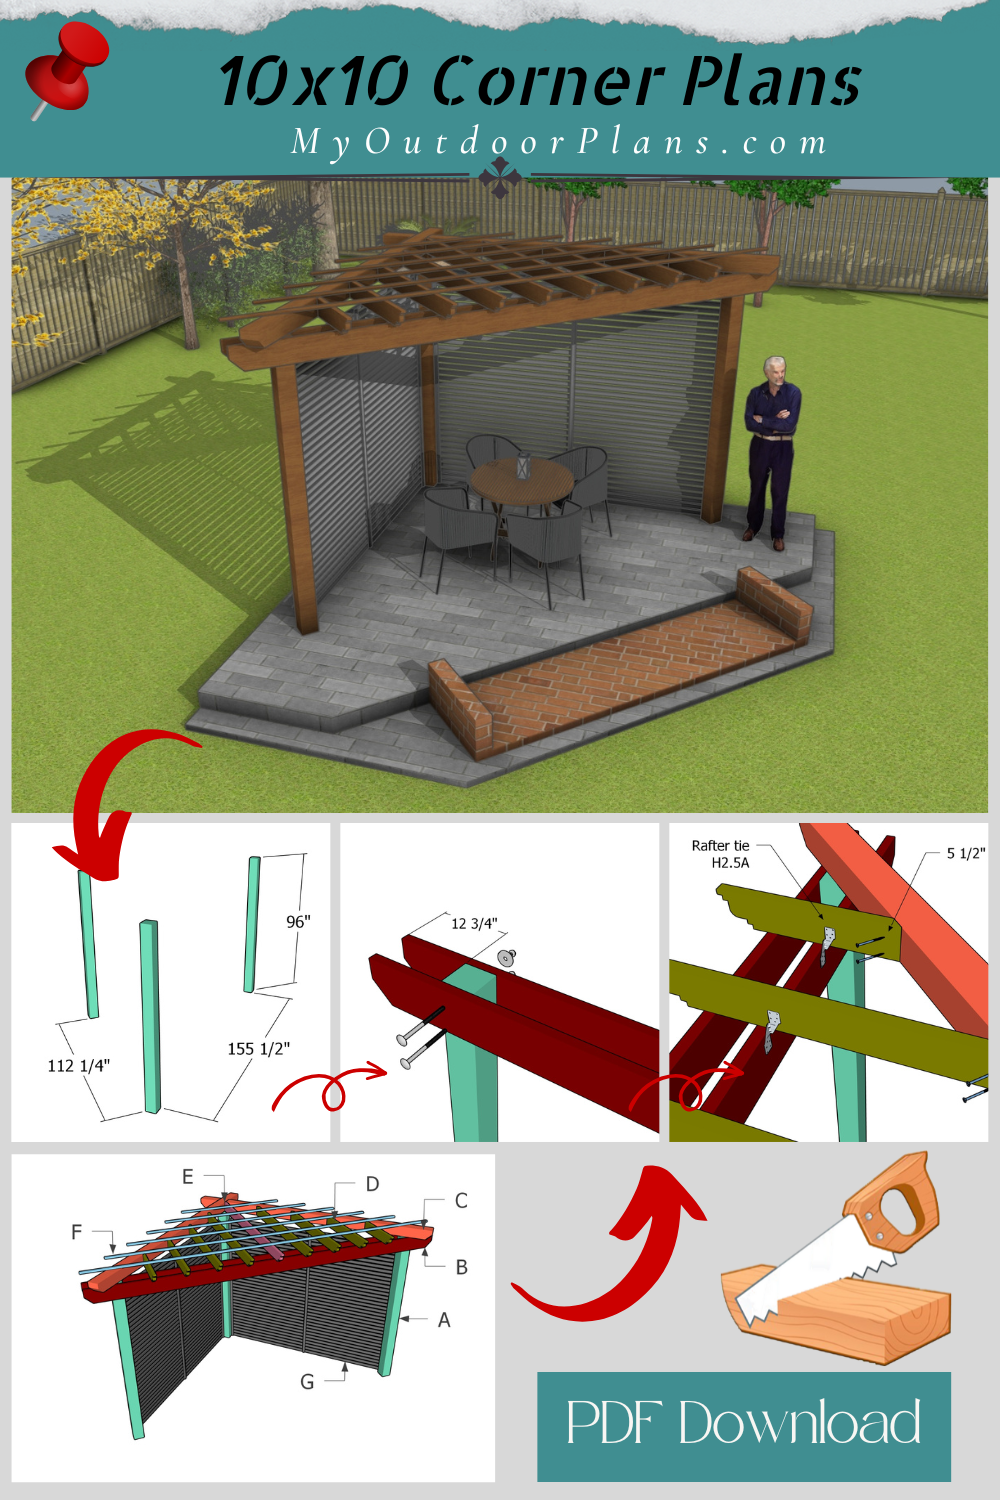
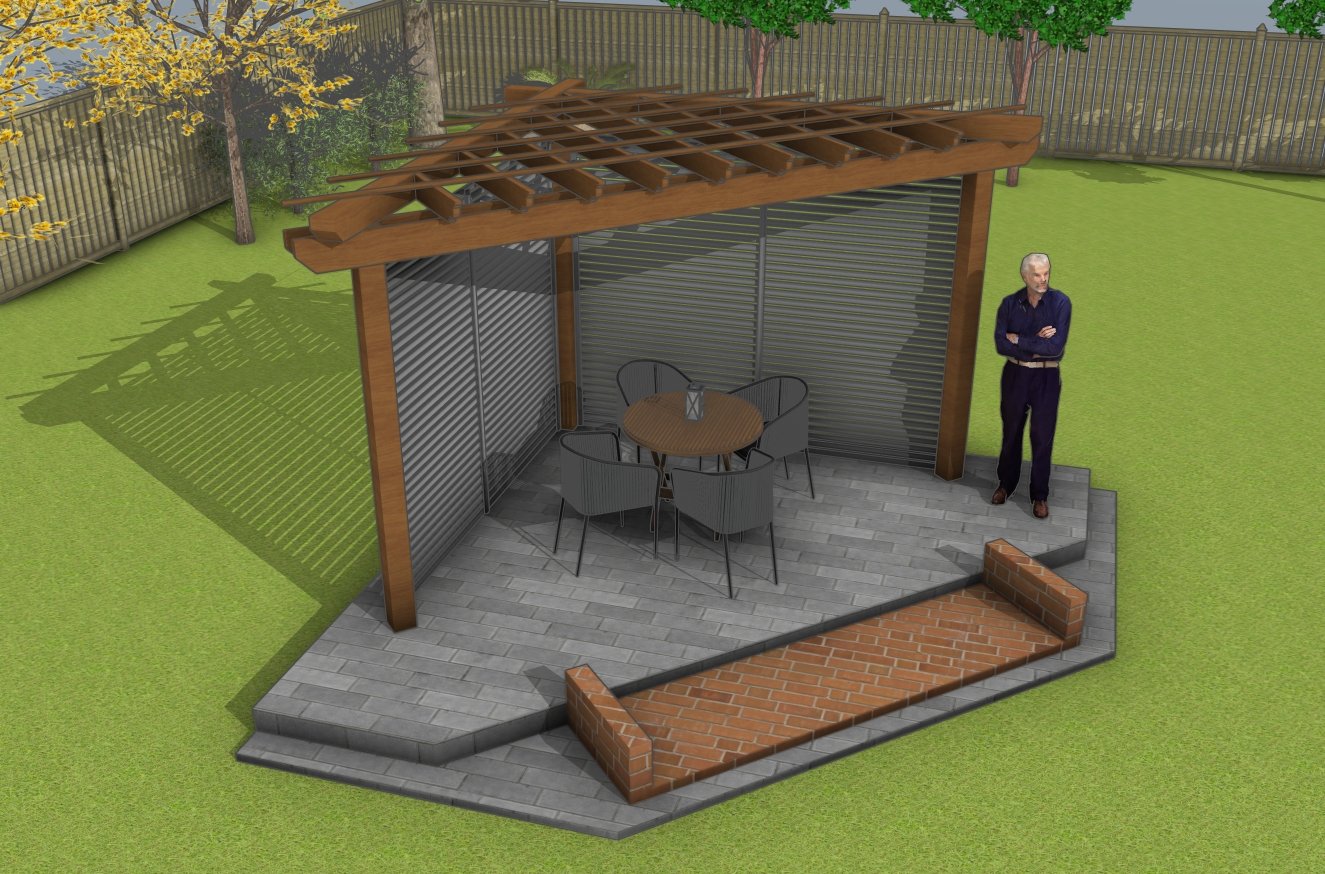
Transform that unused backyard corner into a cozy, eye-catching retreat with this 10×10 corner pergola. Designed to maximize space without sacrificing style, this structure brings both form and function to your outdoor area. Whether you’re setting up a couple of chairs, a small dining table, or just adding some greenery, this pergola helps carve out a perfect hangout spot with a clean, modern touch.
The plans feature sturdy 6×6 posts and solid 2×8 support beams, joined together with decorative cuts and secure fasteners for a rock-solid frame. Rafters are spaced evenly across the top to create partial shade while keeping that open-air feel. Add climbing plants, string lights, or privacy slats to make it your own—this design is flexible and easy to customize. Built with off-the-shelf materials and a few common tools, this project is totally DIY-friendly, even if you’re not a pro.
The downloadable plans include step-by-step instructions, 3D diagrams, a full materials list, and helpful tips along the way. Whether you’re upgrading your patio or creating a peaceful nook by the garden, this corner pergola is a weekend project with big-time results.
When buying the lumber, you should select the planks with great care, making sure they are straight and without any visible flaws (cracks, knots, twists, decay). Investing in cedar or other weather resistant lumber is a good idea, as it will pay off on the long run. Use a spirit level to plumb and align the components, before inserting the galvanized screws, otherwise the project won’t have a symmetrical look. If you have all the materials and tools required for the project, you could get the job done in about a day.
Projects made from these plans
Pin it for later!
Building a Modern 10×10 Corner Pergola
Building-a-corner-pergola
Cut & Shopping Lists
Tools
![]() Hammer, Tape measure, Framing square, Level
Hammer, Tape measure, Framing square, Level
![]() Miter saw, Drill machinery, Screwdriver, Sander
Miter saw, Drill machinery, Screwdriver, Sander
![]() Post hole digger, Concrete mixer
Post hole digger, Concrete mixer
![]() Safety Gloves, Safety Glasses
Safety Gloves, Safety Glasses
Time
![]() One week
One week
Related
- 16×24 run in shed plans
- 18×20 lean pavilion plans
- PART 1: 14×20 lean to pavilion plans
- PART 2: 14×20 lean to pavilion roof plans
It’s that easy to build a small pergola!
STEP 1: Fitting the posts
Layout
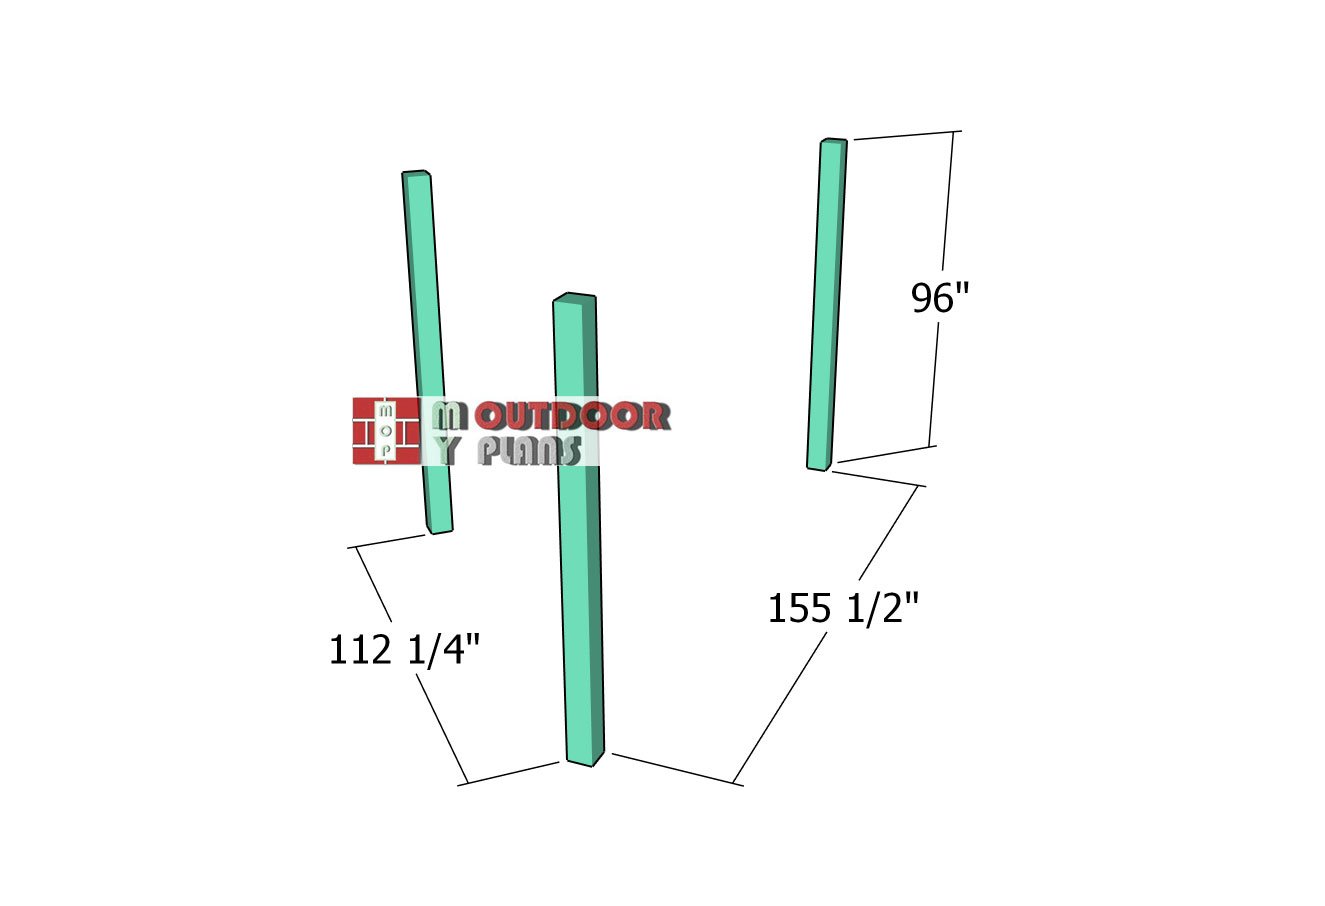
The layout diagram provides the exact distances between each post, giving you a full overview of the spacing as you position the posts for the pergola. This detailed plan ensures precision, helping you build a strong and perfectly aligned frame. With this clear visual guide, you can be confident that every measurement and position is spot-on for a sturdy and polished final structure.
Setting-the-posts
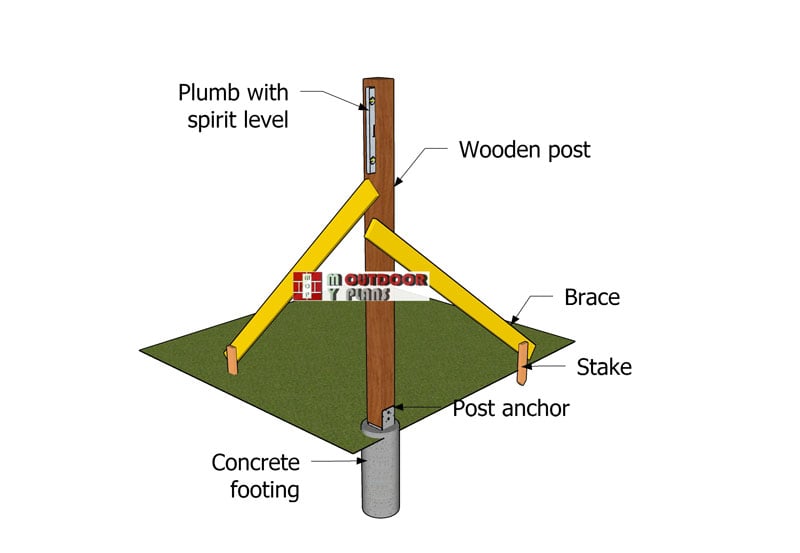
Once your post locations are marked, dig holes that are 3 feet deep and about 14 inches wide. Drop a concrete tube form into each hole and fill them up with concrete. While the mix is still wet, set your post anchors in place—take your time here to make sure they’re perfectly aligned. Getting this part right will save you headaches down the road.
After the concrete has fully cured, it’s time to install the posts. Set each post into its anchor, checking with a level to make sure it’s perfectly plumb. Use 2×4 braces to hold them steady while you work. Then, drive in lag screws through the anchors to lock the posts in for good. This gives you a solid, square foundation—ready to support the rest of the build.
STEP 2: Attaching the beams
Top-front-beams
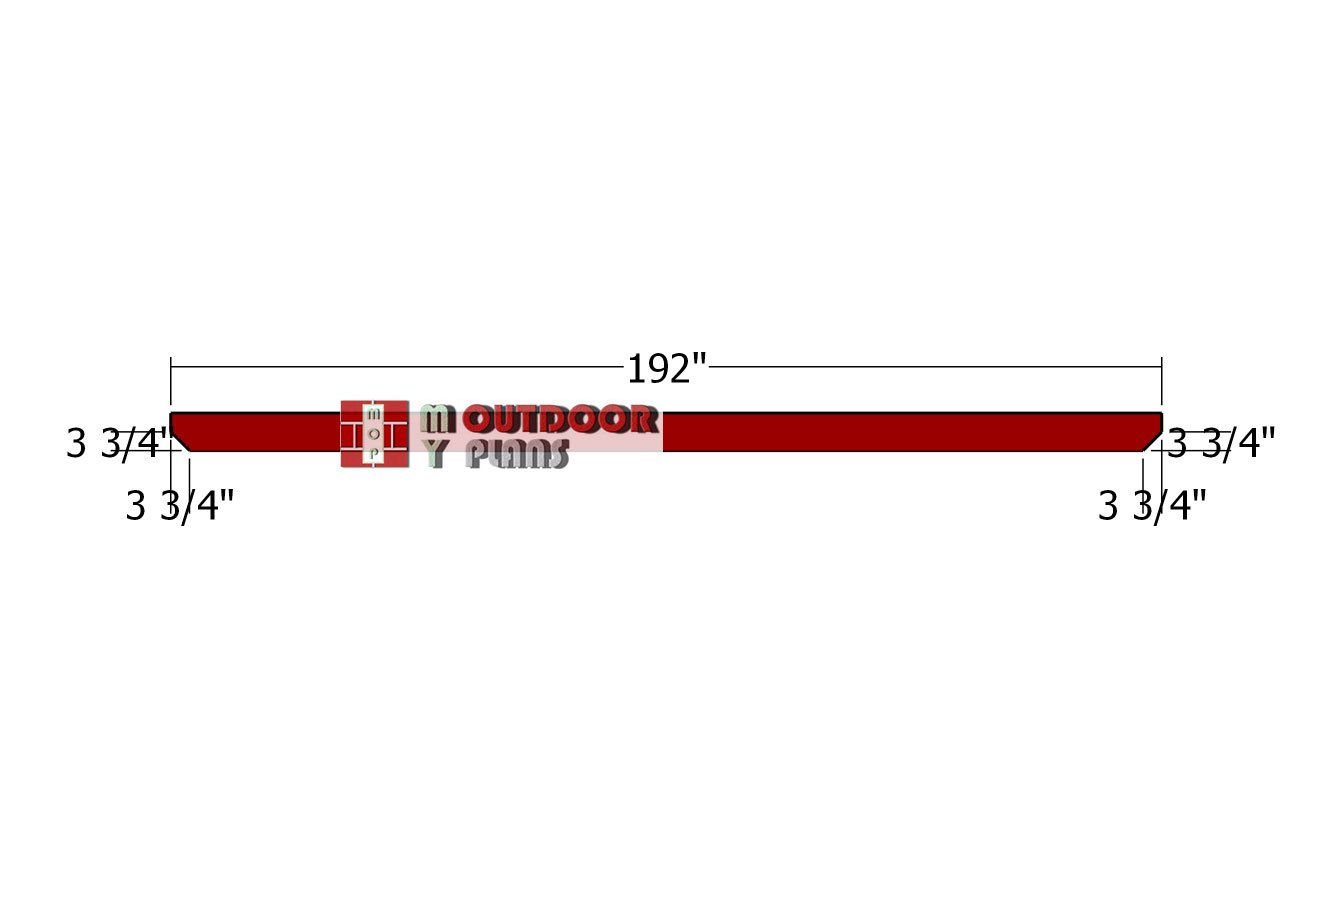
For the front support beams, go with 2×8 lumber—plenty strong and gives the structure a solid look. Grab two 16-footers and add some decorative flair to the ends. This is where you can have a little fun: there are tons of design options out there for end cuts, so pick one that fits your style. Whether you like clean lines or something a bit more classic, this is your chance to make the build yours.
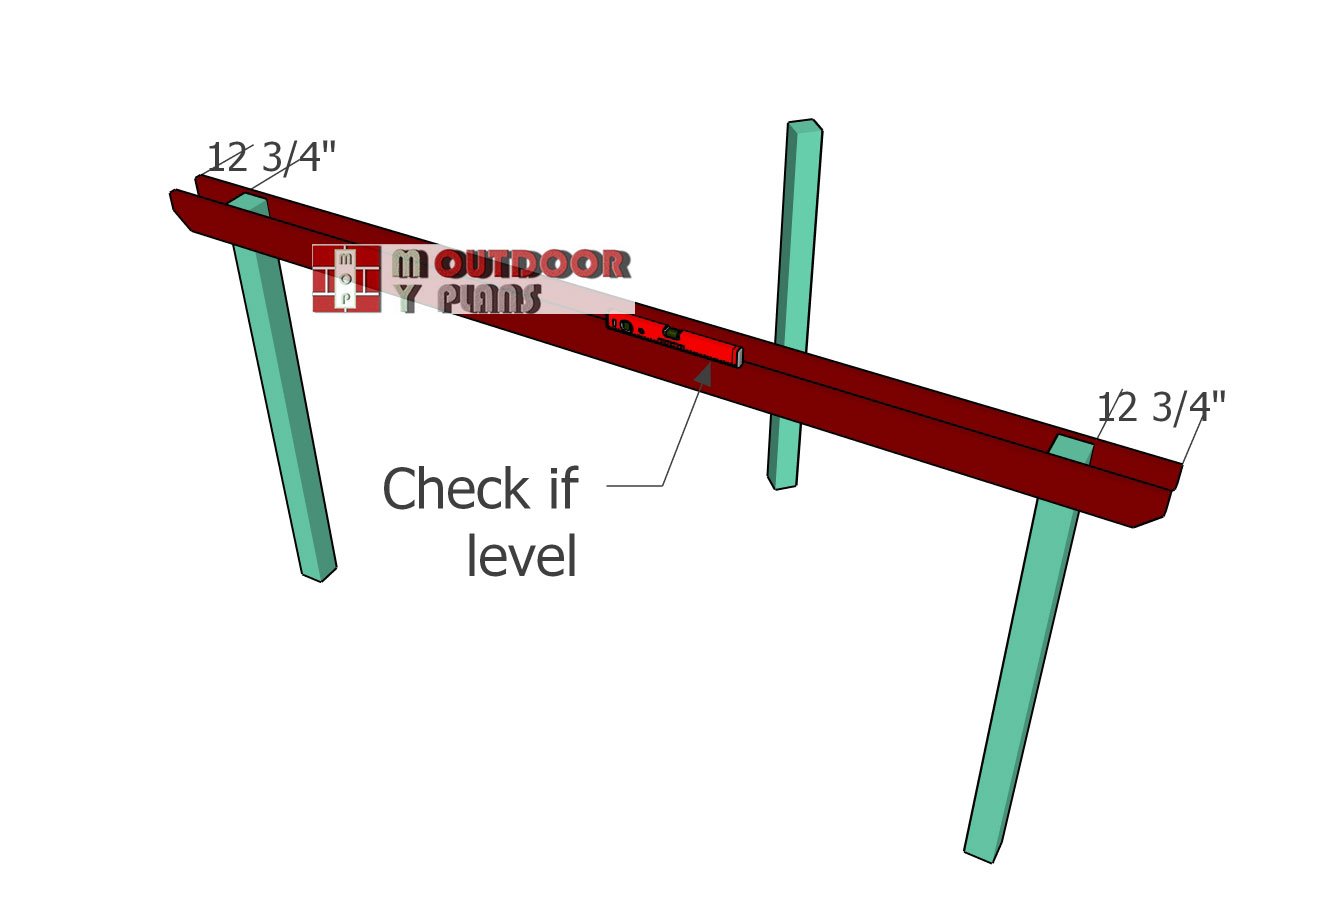
Front-support-beams
Set the support beams right on top of the front posts, making sure they sit nice and flat. Use a spirit level to double-check that everything’s perfectly horizontal—you don’t want a wonky roof later on. You should have a 12 3/4″ overhang on both sides of the posts, so line that up before clamping the beams in place. Once everything’s sitting pretty, drill pilot holes through the beams and into the posts. Then drive in 9″ carriage bolts, making sure to use washers on both sides. Tighten it all up with a nut and you’re good to go.
Top-beams
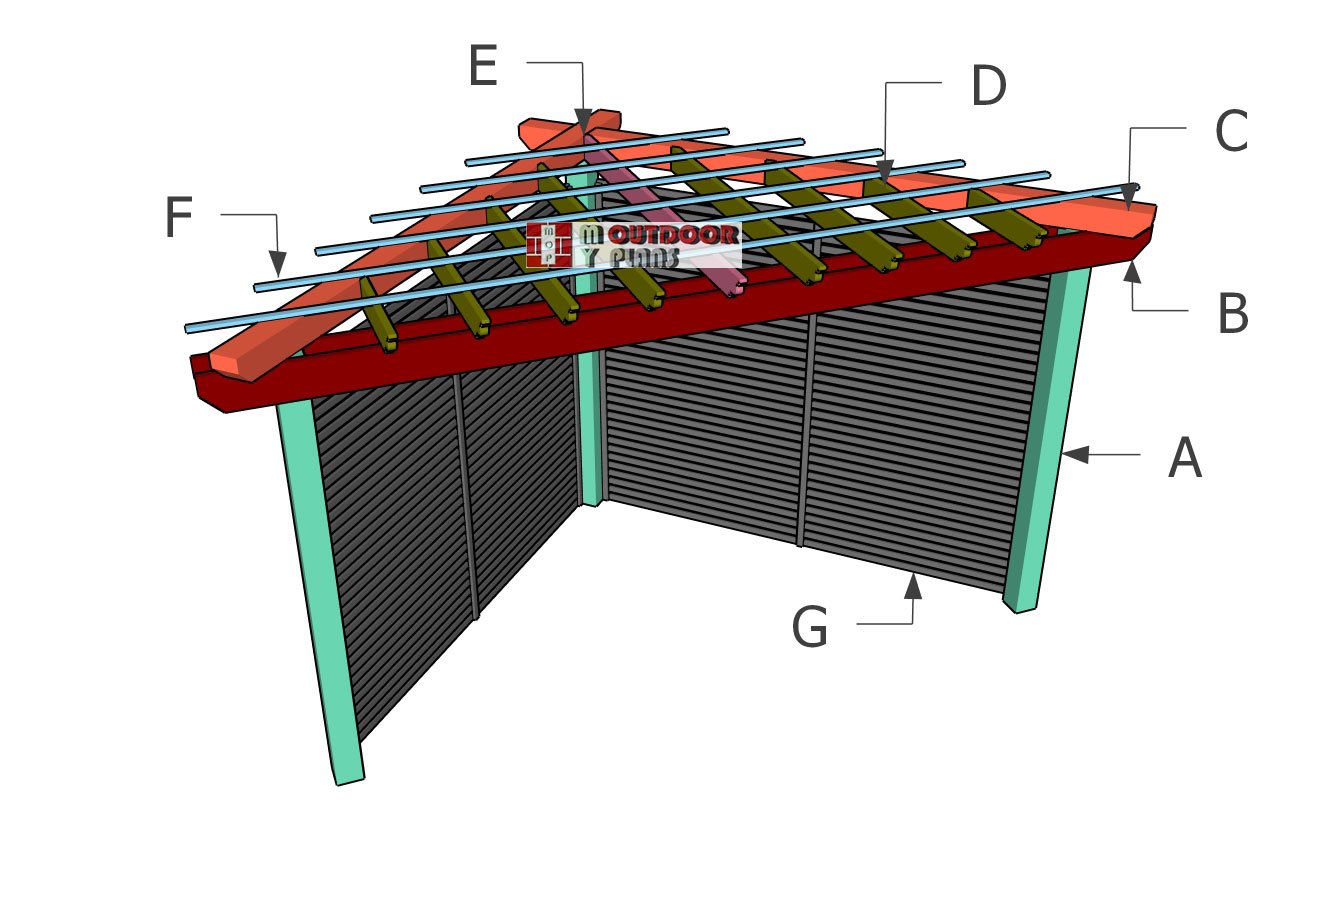
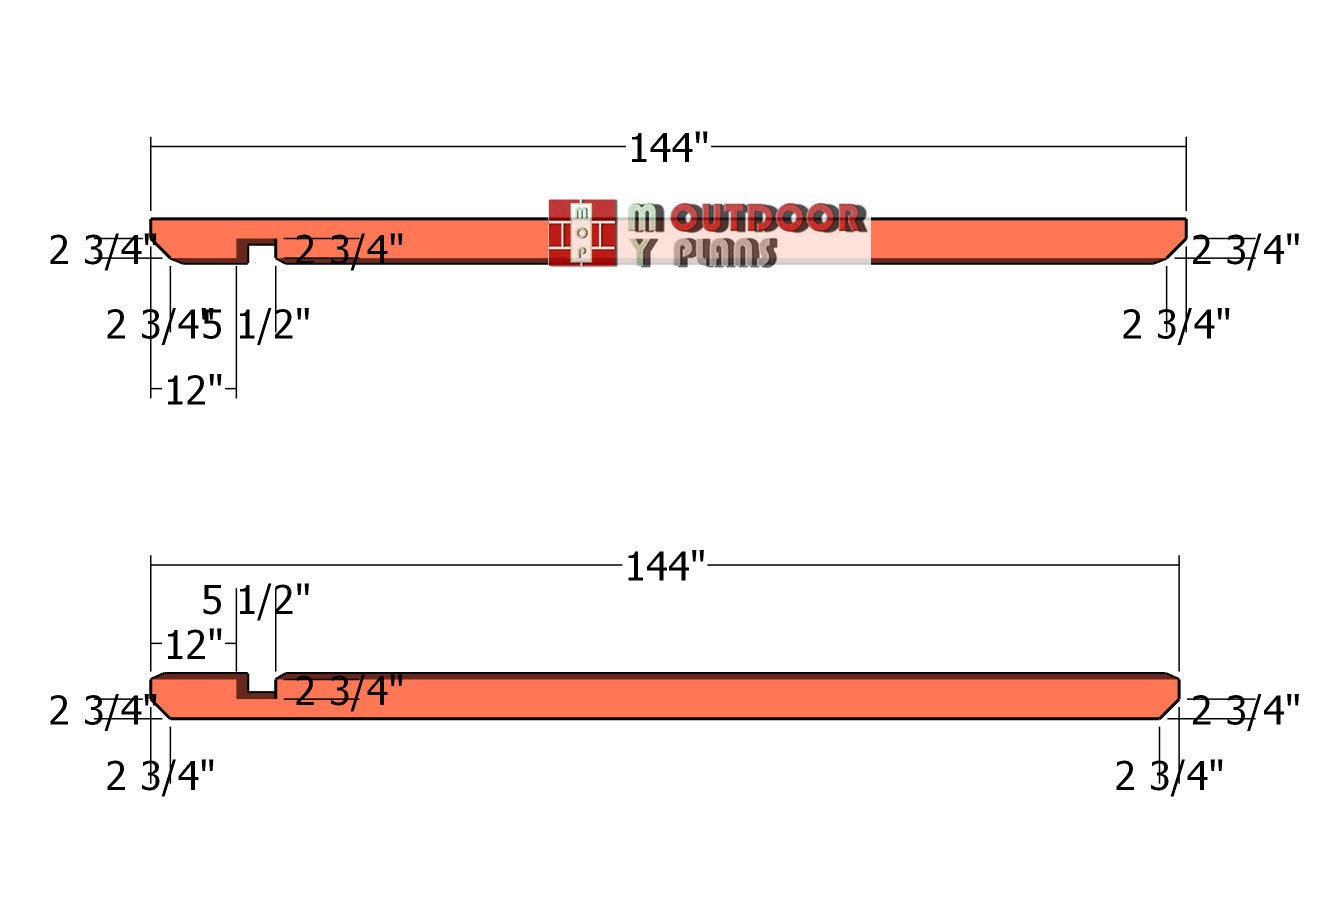
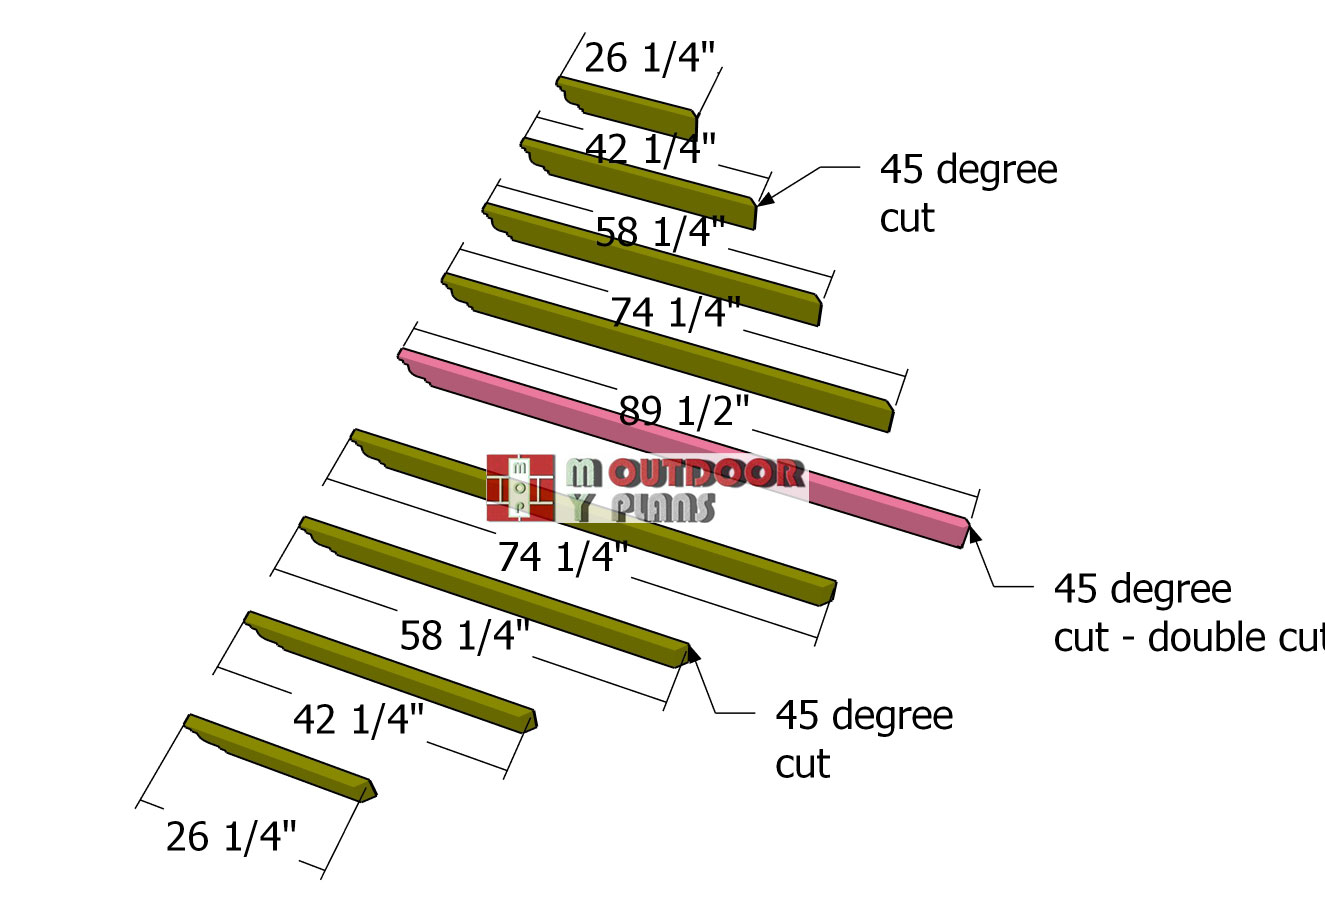
For the rest of the pergola frame, use 6×6 beams—they’re beefy, sturdy, and look great. Cut both ends at a 45-degree angle for a clean, decorative finish. Next up, you’ll need to notch the beams. Set your circular saw blade to 2 3/4″ deep and make a series of parallel cuts inside the marked notch area. Once that’s done, knock out the slats with a hammer and clean up the notch with a chisel. A little sandpaper will help smooth everything out and give it that finished look.
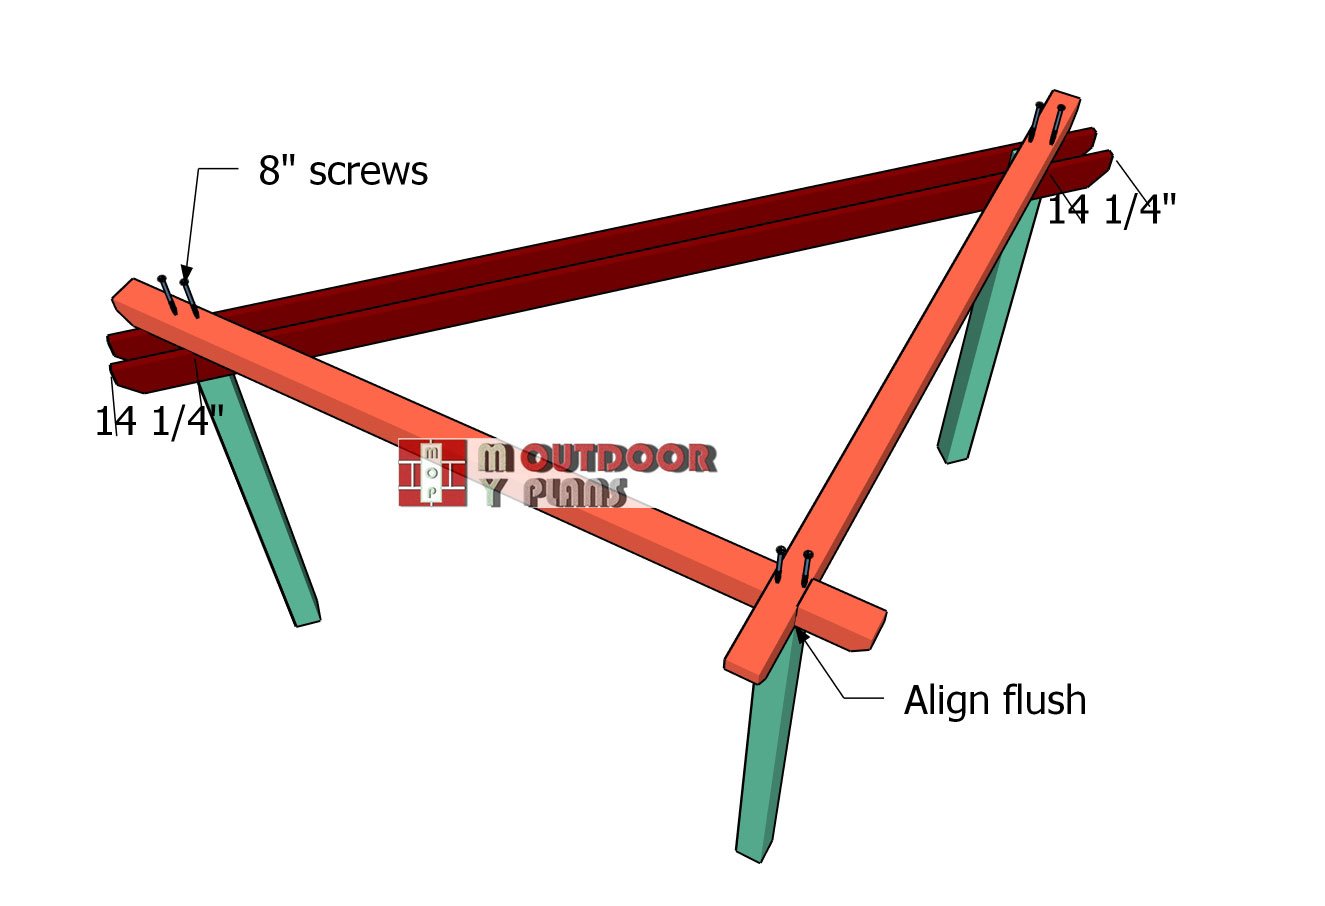
Fitting-the-top-beams
Fit the beams to the top of the corner pergola, lining them up just like shown in the diagram. Make sure the beams come together nice and tight—the joint should sit right over the back post for solid support. Once everything’s lined up, drill pilot holes through the beams and don’t forget to countersink the heads so your screws sit flush. Drive in 8″ screws to lock the beams to the posts—use at least two screws for each joint to keep everything rock solid.
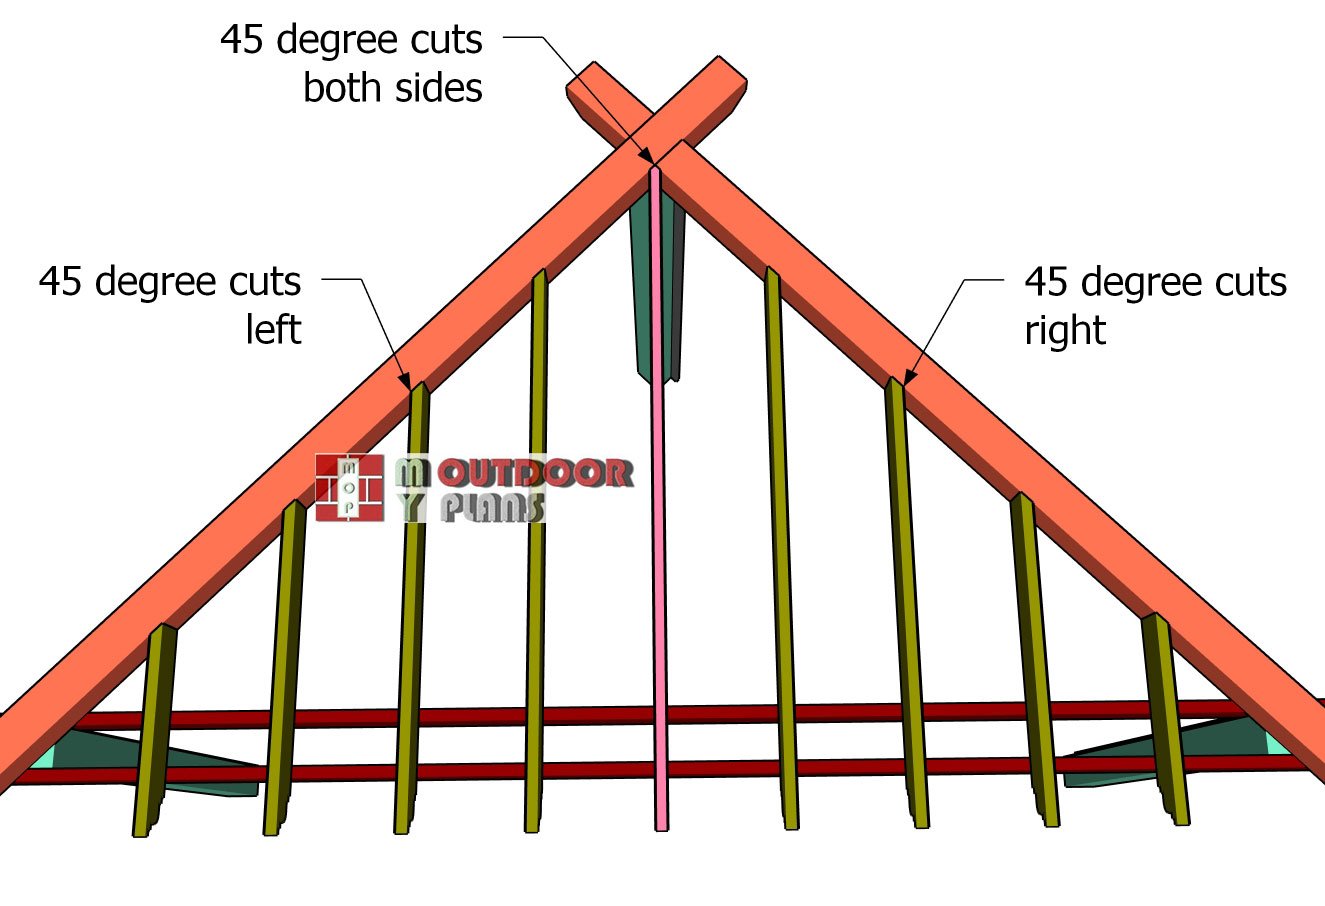
STEP 3: Adding the braces
Rafters—cut-details
For the rafters, we’re using 2×6 lumber—strong enough to handle the job and still easy to work with. As shown in the diagram, cut a 45-degree bevel on one end of each rafter. Then, if you want to add some personality, follow my pattern and cut a decorative design into the opposite end. Just mark your lines, cut along them with a jigsaw, and then smooth everything out with some sandpaper. It’s a small detail, but it adds a lot of charm to the finished build.
Rafters-angle-cuts
Fit the rafters across the top of the pergola, spacing them 16″ on center, just like in the diagram. Take your time to line everything up nice and straight. Use rafter ties and 1 1/2″ structural screws to lock the rafters to the front support beams.
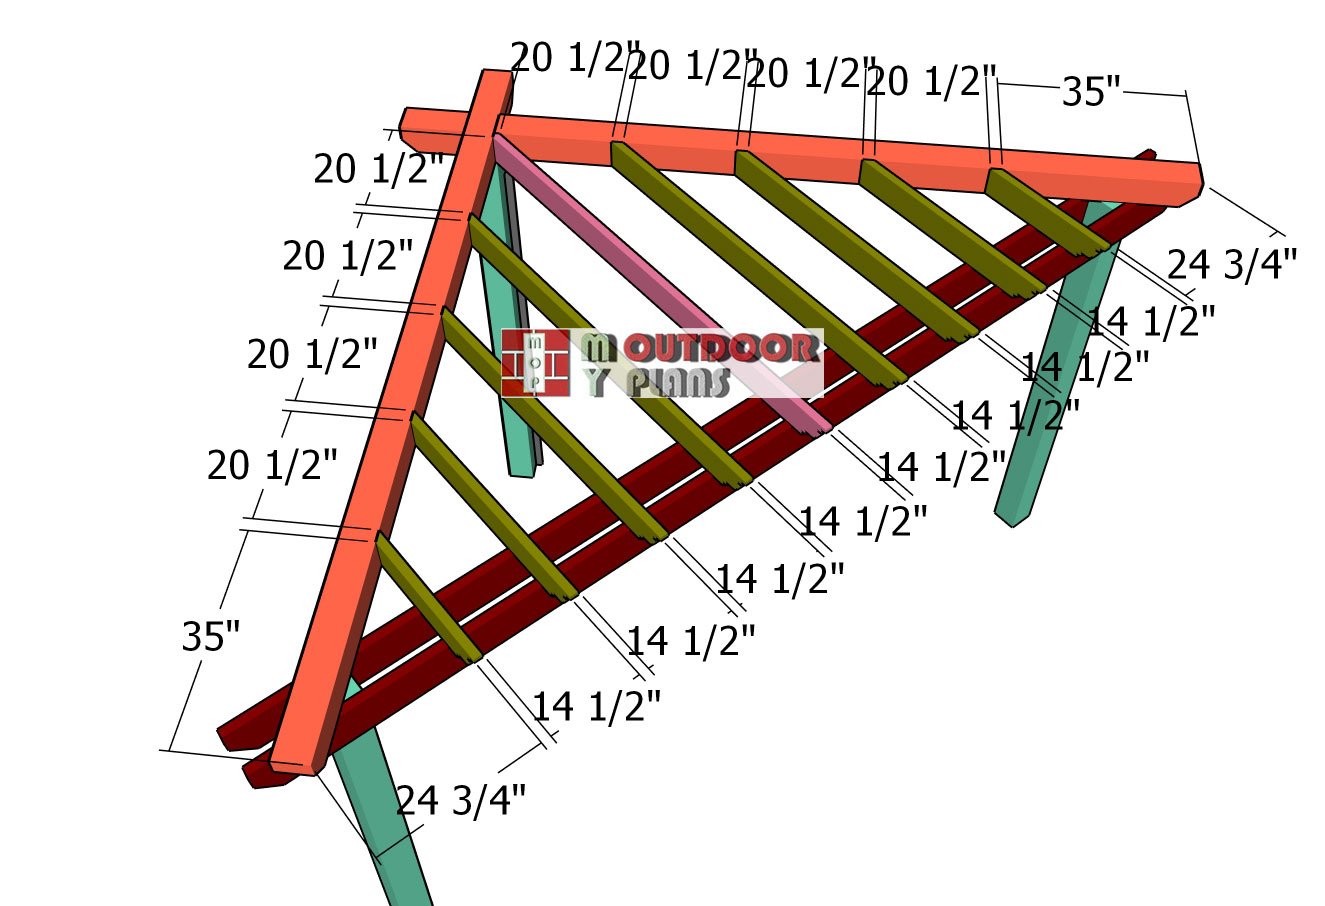
Spacing-the-rafters
At the opposite end, secure them to the top beams with 5 1/2″ screws. Make sure to drill pilot holes first, then drive in at least two screws per rafter to keep everything tight and secure.
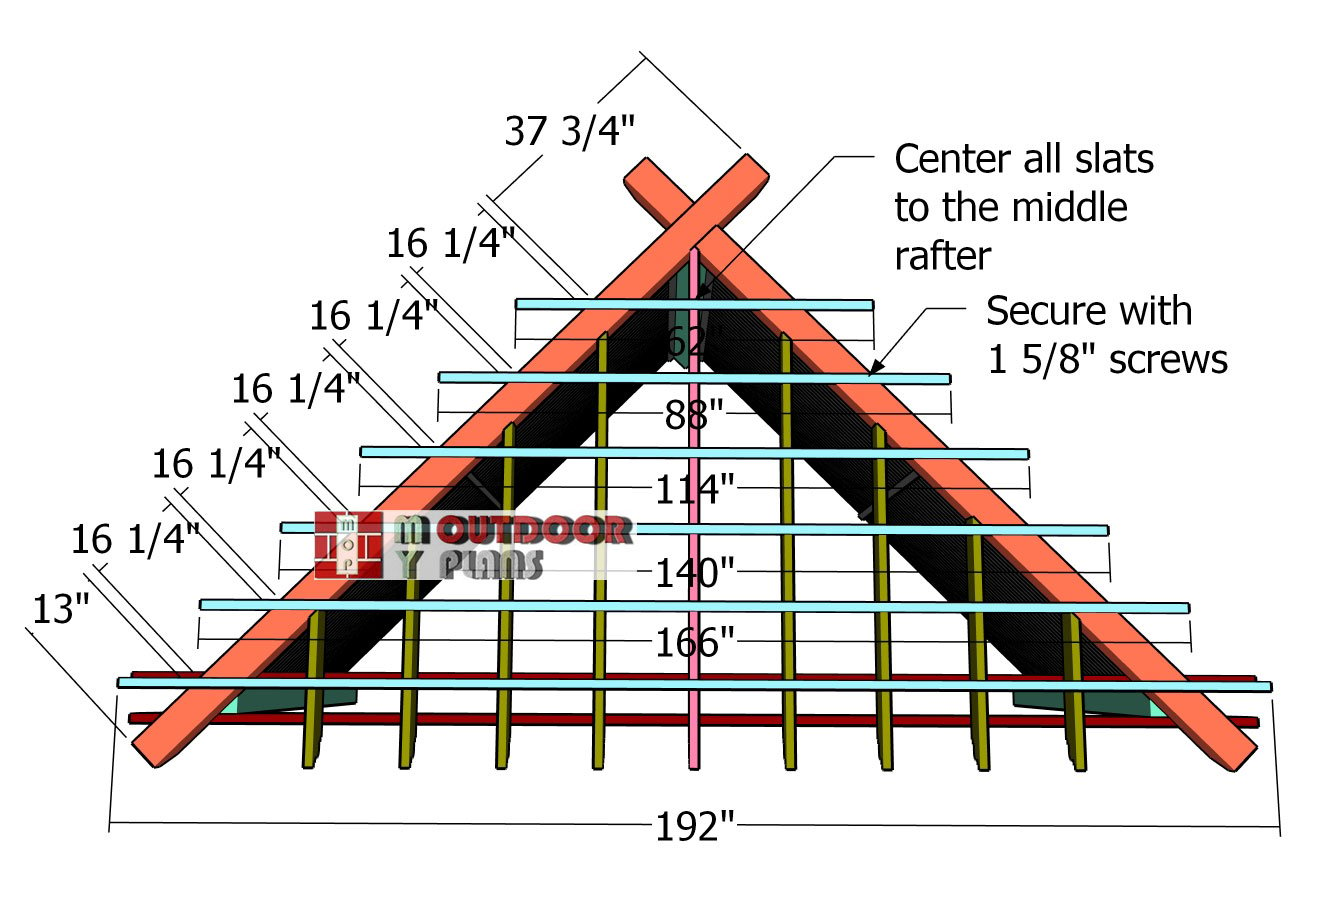
Top-slats—pergola
Now it’s time to add the 1×2 slats across the top of the pergola. Center each slat over the middle rafters so you’ve got equal overhang on both sides—it’ll look clean and balanced when you’re done. Use the spacing shown in the diagram to get consistent gaps between each slat. Drill pilot holes to prevent splitting, then drive in 1 5/8″ screws to lock the slats into the rafters nice and snug.
Finishing touches
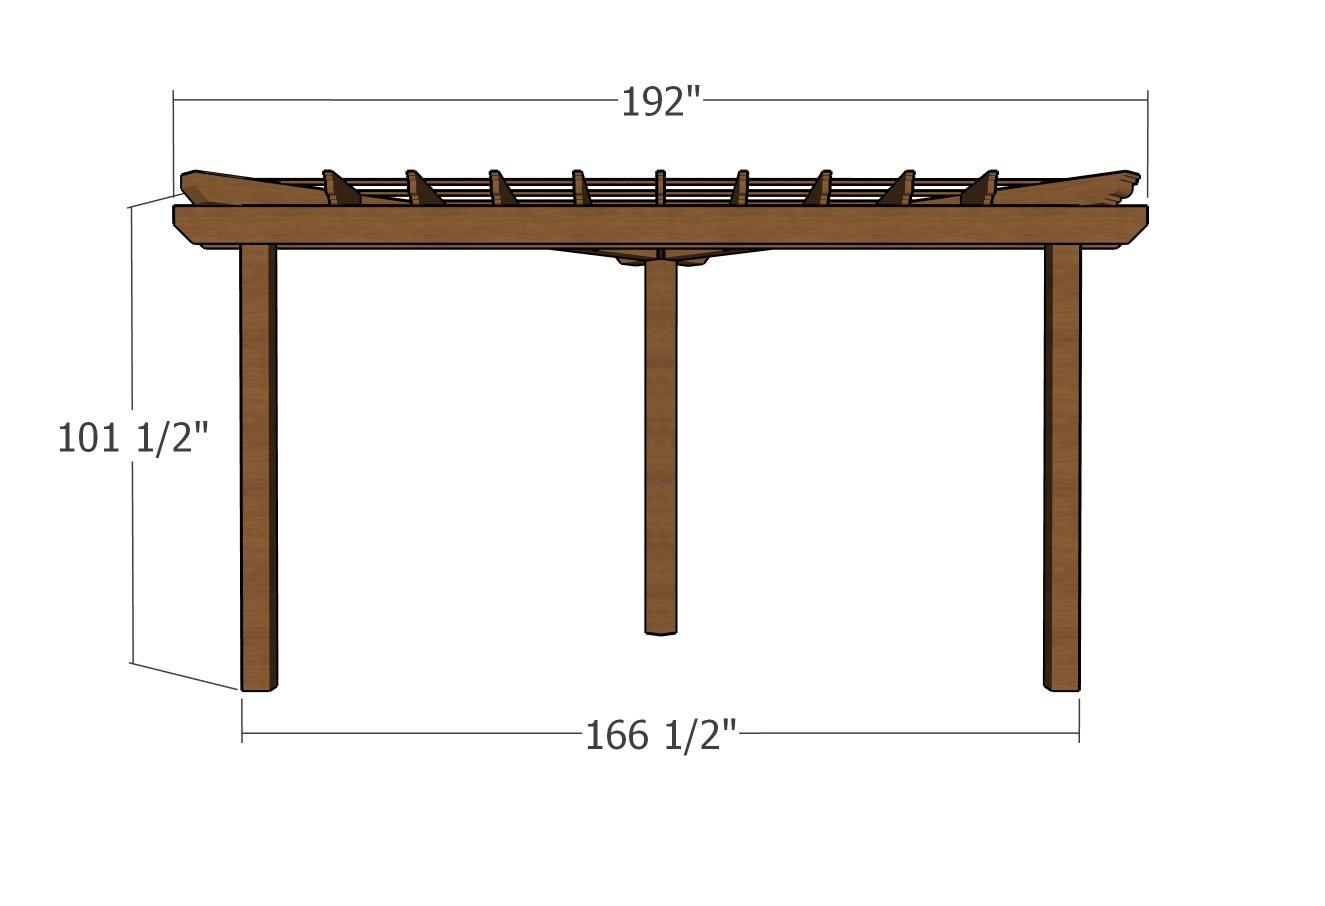
Front view – 10×10 corner pergola
Once the pergola frame is up and looking sharp, it’s time to finish things off with a proper base surface. You’ve got a few great options, depending on your style, budget, and how permanent you want the space to feel. Concrete is the most durable—whether it’s poured in place or pre-made slabs—but it does take more prep and commitment. Pavers are a popular choice too: they’re easier to work with, come in all kinds of colors and textures, and give a polished look without needing a full concrete pour.
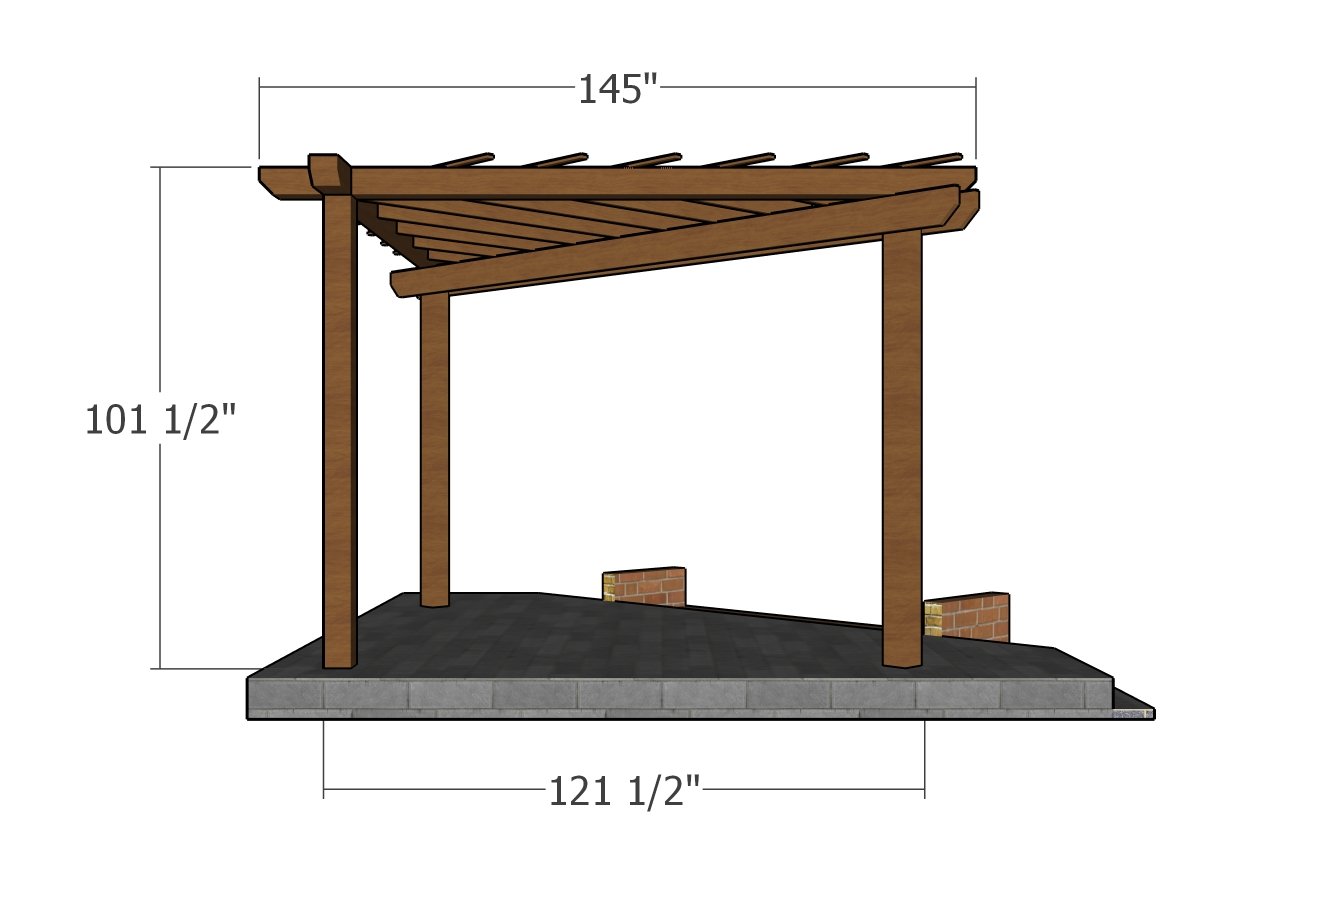
Side view dimensions
For a more rustic or relaxed vibe, concrete blocks or even gravel with stepping stones can do the trick while still providing a stable surface underfoot. If you go with pavers or blocks, you’ll want to fit them around the posts carefully for a clean, custom look. Start by dry-laying the pavers and marking the ones that need to be trimmed. Use a masonry blade or a chisel and hammer to cut around each post so everything fits snug. Take your time here—the cleaner the cuts, the more finished the whole project will look. You can even add polymeric sand between the joints to lock everything in and keep weeds out.
Corner pergola plans
Whether you’re setting up an outdoor dining area or just creating a spot to relax in the shade, a finished base pulls it all together and makes the pergola feel like a natural part of your backyard.
To take your pergola to the next level, consider adding roof shades for extra comfort and style. Whether you go with fabric canopies, bamboo panels, or polycarbonate sheets, the design makes it easy to add that extra layer of sun and rain protection. You can install them permanently or use retractable options for more flexibility depending on the season. It’s a simple upgrade that turns your pergola into a more versatile space—perfect for relaxing, dining, or entertaining all year round.
Top Tip: If you want to get PREMIUM PLANS for this project, in a PDF format, please press GET PDF PLANS button bellow. If you want the free version of the plans, please read the blog FAQs. Thank you for your support.

This woodworking project was about 10×10 corner pergola plans. If you want to see more outdoor plans, we recommend you to check out the rest of our step by step projects.