This step by step diy project is about corner pergola plans. I have designed this unique 3 post pergola so you can finally have that amazing relaxation corner in your backyard. This pergola is super easy to build and it will impress all your friends. Take a look over the rest of my woodworking plans, if you want to get more building inspiration.
When buying the lumber, you should select the planks with great care, making sure they are straight and without any visible flaws (cracks, knots, twists, decay). Investing in cedar or other weather resistant lumber is a good idea, as it will pay off on the long run. Use a spirit level to plumb and align the components, before inserting the galvanized screws, otherwise the project won’t have a symmetrical look. If you have all the materials and tools required for the project, you could get the job done in about a day. See all my Premium Plans HERE.
Projects made from these plans
It’s that simple to build your own corner pergola!
Corner Pergola Plans
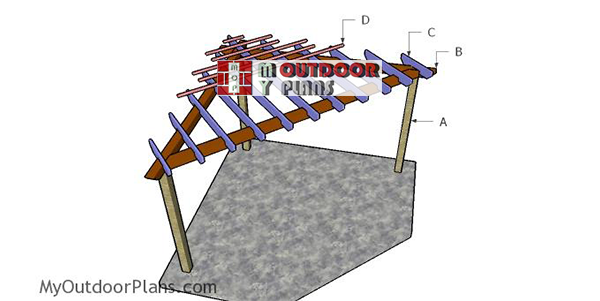
Building-a-corner-pergola
Cut & Shopping lists
- A – 3 pieces of 6×6 lumber – 8′ long POSTS
- B – 2 piece of 6×6 lumber – 14′ long, 1 piece – 195 3/4″ long SUPPORT BEAMS
- C – 1 piece of 2×8 lumber – 129 3/4″ long, 2 pieces – 90 1/2″ long, 2 pieces – 110 1/4″ long, 2 pieces – 71″ long, 2 pieces – 51 1/4″ long, 2 pieces – 31 3/4″ long SHADE ELEMENTS
- D – 3 pieces of 2×2 lumber – 213 1/2′ long, 1 piece – 174 1/4″ long, 2 pieces – 135″ long, 2 pieces – 96″ long, 2 pieces – 56 3/4″ long, 1 piece – 17 1/2″ long SLATS
- 3 pieces of 6×6 lumber – 8′
- 2 pieces of 6×6 lumber – 14′
- 1 piece of 6×6 lumber – 18′
- 1 piece of 2×8 lumber – 12′
- 2 pieces of 2×8 lumber – 10′
- 6 pieces of 2×8 lumber – 8′
- 7 pieces of 2×2 lumber – 10′
- 2 pieces of 2×2 lumber – 12′
- 4 pieces of 2×2 lumber – 8′
- 8″ screws, 5 1/2″ screws, 3 1/2″ screws
- 6×6 post anchor, tube form
- rafter ties
- wood filler , wood glue, stain/paint
- ties
Tools
![]() Hammer, Tape measure, Framing square, Level
Hammer, Tape measure, Framing square, Level
![]() Miter saw, Drill machinery, Screwdriver, Sander
Miter saw, Drill machinery, Screwdriver, Sander
![]() Safety Gloves, Safety Glasses
Safety Gloves, Safety Glasses
Time
Related
How to build a corner pergola
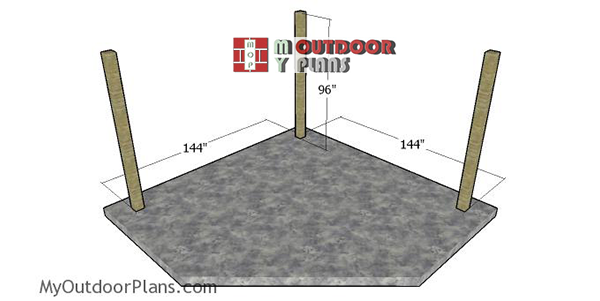
Fitting-the-posts—corner-pergola
The first step of the pergola project is to layout the posts. Use batter boards and string to layout the location of the posts. Apply the 3-4-5 rule to every corner and then measure the diagonals to make sure they are perfectly equal. You need to make adjustments until you get the desired result.
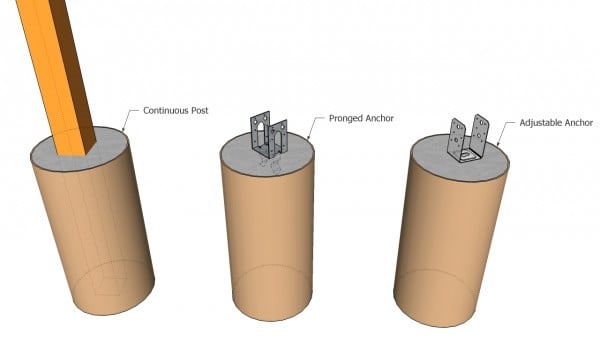
Anchoring the posts of the anchor
There are a few ways to secure the 6×6 posts into place. You can set the posts in concrete or you can use adjustable anchors and pour footings. Dig the holes 3′ deep (or under the front line) and about 12-13″ in diameter. Compact a layer of gravel to the bottom of the holes and then fit the tube forms. Fit the posts, align them and plumb them with a spirit level. Fill the forms with concrete, while the posts are locked into place with temporarily braces. If you use anchors, you need to align and set them into concrete. Fit the posts after the concrete dries, using lag screw.
Smart tip: Read the local building codes, so you dig the holes at the appropriate depth.
Support beams
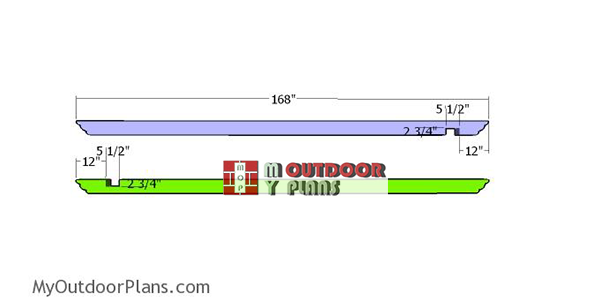
Support-beams-corner-pergola
Use 6×6 lumber for the support beams. You can use a large circular item so you can draw the curved lines. Get the job done with a jigsaw and then smooth the edges for a neat result.
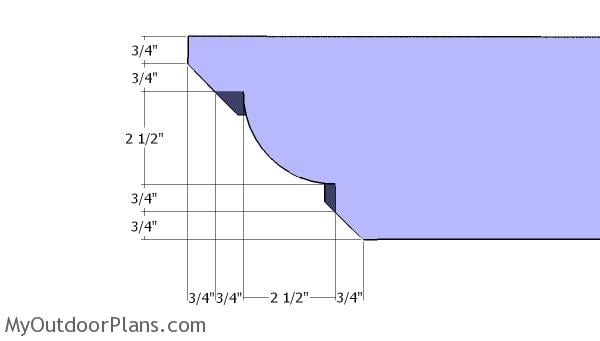
Decorative cuts
Make decorative cuts to both ends of the beams. Mark the cut lines on the beams and then get the job done with a jigsaw.
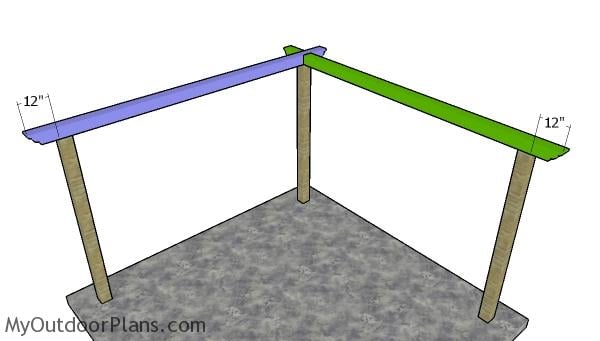
Fitting the beams
Fit the beams to the top of the posts. Align the edges with attention and make sure the corners are square. Drill pilot holes through the beams and insert 8 1/2″ screws to lock them into place.
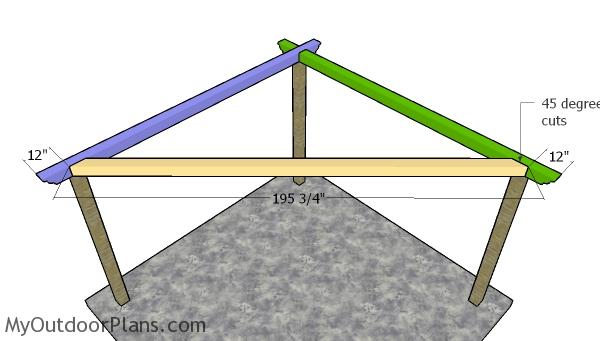
Fitting the diagonal beam
Use 6×6 lumber for the other support beam. Make 45 degree cuts at both ends of the beam and then fit it into place. Align both ends with attention and insert 8 1/2″ screws to lock them into place.
Rafters
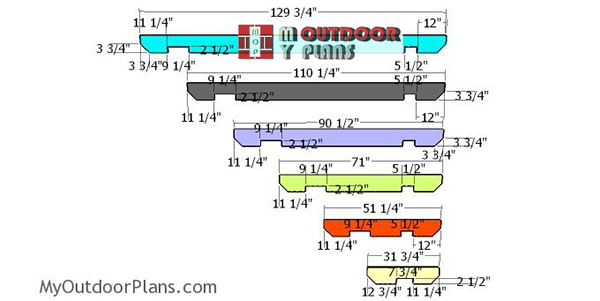
Building-the-rafters—12×12-pergola
Use 2×8 lumber for the shade elements. Mark the cut lines and then get the job done with a saw. In addition, you need to make a few 2 1/2″ deep notches, so you can fit the shade elements to the support beams. Mark the cut lines on the beams and then use a circular saw to make parallel cuts. Use a chisel to remove the excess and then smooth the recess with sandpaper.
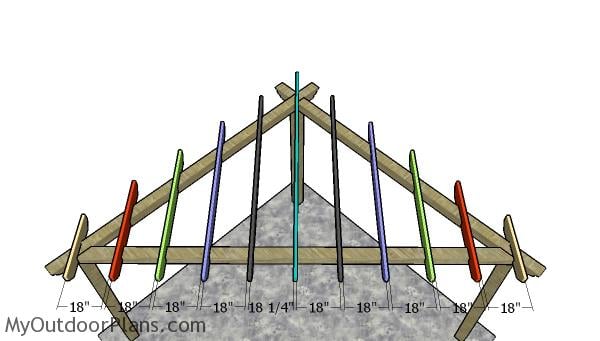
Fitting the rafters
Fit the shade elements to the support beams. Place the shade elements equally spaced and then lock them into place with rafter ties. Alternatively, you could drill pilot holes through the shade elements (above the notches) and insert 5 1/2″ screws so you can lock them into place tightly.
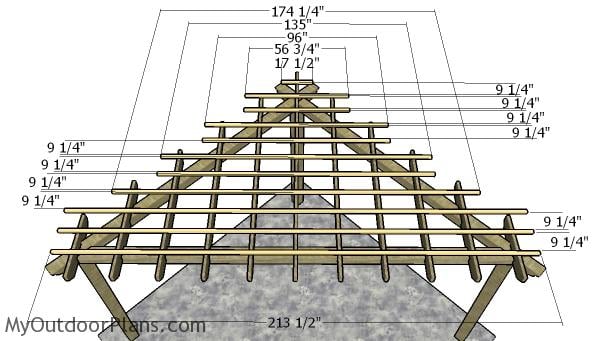
Fitting the top slats
Fit the 2×2 slats to the top of the pergola. Place these slats equally spaced for a professional result. Center the slats to the rafters and then drill pilot holes, before inserting the 3 1/2″ screws.
Finishing touches
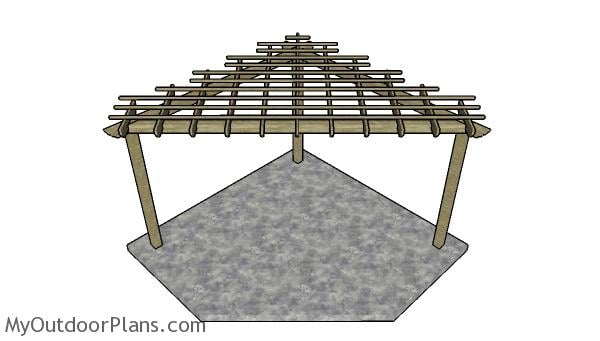
Corner Pergola Plans
Last but not least, you need to take care of the finishing touches. Therefore, fill the holes with wood putty and then smooth the surface with 120-220 grit sandpaper. You can also fit braces, if you live in a windy area. Apply a few coats of paint or stain over the components, to enhance the look of the pergola and to protect the components from decay.
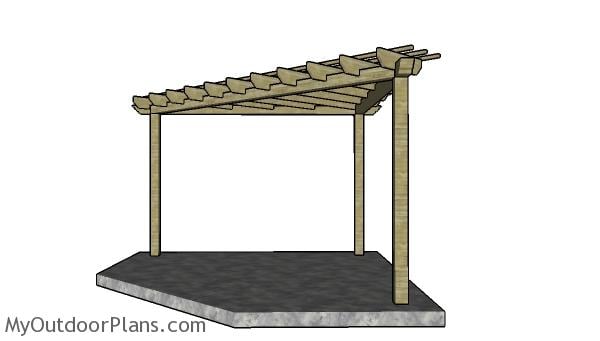
How to build a corner pergola
This pergola has a triangular shape, but it is still ideal for a small table and a few chairs.
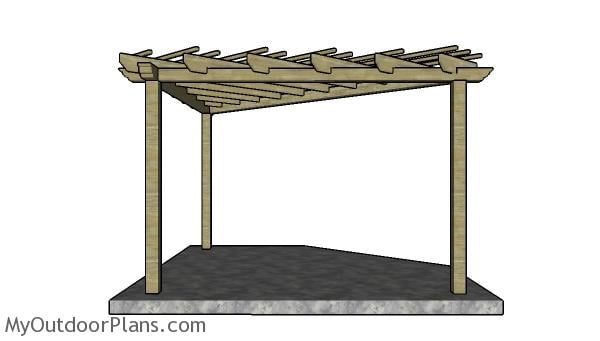
Corner Pergola Plans – side view
If you want to add charm and unique appeal to your garden, I recommend you to check out these plans. This pergola can be built by any person with basic woodworking skills and it is also very budget friendly.

Corner Pergola Plans – dimensions
Building a 12×12 corner pergola will likely cost you between $1,500 and $3,000, depending on the materials you choose and any decorative elements you add. High-quality wood, such as cedar or redwood, will increase the cost, but it also boosts the durability and aesthetics of the structure. This investment creates a beautiful, shaded space that enhances your outdoor living area and adds value to your property.

Corner pergola – free plans
You can expect to spend about 3 to 4 weekends building a 12×12 corner pergola, depending on your experience and the complexity of the design. The project involves precise measuring, cutting, and assembling, but with steady progress, you’ll see your pergola take shape fairly quickly. In the end, you’ll have a stunning, functional outdoor feature that provides both shade and style to your backyard.

How to build a corner pergola
You can make a lot of adjustments to the design so it suits your tastes and needs. Check out the rest of my pergola plans, as I have many designed and sizes you can choose from.
As you step back and admire your finished 12×12 corner pergola, you’ll see that it’s more than just a structure—it’s a new focal point for your outdoor space. This pergola creates a welcoming corner for relaxation, gatherings, or simply enjoying the beauty of your garden. You’ve not only added value to your home but also crafted a space where memories will be made, season after season.
This woodworking project was about corner pergola plans free. If you want to see more outdoor plans, check out the rest of our step by step projects and follow the instructions to obtain a professional result.

10 comments
Hi,
I am interested in building a similar pergola however my measurements would be:
2.2M in width
2.2M in depth
Are you able to design plans for something of this size? Following the same design you have above.
Thanks and much appreciated,
Henry
Unfortunately, I don’t design in metric system and I don’t do custom plans.
Do you have recommended rafter ties? The total weight of the 6×6 diagonal piece is significant. Want to ensure I have the right kind of rafter tie that can help support that kind of weight. Thanks
Since you lock the diagonal beam to the other beams with 8 1/2″ screws, the rafter ties are enough to lock the rafters into place. If you follow the plans, all the components will be inter locked together, thus creating a super rigid structure.
I see the interlocked beams at the 90% angle and at their respective endpoints.
The diagonal segment appears to be cut at both ends and does not have any interlocking as the others do. Since it weighs so much, how many 8 1/2 inch screws are you recommending? I am thinking about adding a metal strapping on the top of the diagonal, connecting to each two other pieces.
Am I reading the plans incorrectly?
I recommend 4 screws for each joint. You can use metal strapping if you want. It won’t do any harm.
For the back corner, how are the support beams done. Are they notched? I have been trying to find the full plans, so I could see the details.
Thank you
I think you are looking at another plans. My plans clearly show there is a half lap notch to the back of the beams.
How does one go about cutting decorative ends on the 3 horizontal 6 x 6 beams?
How to prevent bowing in the 6 x 6 x 18′?
Hi
I want to make the back pole shorter so that when I fit a rainproof roof , the water drain is off. How shorter should I cut it?
Thanks