Welcome to Part 2 of our 2-post pergola project, where we’ll focus on building the roof and adding the decorative privacy panel to the back. In this phase, we’ll guide you through constructing a sturdy, stylish roof that provides shade and protection, while seamlessly complementing the pergola’s design. We’ll also show you how to install the slatted privacy panel—a feature that not only enhances the look of your pergola but also offers a touch of seclusion, perfect for creating a cozy and inviting outdoor retreat. By the end of this step, your pergola will be well on its way to becoming the ultimate backyard centerpiece!
When buying the lumber, you should select the planks with great care, making sure they are straight and without any visible flaws (cracks, knots, twists, decay). Investing in cedar or other weather resistant lumber is a good idea, as it will pay off on the long run. Use a spirit level to plumb and align the components, before inserting the galvanized screws, otherwise the project won’t have a symmetrical look. If you have all the materials and tools required for the project, you could get the job done in about a day. See all my Premium Plans HERE.
Projects made from these plans
2 Post Pergola Plans
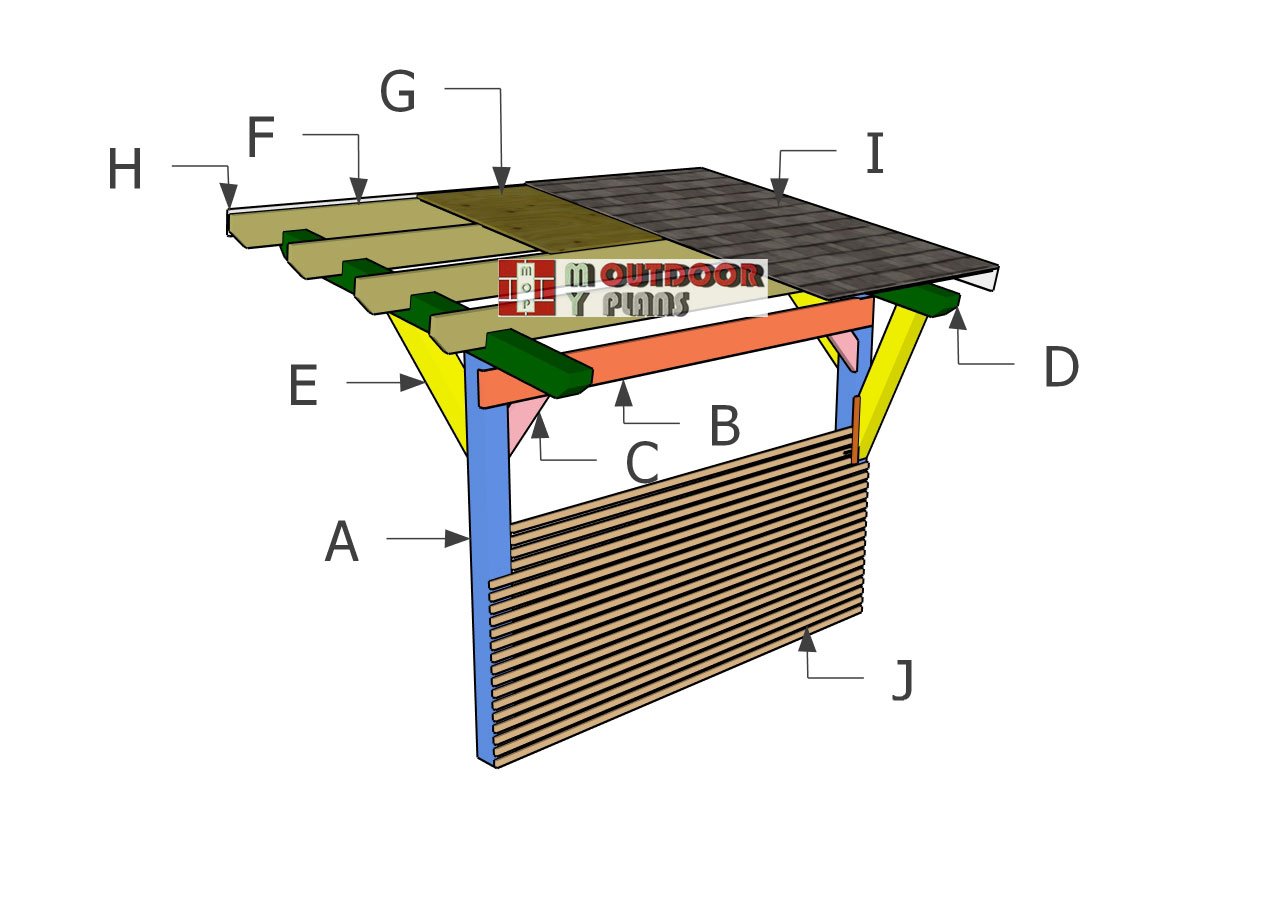
Building-a-2-post-cantilevered-pergola
Cut & Shopping Lists
- F – 5 pieces of 2×8 lumber – 12 ft long RAFTERS
- G – 2 piece of 1/2″ plywood – 4’x8′, 2 pieces – 4’x4′ ROOF SHEETS
- H – 2 pieces of 1×6 lumber – 12 ft, 2 pieces – 97 1/2″ long ROOF TRIMS
- I – tar paper and asphalt shingles – 120 sq ft ROOFING
- J – 33 pieces of 1×2 lumber – 10 ft long PRIVACY SCREEN
- J – 2 pieces of 1×2 lumber – 17″ long PRIVACY SCREEN
Tools
![]() Hammer, Tape measure, Framing square, Level
Hammer, Tape measure, Framing square, Level
![]() Miter saw, Drill machinery, Screwdriver, Sander
Miter saw, Drill machinery, Screwdriver, Sander
![]() Safety Gloves, Safety Glasses
Safety Gloves, Safety Glasses
Time
Related
- PART 1: 2 Post cantilevered pergola plans
- PART 2: 2 Post cantilevered pergola plans
STEP 3: Building the roof
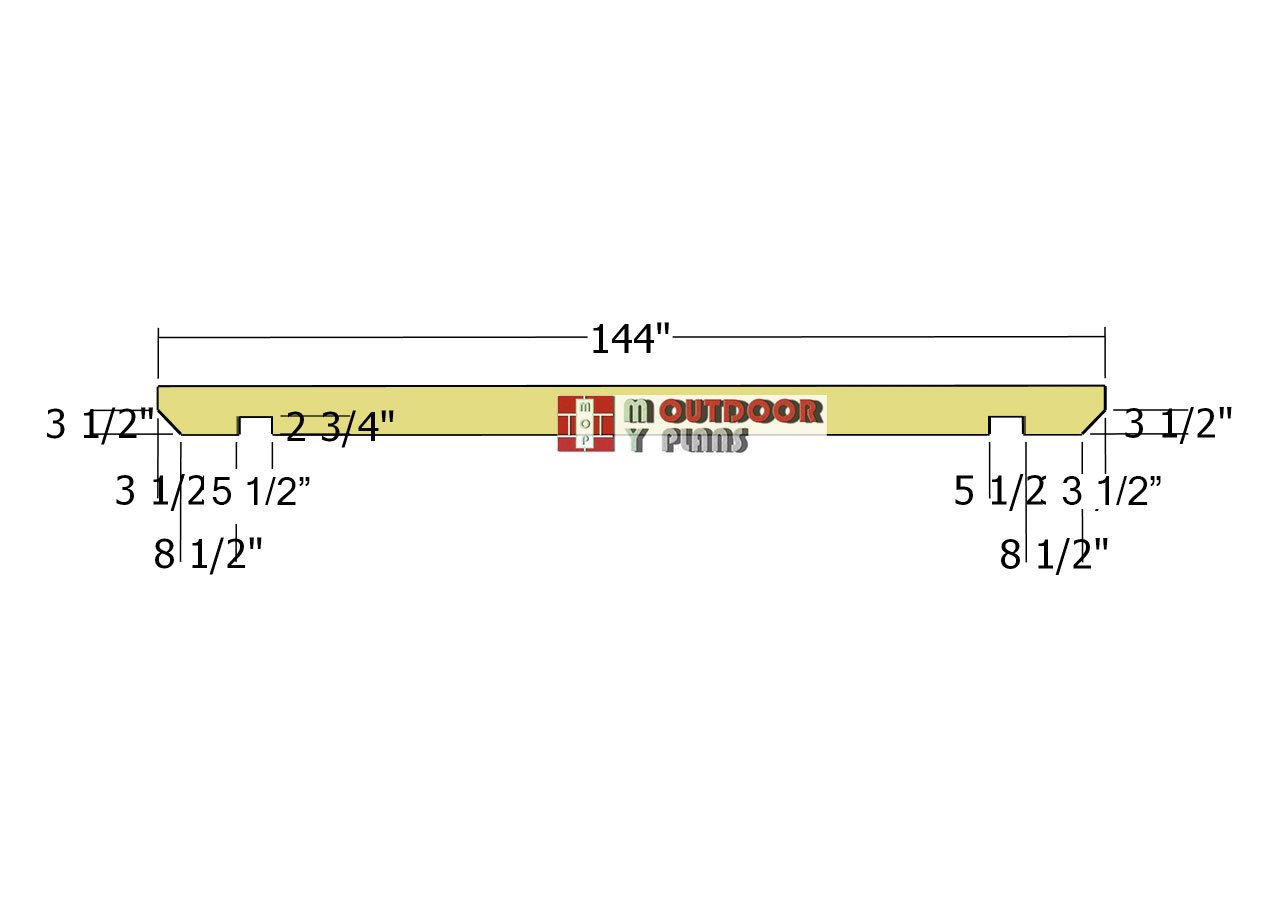
Rafters
Use 2×8 lumber for the rafters to ensure they provide the strength needed for the wide opening and prevent sagging over time. Start by making 45-degree decorative cuts on both ends of each beam using a miter saw or circular saw, giving the rafters a polished and professional look. Next, mark the lines for the notches, which will allow the rafters to sit snugly on the support beams.
Set your saw depth to 2 3/4 inches and make parallel cuts within the marked area. Once the cuts are complete, use a chisel to remove the excess wood and sand the notches smooth for a perfect fit. Taking your time with these details ensures the rafters are not only functional but also visually appealing.
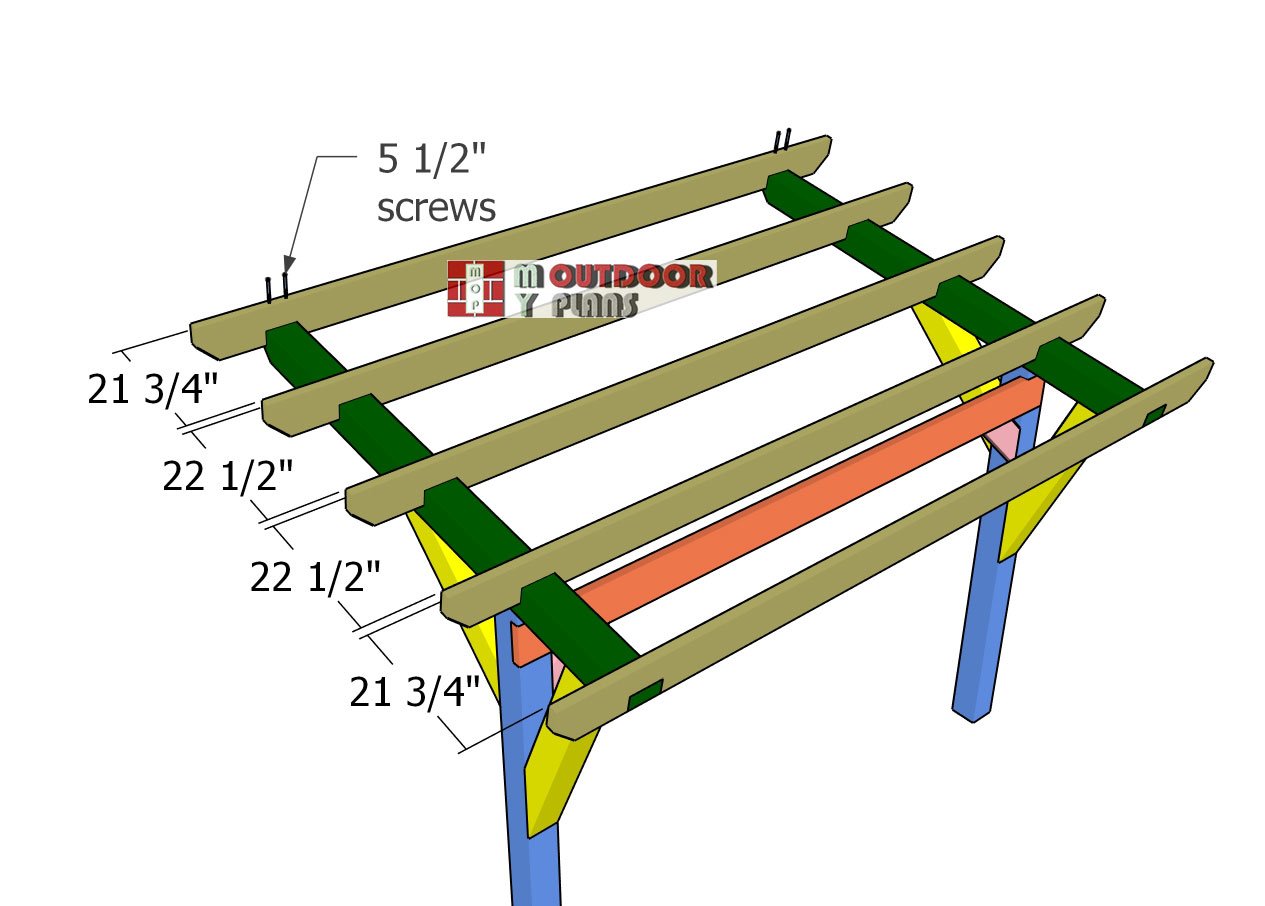
Fitting-the-rafters
Fit the rafters to the support beams, spacing them 24 inches on center (OC) for a balanced and sturdy structure. Carefully slide each rafter into place, ensuring they are perfectly perpendicular to the beams for proper alignment and support. Once positioned, drill pilot holes through the rafters and into the beams to prevent splitting and make screwing easier. Secure each rafter with 5 1/2-inch screws, tightening them firmly to lock everything in place. This precise spacing and secure attachment will create a strong, visually appealing framework for your pergola roof.
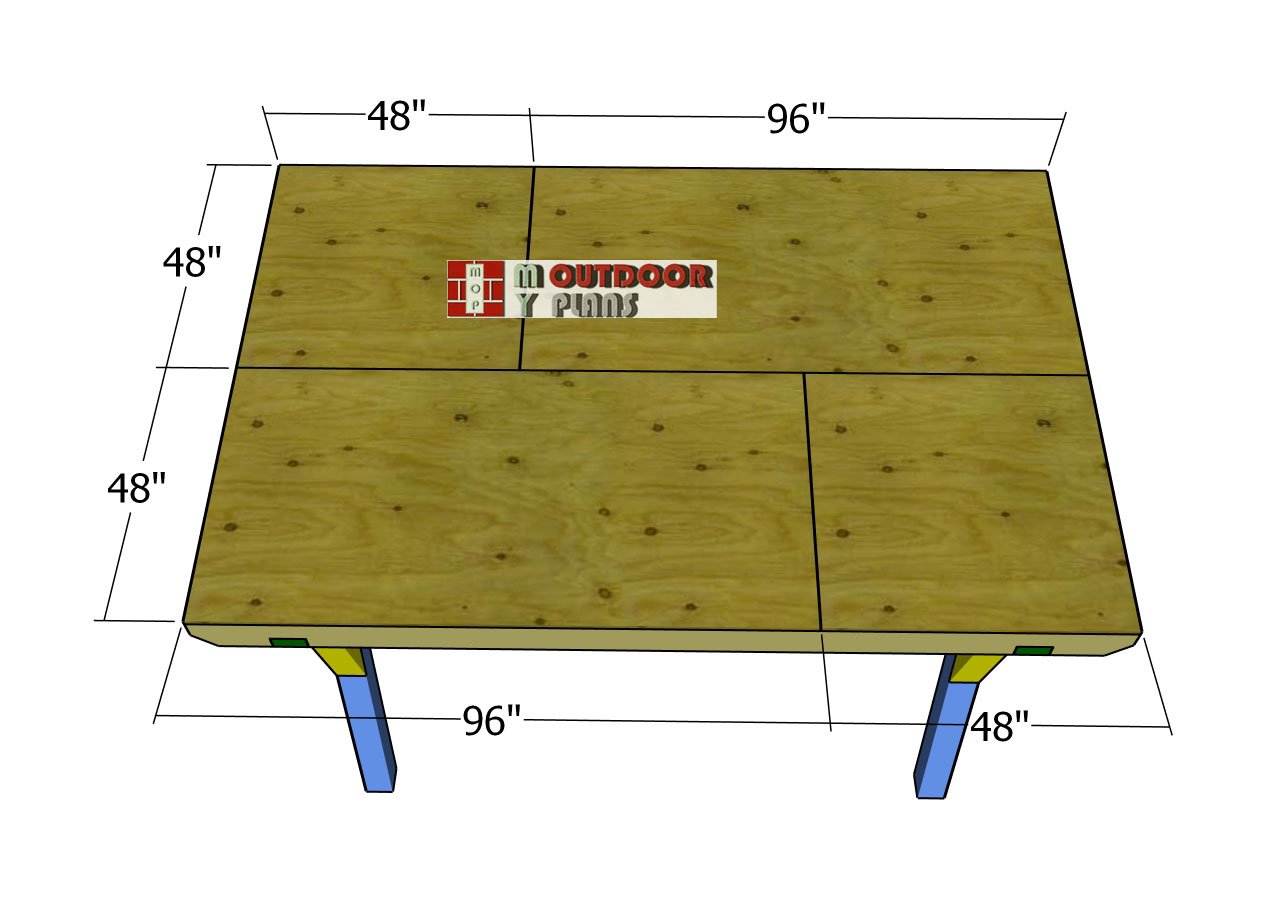
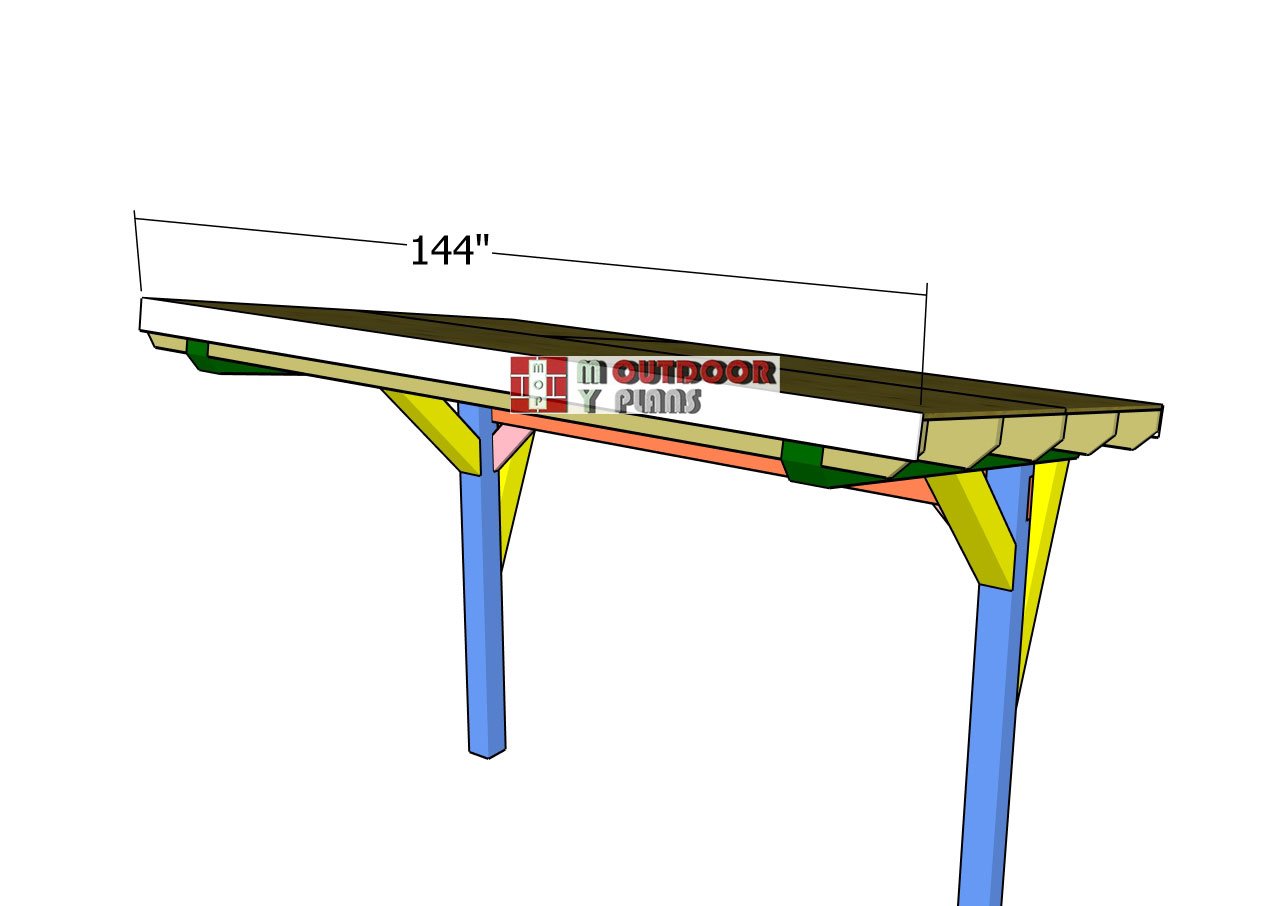
Fitting-the-roof-sheets
Lay the 1/2″ plywood sheets to the roof of the cantilevered pergola. Align the edges flush to the sides and leave no gaps between them. Drill pilot holes and insert 1 5/8″ screws every 8″ along the framing to lock them to the roof structure.
Front-and-back-roof-trims
Attach the 1×6 trims to the front and back edges of the pergola roof for a polished and finished look. Align the trims so their edges are flush with the top of the roof, ensuring a seamless fit. Once positioned, secure the trims by inserting 2-inch finish nails every 8 inches along their length. This not only locks them in place tightly but also adds a decorative touch while protecting the roof edges from the elements. Take care to keep the trims level and properly aligned for a clean and professional result.
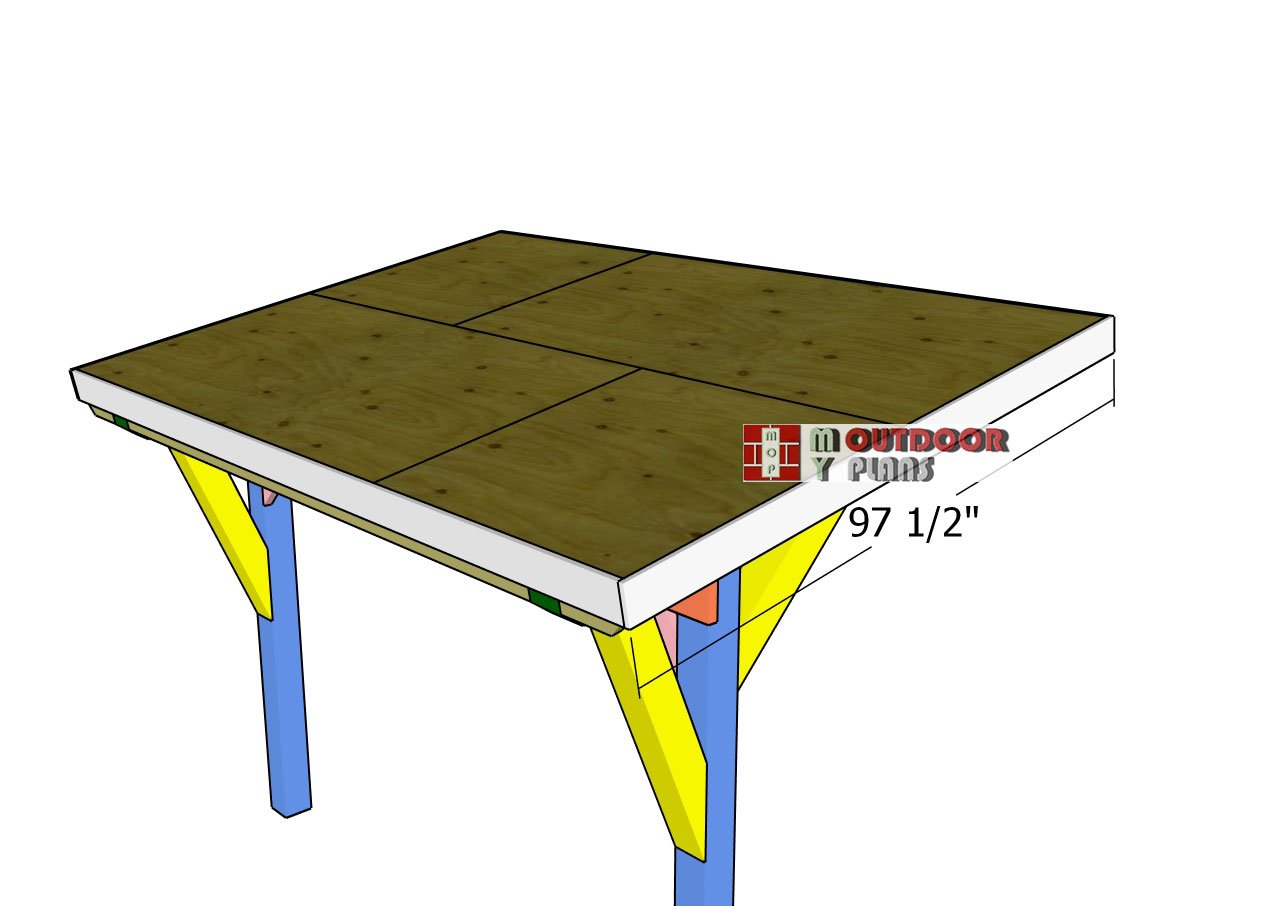
Side-roof-trims
Fit the trims to the sides of the roof to complete the look and tie the design together. Align the trims carefully with the edges of the roof, ensuring a smooth and seamless fit. These side trims not only add to the structural appeal but also enhance the modern aesthetic of your pergola. Secure them in place using 2-inch finish nails spaced every 8 inches, just like the front and back trims. This finishing touch elevates the overall design while providing a cohesive and polished appearance to your project.
Fitting-the-roofing
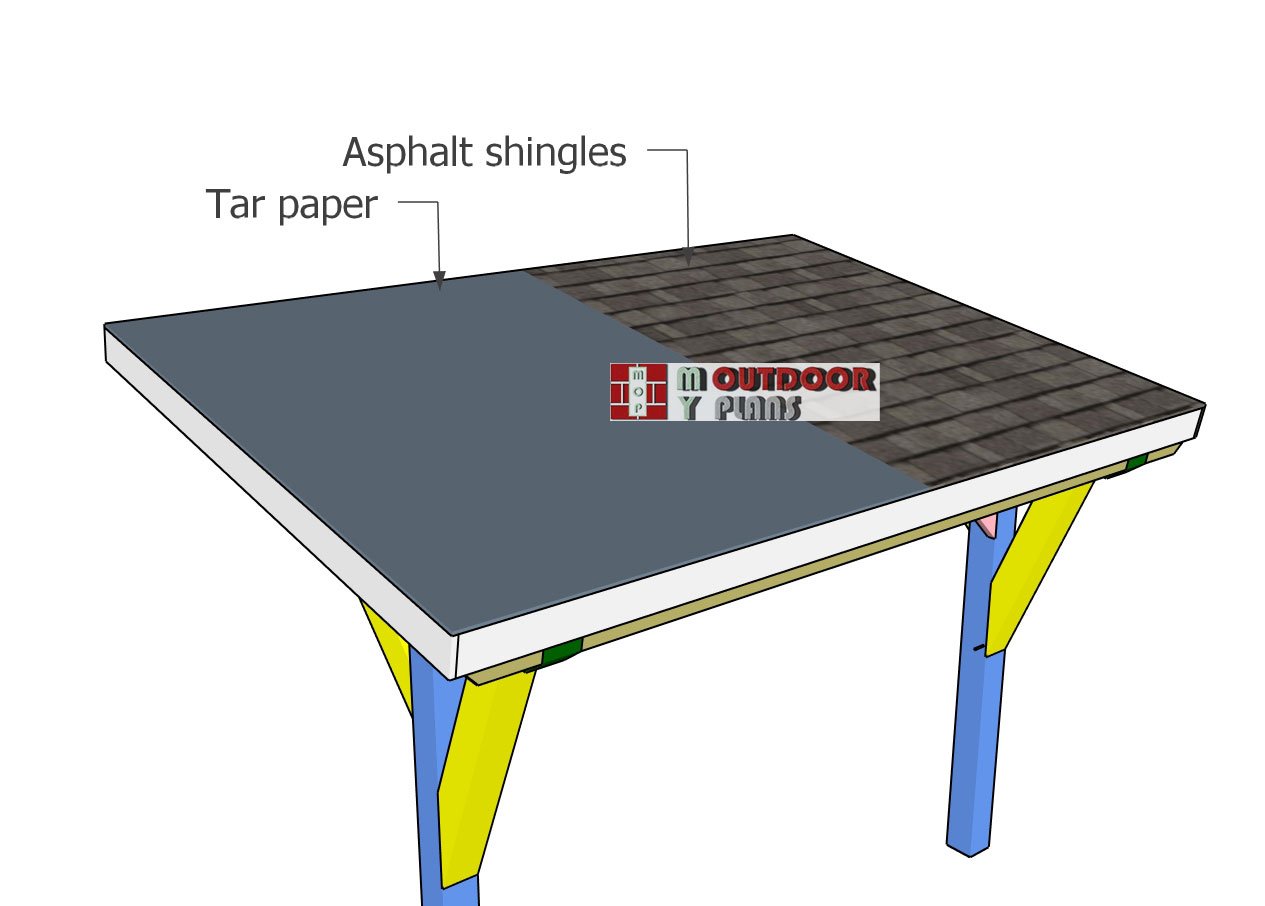
Installing asphalt shingles on your pergola roof is a straightforward process that ensures long-lasting protection from the elements. Begin by attaching drip edges along the edges of the roof, both at the eaves and the rakes, to direct water away from the structure and prevent moisture damage. Lay down a layer of roofing underlayment, such as felt paper or synthetic underlayment, to create an additional waterproof barrier.
Starting at the bottom edge of the roof, install the shingles in overlapping rows, securing them with roofing nails placed just above the adhesive strip. Work your way up, ensuring proper alignment and overlap for a watertight seal. Finish by adding a ridge cap along the top to cover the peak and give the roof a polished look. This step not only adds durability but also enhances the overall appearance of your pergola.
STEP 4: Back panel
Attaching-the-back-slats
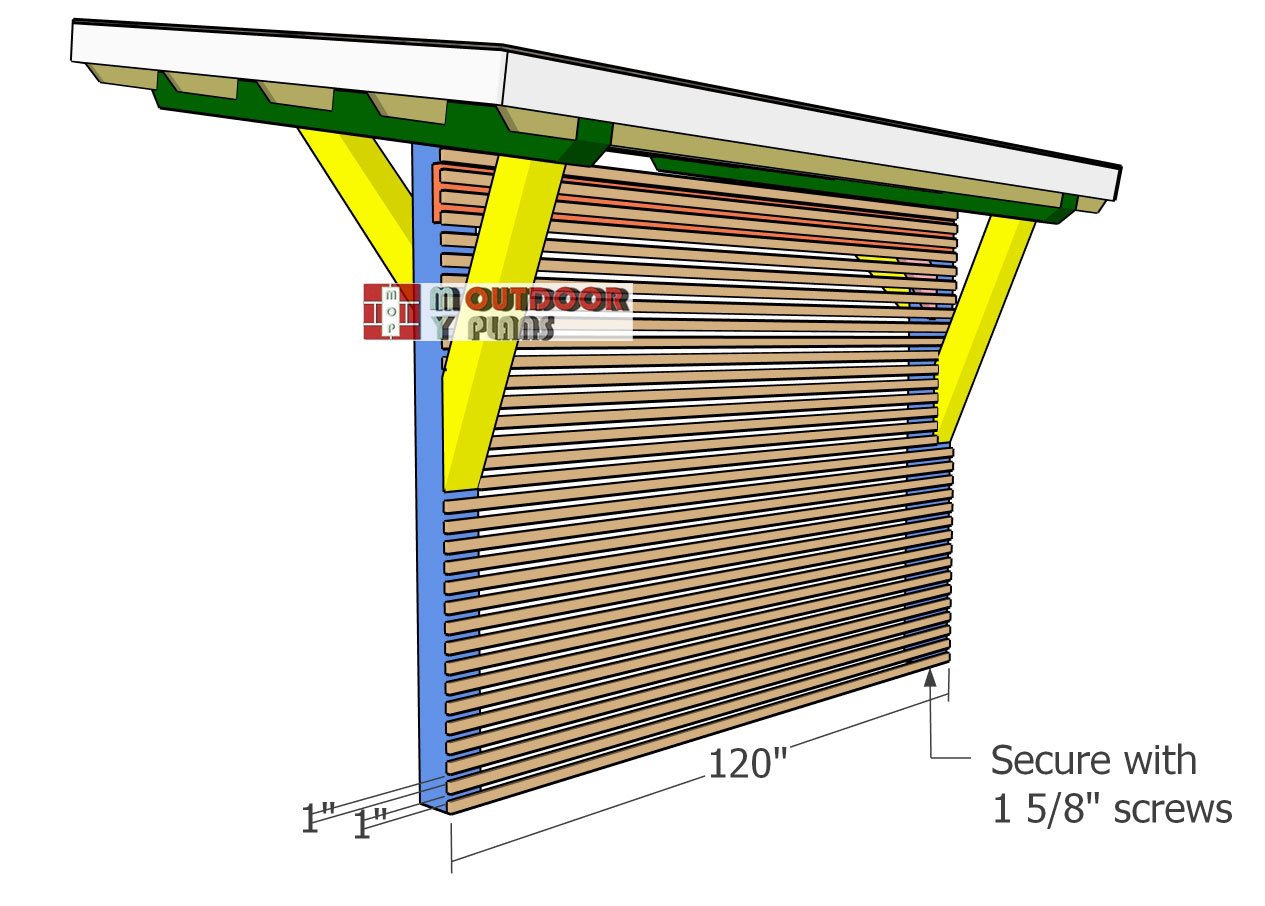
Fit the 1×2 slats to the back of the 2-post cantilevered patio pergola to create a decorative and functional privacy panel. Use spacers at both ends to ensure the gaps between the slats are even and consistent for a clean and professional appearance. Once positioned, drill pilot holes to prevent splitting, then secure each slat to the posts using 1 5/8-inch screws. This simple yet elegant addition enhances the modern design while providing a sense of privacy and style to your pergola.
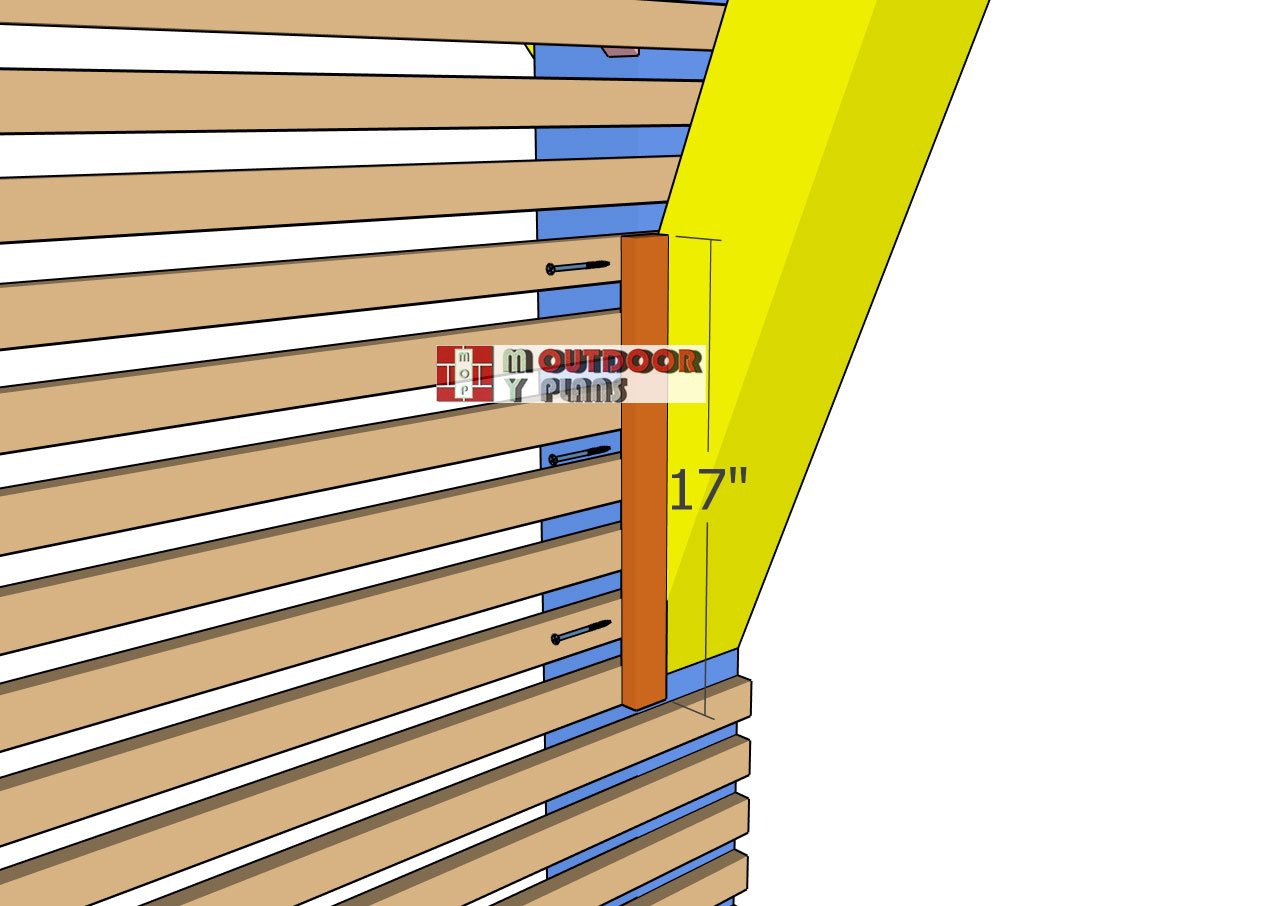
Detail—back-slats-paneling
When fitting the slats, you’ll need to cut them to fit around the back braces for a seamless look. To provide proper support, attach a 1×2 cleat to the back brace, ensuring it aligns perfectly with the slat layout. Use this cleat to secure the slats in place, keeping them even and stable. Drill pilot holes to avoid splitting, then fasten the slats to the cleat and the posts using 1 5/8-inch screws. This approach not only ensures a snug fit around the braces but also adds strength and durability to the privacy panel.
STEP 5: Finishing touches
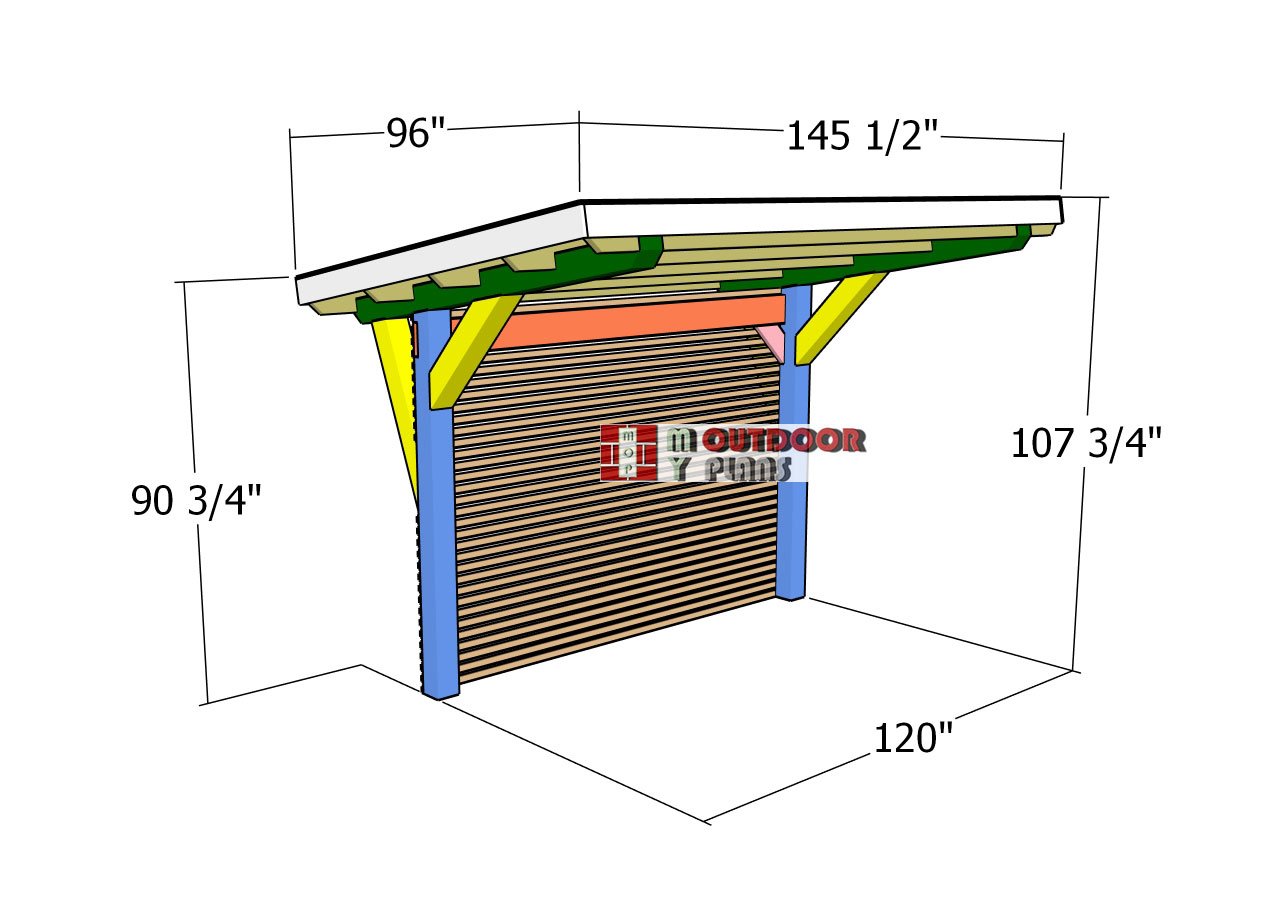
2-Cantilevered-pergola-plans—dimensions
The finishing touches are where your pergola truly comes to life, both in durability and aesthetics. Start by thoroughly preparing the surface, sand all exposed wood with 120-220 grit sandpaper to remove rough spots, splinters, or imperfections. This step ensures a smooth finish that’s both visually appealing and safe for little hands if kids will be around. After sanding, wipe down the wood with a clean, damp cloth to remove dust and debris, allowing the paint or stain to adhere properly.
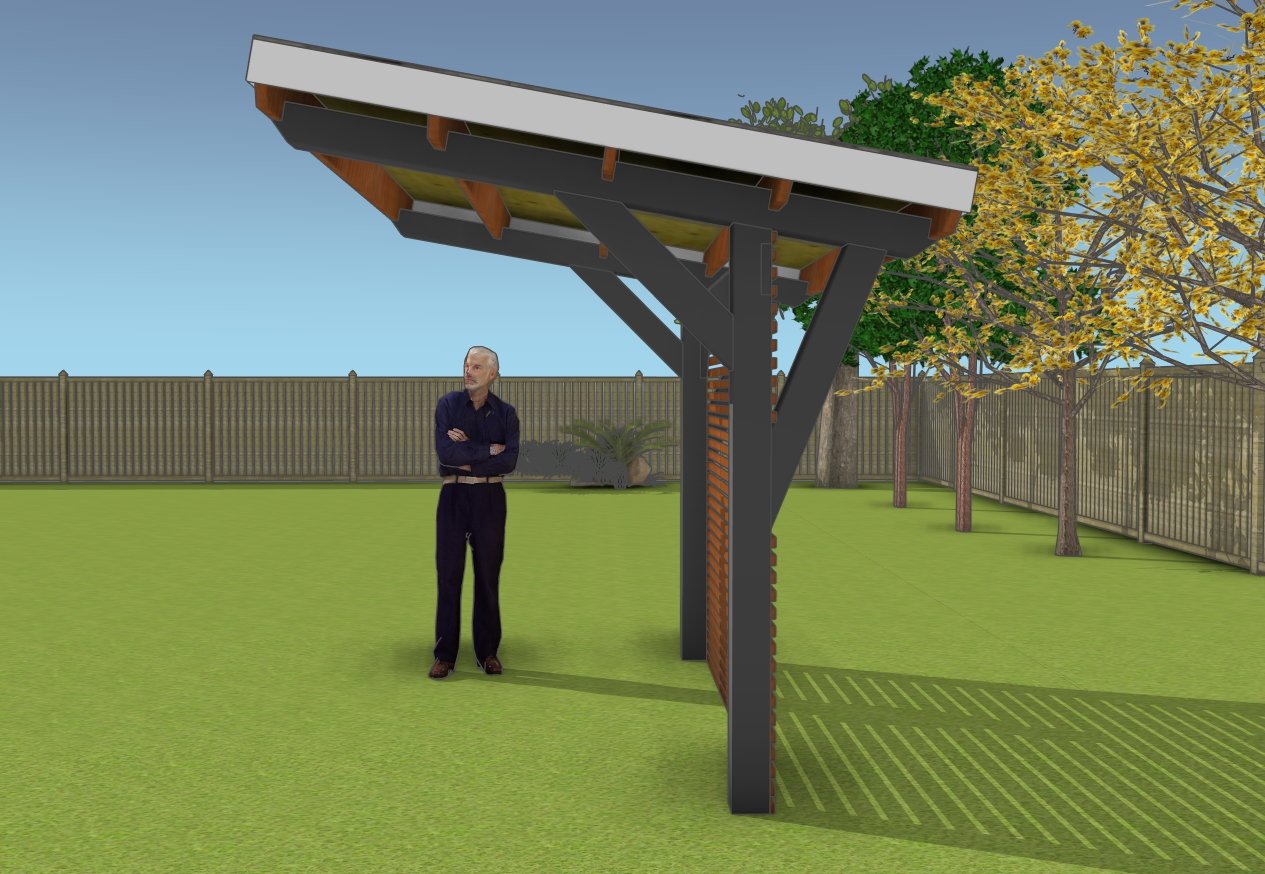
Pergola – side view
For protection and style, apply a high-quality outdoor-rated stain or paint. A stain is a great choice if you want to highlight the natural grain of the wood, while paint allows for a pop of color or a modern, uniform look. Opt for products that are UV-resistant and weatherproof to extend the life of the pergola. Use a brush or sprayer for even coverage, and apply at least two coats, letting each layer dry completely. To complete the project, seal the finish with a clear polyurethane topcoat for added durability and a polished appearance. These final touches not only protect your pergola from the elements but also make it a stunning focal point in your backyard.
This woodworking project was about DIY two legged pergola plans. If you want to see more outdoor plans, check out the rest of our step by step projects and follow the instructions to obtain a professional result.

