I’m super excited to share with you my latest project plans: a stunning 16×36 lean-to pavilion! This spacious and versatile structure is perfect for outdoor gatherings, providing plenty of shade and a stylish space to relax or entertain. Whether you’re looking to create an outdoor dining area, a cozy lounge space, or a sheltered spot for your hot tub, these free pavilion plans will help you build a beautiful and functional addition to your backyard. Let’s dive in and get started on creating your very own outdoor oasis!
The dimensions for this project refer to the base, outside post to outside post. Take a look over the rest of our woodworking plans, if you want to get more building inspiration. Check out the Shop, as well, for full list of Premium Plans.
To start with, here’s a cost estimate for building your 16×36 lean-to pavilion. You’ll need to budget for materials like lumber for the frame and rafters, roofing materials, and hardware, which will likely run between $2000 to $3000 depending on your local prices and quality of materials. Don’t forget additional items like concrete for the posts, screws, and nails, which might add another $1000-$2000, bringing the total cost to around $4000-5000 for a beautiful and sturdy pavilion.
When buying the lumber, you should select the planks with great care, making sure they are straight and without any visible flaws (cracks, knots, twists, decay). Investing in cedar or other weather resistant lumber is a good idea, as it will pay off on the long run. Use a spirit level to plumb and align the components, before inserting the galvanized screws, otherwise the project won’t have a symmetrical look. If you have all the materials and tools required for the project, you could get the job done in about a day. See all my Premium Plans HERE.
Projects made from these plans
16×36 Lean to Pavilion Plans – DIY Gazebo

Building-a-16×36-pavilion-with-lean-to-roof
Cut + Shopping Lists
A – Posts – 6×6 lumber 8′ long – 8 pieces
B – Top Beams – 6×10 lumber 142 1/8″ long – 2 pieces
B – Top Beams – 6×10 lumber 144 7/8″ long – 2 pieces
B – Top Beams – 6×10 lumber 168 7/8″ long – 2 pieces
C – Crossbeams – 6×10 lumber 16′ long – 4 pieces
D – Braces – 6×6 lumber 42″ long – 22 pieces
E – Supports – 6×6 lumber 39 3/8″ long – 4 pieces
E – Supports – 6×6 lumber 16″ long – 4 pieces
E – Ridge Beams – 6×8 lumber 147 5/8″ long – 2 pieces
F – Ridge Beams – 6×8 lumber 171 5/8″ long – 4 pieces
G – Braces – 4×4 lumber 42″ long – 8 pieces
H – Rafters – 2×6 lumber 10′ long – 42 pieces
I – Roof Sheets – 3/4″ plywood – 4’x8′ – 23 pieces
I – Roof Sheets – 3/4″ plywood – 4’x4′ – 4 pieces
J – Trims – 1×8 lumber 8′ long – 4 pieces
J – Trims – 1×8 lumber 12′ long – 6 pieces
J – Trims – 1×8 lumber 48″ long – 2 pieces
J – Trims – 1×8 lumber 49 1/2″ long – 2 pieces
Tools
![]() Hammer, Tape measure, Framing square, Level
Hammer, Tape measure, Framing square, Level
![]() Miter saw, Drill machinery, Screwdriver, Sander
Miter saw, Drill machinery, Screwdriver, Sander
Time
Related
Pin for Later!

How to build a 16×36 pavilion – laying out
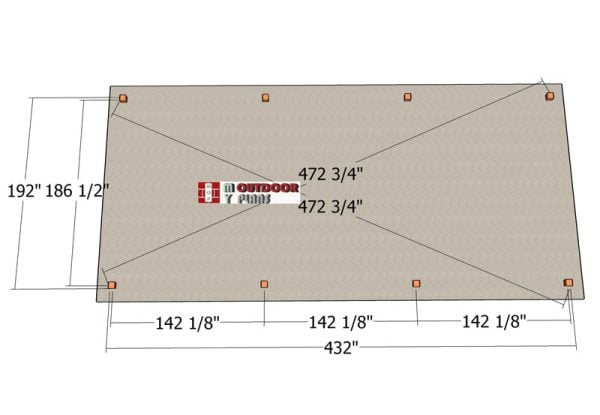
Laying-out-the-posts-for-the-16×36-pavilion
First, you’ll need to lay out the posts for the pavilion. Grab your batter boards and string to mark the exact locations for each post. Dig holes that are 3 feet deep and 12 inches in diameter.
Set your concrete tubes in the holes, then fill them up with concrete. Place the post anchors into the wet concrete, making sure they’re perfectly aligned with each other.
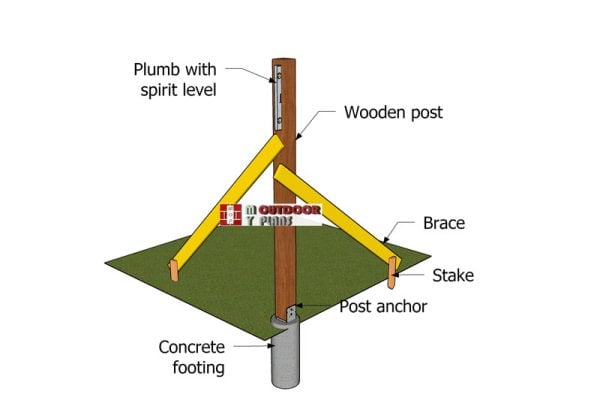
Setting-the-posts
Next, we need to set the posts in place. Dig 3-foot holes into the ground, ensuring they’re about 14 inches in diameter. Fit the tubes and then the posts into the holes, and use a spirit level to plumb them. Temporarily brace the posts to keep them steady while you fill the holes with concrete. Allow the concrete to dry for several days. Be sure to check your local codes for specific details on securing the posts.
Once the concrete is set, use lag screws to secure the posts to the anchors. Before pouring the concrete, make sure the tops of the posts are level with each other. Use a laser to mark the level at the tops of the posts, and if necessary, use a circular saw to make any adjustments.
Building the frame of the large pavilion

Top-plates-for-16×36-lean-to-pavilion
We’ll be using 6×10 lumber for the top support beams. First, make 4 5/8″ deep notches in the beams. Set the blade depth on your circular saw to 4 5/8″.
Then, make parallel cuts within the marked areas and use a hammer and chisel to remove the excess wood. This will ensure a perfect fit for your support beams.

Top-side-plates
Fit the beams to the top of the pavilion, starting with the long sides. Align the edges flush, drill pilot holes, and secure them to the top of the posts with 8″ screws.
Ensure the beams join at the middle of the posts for a secure fit. Place the 142 1/8″ beam at the middle posts, making sure everything is level and properly aligned.

Attaching-the-crossbeams
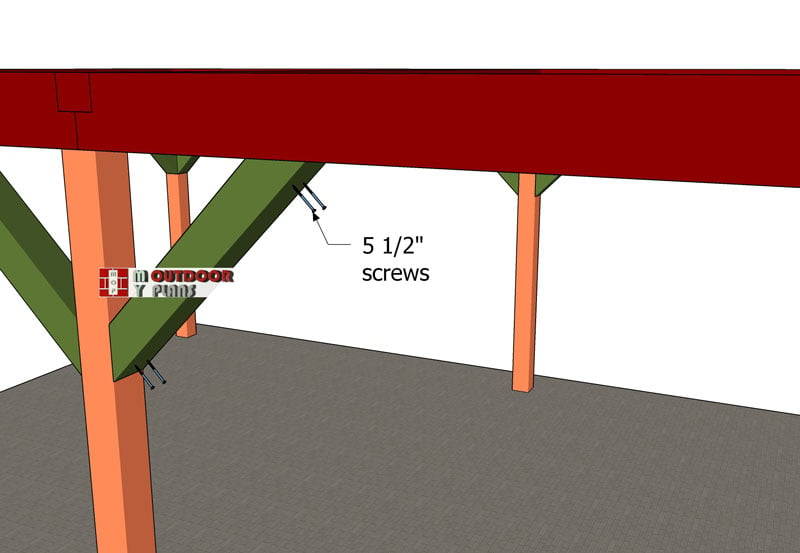
Diagonal-braces—detail
Next, attach the crossbeams to the frame of the pavilion. Drill pilot holes and secure them tightly with 5 1/2″ screws. Make sure the posts are perfectly vertical before attaching the top beams to ensure everything stays aligned and sturdy. This step is crucial for maintaining the pavilion’s structure and stability.

Fitting-the-braces
Attach the braces to the posts of the pavilion, as shown in the diagram. Make sure to plumb the posts and check that the top beams are horizontal before securing the braces in place. This ensures everything is aligned correctly and adds extra stability to the structure.
Building the roof of the pavilion

Supports-for-ridge-beam

Supports-for-the-middle-ridge-beams
Fit the ridge beam supports to the middle of the crossbeams. Use a spirit level to plumb them and secure them with post-to-beam connectors and 1 1/2″ structural screws.
Next, attach the side top supports with L ties and structural screws. Ensure the posts are plumb with a spirit level before locking them into place with the ties.

Braces-for-middle-supports
Finally, fit the 4×4 braces to the middle supports. Make 45-degree cuts on both ends and secure them with 5 1/2″ screws, using 2 screws for each joint. This will add extra stability and strength to your pavilion.

Ridge-beams-components
Use 6×8 lumber for the ridge beams. Make notches in the beams as shown in the diagram. You will need four beams, each 171 5/8″ long, and two beams, each 147 5/8″ long. Use a saw to make parallel cuts within the marked areas, then remove the excess wood with a hammer and chisel.
Fit the beams to the top of the supports and secure them with 8″ screws. Use post-to-beam connectors and 1 1/2″ structural screws to lock everything into place, ensuring a sturdy and stable structure.

Attaching-the-ridge-beams

Braces-for-the-ridge-beams
Next, we need to attach the braces to the ridge beam. Make 45-degree cuts on both ends of each brace. Secure the braces to the beams and supports using 5 1/2″ screws, with two screws for each brace.
Ensure the supports are plumb with a spirit level before setting the braces into place to keep everything aligned and sturdy

Rafters-for-16×36-lean-to-pavilion

Fitting-the-rafters—lean-to-pavilion
Next, we need to build the rafters for the lean-to roof. Using 2×6 lumber, make the necessary notches. Mark the cut lines as shown in the diagram, and then cut them with a circular saw. Once the cuts are made, smooth the edges with sandpaper for a clean finish.

Setting-the-rafters
Fit the rafters to the top of the pavilion, spacing them every 24″ on center. Secure the rafters to the pavilion structure using rafter ties and 1 1/2″ structural screws, as shown in the diagram. Make sure to use a rafter tie at each end of the rafters to keep everything sturdy and well-aligned.

Fitting-the-roof-sheets
Attach the 3/4″ plywood sheets to the roof of the pavilion. Start at the lower left side of the roof and work your way up to the ridge line. Ensure there are no gaps between the sheets, and secure them in place with 2 1/2″ screws. Insert the screws every 8″ along the rafters, making sure the adjacent sheets meet at the middle of the rafters for a strong and seamless finish.
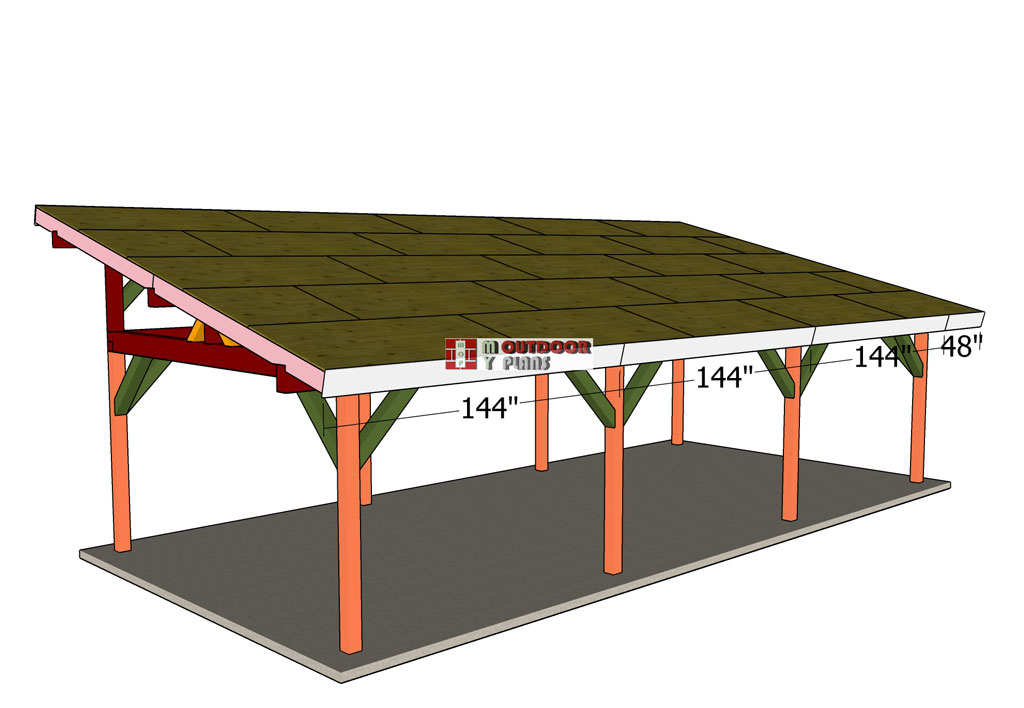
Roof-trims
.

Side-roof-trims
Next, attach the 1×8 trims to the sides of the pavilion. Align the edges flush and secure them tightly with 2″ nails. Then, cut and install the trims on the gable ends of the pavilion, using 2″ nails to lock them into place. This will give your pavilion a clean and finished look.
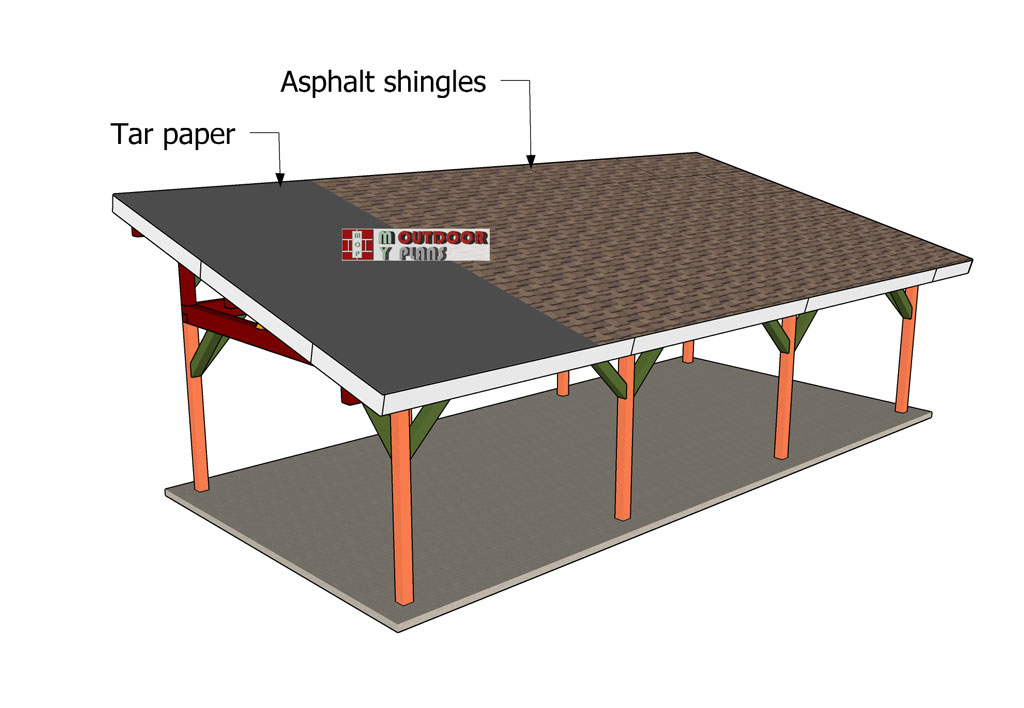
Fitting-the-roofing-to-the-lean-to-pavilion
To install asphalt shingles on your new pavilion roof, start by laying an asphalt underlayment over the plywood sheathing, ensuring full coverage with proper overlapping. Begin at the lower edge with a starter strip, securing it with roofing nails. Lay the first row of shingles along the eaves, aligning the tabs with the starter strip and nailing them down.
Continue installing subsequent rows, staggering the shingle joints and following the manufacturer’s guidelines for overlap and fastening. This will ensure a durable and weatherproof roof for your pavilion.
Finishing touches

16×36 lean to pavilion
Customizing your pavilion is a breeze! You can paint or stain the wood to match your home’s exterior or garden decor for a cohesive look.
Add decorative brackets or trim to the posts and beams for an extra touch of charm. Consider installing built-in benches, planters, or even outdoor lighting to make your pavilion the perfect spot for relaxing or entertaining.
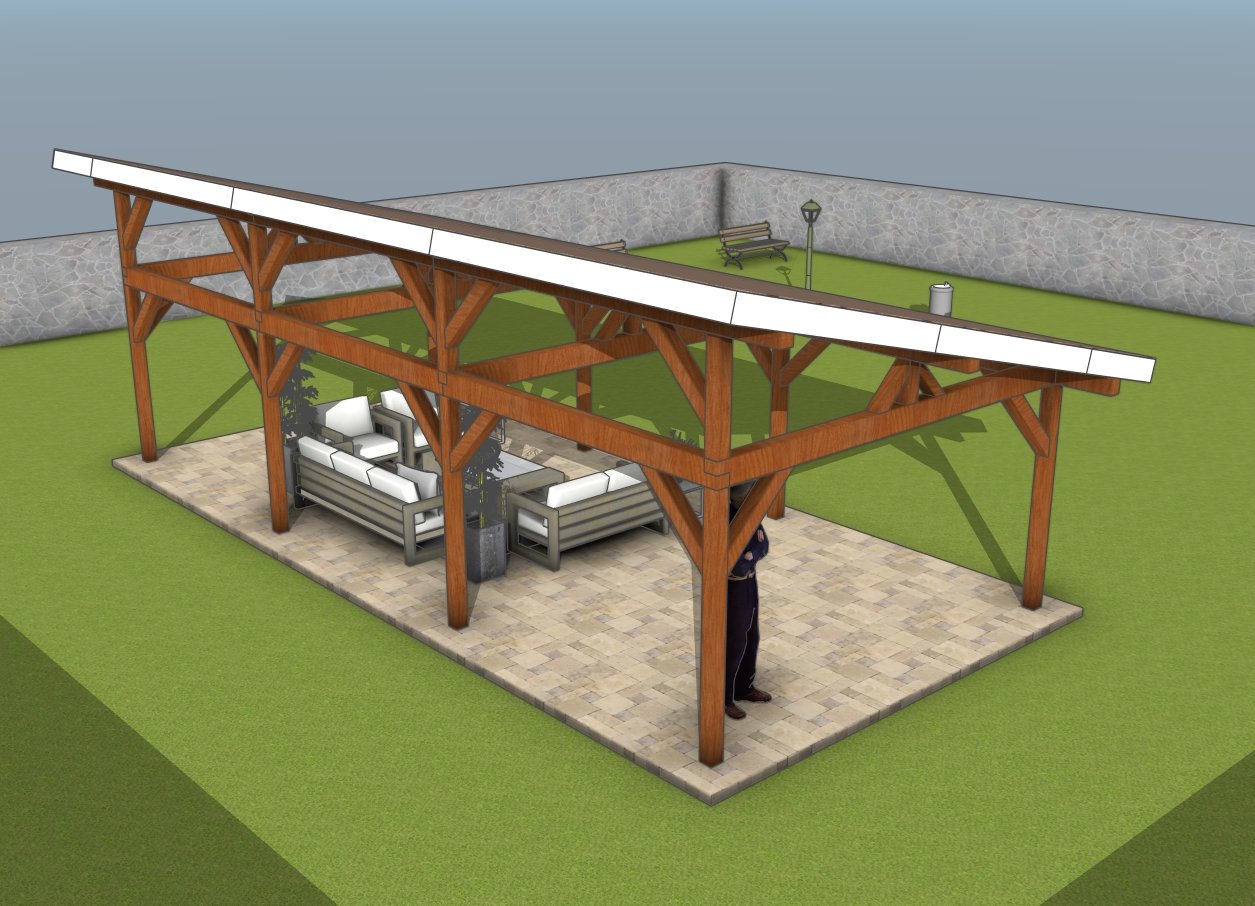
How to make a 16×36 lean to pavilion
If you’re just getting started with woodworking, this might be a bit challenging, but don’t worry! With detailed plans and a bit of patience, you can definitely tackle it. It’s a great way to build up your skills, and by the end, you’ll have an awesome pavilion to show off. Just take it step-by-step, and you’ve got this!

16×36 lean to pavilion – side view

16×36 lean to pavilion – front view
Building a 16×36 lean-to pavilion comes with some fantastic benefits. First, it provides a spacious and sheltered outdoor area, perfect for hosting gatherings or enjoying family time, rain or shine. Second, the pavilion’s lean-to design is both stylish and functional, seamlessly blending with your existing landscape while offering excellent drainage.
Third, it’s a versatile space—you can set up an outdoor kitchen, create a cozy lounging area, or even use it as a carport. Lastly, a well-built pavilion adds significant value to your property, enhancing both its aesthetic appeal and functionality.
Top Tip: Check out the Shop, as well, for full list of Premium Plans. Press the GET PDF PLANS button bellow, if you want to get the Premium Plans with the full Cut and Shopping lists included, as well as with the cut layout diagram.
This woodworking project was about 16×36 lean to pavilion plans. I encourage you to explore the wealth of projects awaiting you on my blog. Share these projects with your friends, and together, let’s continue to build a community fueled by creativity and passion.

