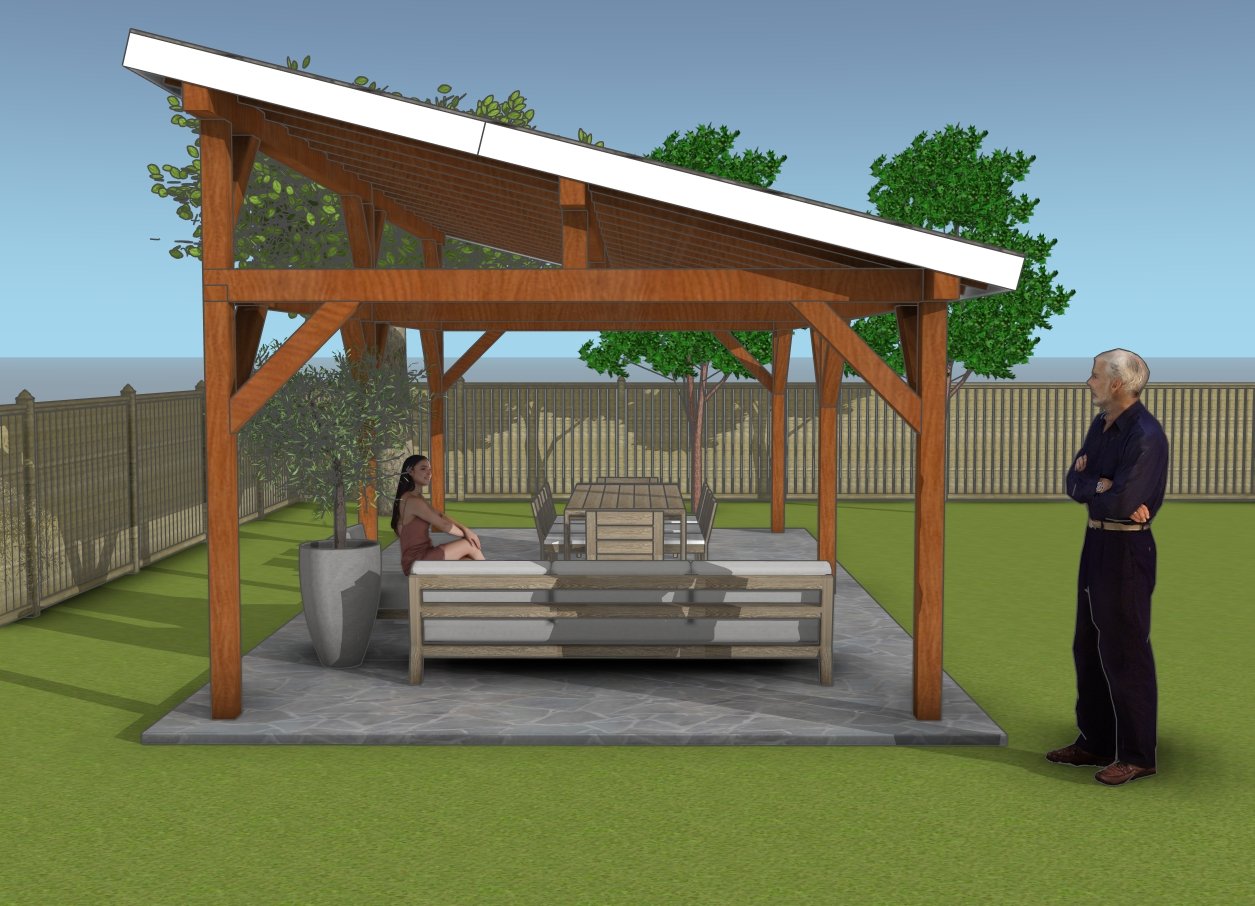
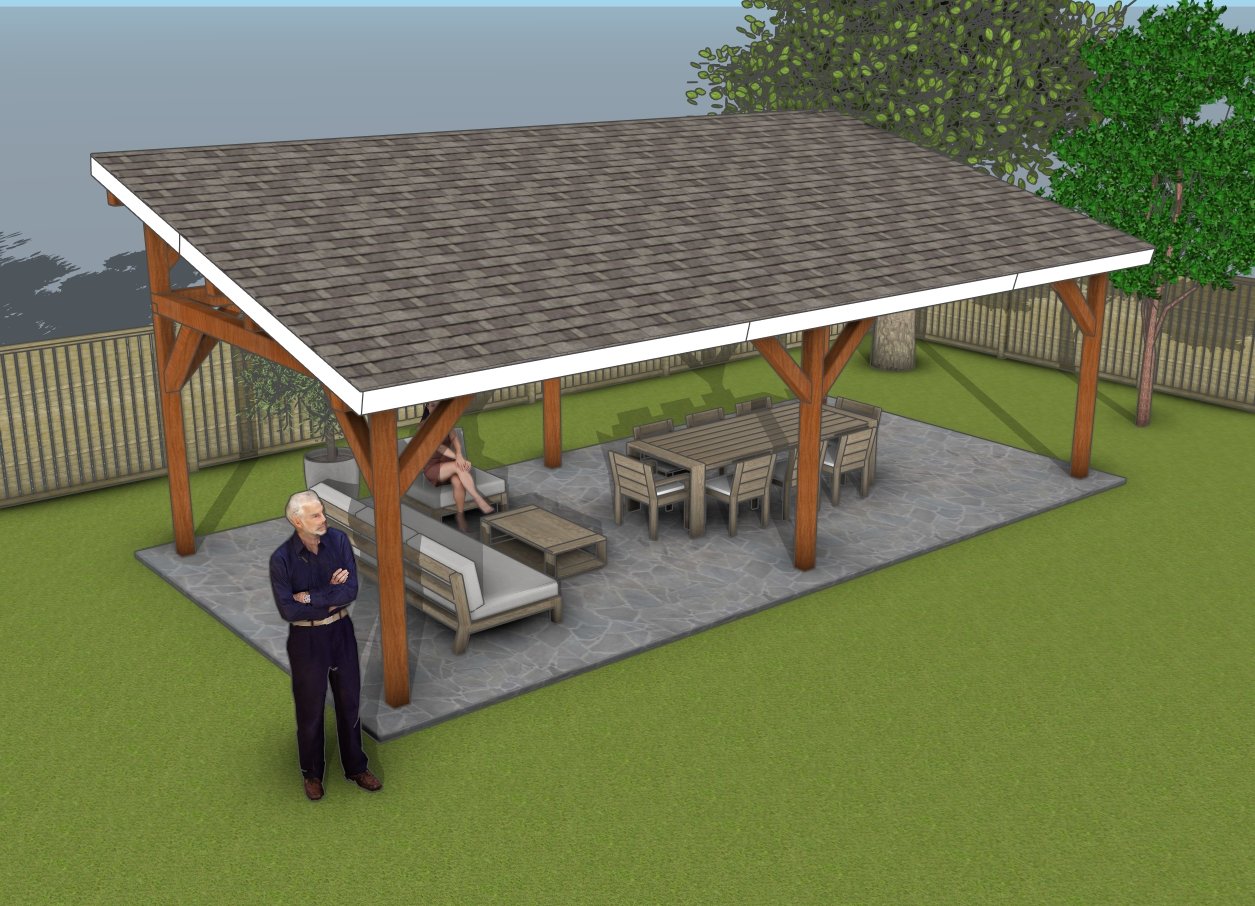
Looking to build a spacious outdoor shelter? A 14×30 lean-to pavilion is a perfect solution for hosting gatherings, providing shade, or creating a cozy outdoor retreat. The lean-to design offers a sleek, modern look while maintaining practicality. In this blog post, I’ll guide you through the steps to build your pavilion, including marking post locations, setting a sturdy foundation, attaching beams and rafters, and roofing with asphalt shingles. By the end, you’ll have a durable, weather-resistant space perfect for any backyard occasion. Stay tuned for detailed tips and instructions!
Building a 14×30 lean-to pavilion could take approximately 1-2 weeks for a DIYer, depending on experience and weather conditions. The project involves tasks like laying the foundation, constructing the frame, roofing, and finishing touches, each requiring careful attention. The estimated cost for building a 14×30 lean-to pavilion is between $2,500 and $4,200, depending on the materials used. This includes expenses for lumber, concrete, roofing materials, hardware, and paint or stain. Check out the Shop, as well, for full list of Premium Plans.
When buying the lumber, you should select the planks with great care, making sure they are straight and without any visible flaws (cracks, knots, twists, decay). Investing in cedar or other weather resistant lumber is a good idea, as it will pay off on the long run. Use a spirit level to plumb and align the components, before inserting the galvanized screws, otherwise the project won’t have a symmetrical look. If you have all the materials and tools required for the project, you could get the job done in about a day.
Projects made from these plans
Pin it for later!
14×30 Lean to Pavilion – DIY Plans
Building-a-14×30-lean-to-pavilion
Materials
- A – Posts – 6×6 lumber 8′ long – 6 pieces
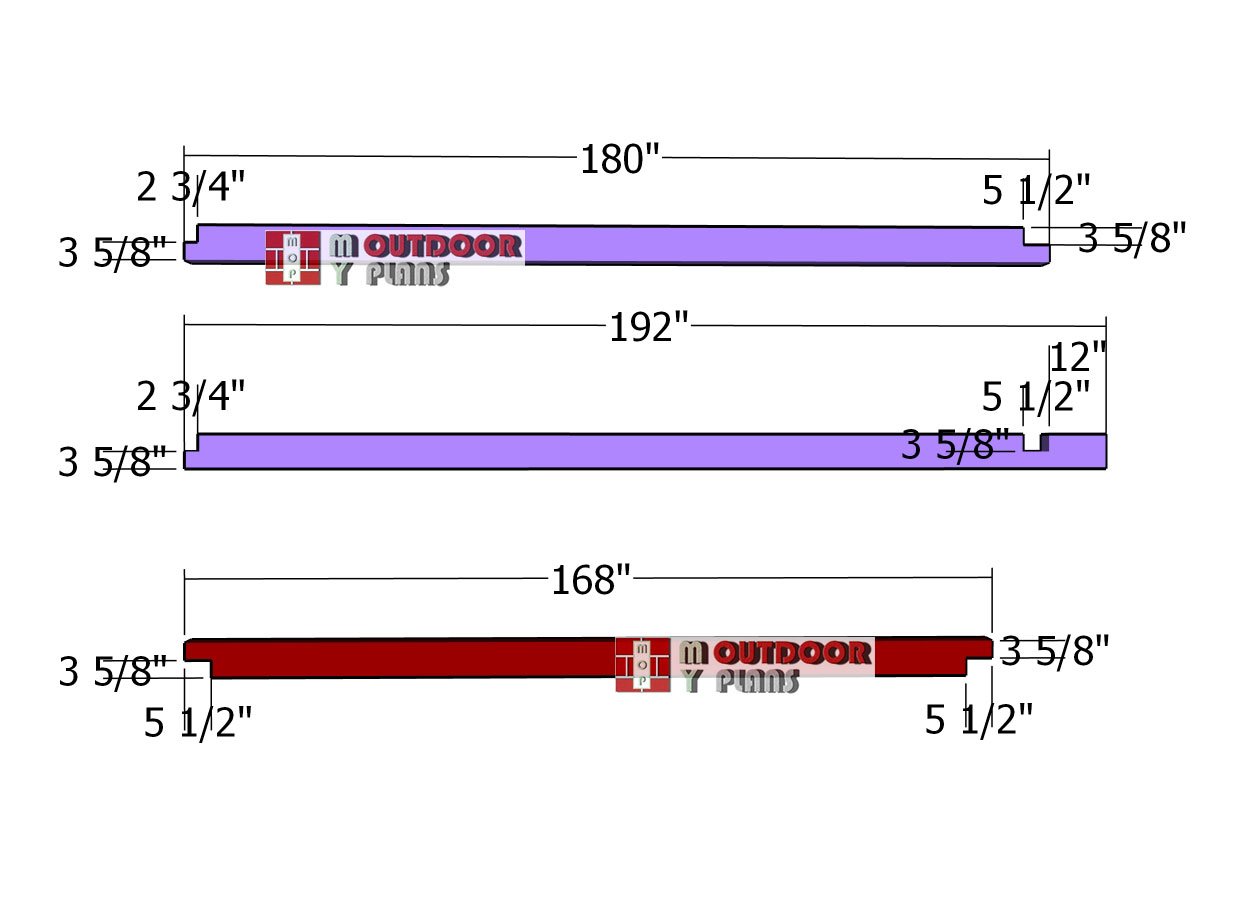
- B – Top Beams – 6×8 lumber 180″ long – 2 pieces
- B – Top Beams – 6×8 lumber 192″ long – 2 pieces
- C – Crossbeams – 6×8 lumber 14′ long – 3 pieces
- D – Supports – 6×6 lumber 33 3/8″ long – 3 pieces
- D – Supports – 6×6 lumber 13 1/8″ long – 3 pieces
- D – Ridge Beams – 6×8 lumber 192″ long – 4 pieces
- E – Braces – 6×6 lumber 42″ long – 12 pieces
- E – Braces – 6×6 lumber 36″ long – 4 pieces
- F – Braces – 2×6 lumber 98 3/4″ long – 17 pieces
- F – Rafters – 2×6 lumber 98 3/4′ long – 17 pieces
- G – Roof Sheets – 3/4″ plywood – 4’x8′ – 14 pieces
- G – Roof Sheets – 3/4″ plywood – 4’x4′ – 4 pieces
- G – Roof Sheets – 3/4″ plywood – 5 1/4″x8′ – 4 pieces
- J – Trims – 1×8 lumber 8′ long – 2 pieces
- J – Trims – 1×8 lumber 12′ long – 4 pieces
- J – Trims – 1×8 lumber 10′ long – 2 pieces
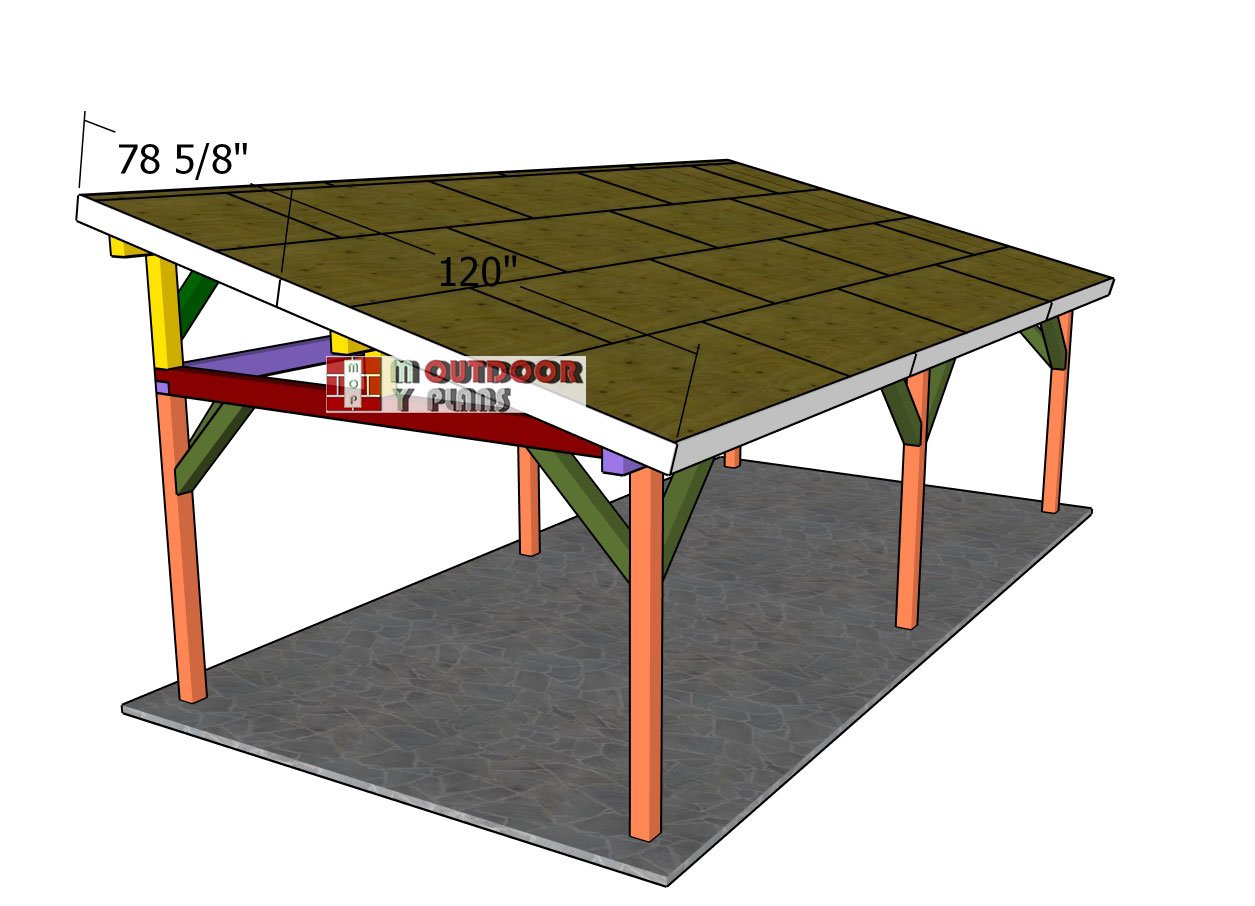
- J – Trims – 1×8 lumber 78 5/8″ long – 2 pieces
Tools
![]() Hammer, Tape measure, Framing square, Level
Hammer, Tape measure, Framing square, Level
![]() Miter saw, Drill machinery, Screwdriver, Sander
Miter saw, Drill machinery, Screwdriver, Sander
![]() Safety Gloves, Safety Glasses, Post hole digger
Safety Gloves, Safety Glasses, Post hole digger
Time
![]() One week
One week
Related
How to build a 14×30 pavilion
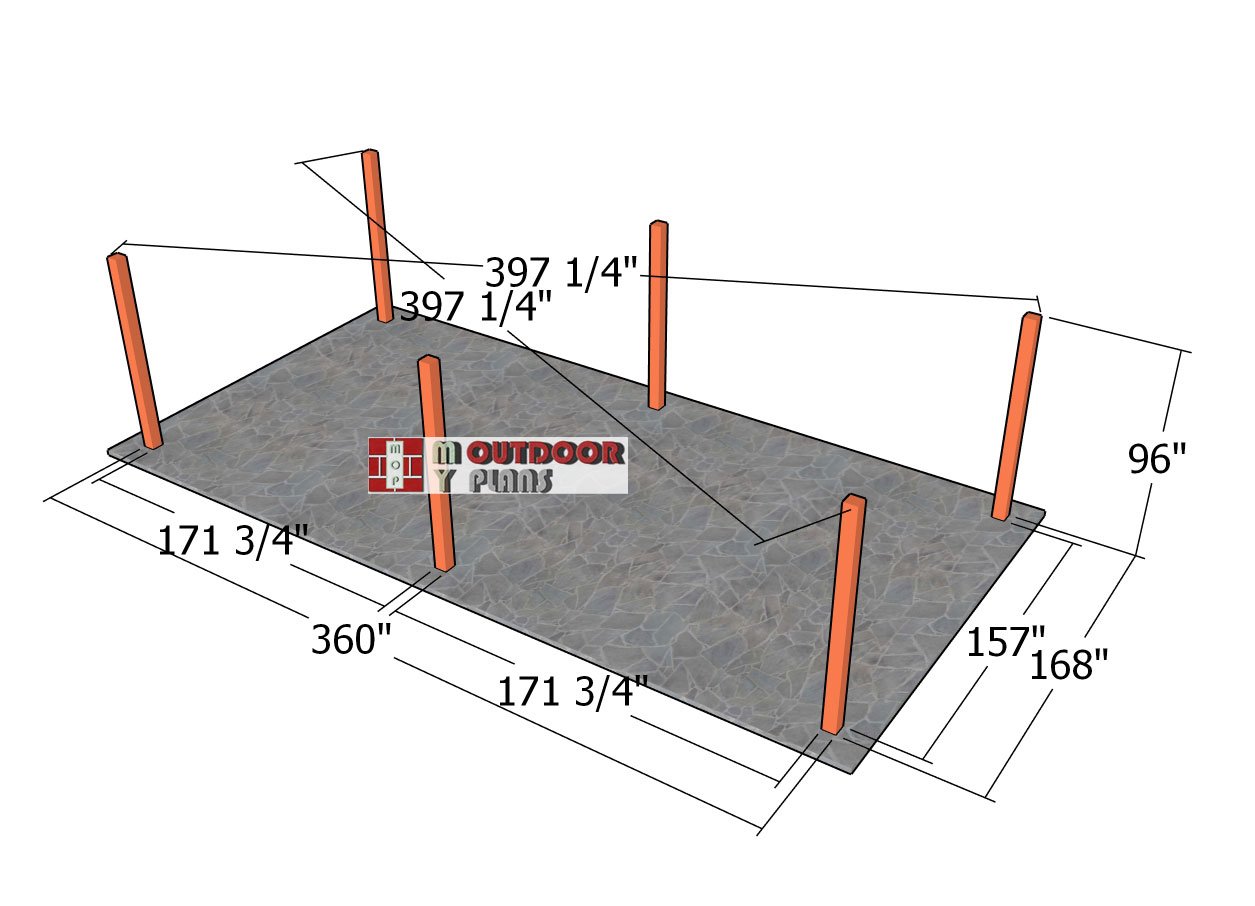
Laying-out-the-posts—14×30-pavilion
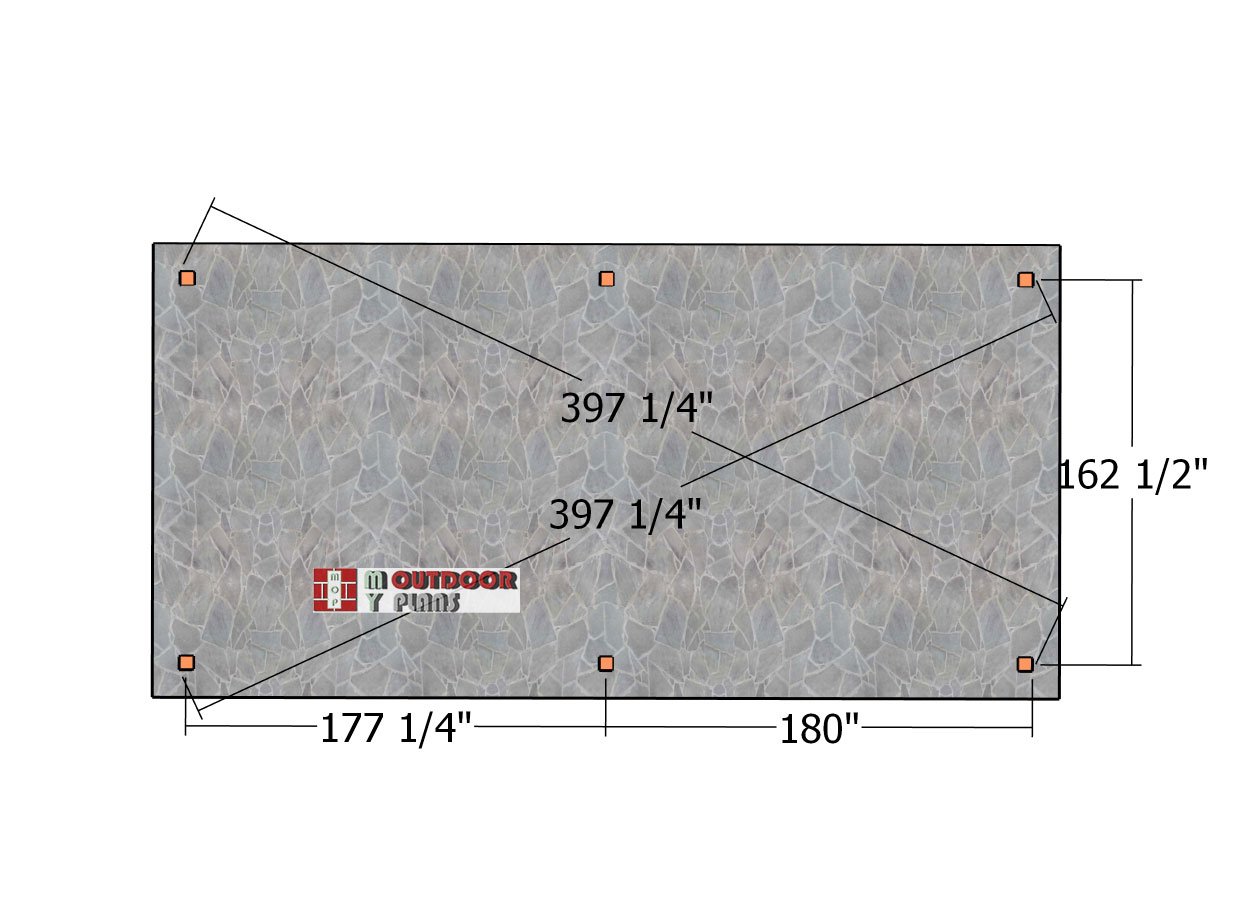
Axes-layout
First, you’ll need to mark the locations for your posts using batter boards and string to get everything lined up perfectly. Ensure you’re measuring from outside post to outside post and double-check the distances between the centers of the posts. Once marked, dig 3-foot deep holes that are 12 inches in diameter. Set concrete tubes into each hole, then fill them with concrete. As the concrete is still wet, set your post anchors in place, making sure they’re lined up straight.
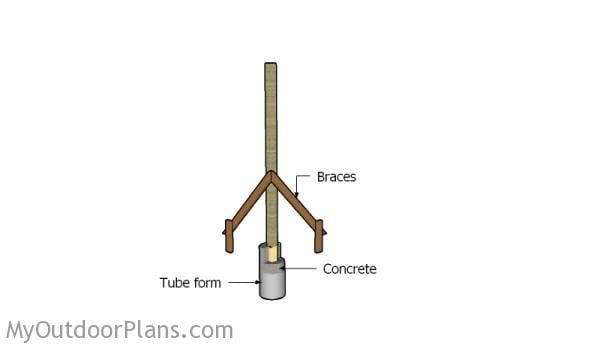
Setting the posts in concrete
Once the concrete has set, you can attach the posts to the anchors. Make sure the posts are plumb using a spirit level and temporarily brace them to hold their position. Secure the posts to the anchors with lag screws to lock them in place.
Tip: Before starting the project, it’s a good idea to clear the top layer of vegetation to create a clean work area and ensure a stable foundation for the posts.
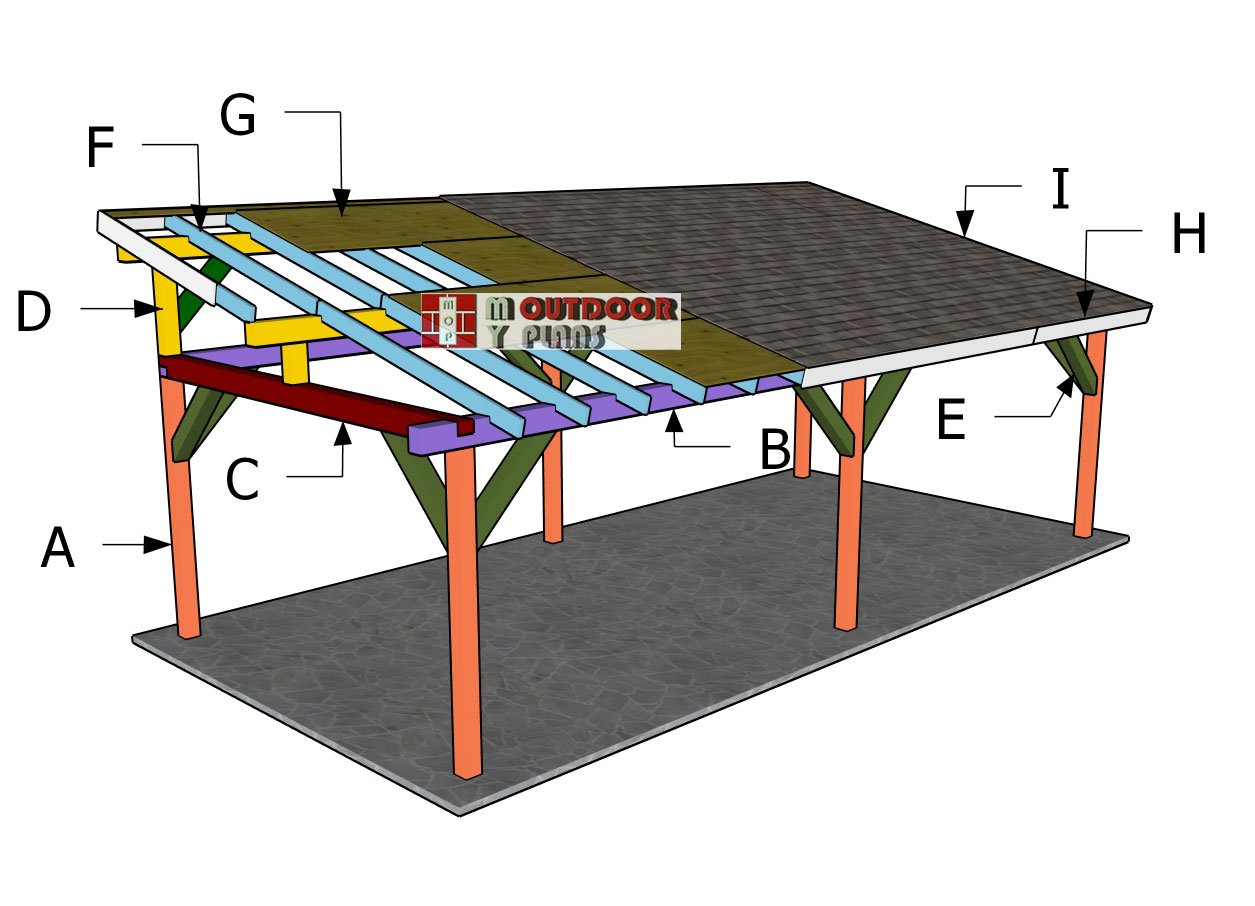
Building the frame of the pavilion
Top-plates—cut-detail
We’ll be using 6×8 lumber for the top support beams. To create notches, set your circular saw blade to a depth of 3 5/8″. Mark the notches, then make several parallel cuts inside the marked areas. Afterward, use a hammer and chisel to remove the excess wood, cleaning up the notches for a precise fit. This method ensures the beams fit securely when attached.
Fitting-the-top-plates
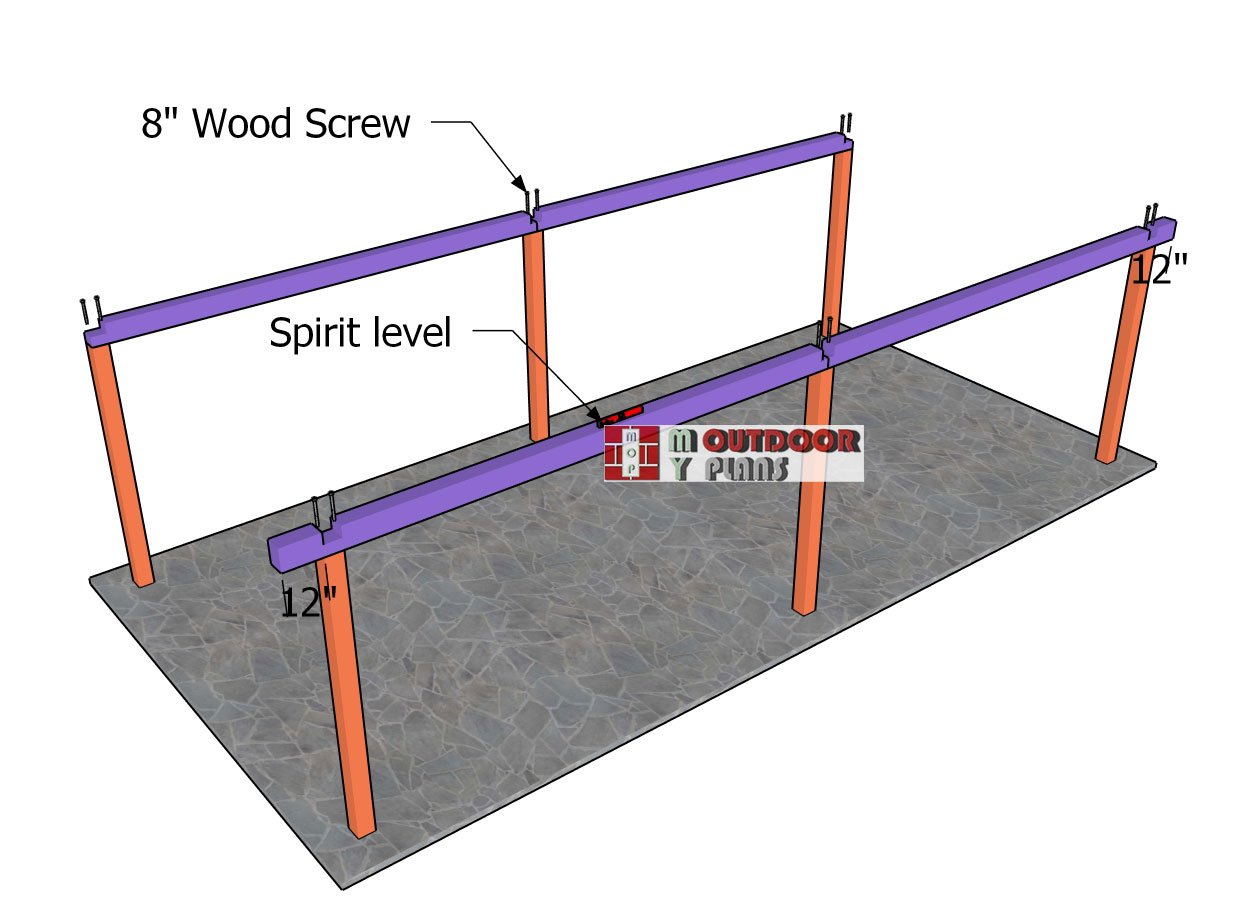
Fit the beams to the top of the pavilion, starting with the long sides. Align the edges flush with the posts, then drill pilot holes and insert 8″ screws to secure the beams to the top of the posts. Ensure that the beams join precisely at the center of the posts for a stable connection. Use a spirit level to check that the beams are perfectly horizontal before securing them fully. This will ensure your structure remains level and strong.
Attaching-the-crossbeams
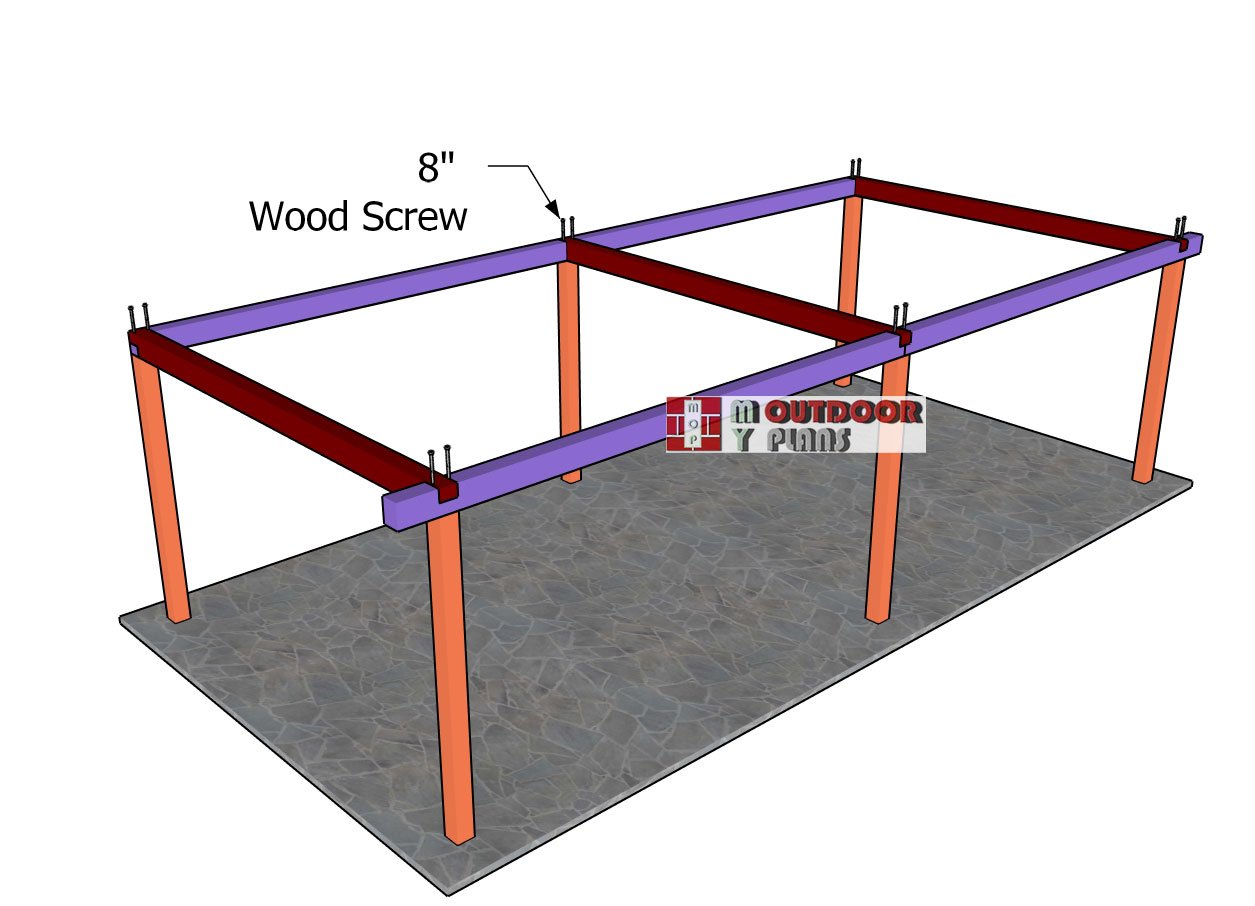
Next, attach the crossbeams to the top of the pavilion. Drill pilot holes through the crossbeams and insert 8″ screws to ensure a secure fit. Before attaching the beams, double-check that the posts are perfectly vertical using a spirit level. This will help keep the structure sturdy and aligned as you tighten the crossbeams into place.
Fitting the braces
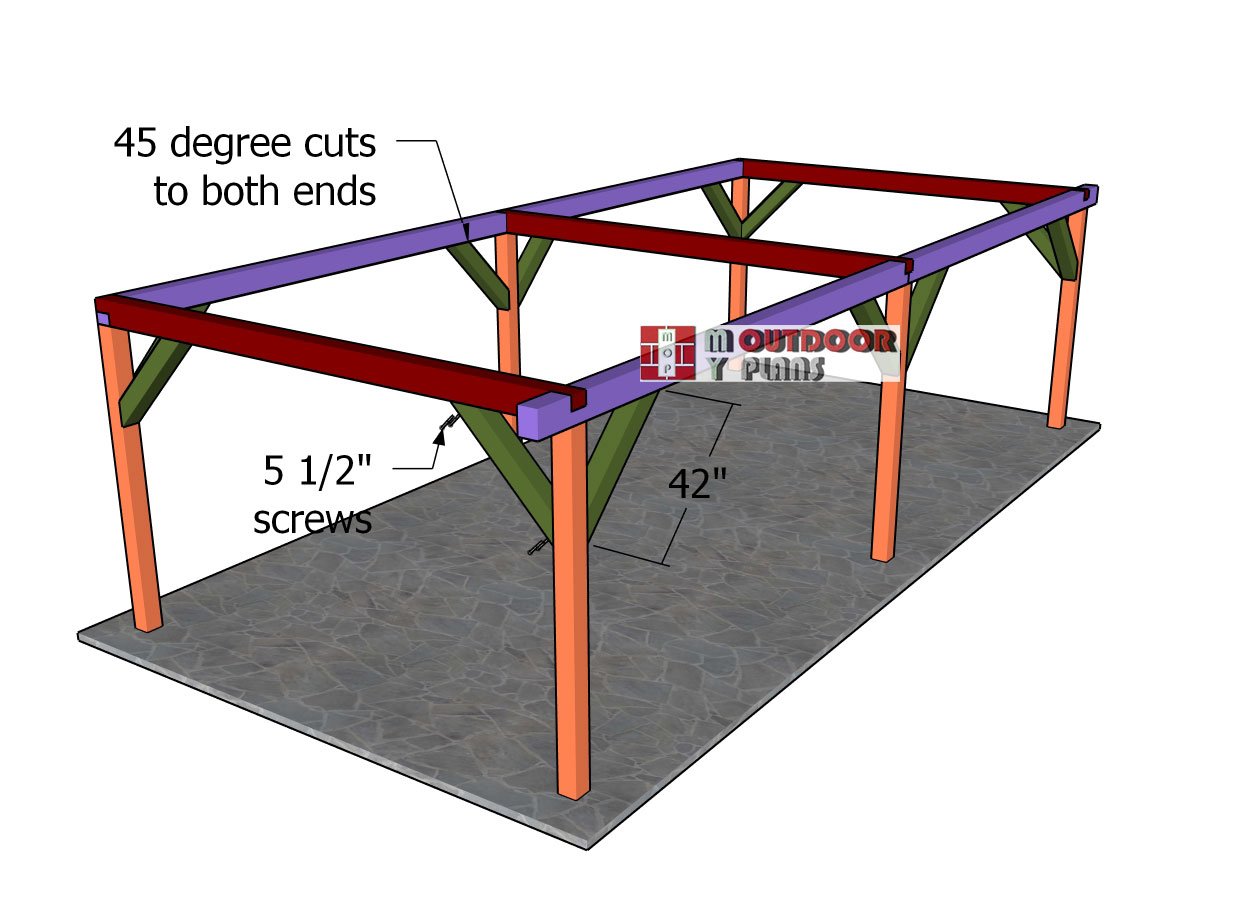
Fitting-the-braces
Use 6×6 lumber for the braces to strengthen the structure. Cut the braces at 45-degree angles on both ends, as shown in the diagram. These braces will provide additional rigidity to the pavilion. Drill pilot holes at the joints and insert 5 1/2″ screws to secure the braces to the structure. Use two screws for each joint to ensure a tight, secure fit that will help stabilize the entire pavilion.
Attach the braces to the posts of the pavilion as shown in the diagram. Before securing them, make sure the posts are plumb and the top beams are perfectly horizontal. This will ensure the structure is aligned properly. Once verified, position the braces and secure them in place using screws. These braces will add essential stability to the overall structure.
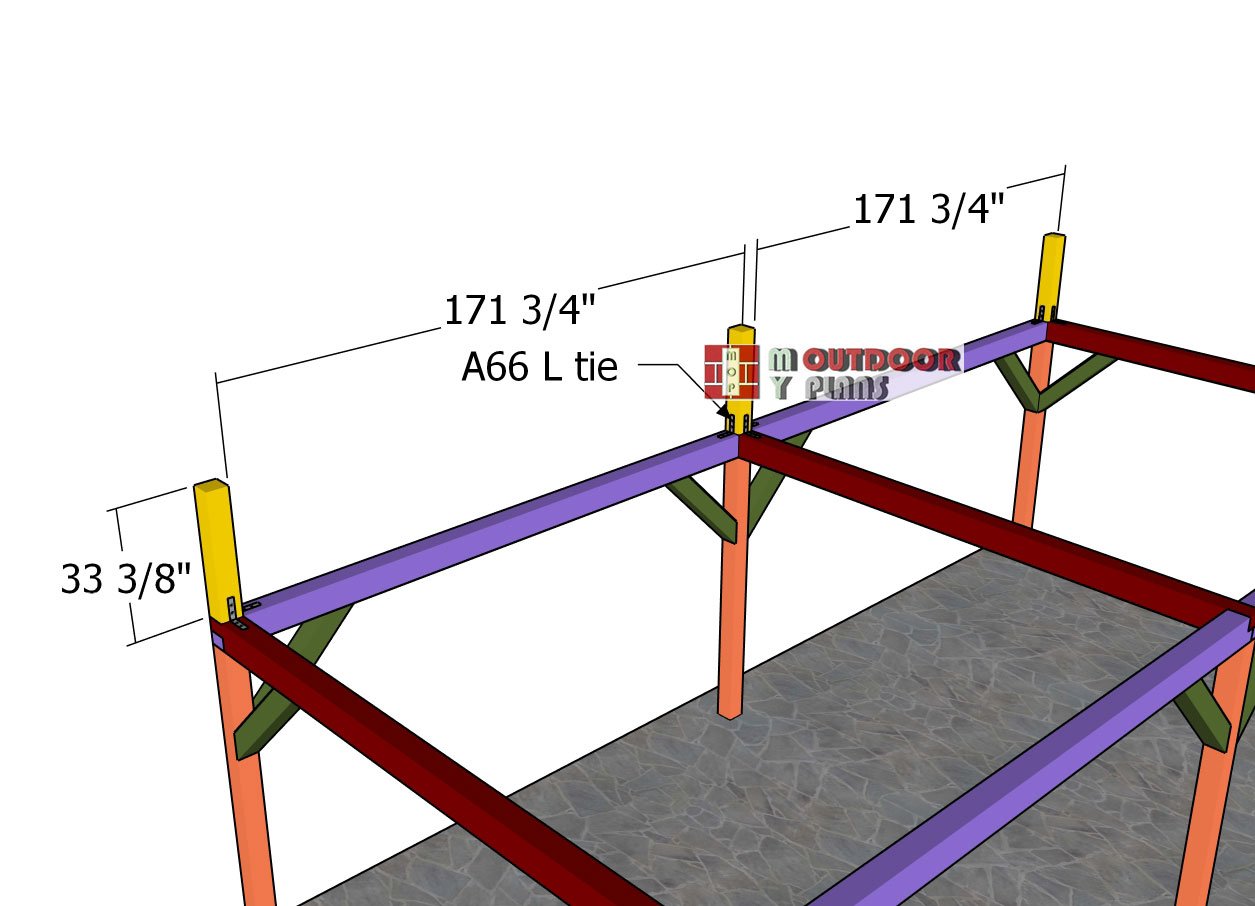
Attaching-the-top-ridge-supports
Attach the 6×6 supports to the back of the pavilion, ensuring the posts are plumb using a spirit level. Secure them with L ties and 1 1/2″ structural screws, checking for alignment before tightening.
Fitting-the-middle-post-supports
Next, install the middle 6×6 supports using post-to-beam connectors and the same screws. Center the posts carefully before locking them into place.
These middle supports are important for providing extra strength to the roof rafters, improving the overall stability and rigidity of the pavilion.
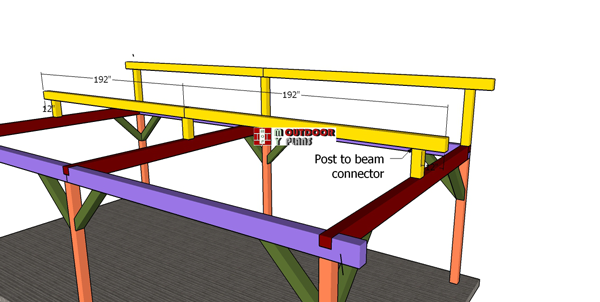
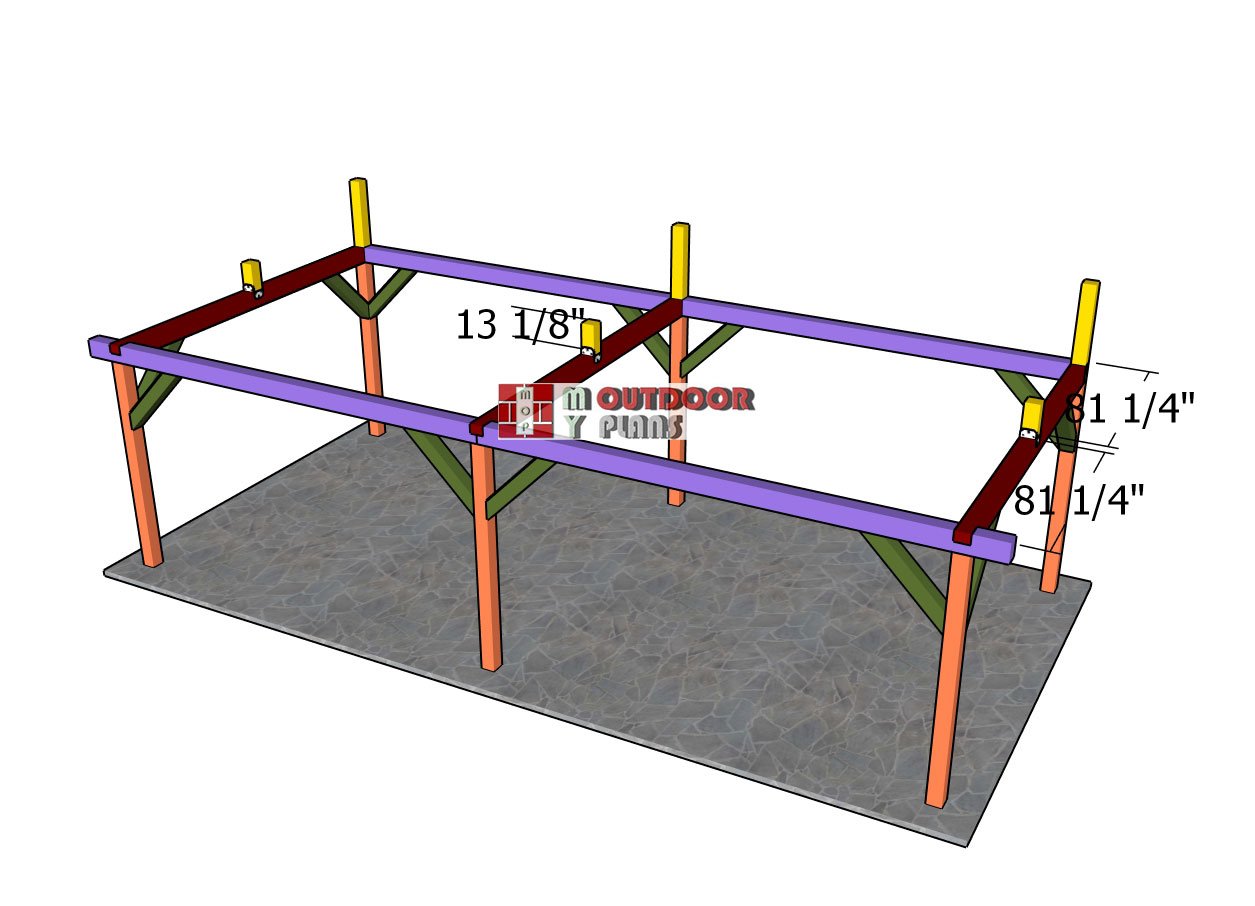
Fitting-the-ridge-beam
Use 6×8 lumber for the ridge beams. Cut notches into the beams as indicated in the diagram. Once the notches are made, fit the beams securely on top of the supports.
To fasten them, use 8″ screws and post-to-beam connectors with 1 1/2″ structural screws. Make sure everything is aligned and tightly secured to ensure the beams provide strong support for the roof structure.

Fitting-the-ridge-beam-braces
Use 6×6 lumber for the braces. Make 45 degree cuts at both ends of the braces. Secure the braces into place with 5 1/2″ screws. Drill pilot holes before inserting the screws. Use at least 2 screws for each joint. These braces will really reinforce the structure and add extra-support to the ridge beams.
Building the roof
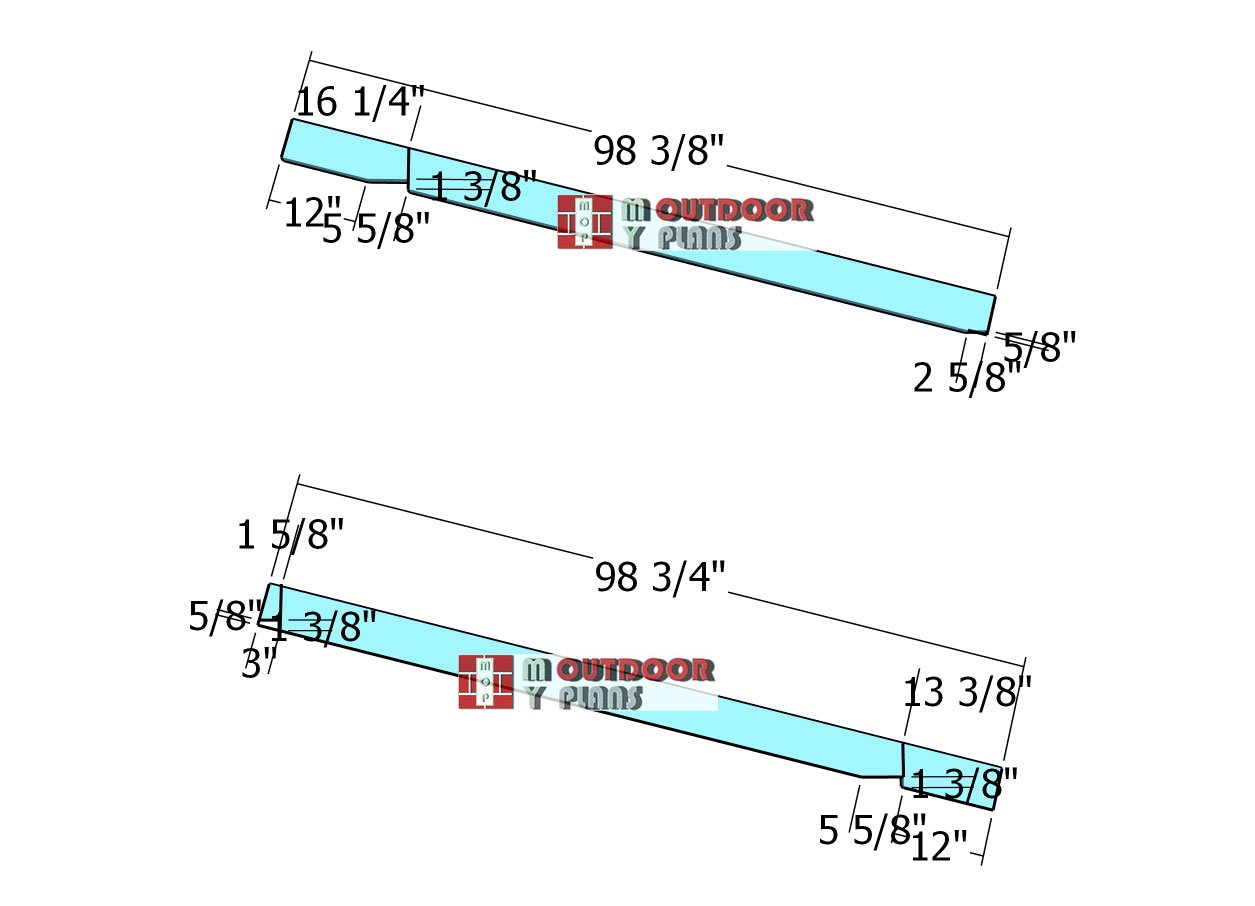
Rafters—cut-details
Next, build the rafters for the lean-to roof using 2×6 lumber. Cut notches where necessary, following the cut lines as shown in the diagram. Use a circular saw to make the cuts, and smooth the edges with sandpaper to ensure a clean finish. Keep in mind that the bottom rafter will go at the base of the roof structure, providing essential support.
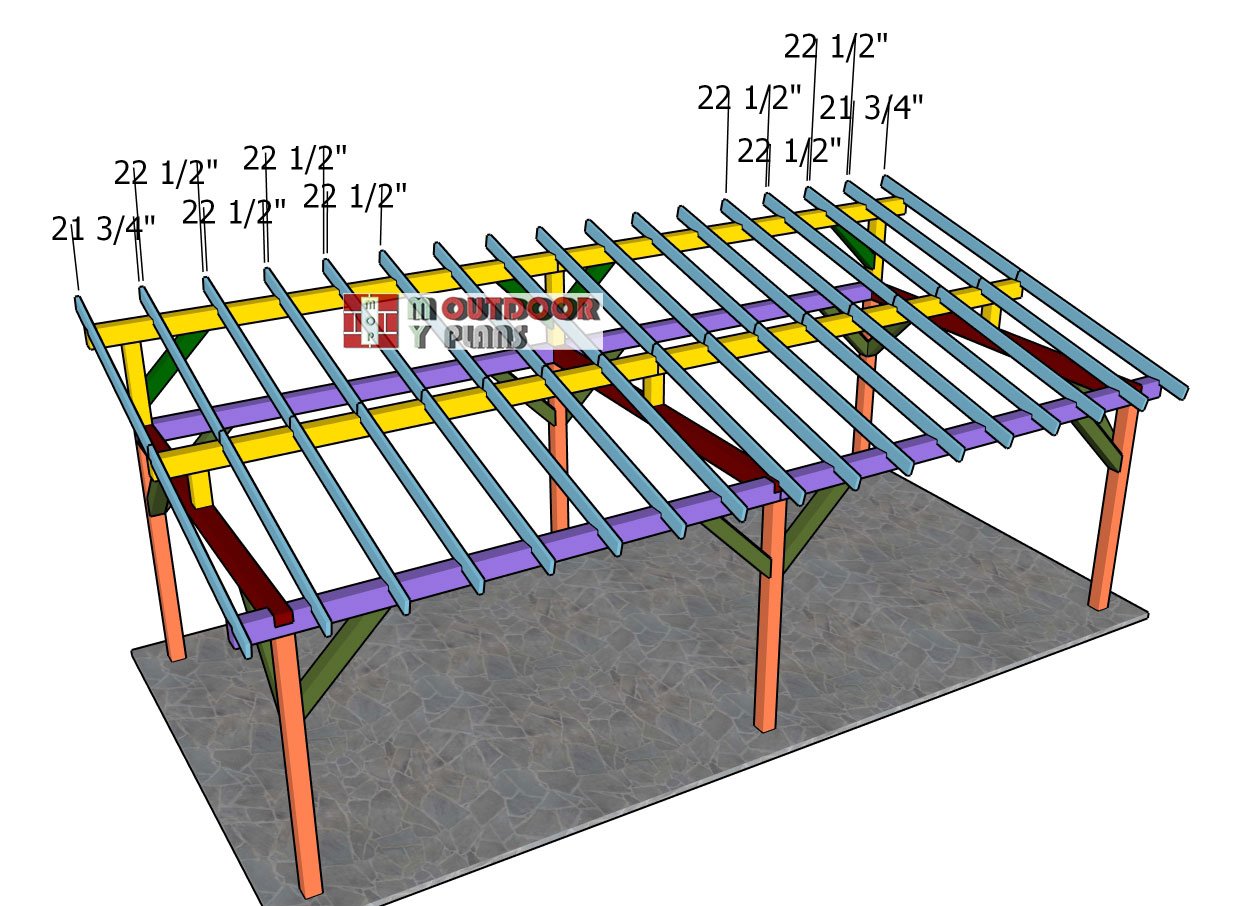
Fitting-the-rafters
Next, fit the rafters to the top of the pavilion, every 24″ on center. Use rafter ties and 1 1/2″ structural screws to lock the rafters into place tightly. Use a tie at each end of the rafters.

Rafter-tie—detail
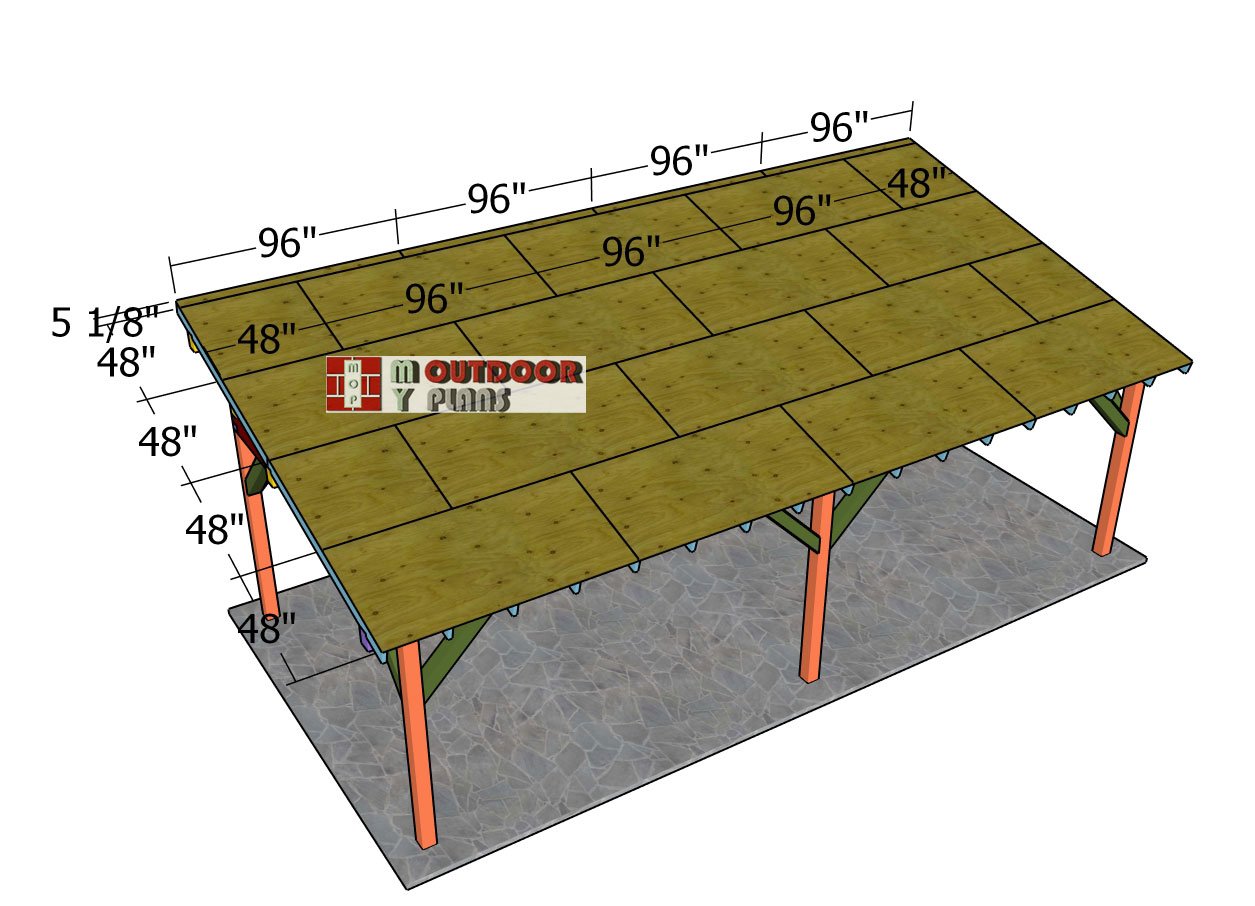
Roof-sheets—details
Attach the 3/4″ plywood sheets to the roof, starting at the lower left side and working up toward the ridge line. Make sure there are no gaps between the sheets, and secure them with 2 1/2″ screws, placing the screws every 8 inches along the rafters.
Ensure that the edges of adjacent sheets meet along the middle of the rafters for proper alignment and support. This method will create a strong and stable roof surface for the pavilion.
Front-and-back-roof-trims
Side-roof-trims
Next, attach the 1×8 trims to the sides of the pavilion, making sure the edges are flush. Secure them tightly using 2″ nails. Once the side trims are in place, cut and install the trims on the gable ends of the pavilion.
Use the same 2″ nails to fix the gable trims securely. These trims will give the pavilion a finished and polished look while protecting the edges from the elements. Cut and install the trims to the gable ends of the pavilion. Use 2″ nails to secure the trims into place.
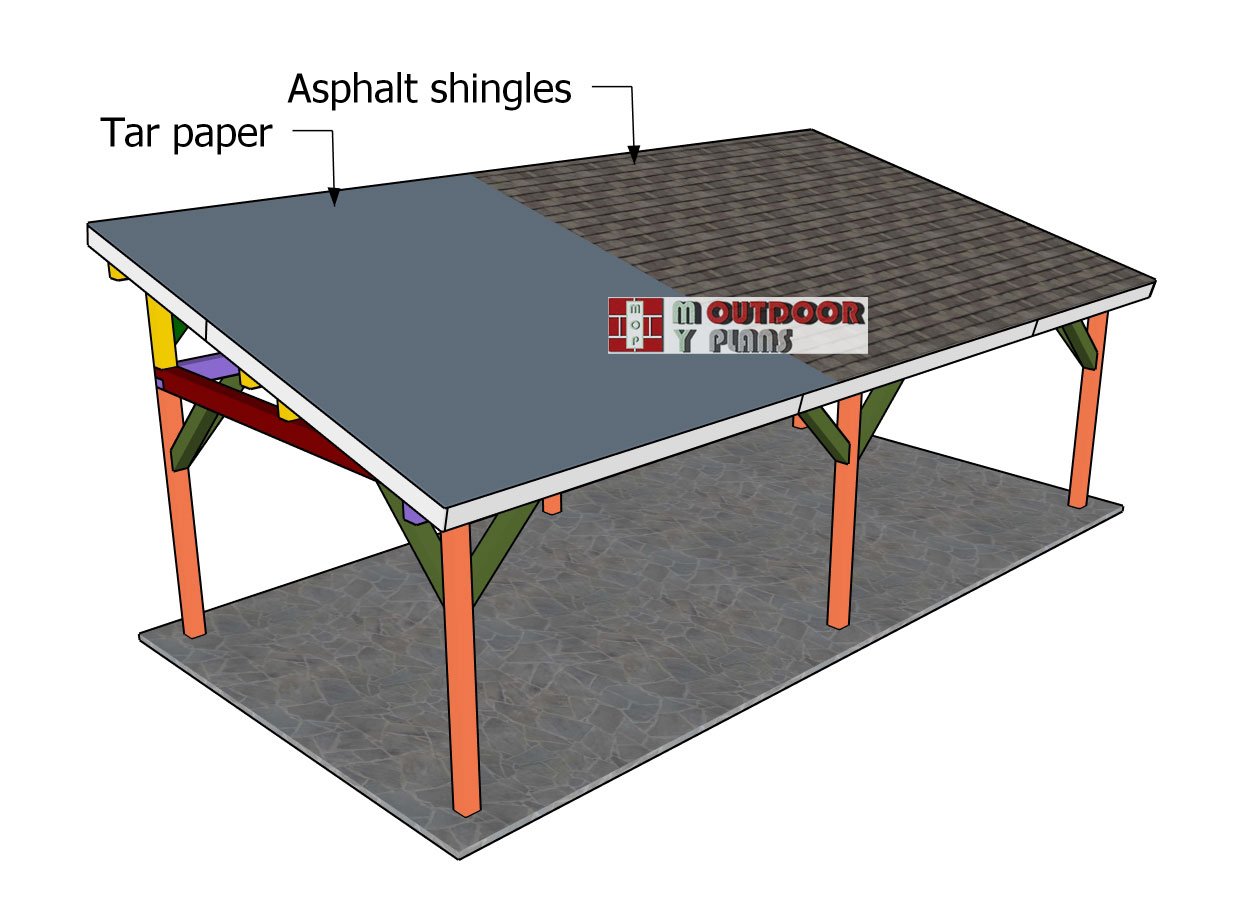
Fitting-the-roofing—lean-to-pavilion
To install asphalt shingles on the pavilion roof, first, lay an asphalt underlayment over the plywood, ensuring full coverage and proper overlapping. Begin at the lower edge with a starter strip, securing it with roofing nails.
Next, lay the first row of shingles along the eaves, aligning the tabs with the starter strip and nailing them down. Continue installing additional rows, staggering the shingle joints for stability and following the manufacturer’s guidelines for overlap and nail placement to ensure proper protection and longevity of the roof.
Finishing touches
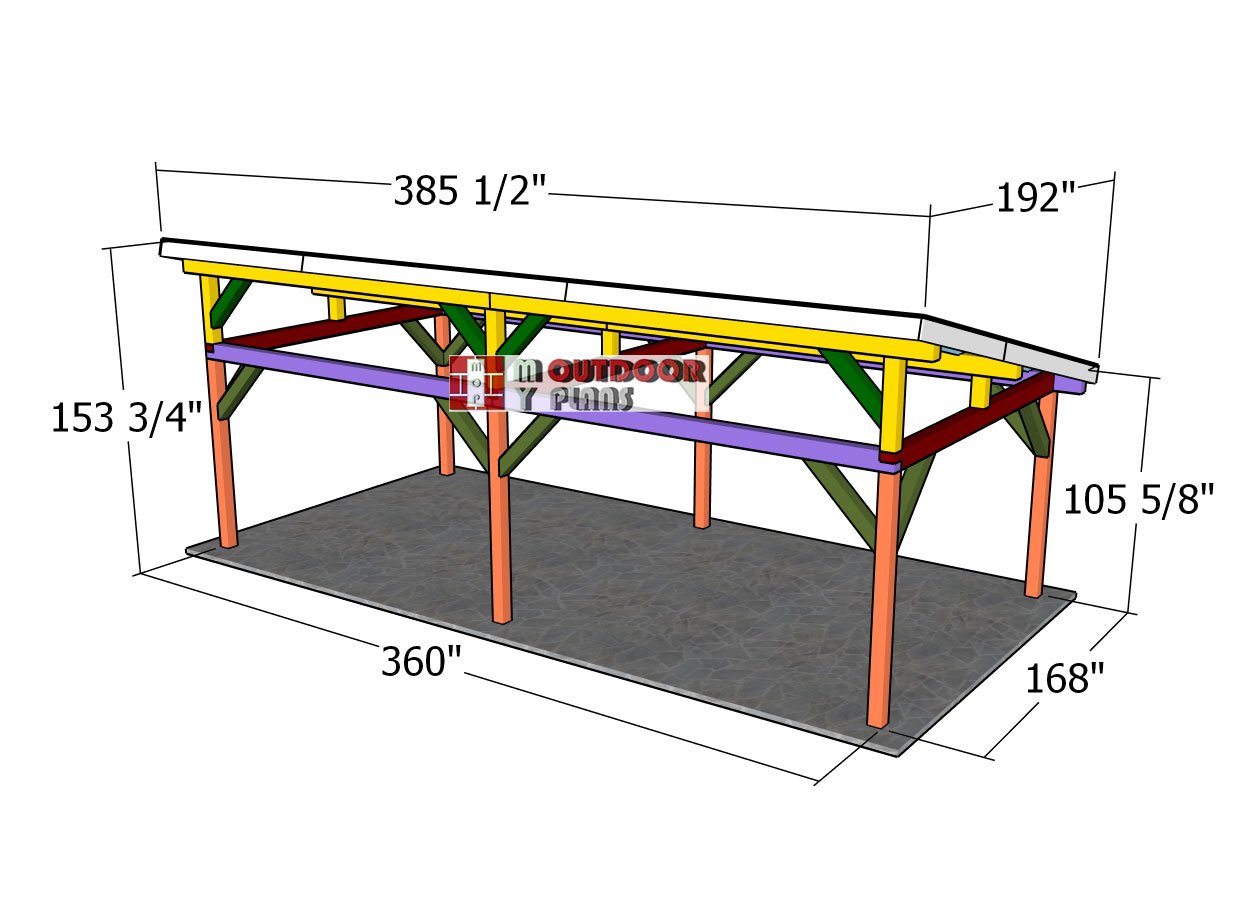
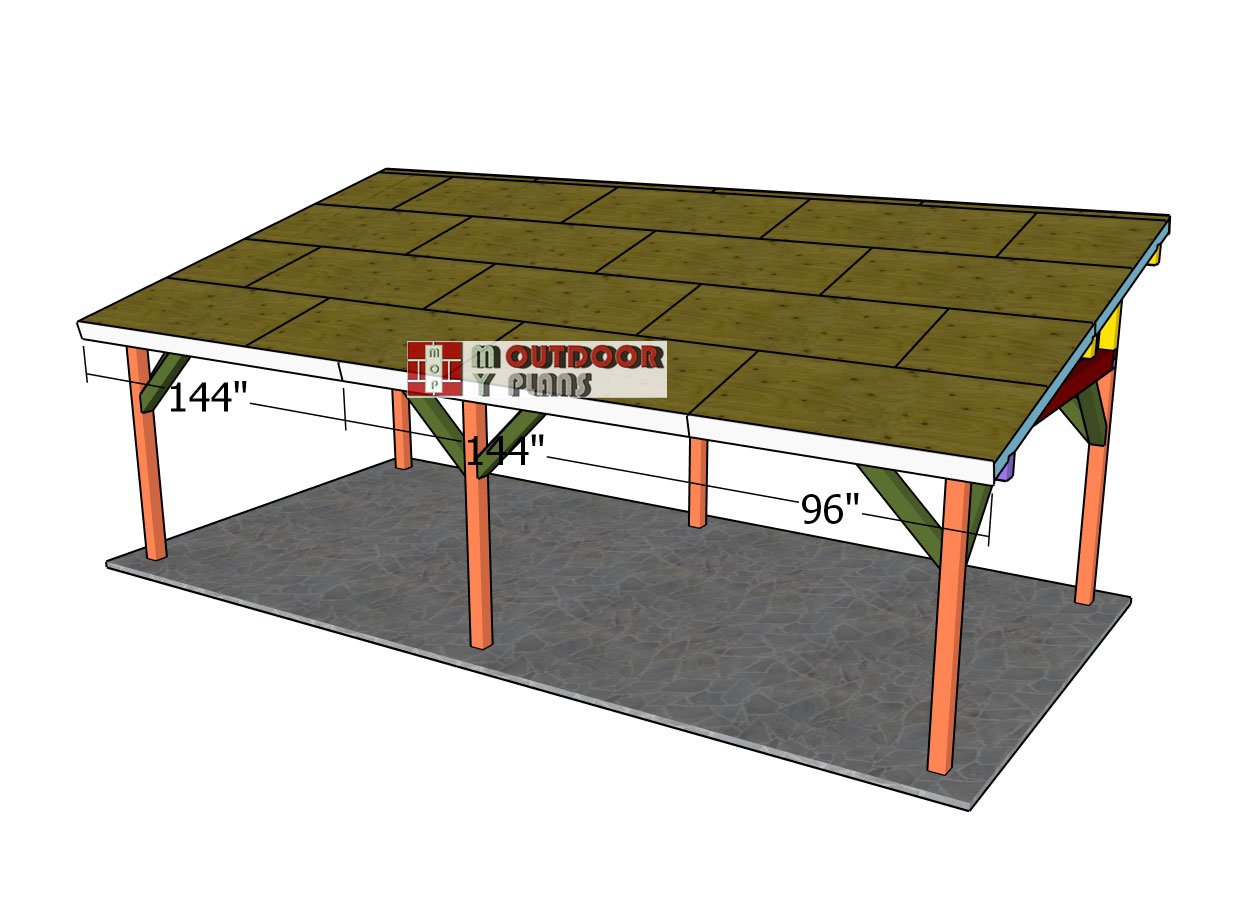
14×30-pavilion-plans—full-dimensions
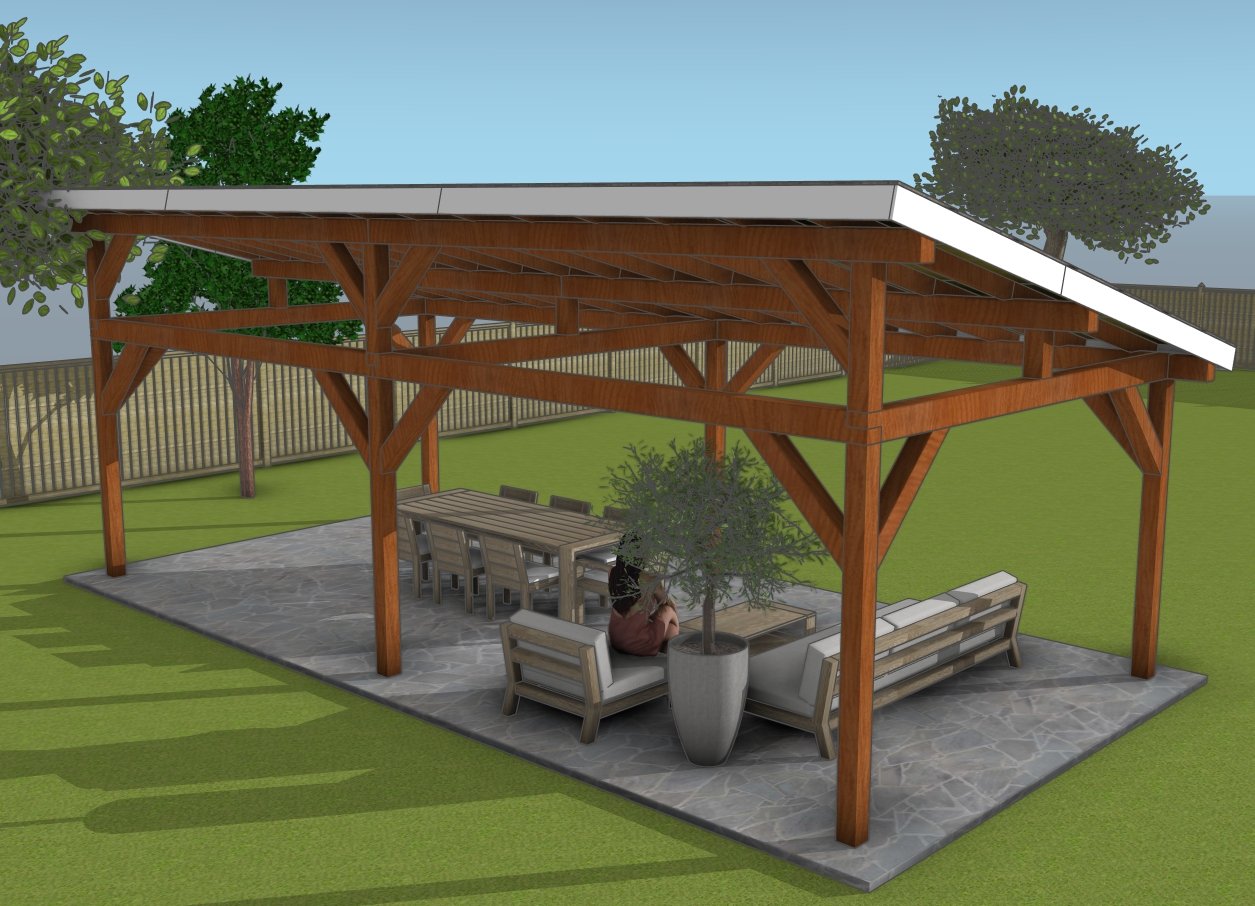
To complete the pavilion, apply a weather-resistant stain or paint to protect the wood and enhance its appearance. Add comfortable outdoor furniture and decorative lighting to create a welcoming, functional space for gatherings.
Finally, consider adding potted plants or outdoor curtains to give the pavilion a cozy, finished feel that blends with your backyard.
Large pavilion – free plans
To enhance your pavilion, consider adding built-in benches for extra seating or storage. You can also install retractable outdoor curtains for privacy and shade. Lastly, incorporate a small outdoor kitchen or bar area to make it a versatile space for entertaining guests.
14×20 lean to pavilion – free plans
Building a 14×30 lean-to pavilion is the perfect DIY project to create a stylish, functional space for entertaining or relaxing. Imagine having a shaded spot for family gatherings, BBQs, or even a quiet place to unwind with a book. With detailed plans, straightforward construction, and room to customize with furniture, lighting, and more, this pavilion can become the centerpiece of your outdoor area.
14×20 lean to pavilion plans
Building a 14×30 lean-to pavilion is a rewarding project that can transform your outdoor space into a functional and stylish area. With careful planning, the right materials, and patience, you can create a sturdy structure that will last for years. Whether it’s for hosting family gatherings, enjoying quiet afternoons, or adding value to your property, this pavilion offers both beauty and practicality. Now that you have the plans and cost estimates, it’s time to roll up your sleeves and get started on your dream pavilion!
Top Tip: Check out the Shop, as well, for full list of Premium Plans. If you want to get PREMIUM PLANS for this project, in a PDF format, please press GET PDF PLANS button bellow. Thank you for the support.

This woodworking project was about 14×30 lean to pavilion plans free. If you want to see more outdoor plans, check out the rest of our step by step projects and follow the instructions to obtain a professional result.