This step by step diy project is about 12×12 hip roof gazebo plans. This square gazebo has a 12×12 footprint and it features a hip roof with generous overhangs on all sides. This gazebo is easy to build and it carries that elegant look that will make it stand out in any backyard. Make sure you read the local codes so you can comply with the legal requirements. Take a look over the rest of my woodworking plans, if you want to get more building inspiration. Premium Plans for this project available in the Shop.
When buying the lumber, you should select the planks with great care, making sure they are straight and without any visible flaws (cracks, knots, twists, decay). Investing in cedar or other weather resistant lumber is a good idea, as it will pay off on the long run. Use a spirit level to plumb and align the components, before inserting the galvanized screws, otherwise the project won’t have a symmetrical look. If you have all the materials and tools required for the project, you could get the job done in about a day. See all my Premium Plans HERE.
Projects made from these plans
12×12 Hip Roof Gazebo Plans
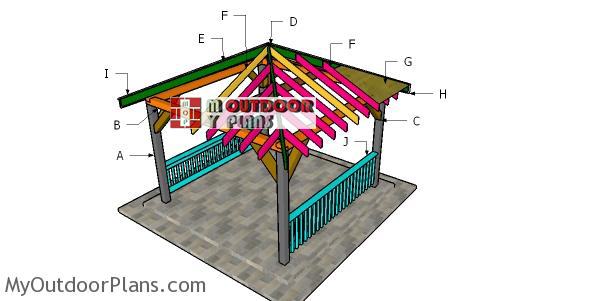
building-a-12×12-hip-roof-gazebo
Cut & Shopping Lists
- A – 4 pieces of 6×6 lumber – 8′ long POSTS
- B – 5 pieces of 6×6 lumber – 12′ long PLATES
- C – 8 pieces of 6×6 lumber – 36″ long BRACES
- 4 pieces of 6×6 lumber – 8′
- 7 pieces of 6×6 lumber – 12′
- 4 post anchors
- 8 pieces of 8 1/2″ screws
- 32 pieces of 5″ screws
- wood filler , wood glue, stain/paint
Tools
![]() Hammer, Tape measure, Framing square, Level
Hammer, Tape measure, Framing square, Level
![]() Miter saw, Drill machinery, Screwdriver, Sander
Miter saw, Drill machinery, Screwdriver, Sander
![]() Safety Gloves, Safety Glasses
Safety Gloves, Safety Glasses
Time
Related
- PART 1: 12×12 Shed with a Hip Roof Plans
- PART 2: 12×12 Hip Roof Shed Plans
It’s that simple to build a wooden gazebo – Video!
12×12 Garden Gazebo with Hip Roof Plans
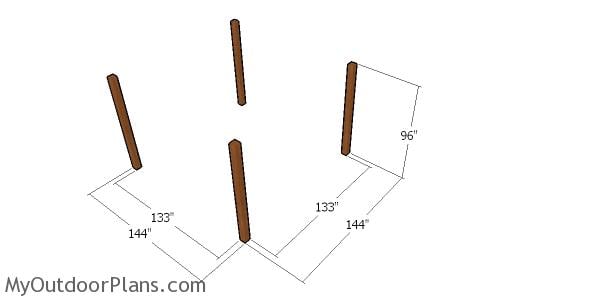
Laying out the posts – square gazebo
The first step of the project is to lay out the location of the gazebo posts. Use batter boards and string to make sure the diagonals are equal. In addition, apply the 3-4-5 rule to the corners of the gazebo to make sure they are right-angled.

Anchoring the posts of the anchor
You can set the posts in concrete or you can pour 3′ deep footings and use posts anchors. Considering this is a light outdoor project, you can set the posts to anchors. That is why, these plans are designed having that assumption in mind (concrete anchors). Make sure you let the concrete to dry out for a few day, before installing the posts into place. Use temporarily braces to secure the posts until you attach the plates.
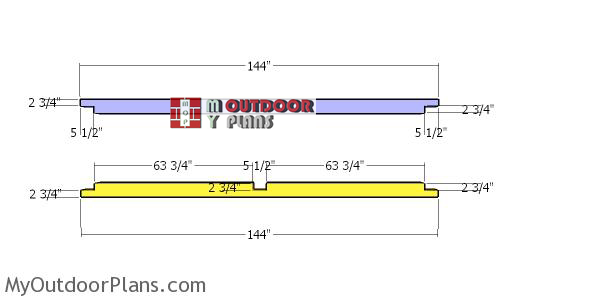
Building-the-plates-for-the-gazebo
Use 6×6 lumber for the top plates. Use a circular saw to make notches to the beams, as shown in the diagram. Make parallel cuts inside the marked areas and then remove the excess with a chisel and sandpaper.
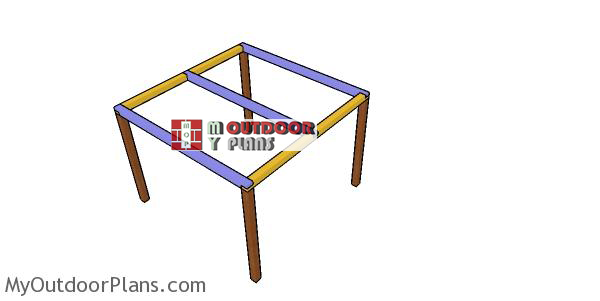
Fitting-the-top-rails-to-the-12×12-gazebo
Fit the beams to the top of the posts and align the edges flush. Drill pilot holes and insert 8 1/2″ screws to lock them into place tightly. Make sure the corners are right angled.
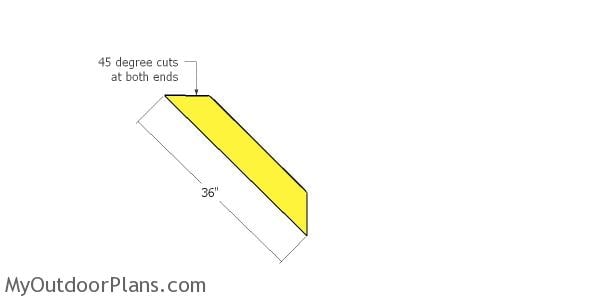
Building the braces for the gazebo
Use 6×6 lumber for the braces. Make 45 degree cuts to both ends of the braces using a circular / miter saw.
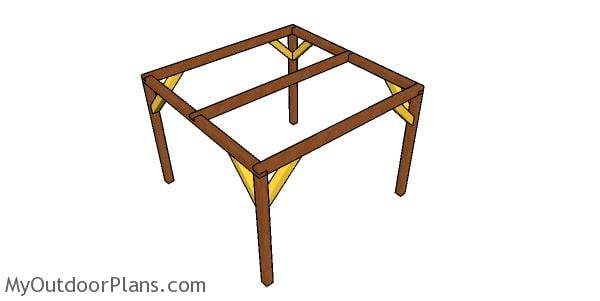
Fitting the braces to the frame of the gazebo
Plumb the posts for the posts and then attach the braces. Drill pilot holes and insert 5 1/2″ screws to lock everything together tightly.
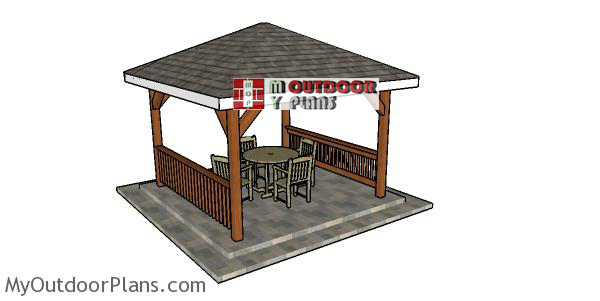
12×12-hip-roof-gazebo-plans
Take a look over PART 2 of the 12×12 gazebo project, so you learn how to build the hip roof.
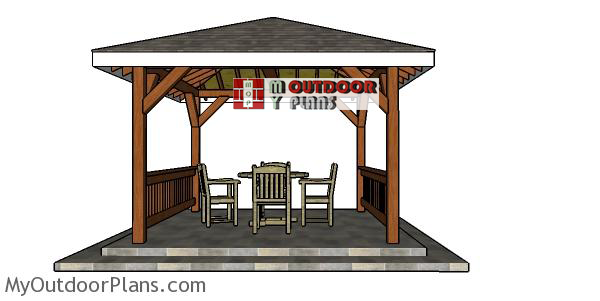
How-to-build-a-12×12-hip-roof-gazebo
This square gazebo with a hip roof is the ideal project if you want to build a beautiful grill shelter or hot tub cover. You can make a lot of adjustments and customize it to suit your needs. Please take a look over the rest of my woodworking plans, because I have over 1500 free designs. Premium Plans for this project available in the Shop.

12×12 Hip Roof Gazebo – dimensions
Building a 12×12 hip roof gazebo will likely cost you between $1,500 and $3,000, depending on the materials and finishes you choose. Time-wise, you can expect to spend about 3 to 4 weekends on this project, especially with the detailed work involved in constructing the hip roof. It’s a bit of an investment in time and money, but the end result is a beautiful, sturdy structure that adds value and charm to your outdoor space.

12×12 hip roof pavilion – free plans
Taking on a 12×12 hip roof gazebo project is a great way to add a touch of elegance and functionality to your backyard. The hip roof design not only gives it a classic, symmetrical look but also provides excellent stability and shade, making it perfect for outdoor gatherings or just relaxing. With a 12×12 footprint, you’ve got plenty of room for seating or a dining setup, turning your yard into an inviting outdoor retreat that you’ll enjoy year-round.

How to build a 12×12 hip roof gazebo
If you want to get PREMIUM PLANS for this project, in a PDF format, please press GET PDF PLANS button bellow. Thank you for the support.
This woodworking project was about 12×12 hip roof gazebo plans free. If you want to see more outdoor plans, check out the rest of our step by step projects and follow the instructions to obtain a professional result.


11 comments
I would like to use Tuscan columns for the posts. If I add a Third railing for support, can I eliminate the post braces?
It depends on the local winds and local codes.
Hi can I use longer beams and turn it into 16×16 ?
You need an extra middle post or 6×8 plates instead of the 6×6 plates.
The picture shows a fascia board, do you have the measurement for that pieces and do the plywood cuts account for the fascia board?
You’ll find those details in PART 2 (see NEXT button at the bottom of the article)
I would like to purchase this plan but it is not on the premium list. Let me know how to get it.
Not available at the moment. For free version read this: https://myoutdoorplans.com/faq/
Are any of these printable?
Read this: https://myoutdoorplans.com/faq/
What is the height for this build?