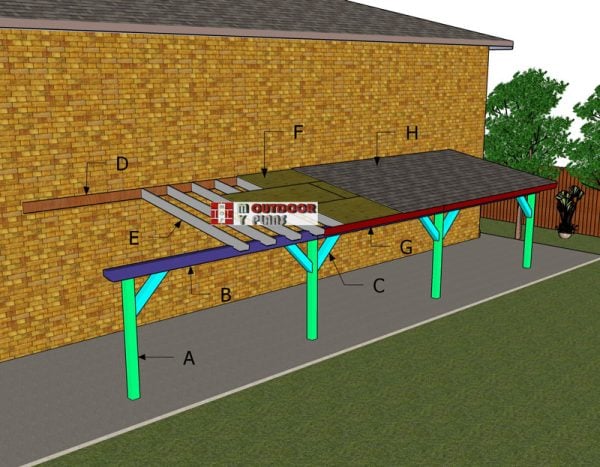
This step by step diy project is about 10×40 lean to patio cover plans. This lean to can be both used as a carport or as a patio cover. If you’re embarking on a DIY project to enhance your outdoor space, my latest venture into building a 10×40 lean-to patio cover might just be the inspiration you need.
Utilizing simple techniques and accessible materials, this cover not only promises to shield your patio from the elements but also transforms it into a year-round haven for relaxation and entertainment. Join me as I break down the steps, from planning to the final touches, to create a functional and stylish addition to your home.
Take a look over the rest of my woodworking plans, if you want to get more building inspiration.
When buying the lumber, you should select the planks with great care, making sure they are straight and without any visible flaws (cracks, knots, twists, decay). Investing in cedar or other weather resistant lumber is a good idea, as it will pay off on the long run. Use a spirit level to plumb and align the components, before inserting the galvanized screws, otherwise the project won’t have a symmetrical look. If you have all the materials and tools required for the project, you could get the job done in about a day.
Projects made from these plans
10×40 Lean to Patio Cover Plans – PDF Download
Building-a-10×40-patio-cover
Cut & Shopping List
A – Posts – 6×6 lumber 80 1/4″ long – 4 pieces
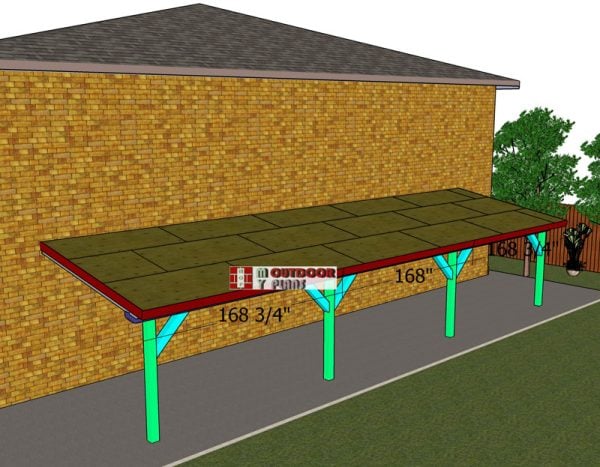
B – Top Beams – 6×8 lumber 163 3/4″ long – 1 piece
B – Top Beams – 6×8 lumber 175 3/4″ long – 2 pieces
C – Braces – 6×6 lumber 36″ long – 6 pieces
D – Ledger Boards – 2×8 lumber 168″ long – 3 pieces
E – Rafters – 2×8 lumber 136″ long – 22 pieces
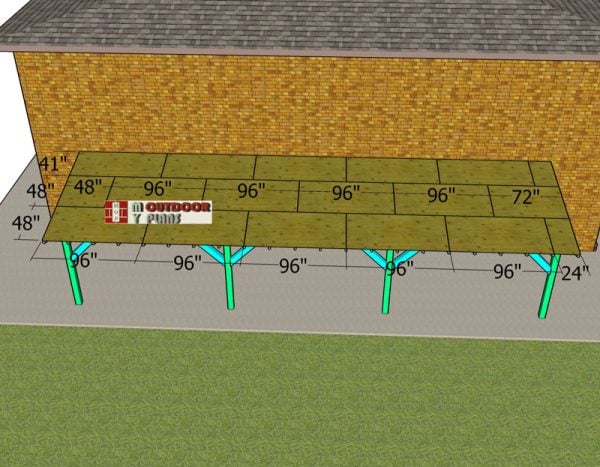
F – Roof sheets – 3/4″ plywood 4’x8′ – 9 pieces
F – Roof sheets – 3/4″ plywood 4’x4′ – 1 piece
F – Roof sheets – 3/4″ plywood 4’x6′ – 1 piece
F – Roof sheets – 3/4″ plywood 4’x2′ – 1 piece
F – Roof sheets – 3/4″ plywood 41″x8′ – 5 pieces
F – Roof sheets – 3/4″ plywood 41″x2′ – 1 piece
G – Trims – 1×6 lumber 168″ long – 1 piece
G – Trims – 1×6 lumber 168 3/4″ long – 2 pieces
G – Trims – 1×6 lumber 120 3/4″ long – 1 piece
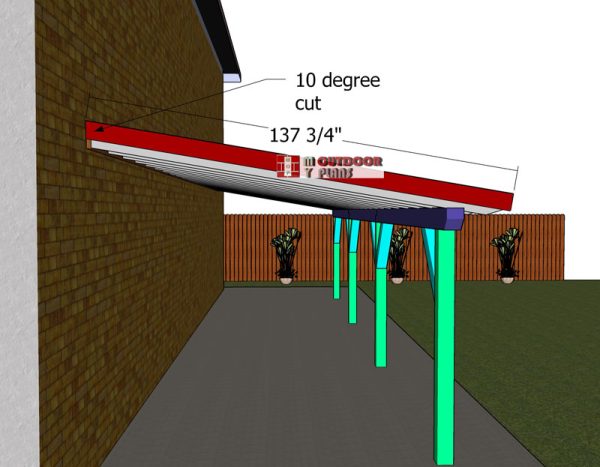
G – Trims – 1×6 lumber 137 3/4″ long – 2 pieces
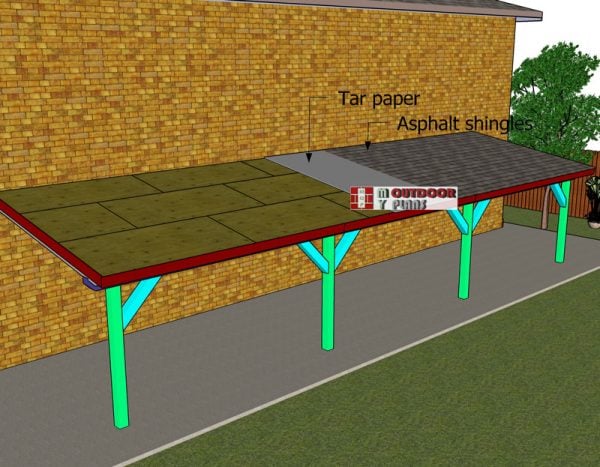
H – Roofing – Underlayment – 550 sq f
H – Roofing – Underlayment – 550 sq f
Tools
![]() Hammer, Tape measure, Framing square, Level
Hammer, Tape measure, Framing square, Level
![]() Miter saw, Drill machinery, Screwdriver, Sander
Miter saw, Drill machinery, Screwdriver, Sander
![]() Concrete mixer, Post hole digger
Concrete mixer, Post hole digger
Time
![]() One week
One week
Related
Pin for later!

Building an attached carport – 10×20 DIY Plans
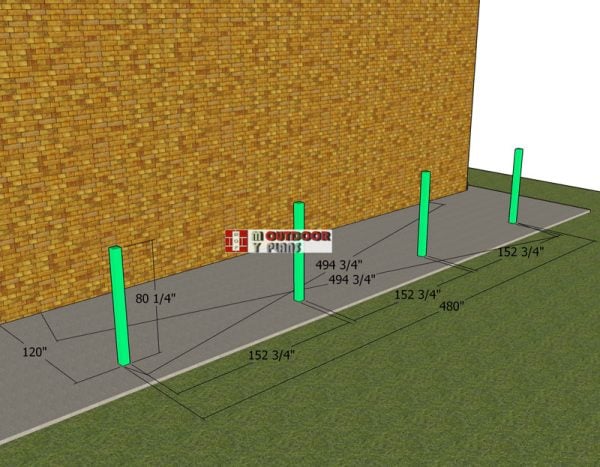
Laying-out-the-posts
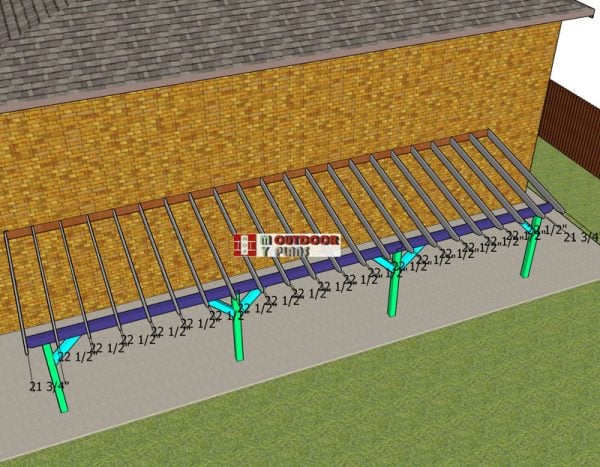
First, you need to layout the posts for the patio cover. Use batter boards and string to mark the location for the posts. Dig 3 ft deep holes and 12″ in diameter. Set the concrete tubes and then fill them with concrete. Set the post anchors into place and line them one to another.

Anchoring the posts of the anchor
You can set the posts in concrete or you can pour 3′ deep footings and use posts anchors. Considering this is a light outdoor project, you can set the posts to anchors. That is why, these plans are designed having that assumption in mind (concrete anchors).
Dig the holes and set the 14″ tube forms. Fill the tubes with concrete and set the post anchors. Make sure you let the concrete to dry out for a few day, before installing the posts into place. Use temporarily braces to secure the posts until you attach the plates.
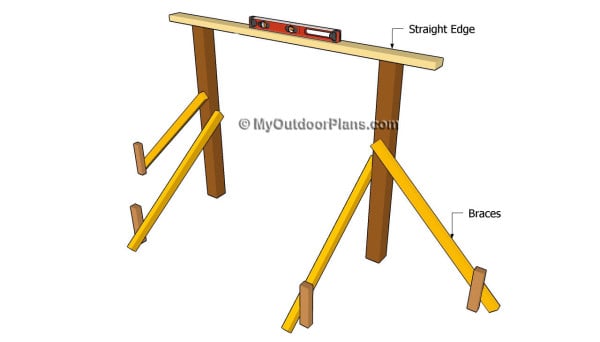
Installing the posts
Use a laser level / water level to make sure the top of the posts are at the same level.
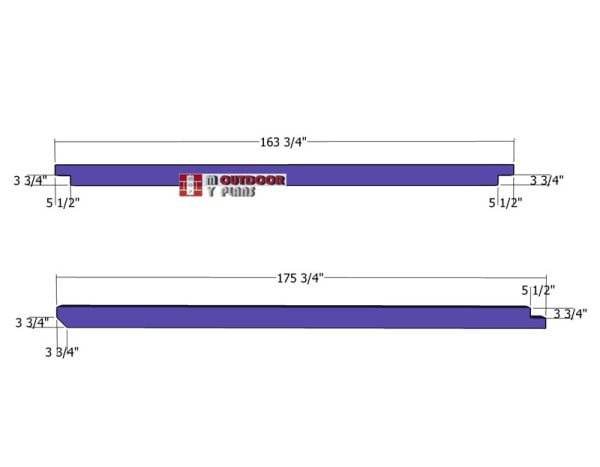
Top-plates—cutting-detail
For the top support beams, we’ll be using sturdy 6×8 lumber, and here’s how to prepare them: Start by marking both ends for 3 3/4″ deep notches, as outlined in the diagram. Using a circular saw, adjust your blade depth to precisely 3 3/4″ and make parallel cuts within the marked areas.
Then, grab a hammer and chisel to knock out the excess wood. Lastly, for a bit of flair, we’ll finish one end of each beam with a decorative cut, adding a unique touch to our project. Let’s get to work and make these beams perfect for our lean-to patio cover!
Attaching-the-top-support-beams
Fitting-the-top-beams
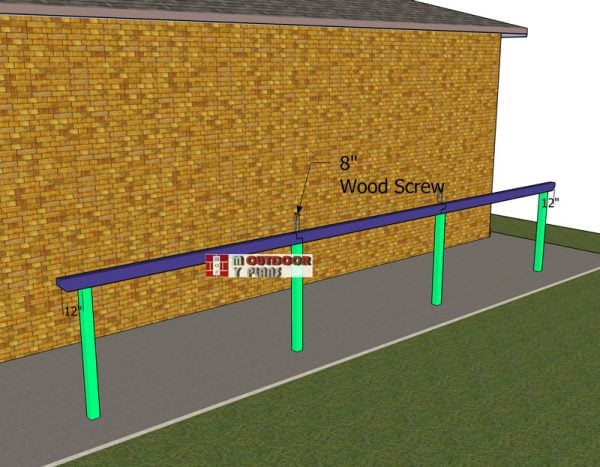
Next up, we’ll secure the beams on top of the posts. Make sure the edges of the beams are perfectly aligned with the posts. Before fixing them into place, double-check that the posts are straight using a spirit level. Once everything is aligned, drill pilot holes and drive in 10″ screws to firmly attach the beams to the posts.
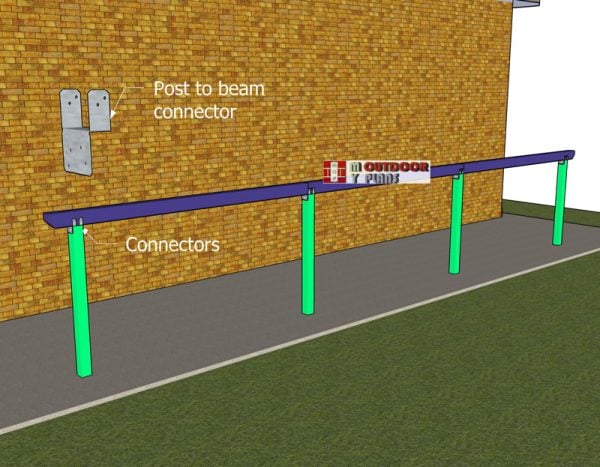
To ensure our structure is rock-solid, we’ll also reinforce the joints. Use post-to-beam connectors and 1 1/2″ structural screws for extra stability. Refer to the image above for a detailed visual on how everything fits together. Let’s make sure our patio cover is as sturdy as it is stylish!
Fitting-the-diagonal-braces
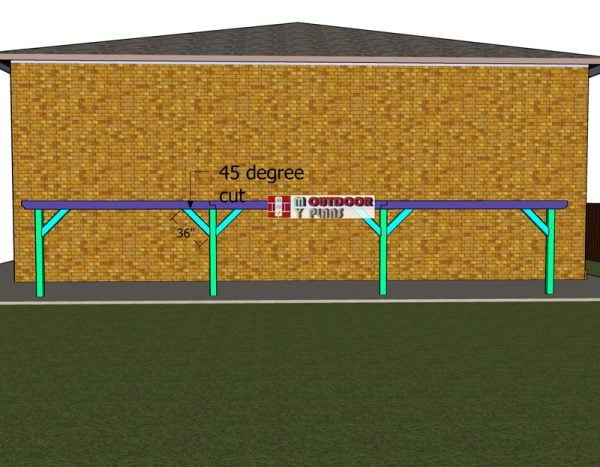
For the braces, we’re going to use 6×6 lumber to really boost the stability of our structure. Start by cutting the braces as indicated in the diagram—each end should have a 45-degree angle for a snug fit against the main structure.
Next, you’ll want to pre-drill pilot holes to prevent any splitting. Once your holes are ready, secure each brace with 5 1/2″ screws, using two screws at each joint to ensure a solid connection.
This step is crucial for adding the necessary rigidity to our pavilion, so take your time to get it just right!
Ledger-boards
Fitting-the-ledger-boards
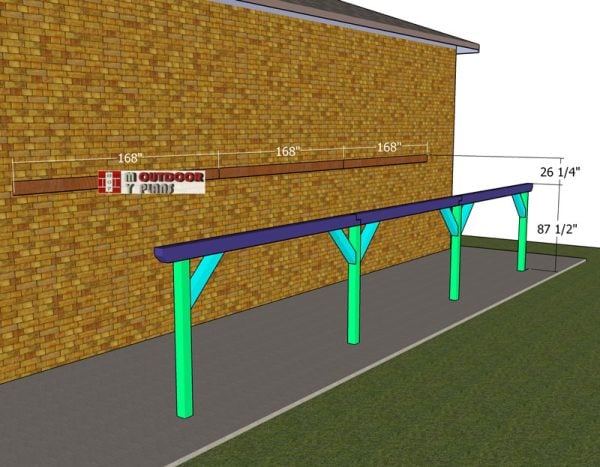
Moving on, we’re going to attach the 2×10 ledger directly to your house. It’s crucial to anchor this ledger securely into the home’s framing, so use 4 1/2″ lag screws with washers, or longer if your home’s structure requires it.
To ensure your ledger is perfectly horizontal, grab your trusty spirit level and make any necessary adjustments. Once you’re all lined up, drill pilot holes to help guide the screws in smoothly and to prevent any wood splitting. For a solid attachment, place three screws into each stud.
Always double-check your local building codes to ensure you’re meeting all requirements for securing the ledger to your home. Safety and precision are key here, so take your time to get it just right!
Building the lean to roof
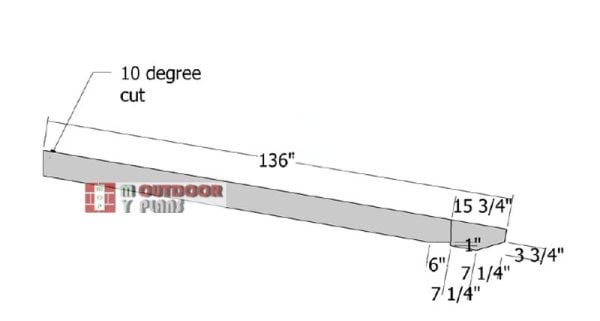
When it comes to setting up the 2×8 rafters for our pavilion project, precision cuts are key for a sturdy and visually appealing structure. First, you’ll make a 10-degree angle cut at one end of each rafter, which allows the rafters to sit flush against the ledger, enhancing the overall look and fit. On the opposite end, you’ll carve out a birdsmouth notch.
This notch is essential as it helps the rafter securely rest over and connect to the support beams, providing crucial structural support and stability. Taking the time to measure and cut these features accurately will ensure a smooth installation and a robust final product.
Attaching-the-rafters

Rafter-ties
Next up, we’ll install the rafters for our patio cover. Start by positioning the 2×8 rafters at intervals of 24 inches on center across the top. To securely attach each rafter to the ledger boards, use rafter hangers along with 1 1/2″ structural screws for a tight and sturdy fit.
Then, to ensure the rafters are well-secured to the support beams, employ rafter ties and the same 1 1/2″ structural screws. This dual connection strategy not only enhances the overall strength of the structure but also ensures your patio cover will stand up to the elements. Let’s get these rafters set up right!

Fitting-the-hangers
To attach rafters with rafter hangers, first, position the hangers along the support beams at the desired spacing, ensuring they are level and aligned. Next, place the rafters into the hangers, making sure they fit snugly, and then secure them with appropriate nails or screws to create a sturdy and reliable patio cover structure.
Fitting-the-roof-sheets
Now, let’s move on to laying the 3/4″ plywood sheets on top of our pavilion. Begin by positioning the plywood panels perpendicular to the roof rafters to ensure proper support. Secure these panels to the rafters using 2 1/2-inch wood screws. Place these screws about every 6 to 8 inches along the plywood edges and around every 12 inches in the center areas of the panels.
This method will help evenly distribute the weight and enhance the roof’s overall strength and durability. Let’s make sure every panel is snug and well-secured!
Side-roof-trims
Next, we’ll add a finishing touch by attaching 1×6 trims to the sides of our pavilion. Make sure to line up the trims flush with the top edge of the roof sheets for a clean look. Use 2″ nails to securely fasten the trims to the pavilion’s frame.
This step not only enhances the aesthetic of the structure but also helps protect the edges from weathering. Let’s get these trims perfectly aligned and nailed in!
Fitting-the-front-trims
Let’s continue by attaching the trims to the front of the pavilion as well. Line up the edges so they’re flush and neat, and then use 2″ nails to firmly secure the trims into place.
This step ensures a cohesive and polished appearance all around the pavilion. Time to make sure every trim piece is locked in tight and looks great!

Installing-the-roof-flashing
Next, let’s tackle installing a flashing where the roof meets the wall to create a watertight barrier and prevent any leaks. First, it’s essential to consult with the roof manufacturer to ensure you’re using the correct method for sealing the joint—whether the flashing should be placed under or over the roof sheets.
Start by measuring the installation area and cutting your metal flashing to size using tin snips or another appropriate metal cutting tool. Before attaching, clean and dry the target surface thoroughly to ensure it’s free of debris. Apply a generous layer of construction adhesive to the back of the flashing, then firmly press it against the wall, aligning it carefully.
Secure the flashing with galvanized nails or screws, spacing them evenly and making sure they’re flush against the surface. After installation, do a thorough check for any gaps or looseness, and adjust as needed. By paying close attention to these steps and following safety guidelines, your flashing will be set up perfectly to protect and extend the lifespan of your pavilion.
Fitting-the-roofing
To get started with installing asphalt shingles on our lean-to pavilion roof, first roll out an asphalt underlayment over the plywood, making sure to overlap for full coverage. Begin at the bottom with a starter strip, securing it with roofing nails, then align and nail down the first row of shingles along the eaves.
Keep adding rows, staggering the joints as you go, and be sure to follow the manufacturer’s instructions for proper overlap and fastening. To really elevate the look, apply a weather-resistant stain or paint to protect the wood and enhance its beauty.
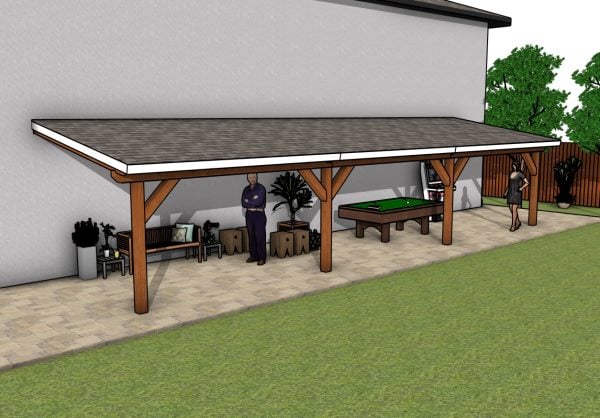
Lastly, add some comfy outdoor furniture and stylish lighting to turn this space into a cozy spot for relaxation and social gatherings.

10×40 patio cover plans – front view
As we near the completion of our lean-to pavilion project, it’s time to focus on the finishing touches that will make it truly shine. First up, sanding! Grab your sander and smooth out any rough spots on the wood. This step is crucial for ensuring a professional, splinter-free finish and better paint adhesion.
Once everything is nicely sanded, it’s time to paint. Choose a high-quality, weather-resistant paint that compleates the look of your outdoor space. Apply it evenly, taking care to cover all exposed areas. This not only boosts the aesthetic but also protects your pavilion from the elements, ensuring it can be enjoyed for years to come.

10×40 patio cover plans – side view
As we wrap up our lean-to pavilion project, let’s talk about the costs and the incredible value it adds to your property. Depending on the materials chosen and the size of the structure, a typical 10×40 lean-to can range in cost. For our project, using premium lumber, durable asphalt shingles, and quality finishes, you can expect to spend around $3,000 to $5,000. This includes all the necessary supplies like wood, fasteners, paint, and other hardware.
While the upfront cost is a consideration, the value it brings to your home is substantial. Not only does this pavilion extend your living space, providing a beautiful and functional outdoor area for relaxation and gatherings, but it also significantly boosts your property’s curb appeal and potential resale value. It’s an investment that pays dividends in both utility and aesthetics, making it a wise choice for any homeowner looking to enhance their outdoor space.
10×40 patio cover plans
Tackling this DIY lean-to pavilion project is not just a rewarding weekend endeavor, it’s an investment in transforming your outdoor living space. By adding a stylish and practical structure to your backyard, you not only increase your home’s value but also create a versatile area for year-round enjoyment, making it an absolutely worthwhile project for any DIY enthusiast.
If you’re ready to take your project to the next level, hit the “GET PDF PLANS” button below for the Premium Plans. You’ll get detailed Cut & Shopping Lists, plus a Cut Layout Diagram to help you stay organized and efficient from start to finish. Let’s make this project a breeze!

This woodworking project was about 10×40 attached patio cover plans. If you want to see more outdoor plans, check out the rest of our step by step projects and follow the instructions to obtain a professional result.