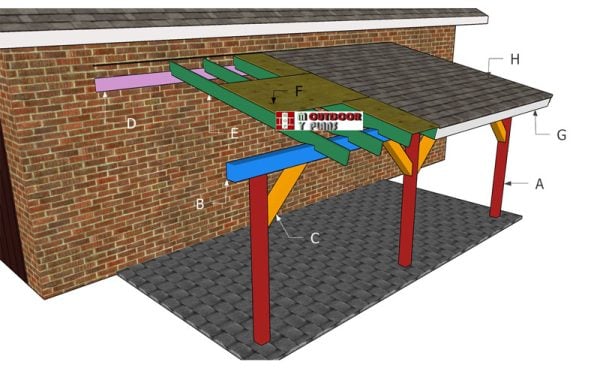
This step by step diy project is about 10×20 lean to patio cover plans. This lean to has a 2:12 pitch and it can be both used as a carport or as a patio cover. If you like a simplistic design, this project will help you get the job done and save tons of money. Premium Plans also available in the Shop. Take a look over the rest of my woodworking plans, if you want to get more building inspiration.
When buying the lumber, you should select the planks with great care, making sure they are straight and without any visible flaws (cracks, knots, twists, decay). Investing in cedar or other weather resistant lumber is a good idea, as it will pay off on the long run. Use a spirit level to plumb and align the components, before inserting the galvanized screws, otherwise the project won’t have a symmetrical look. If you have all the materials and tools required for the project, you could get the job done in about a day.
Projects made from these plans
10×20 Lean to Patio Cover Plans – PDF Download
Building-a-10×20-lean-to-patio-cover
Cut List + Shopping List
Tools
![]() Hammer, Tape measure, Framing square, Level
Hammer, Tape measure, Framing square, Level
![]() Miter saw, Drill machinery, Screwdriver, Sander
Miter saw, Drill machinery, Screwdriver, Sander
![]() Concrete mixer, Post hole digger
Concrete mixer, Post hole digger
Time
![]() One week
One week
Related
Building an attached carport – 10×20 DIY Plans
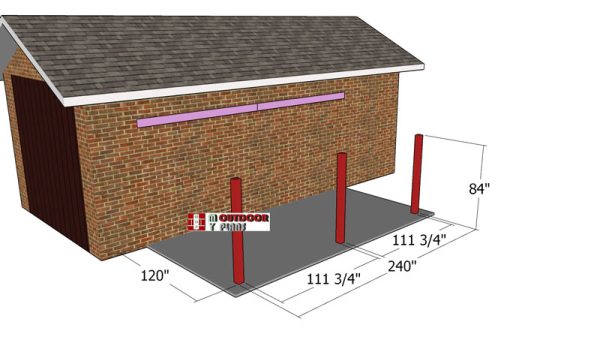
Laying-out-the-posts
The first step of the project is to set the posts for the wooden attached patio cover. Use batter boards and string to layout the posts for the lean to attached patio cover.

Anchoring the posts of the anchor
You can set the posts in concrete or you can pour 3′ deep footings and use posts anchors. Considering this is a light outdoor project, you can set the posts to anchors. That is why, these plans are designed having that assumption in mind (concrete anchors).
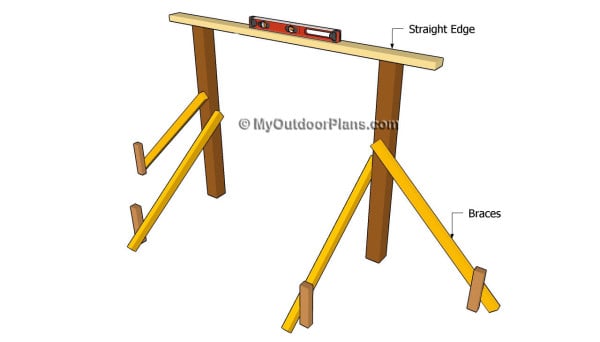
Dig the holes and set the 14″ tube forms. Fill the tubes with concrete and set the post anchors. Make sure you let the concrete to dry out for a few day, before installing the posts into place. Use temporarily braces to secure the posts until you attach the plates.
Installing the posts
After setting the posts into place, check if they are level and user a circular saw to make corrections. Notice the temporarily braces that hold the posts plumb. Leave the braces into place until you finish the assembly of the pergola. The temporarily braces will give support to the structure.
Top-beams
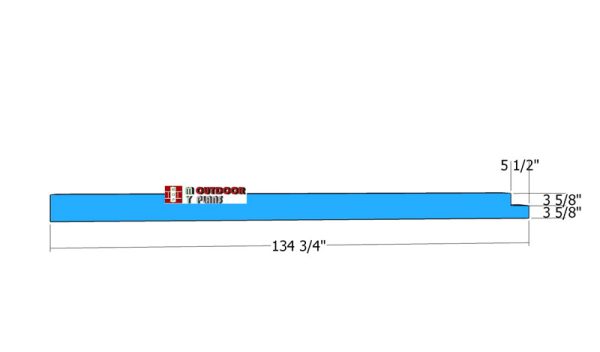
Mark the cut lines to the 6×8 beams and get the job done with a circular saw. Set the depth of the blade at 3 5/8″ and make parallel cuts inside the marked area. Remove the lumber from the notch with a hammer and then clean it with a chisel and sandpaper.

Fitting-the-top-support-beams
Continue the project by attaching the support beam to the top of the posts. See the 12″ overhangs on the sides. Plumb the posts and make sure the beams are horizontal. Fit two post to beam connectors to each post. Insert 1 1/2″ structural screws to lock the connectors together tightly.
In addition, insert 8″ screws to reinforce the joints. Drill pilot holes before inserting the screws to prevent the wood from splitting.
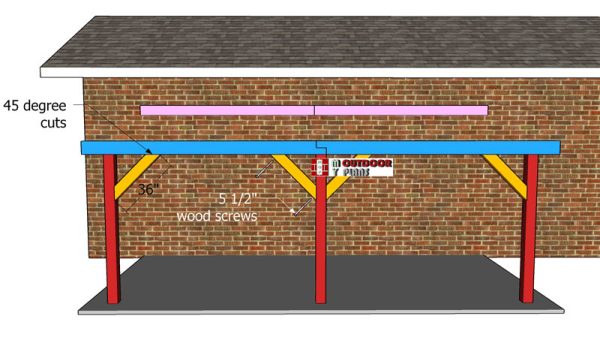
Fitting-the-support-braces
Use 6×6 lumber for the braces. Make 45 degree cuts at both ends of the braces and then secure them into place with 5 1/2″ screws (at least 2 screws for joint).
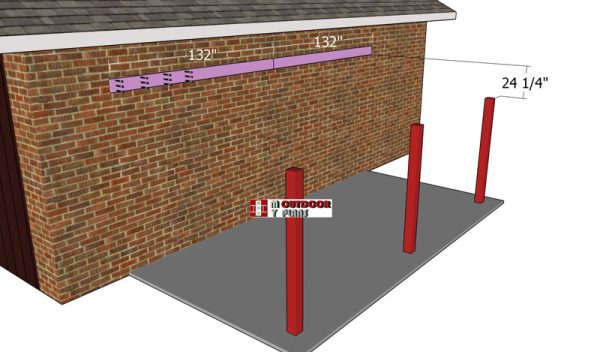
Fitting-the-ledger-boards
Next, we need to attach the ledger boards to the house. Make sure you set the 2×8 ledger directly into the framing structure with 4 1/2″ lag screws with washers (or longer, depending to the house structure). Use a spirit level to check if the ledger is horizontal. Drill pilot holes and insert the screws to lock it into place tightly.
Insert at least 3 screws into each stud. See your local codes for more info on how to secure the ledger.
Building the lean to roof
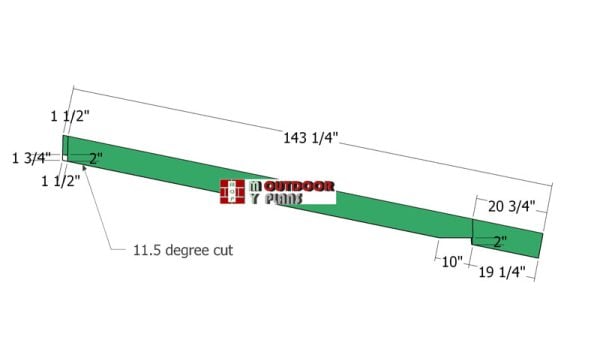
Cutting-the-rafters
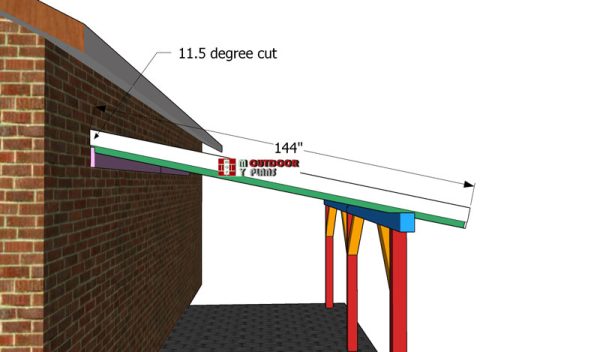
Use 2×8 lumber for the rafters. Make a 11.5 degree cut to one end of the rafters. Mark the cut lines on the beams and then get the job done with a circular saw. Smooth the edges with sandpaper.
Mark the cut lines to the beams and make the notches with a circular saw.
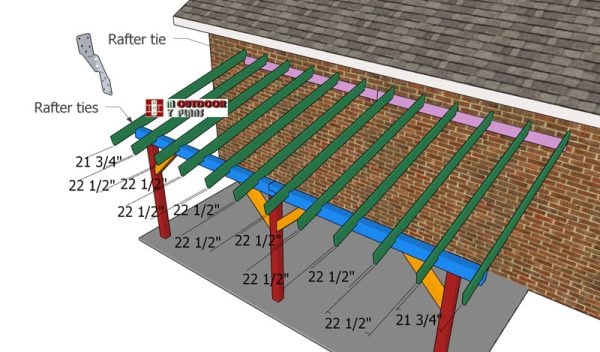
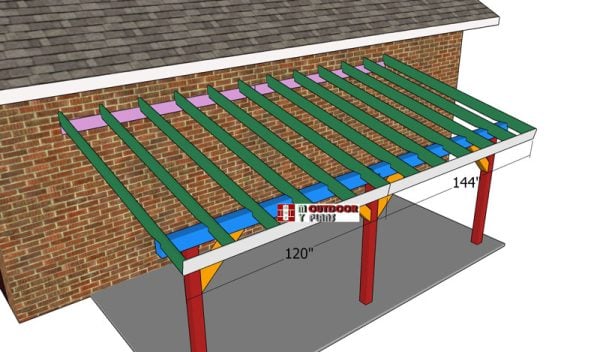
Fitting-the-rafters
Fit the rafters to the attached carport, every 24″ on center. Fit the rafters to the top of the ledgers using rafter ties and 1 1/2″ structural screws. Use rafter ties and 1 1/2″ structural screws to lock the rafters to the support beam, as well.
Attaching-the-front-trims
Fit the 1×8 trim to the front of the lean to patio cover. Align the edges flush and insert 2″ nails to lock them to the ends of the rafters.
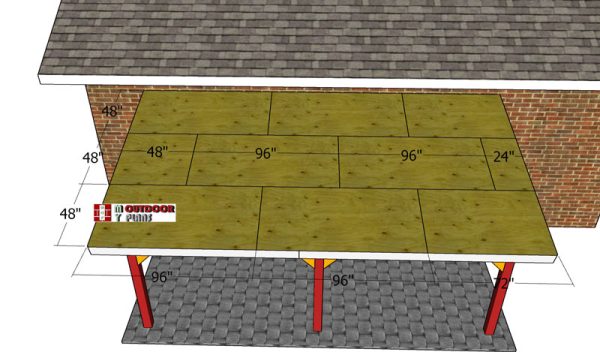
Fitting-the-roof-sheets
Use 3/4″ plywood for the roof sheeting. Lay the sheets and align the edges flush. Leave no gaps between the sheets. Insert 1 5/8″ screws to lock the sheets into place tightly, every 8″ along the framing.
Side-roof-trims
Cut and fit the trims to the sides of the carport. See the 11.5 degree cuts to one end of the trims. Insert 2″ nails to secure the trims into place.
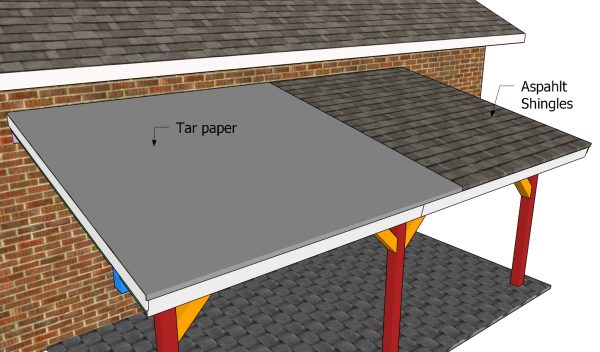
Fitting the roofing
Cover the roof with tar paper, making sure the strips overlap at least 2″. Then install the asphalt shingles starting with the bottom of the roof. Read the manufacturer’s instructions, so you can install the roofing properly.
Install drip edges to the front and side edges.

Installing-the-roof-flashing
In addition, install a flashing at the intersection of the roof to the wall. The flashing will waterproof the joint and prevent water leaks. Make sure you ask directions from the roof manufacturer, so you use the best solution to seal the wall to roof joint.
Fill the holes with wood putty and let them dry out for a few hours. Smooth the surface with 100-220 grit sandpaper and remove the residues with a damp cloth.

10×20 lean to patio cover – side view
You should take a look over my 24×24 garage plans and 16×24 garage plans, because you can easily add this carport to them. In this manner, you will have a garage with a side carport and shelter mare than one car.
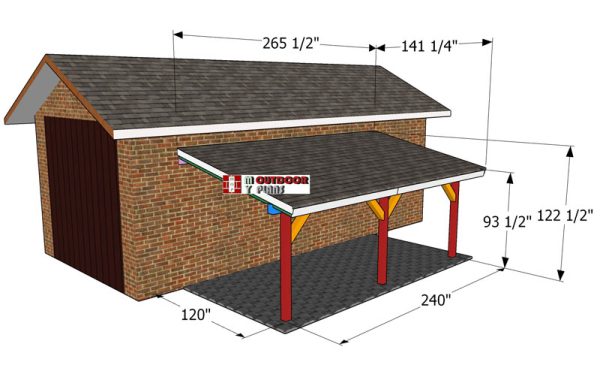
10×20-lean-to-patio-cover—dimensions

10×20 lean to patio cover
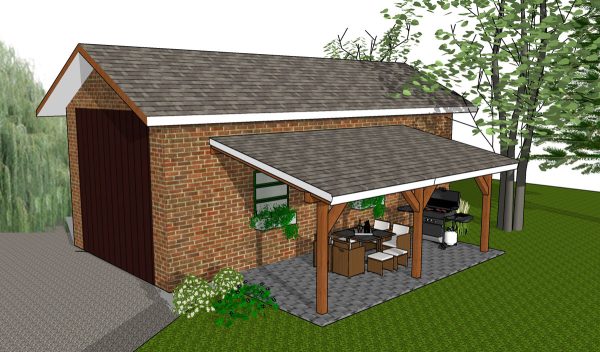
10×20-lean-to-patio-cover
This project can be built in less than one week and it can also be used as a patio cover. I recommend you to read the local building codes before starting the project, so you make sure you comply with the local requirements. See all my Premium Plans in the Shop.
If you build this carport attached to the double garage, you will have a nice shaded area that will be perfect for a car or for woodworking outside. If you want to get the Premium Plans, see the GET PDF PLANS button bellow.

This woodworking project was about small 10×20 patio cover plans free. If you want to see more outdoor plans, check out the rest of our step by step projects and follow the instructions to obtain a professional result.
1 comment
No gutters?