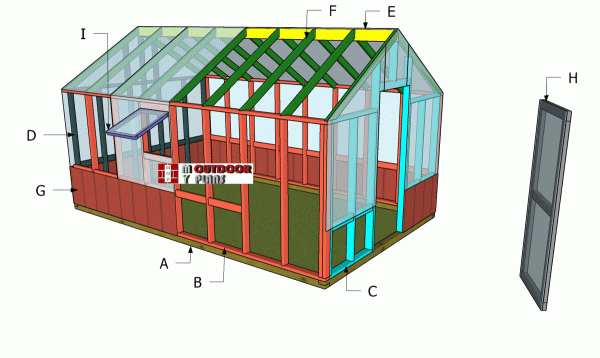
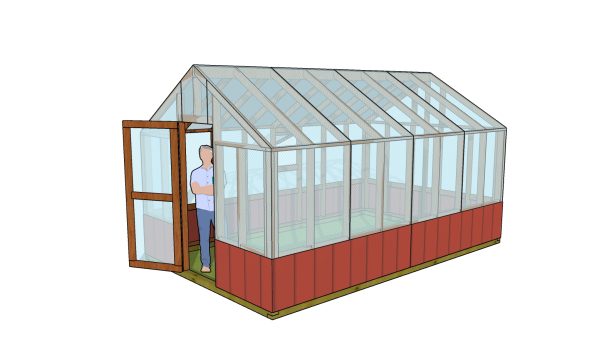
This step by step diy project is about 10×16 small greenhouse plans. I have designed this stylish greenhouse covered with polycarbonate sheets, so you can keep the costs down and build a durable structure. The roof pitch of 7:12. The greenhouse has a door to the front and 1 vent to the side. The vents can be automated with openers, and you can add more vents if you live in a warm climate. in addition, you can add ass many vents as you like to suits your needs and the local climate. Take a look over the rest of my woodworking plans, if you want to get more building inspiration.
When buying the lumber, you should select the planks with great care, making sure they are straight and without any visible flaws (cracks, knots, twists, decay). Investing in cedar or other weather resistant lumber is a good idea, as it will pay off on the long run. Use a spirit level to plumb and align the components, before inserting the galvanized screws, otherwise the project won’t have a symmetrical look. If you have all the materials and tools required for the project, you could get the job done in about a day.
Projects made from these plans
10×16 Small Greenhouse Plans – PDF Download
Building-a-small-greenhouse
Cut and Shopping Lists
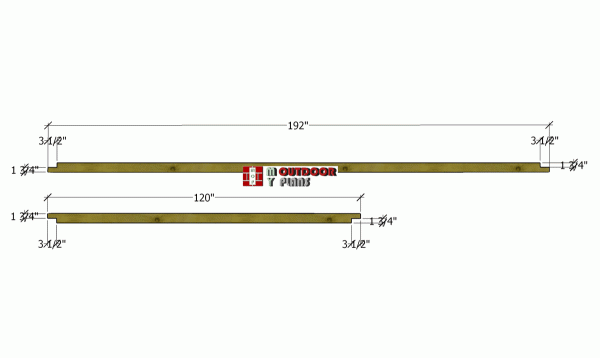
A – 2 pieces of 4×4 lumber – 10 ft, 2 pieces – 16 ft SKIDS
B – 2 pieces of 2×4 lumber – 16 ft, 11 pieces – 69”, 2 pieces – 19 ¾”, 6 pieces – 22 ½” SIDE WALL FRAME1
B – 2 pieces of 2×4 lumber – 16 ft, 11 pieces – 69”, 2 pieces – 19 ¾”, 8 pieces – 22 ½” SIDE WALL FRAME2
C – 2 pieces of 2×4 lumber – 94 3/8”, 2 pieces – 32”, 1 piece – 18 ½”, 4 pieces – 39”, 6 pieces – 69”, 2 pieces – 18”, 2 pieces – 16 ½” FRONT WALL FRAMR
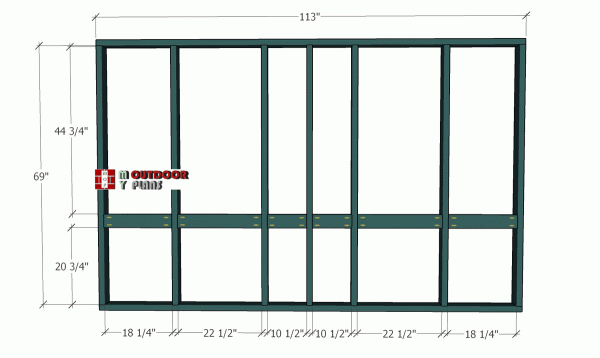
D – 2 pieces of 2×4 lumber – 113”, 7 pieces – 69”, 2 pieces – 18 ¼”, 2 pieces – 22 ½”, 2 pieces – 10 1/2”, 2 pieces – 25 ¾”, 1 piece – 30” BACK WALL
E – 1 piece of 2×6 lumber – 16 ft RIDGE BEAM
F – 18 pieces of 2×4 lumber – 69 1/8“ RAFTERS
G – 2 piece of T1-11 siding – 44”x48”, 10 pieces – 24”x48”, 1 piece – 24”x24” SIDING
H – 2 pieces of 2×4 lumber – 73”, 2 pieces – 32”, 1 piece – 25” DOOR
I – 2 pieces of 2×2 lumber – 22 1/2”, 2 pieces – 24” VENT
Tools
![]() Hammer, Tape measure, Framing square, Level
Hammer, Tape measure, Framing square, Level
![]() Miter saw, Drill machinery, Screwdriver, Sander
Miter saw, Drill machinery, Screwdriver, Sander
Time
![]() One weekend
One weekend
Related
- PART 1: 10×16 Greenhouse Plans
- PART 2: 10×16 Greenhouse Plans – Part II
It’s that easy to make a greenhouse!
How to build a 10×16 greenhouse
Skids
The first step of the project is to build the base for the greenhouse. Therefore, you should use 4×4 pressure treated beams, because they are resistant to moisture. Use a circular saw and set the blade depth tp 1 3/4″ to make the notches to both ends of the beams. Make parallel cuts inside the areas and then use a chisel to remove the excess. Smooth the recess with a chisel.
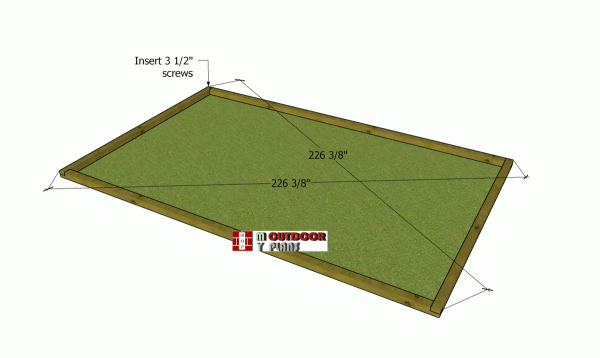
Assembling-the-base-of-the-greenhouse
Selecting the location for the greenhouse is essential for the project, as most plans need plenty of direct sun light. Therefore, choose a location that is exposed to the south and then level the surface thoroughly. Lay the beams and align the corners. Drill pilot holes and insert 3 1/2″ screws to lock everything together tightly. Make sure the corner are square. Use a L-square and check if the diagonals are equal.
You can fit 2×3 anchors along the side skids and then insert them to the ground till they are flush with the beams, if you live in an area with strong winds. Use 2 1/2″ screws to secure the stakes to the base of the greenhouse. This is a very simple method to anchor the greenhouse to the ground, but make sure you adjust the depth of the skids according to the winds in your particular location.
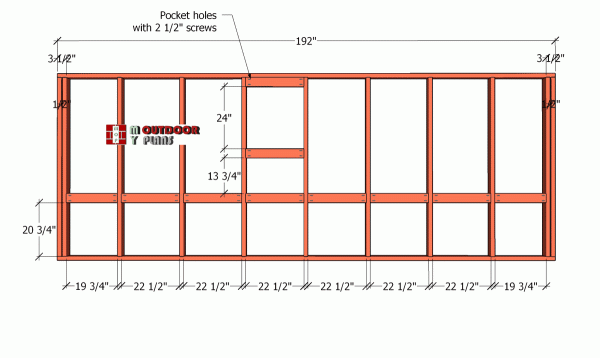
Side-wall-frames
Use 2×4 lumber to frame the side walls. Drill pilot holes through the plates and insert 3 1/2″ screws into the studs. Place the studs every 24″ on center and align the edges with attention. Make sure the corners are square. Notice the double studs at both ends of the wall frame.
Fit the 2×4 supports to create the openings for the vents. Drill pocket holes at both ends of the supports and insert 2 1/2″ screws to lock them to the studs. in addition, we need to fit 2×4 blockings between the studs, to create a support for the siding sheets. Drill pocket holes at both ends of the blockings and insert 2 1/2″ screws to lock them to the studs.
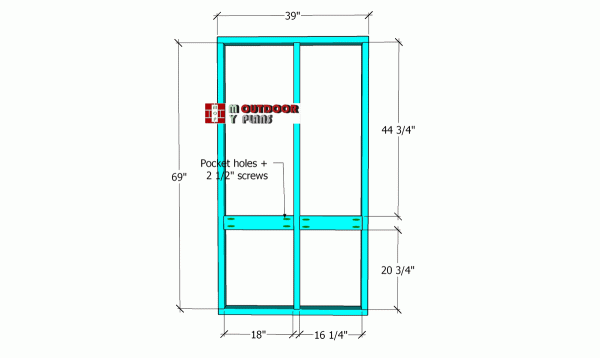
Front-wall-sections
We will build the front wall in three sections, because this is the best configuration for this gable greenhouse. First, build two sections like the ones in the image. Drill pilot holes through the plates and insert 3 1/2″ screws into the studs. Use pocket holes and 2 1/2″ screws to lock the supports to the studs.
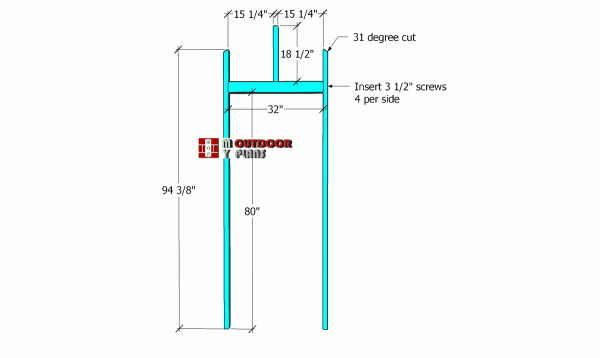
Front-wall—middle-section
Next, we build the middle section for the front wall. Make angle cuts to the studs using a miter saw. Secure the double header to the side studs with 3 1/2″ screws. Lock the middle post to the double header with 3 1/2″ screws (drive at angle).
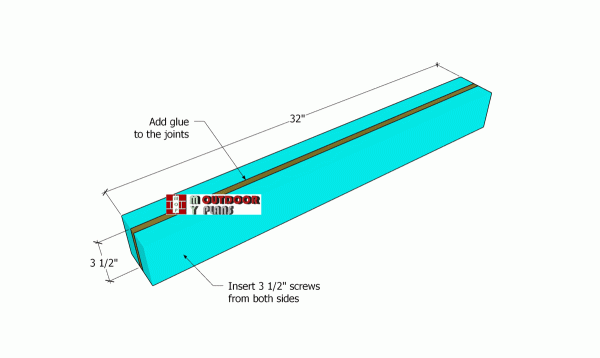
Double-header
Notice the double header for the greenhouse. Use 2×4 lumber for the beams and 1/2″ plywood between them. Add glue to the joints and insert 2 1/2″ screws from both sides. Align the edges flush.
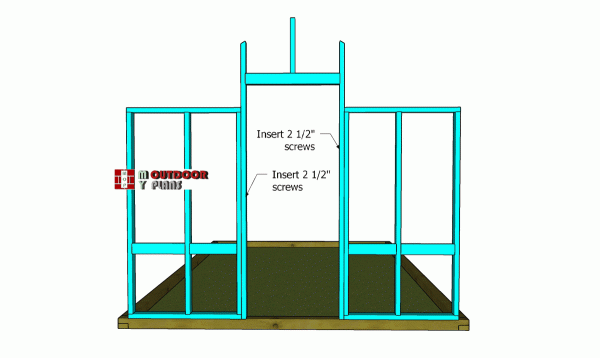
Front-wall-assembly
Fit the sections to the front of the greenhouse. Plumb the walls with a spirit level and secure them to the skids with 3 1/2″ screws. In addition, attach the sections together tightly with 2 1/2″ screws.
Back-wall-frame
Build the back wall in the same manner described above. Make sure the corners are square and place the studs every 24″ on center.
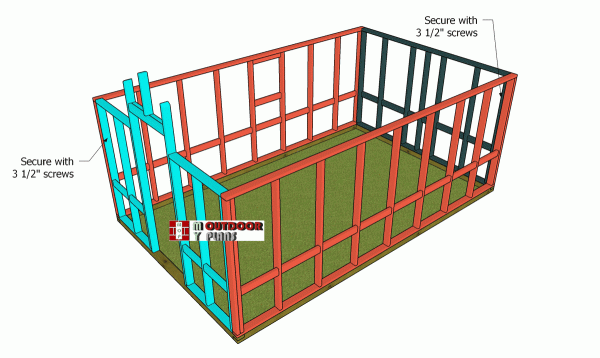
Assembling-the-greenhouse-walls
Lift the wall frames to the base of the greenhouse and plumb them with a spirit level. Drill pilot holes through the base plates and insert 3 1/2″ screws into the base. Drill pilot and insert 3 1/2″ screws to lock the adjacent walls together tightly. Make sure the corners are square and align the edges flush.
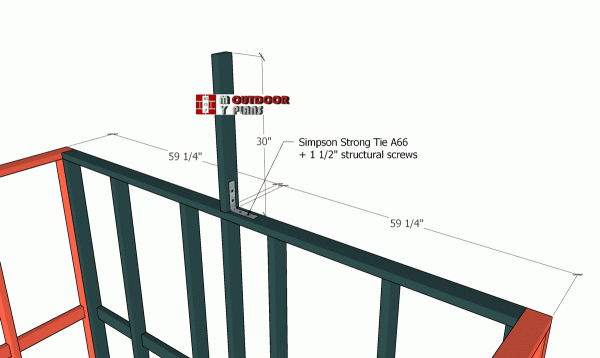
Ridge-beam-support
Fit the 2×4 ridge beam support to the middle of the back wall. Plumb the support vertically and secure it into place with 1 1/2″ structural screws and A66 strong tie connecters.
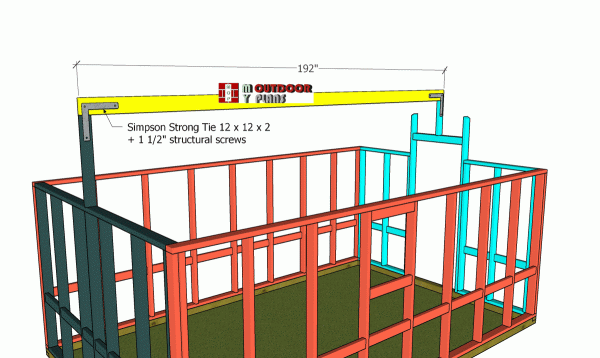
Fitting-the-ridge-beam
Fit the 2×6 ridge beam to the top of the supports and make sure the corners are square. Use L ties and 1 1/2″ structural screws to lock the beam to the supports.
10×16 Gable Greenhouse Plans
Check out PART 2 of the greenhouse project, where I show you how to build the door and the roof for the greenhouse.
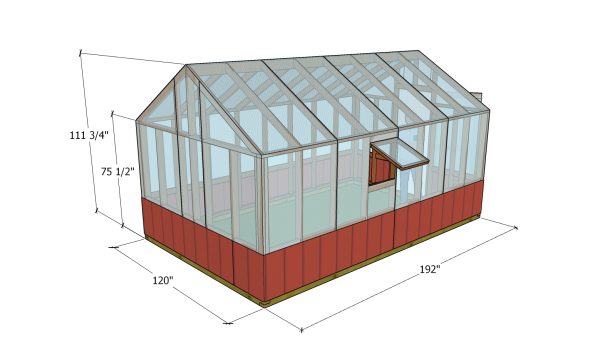
10×16 Gable Greenhouse Plans – dimensions
This is a wooden greenhouse built with 2x4s studs placed at every 24″ on center. The greenhouse is covered with polycarbonate sheets. You can build this greenhouse in less than one week and you can then start growing vegetables. You can adjust the size of the greenhouse to suit your needs.
If you want to get the Premium plans with all the extras, just press the GET PREMIUM PLANS button bellow. If you want to get the free plans, just read the blog FAQs.

This woodworking project was about 10×16 greenhouse plans. If you want to see more outdoor plans, check out the rest of our step by step projects and follow the instructions to obtain a professional result.

6 comments
Am I able to find one for a 8ft x 10ft greenhouse?
Sure. Here: https://myoutdoorplans.com/greenhouse/8×10-wood-greenhouse-plans/
Are plans for 16’x30’ Available
No, sorry. I don’t have plans for something that large at the moment.
Hello. Do you ever commission custom plans? Say for a 17’x17’ based on this design? Thanks.
Hi, no, sorry. I try to focus on popular sizes. 17×17 would be too specific.