This step by step diy woodworking project is about toddler bed plans. If you want to learn more about building a toddler bed frame, we recommend you to pay attention to the instructions described in the article. There are many other designs and plans to choose from when building projects for your backyard, so make sure you take a close look over the related plans that are featured on our site.
There are many plans and designs to choose from, so make sure you take a close look over the rest of the furniture plans featured on our website. Plan everything with attention and adjust the size and the shape of the table to suit your needs. Plumb the legs and make sure the corners are right-angled before inserting the galvanized screws into place. Drill pilot or pocket holes to prevent the wood from splitting. See all my Premium Plans HERE.
Projects made from these plans
Building a toddler bed
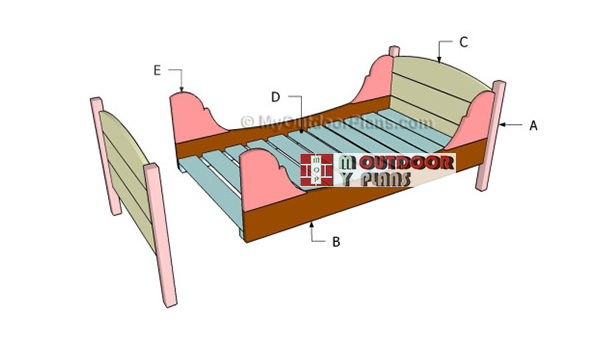
Cut & Shopping Lists
- A – 4 pieces of 2×2 lumber – 22 1/2” long LEGS
- B – 2 pieces of 1×6 lumber – 52″ long SIDES
- C – 6 pieces of 1×6 lumber – 28” long BOARDS
- D – 2 pieces of 2×2 lumber – 52” long, 11 pieces of 1×4 lumber – 28″ long SLATS
- E – 4 pieces of 3/4″ plywood – 9 1/2″x11″ long DECORATIVE ELEMENTS
- 3 pieces of 2×2 lumber – 8 ft
- 3 pieces of 1×6 lumber – 8 ft
- 4 pieces of 1×4 lumber – 8 ft
- 1 piece of 3/4″ plywood – 2’x2′
- 2 1/2″ screws
- 1 5/8″ screws
- 1 1/4″ screws
- wood filler
- wood glue
- stain/paint
Tools
![]() Hammer, Tape measure, Framing square
Hammer, Tape measure, Framing square
![]() Miter saw, Drill machinery, Screwdriver, Sander, Post-hole digger
Miter saw, Drill machinery, Screwdriver, Sander, Post-hole digger
Time
![]() One weekend
One weekend
Related
Toddler Bed Plans
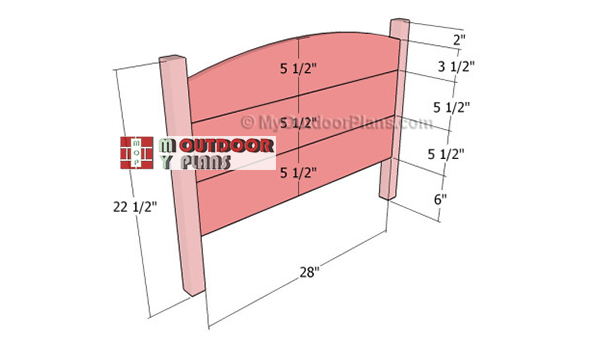
Building-the-headboard
The first step of the woodworking project is to build the footboard and the headboard of the toddler bed frame. Therefore, build the posts out of 2×2 lumber and the boards out of 1×6 lumber.
Top Tip: Take accurate measurements and use a proper circular saw to get a professional result. Drill pocket holes at both ends of the wooden boards and secure them to the four legs, as described in the diagram.
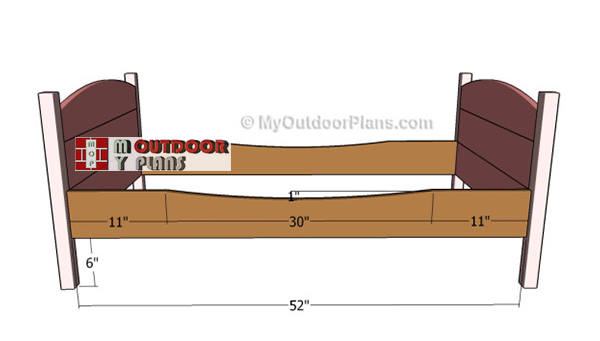
Building-the-frame-of-the-bed-frame
The next step of the project is to attach the side boards to the headboard and to the foorboard. Cut the 1×6 slats at the right size, making sure you make the curved cuts to the top of the component.
Smooth the edges with sandpaper and remove the residues. Drill pocket holes at both ends and secure them to the legs, as described in the plans. Make sure the corners are right-angled and add glue to the joints.
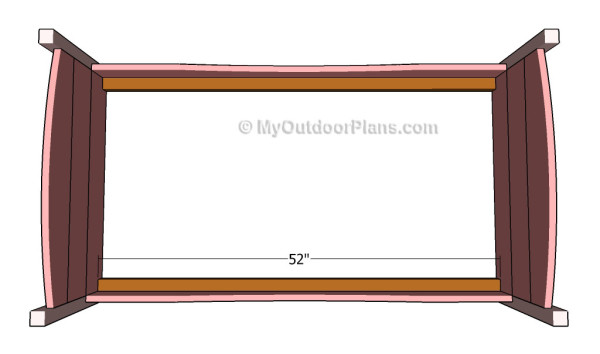
Fitting the cleats
Continue the bed project by attaching the 2×2 cleats to the interior sides of the frame. Drill pilot holes through the cleats and secure them to the sides of the bed frame by using 2″ screws. Place a spirit level on top of the cleats in order to make sure they are perfectly horizontal. Add glue the joints and remove the excess with a damp cloth.

Fitting the support slats
Next, attach 1×4 slats to the cleats, as described in the diagram. Place the slats equally-spaced and secure them to the cleats by using 2 1/2″ screws. Check if the supports slats described a perfectly horizontal surface.

Building the corner decorative elements
Mark the cut lines on a piece of 3/4″ plywood with great care and get the job done with a jigsaw and with a circular saw. Smooth the cut edges with sandpaper and drill pocket holes along the side and along the bottom of the decorative elements.
Top Tip: It is essential to drill the pocket holes on the interior faces of the components, to hide the head of the screws.

Fitting the corner trims
Align the decorative elements with attention and secure them to the corners of the bed frame, as described in the plans. Add glue to the joints and remove the excess with a damp cloth.
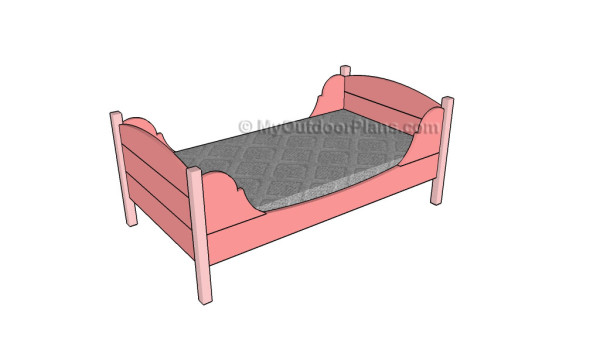
Toddler bed plans
One of the last steps of the woodworking project is to take care of the finishing touches. Therefore, fill the pilot holes with wood putty and smooth the surface with 120-grit sandpaper.
Top Tip: If you want to enhance the look of the woodworking project and to protect the bed from decay, we recommend you to cover the components with paint or stain. Place the bed in a proper location and move it whenever necessary.
This woodworking project was about toddler bed plans. If you want to see more outdoor plans, we recommend you to check out the rest of our step by step projects. LIKE us on Facebook and Google + to be the first that gets out latest projects.


