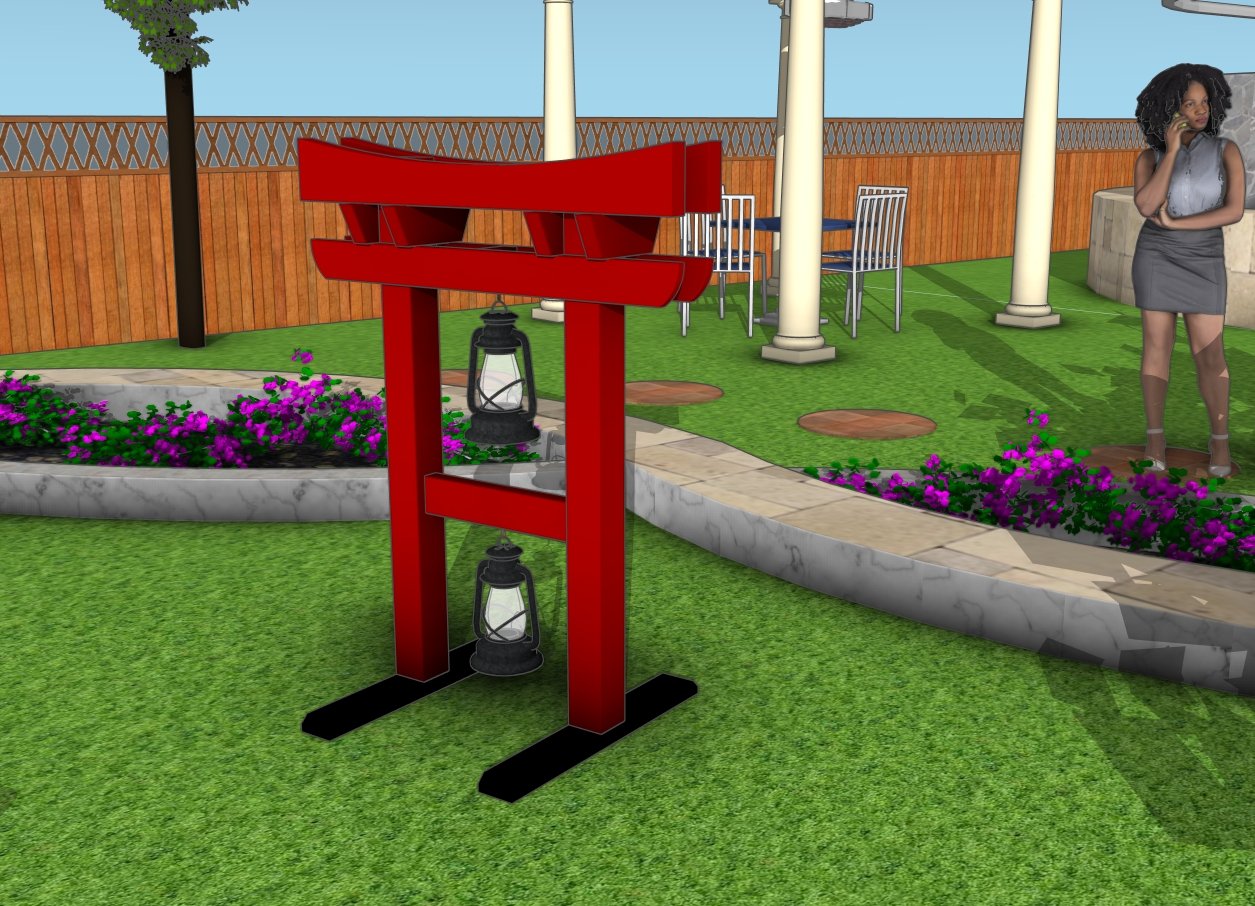
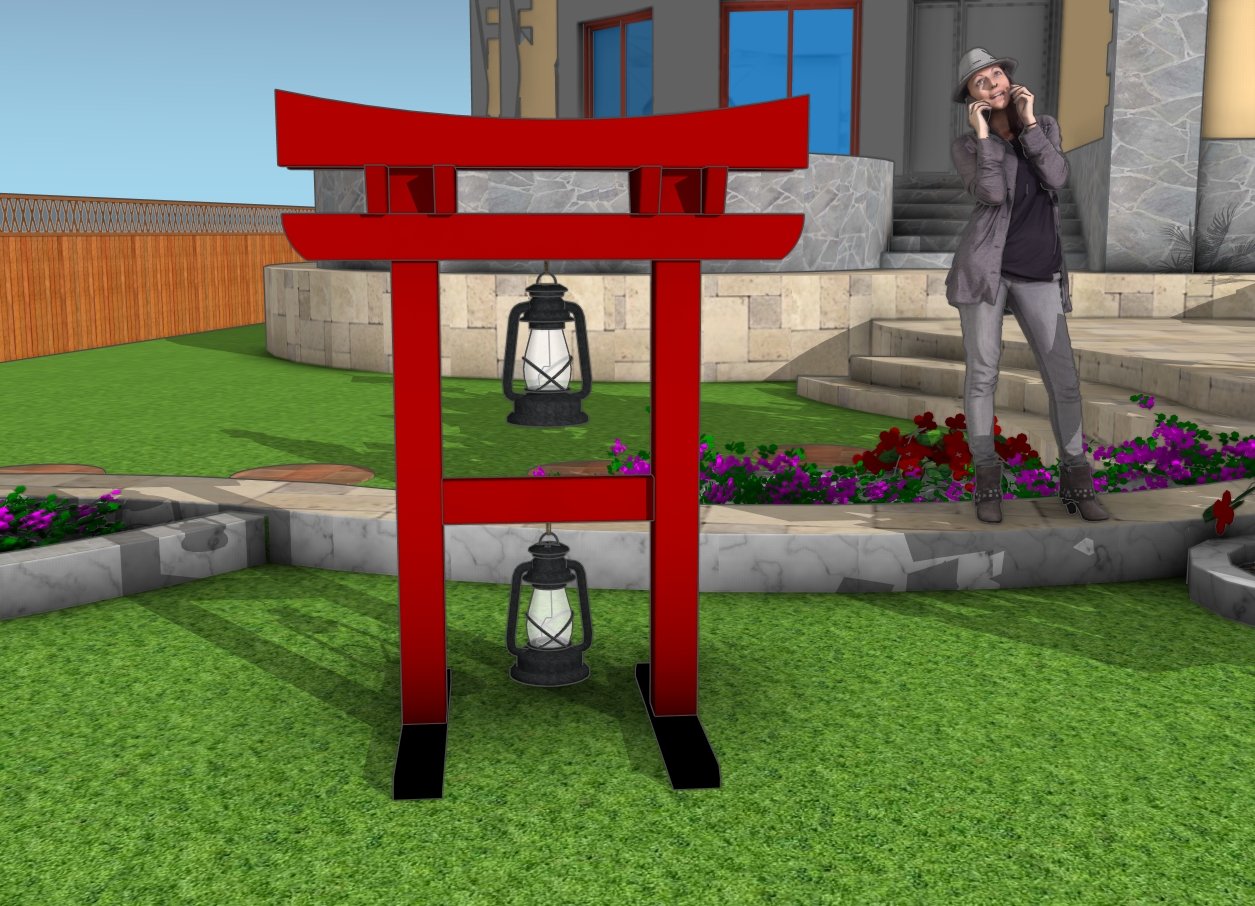
If you’re looking to bring a touch of tranquility and elegance to your outdoor space, this Japanese-style garden tower plan might be just the project for you. It’s a perfect blend of simplicity and function, designed to enhance the natural beauty of your garden. Whether you want to create a peaceful focal point or just add a bit of charm, this tower does the trick. And with space to hang two lanterns, it adds a warm, inviting glow that takes your garden to the next level. Ready to dive in? Let’s get started!
Not only does this Japanese-style garden tower add beauty to your space, but it also brings a ton of practical benefits. First off, it’s a great weekend project—simple enough to tackle without too much hassle, but still satisfying when you see it all come together. Plus, the compact design makes it perfect for any size garden, whether you’ve got a sprawling backyard or a cozy corner. And let’s not forget about those lanterns! They’re a great way to add ambient lighting, creating a peaceful vibe for those quiet evenings outside. This project is all about elevating your space with minimal effort! Take a look over the rest of my woodworking plans, if you want to get more building inspiration. Premium Plans for this project available in the Shop.
For this project, I recommend using cedar or hardwood for their durability and natural resistance to the elements. Cedar is a fantastic option because it’s lightweight, rot-resistant, and has a beautiful, rustic look. Hardwood, on the other hand, provides superior strength and longevity, making your mailbox stand a sturdy and stylish addition to your home.
Projects made from these plans
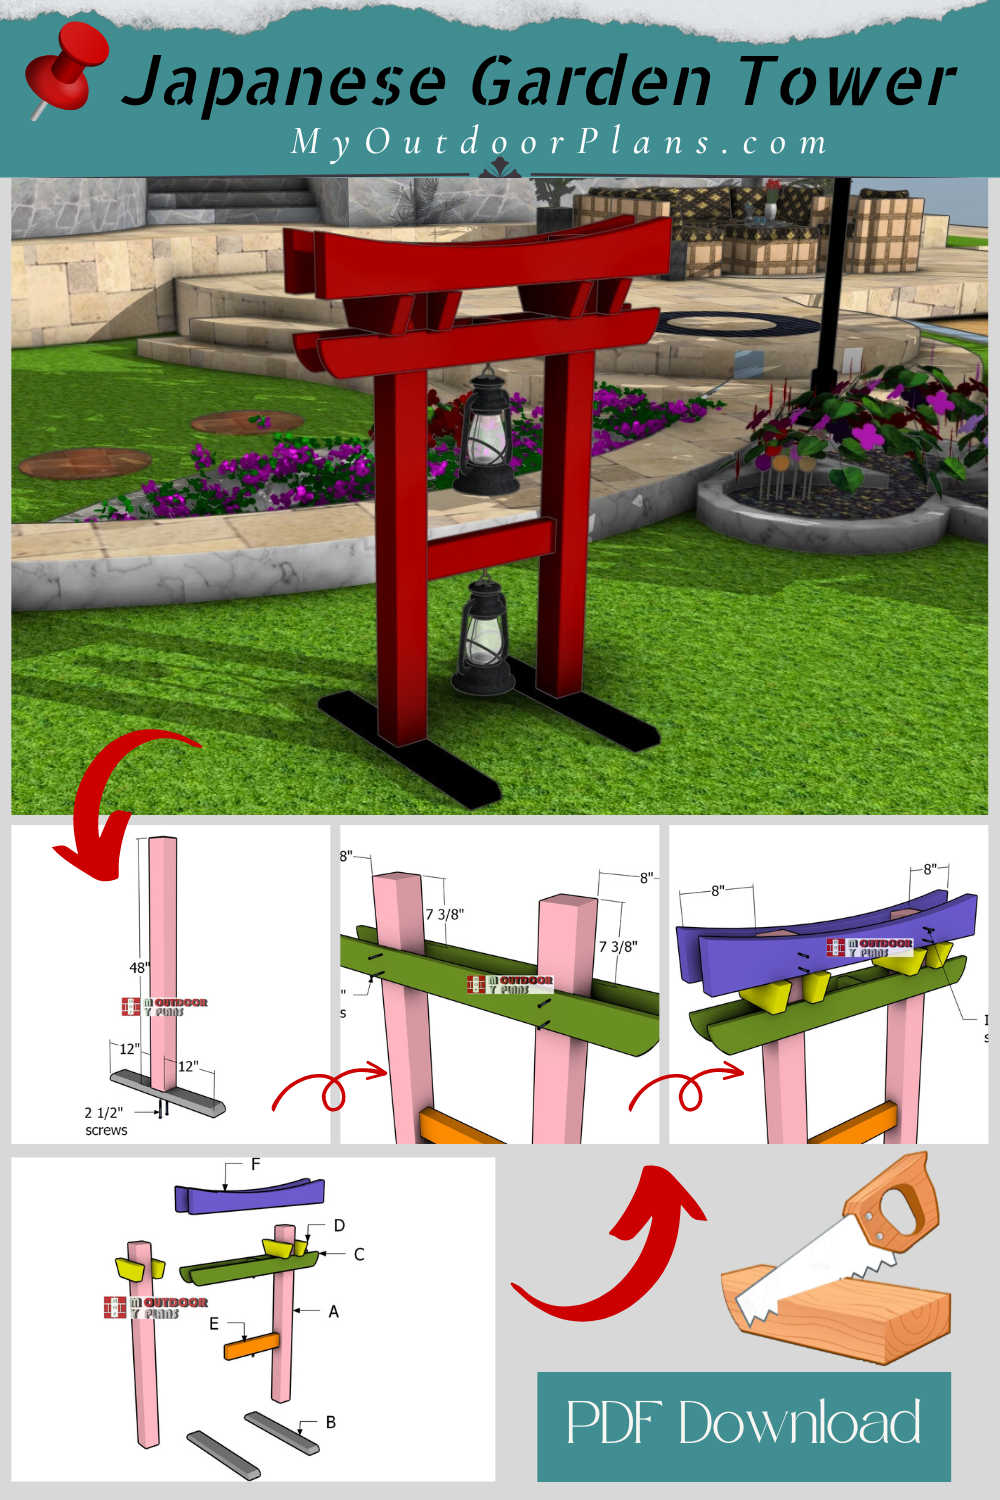
Japanese Style Garden Tower – Free Plans
Building-a-Japanese-tower-for-garden
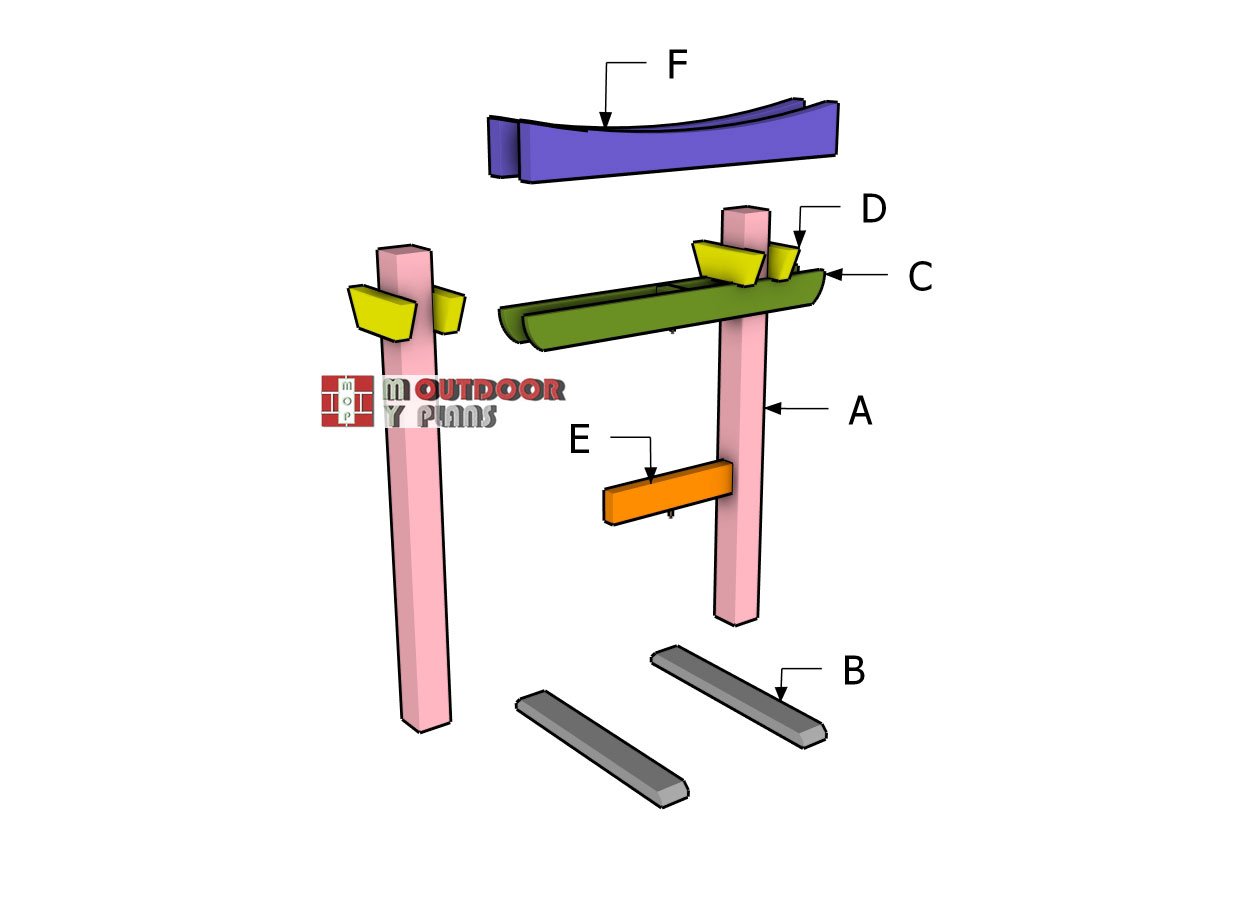
Cut and Shopping Lists
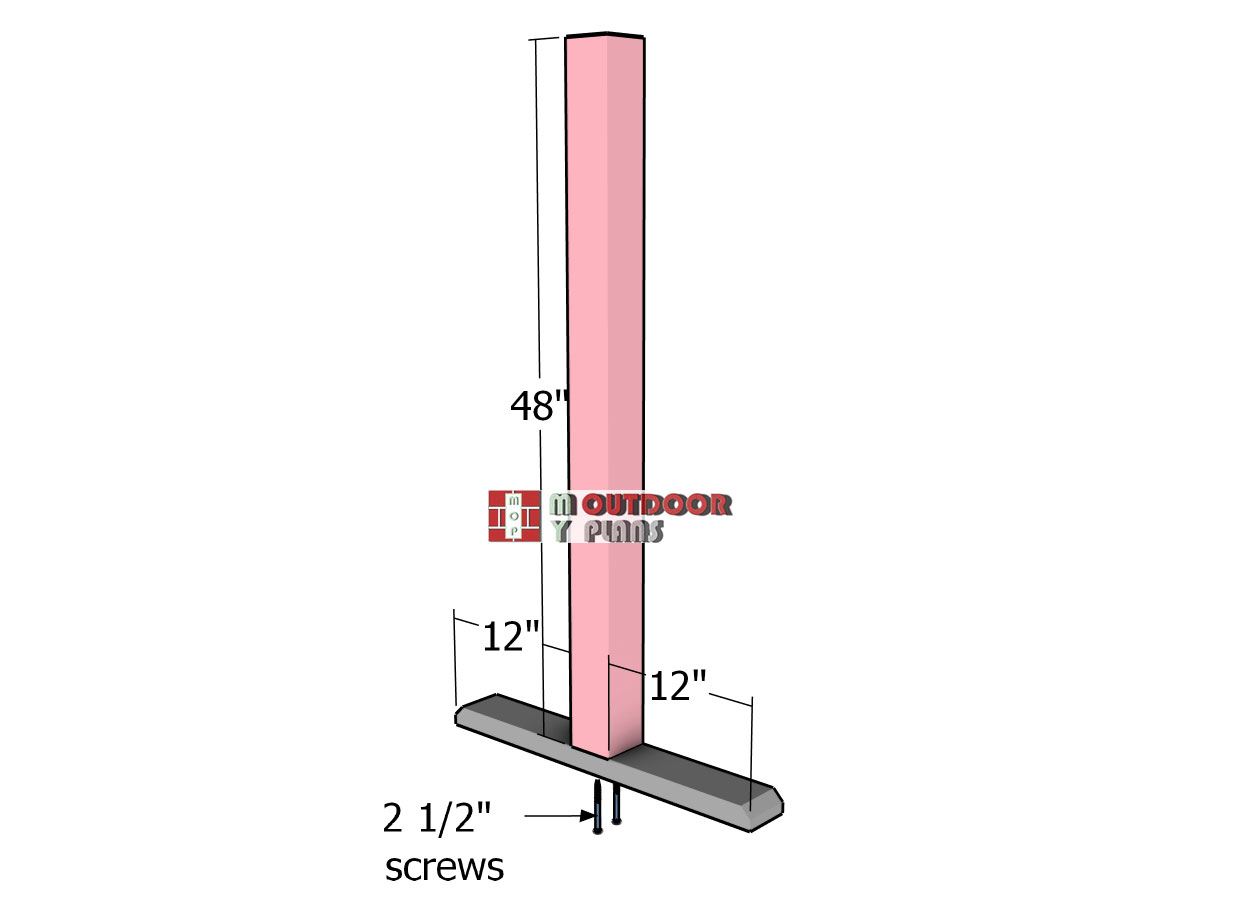
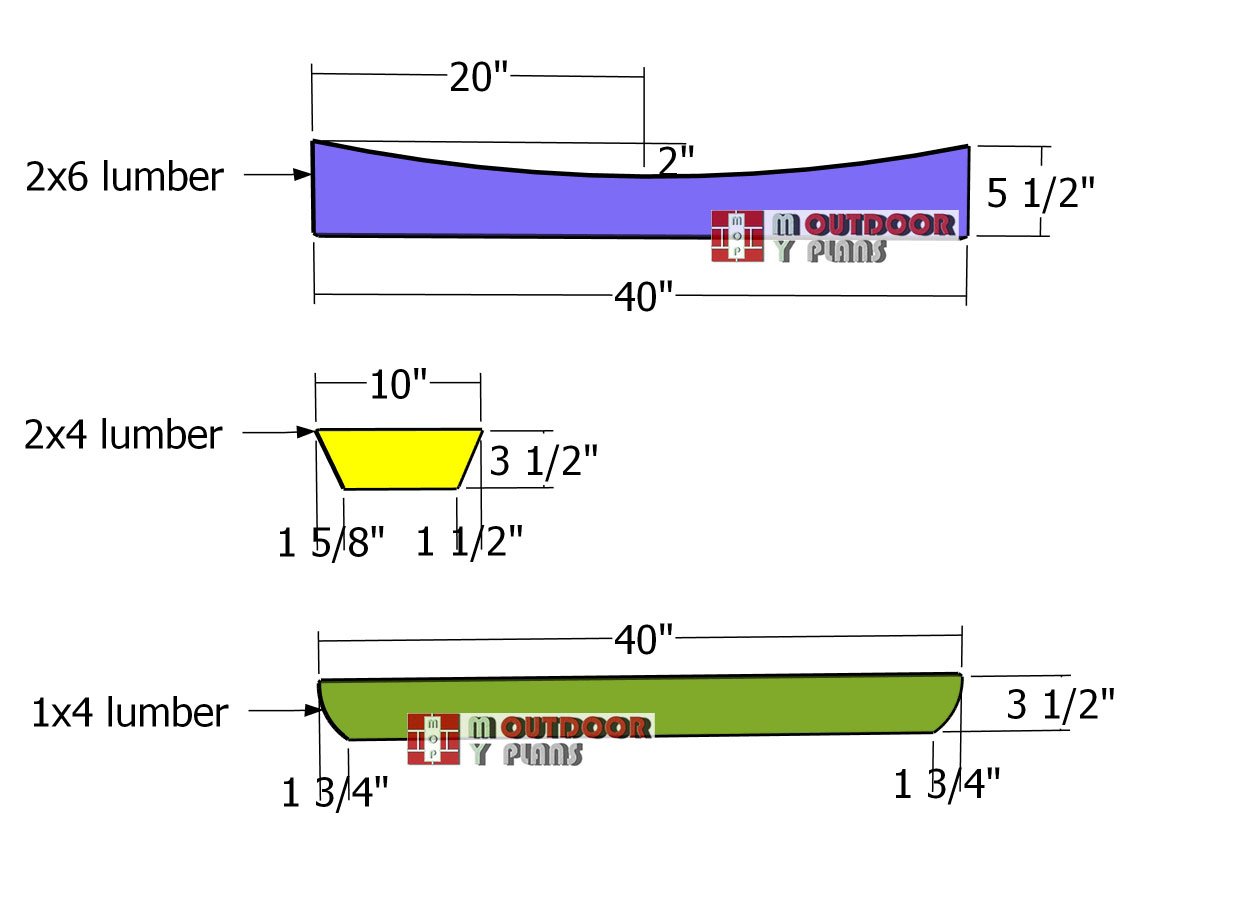
A – Posts – 4×4 lumber 48″ long – 2 pieces
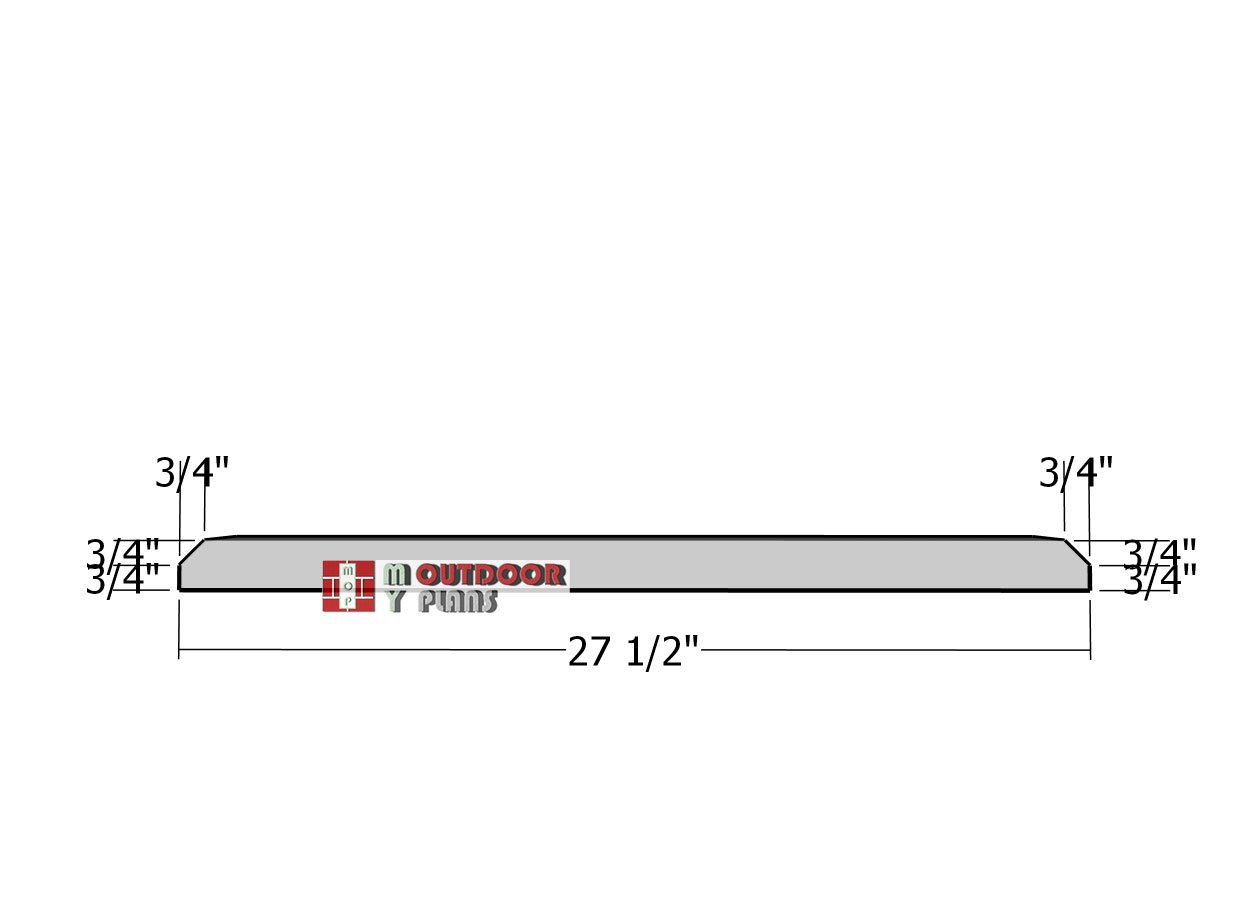
B – Base – 2×4 lumber 27 1/2″ long – 2 pieces
C – Base Beams – 1×4 lumber 40″ long – 2 pieces
D – Supports – 2×4 lumber 10″ long – 4 pieces
E -Support – 2×4 lumber 17″ long – 2 pieces
F -Top Beams – 2×6 lumber 40″ long – 2 pieces
- 4×4 lumber 8 ft – 1 piece
- 2×6 lumber 8 ft – 1 piece
- 2×4 lumber 10 ft – 1 piece
- 1×4 lumber 8 ft – 1 piece
- 2 1/2″ screws – 40 pieces
- Hook screw – 2 pieces
- Lanterns – 2 pieces
- Wood glue – 1 can
- Stain / Paint – 1 can
Tools
![]() Hammer, Tape measure, Framing square, Level
Hammer, Tape measure, Framing square, Level
![]() Miter saw, Drill machinery, Screwdriver, Sander
Miter saw, Drill machinery, Screwdriver, Sander
![]() Safety Gloves, Safety Glasses
Safety Gloves, Safety Glasses
Time
![]() One weekend
One weekend
Related
Pin for Later!
Building a Botanical garden tower
Cutting-the-base-elements
The first step in this project is cutting the boards for the base of your garden arch tower. Grab your saw and make some 45-degree bevel cuts on both ends of each board to give it that decorative touch.
Once you’ve got those cuts done, take some sandpaper and smooth out the edges, making sure everything is nice and clean before moving on.
Assembling-the-sides
Next up, you’ll want to use 4×4 lumber for the vertical posts. Center each post on the base, then drill some pilot holes through the boards to make things easier. Once that’s done, drive in two 2 1/2″ screws to secure the sides.
Be sure to align the edges so they’re flush, and double-check that your corners are nice and square before moving on. This step sets the foundation, so take your time to get it right!
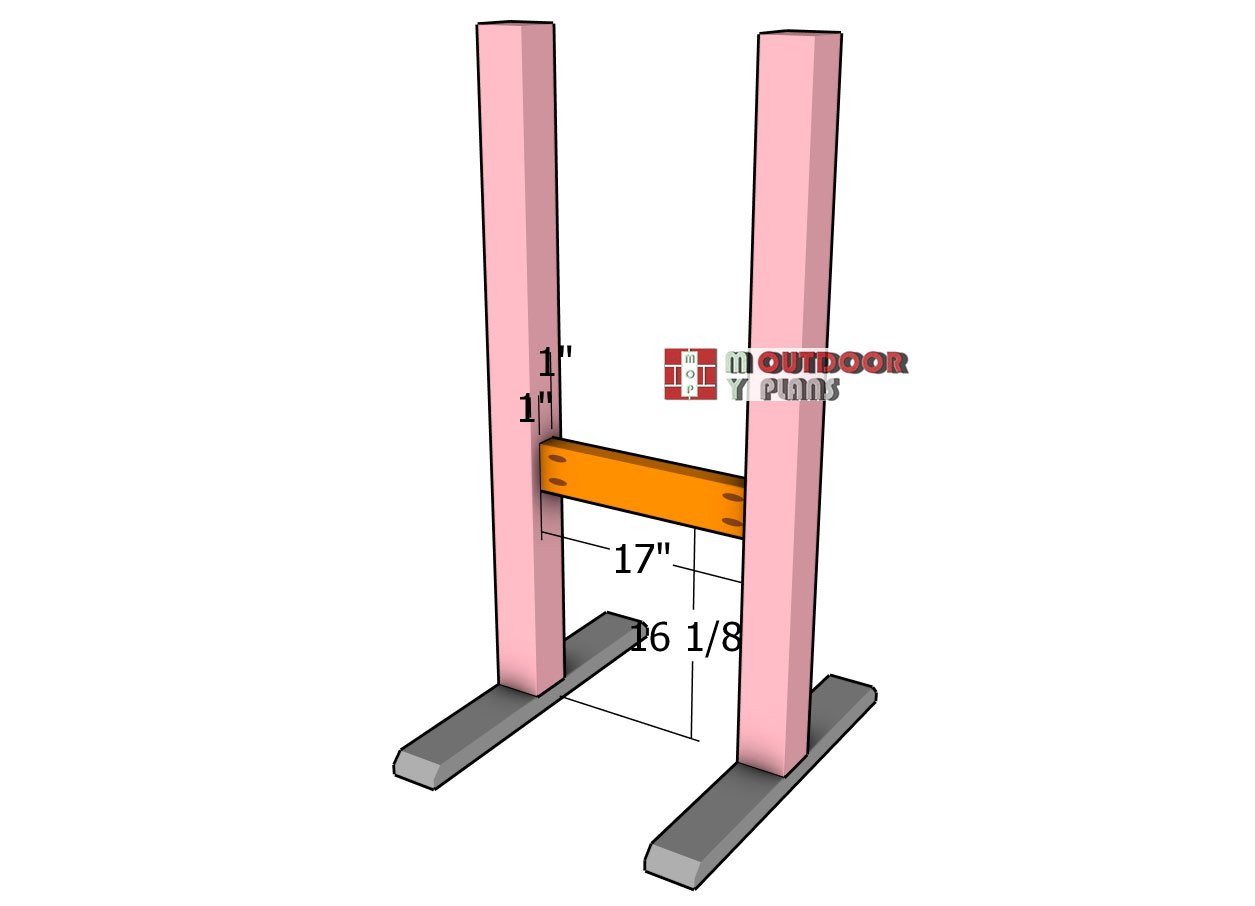
Fitting-the-middle-supports
Now it’s time to fit the 2×4 support between the sides so you’ve got a spot to hang that second lantern. Drill pocket holes at both ends of the support, then secure it to the posts using 2 1/2″ screws. Make sure everything’s nice and snug so your lantern hangs perfectly!
Building the top elements
Cutting-the-elements
Now it’s time to cut the rest of the components for your botanical tower. For the base beams, go with 1×4 lumber, 2×4 lumber for the middle supports, and 2×6 lumber for those top decorative beams. Grab your jigsaw to make the curved cuts on the decorative pieces, then smooth everything out with sandpaper to get those edges nice and clean. This will really add a polished look to your tower!
Fitting-the-base-rafters
Fit the base beams to the vertical posts, making sure you have equal 8″ overhangs on both sides for that balanced look. Grab your spirit level to ensure the beams are perfectly horizontal—this part is key! Once everything’s lined up, drill pilot holes and secure the beams to the posts with 2 1/2″ screws. This will lock everything in place, keeping your tower sturdy and square.
Middle-support
Next, fit a 2×4 piece between the boards to create the perfect hanging area for your screw hooks. Center the board carefully, making sure it’s aligned, and then secure it into place with 2 1/2″ screws, just like in the diagram. This will give you a sturdy spot to hang whatever you need, whether it’s lanterns or garden tools!
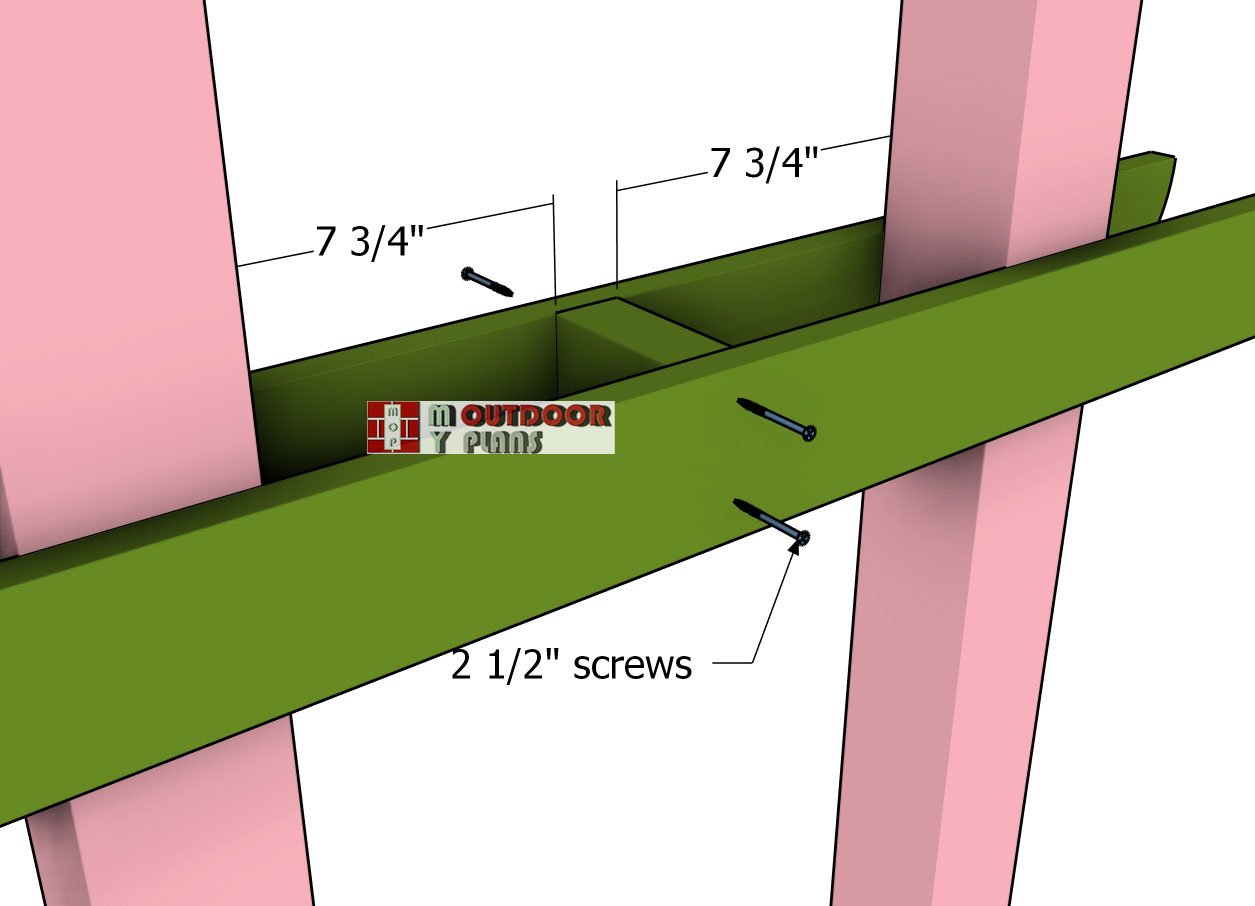
Attaching-the-supports
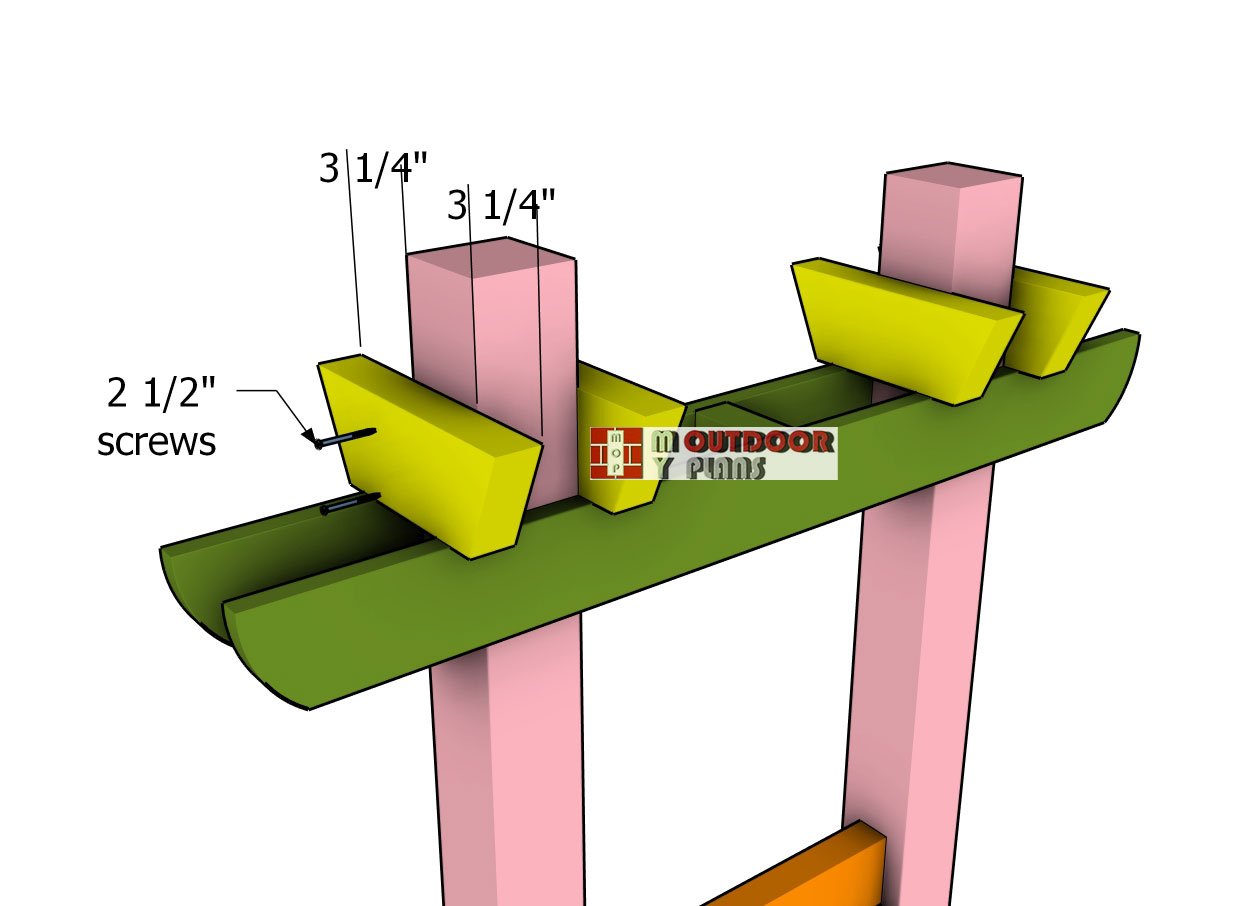
Center the supports to the posts, ensuring you’ve got equal 3 1/4″ overhangs on both sides for a balanced look. Drill some pilot holes, then lock the supports to the posts with 2 1/2″ screws. Be sure to use two screws for each joint to keep everything secure and sturdy. This will keep your tower solid and looking sharp!
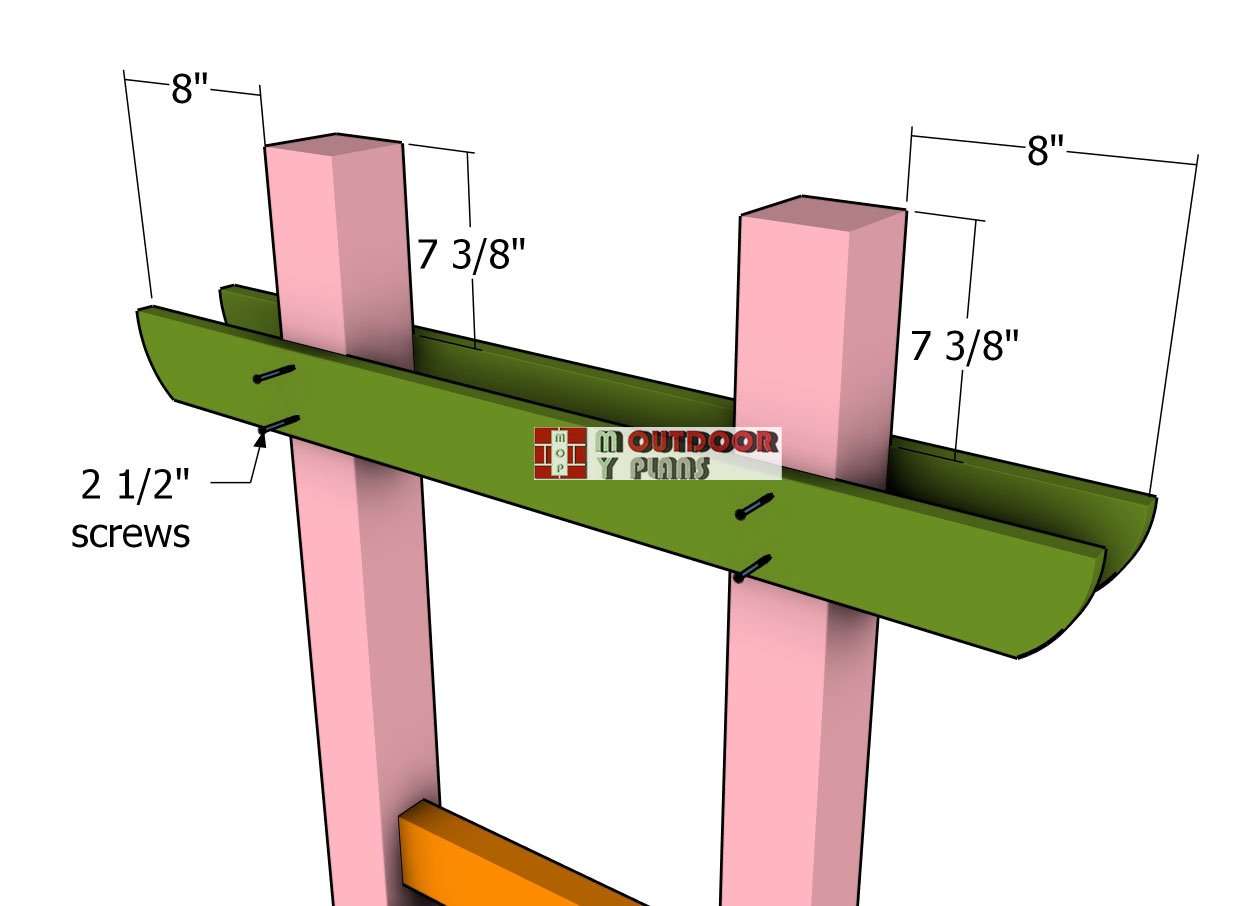
Fitting-the-top-elements
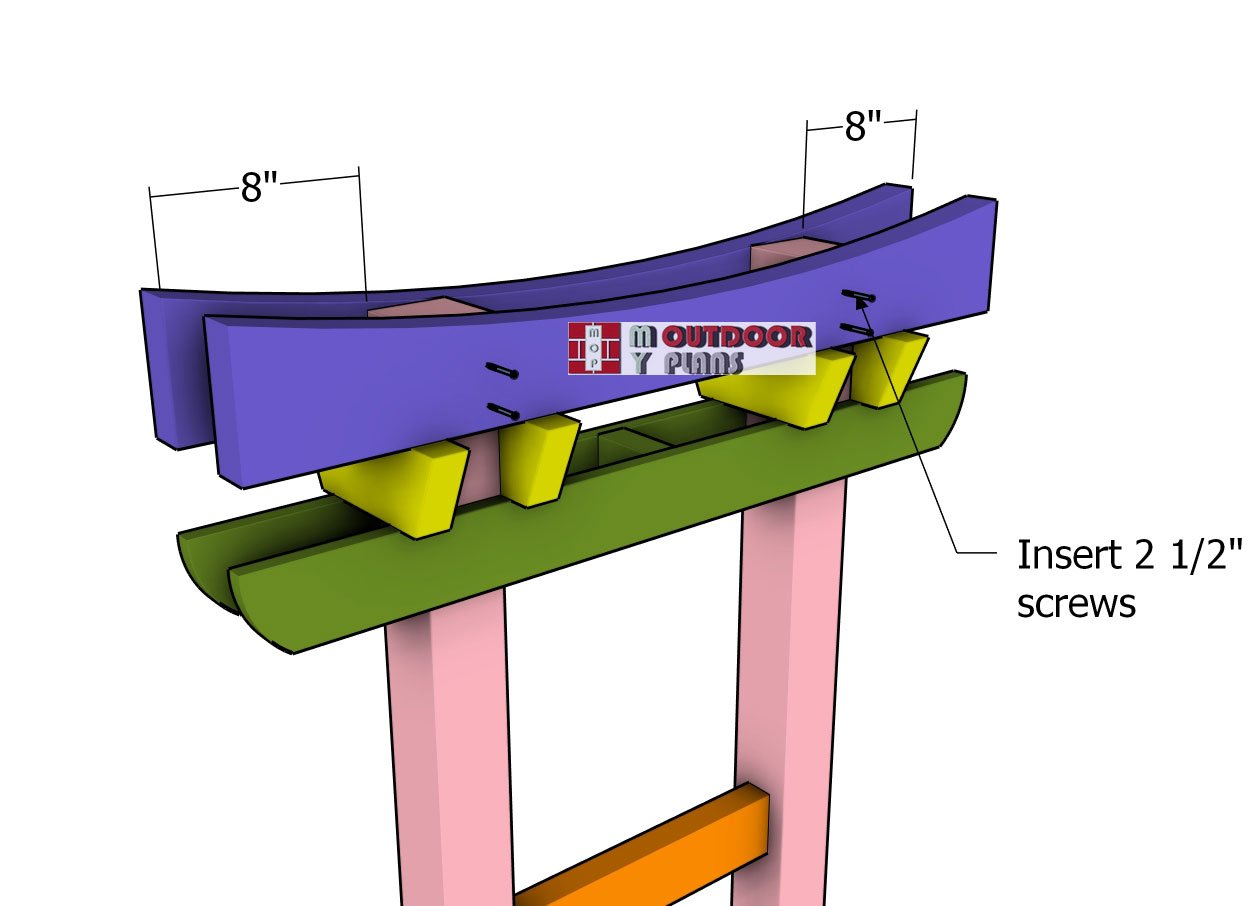
Center the top beams to the tower frame, making sure you have 8″ overhangs on both sides for a clean, symmetrical look. Drill pilot holes through the beams, then secure them to the posts with 2 1/2″ screws; use two screws per joint for a sturdy connection. As shown in the diagram, be sure to attach the top beams on both sides of the botanical tower to complete the structure and add that final touch of stability.
Fitting-the-screw-hooks
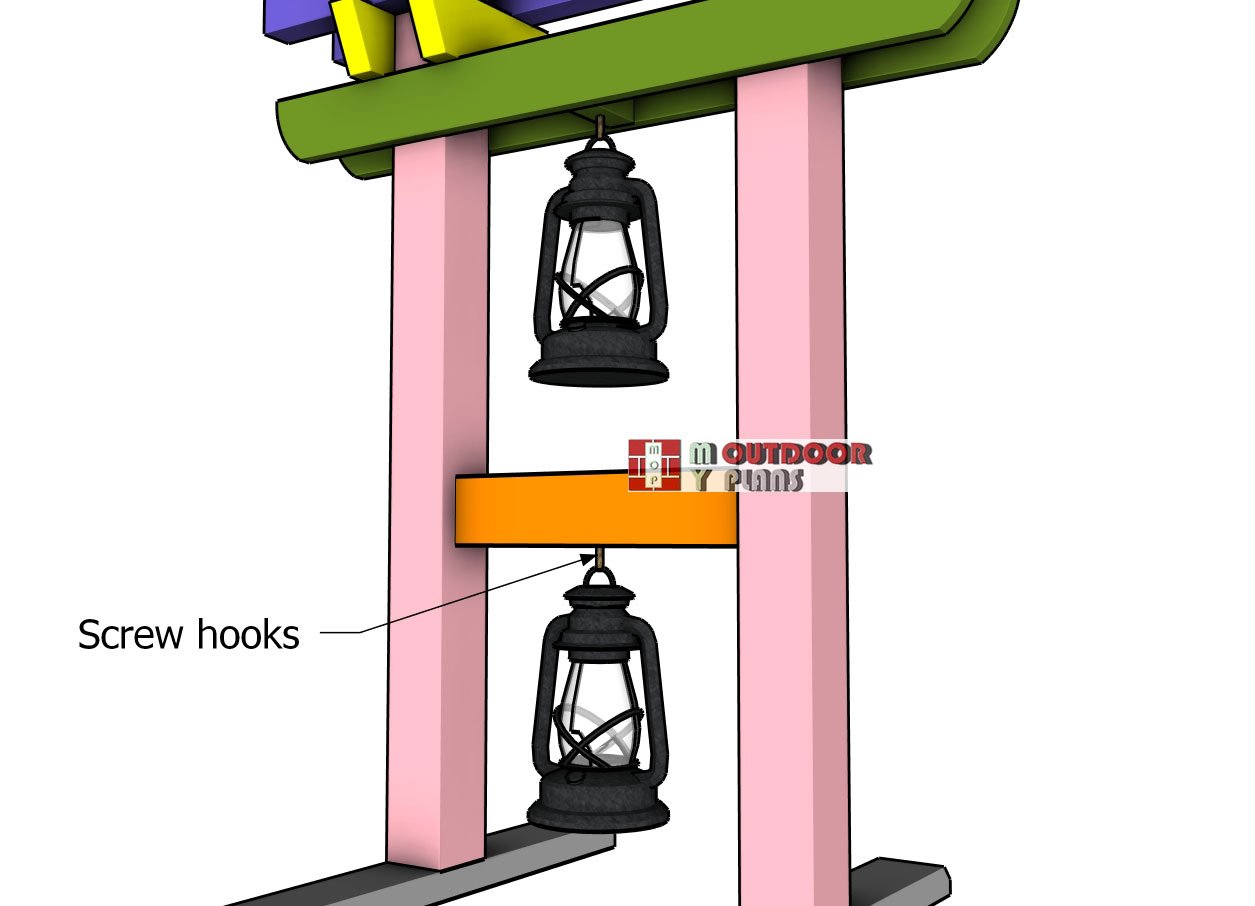
Now, fit the screw hooks to the center of the supports, making sure they’re securely in place. This is where you’ll hang the lanterns, so double-check that the hooks are positioned correctly and well-anchored. Once they’re in, your botanical tower will be ready to shine with those lanterns hanging beautifully!
Finishing touches – Garden Arch Tower
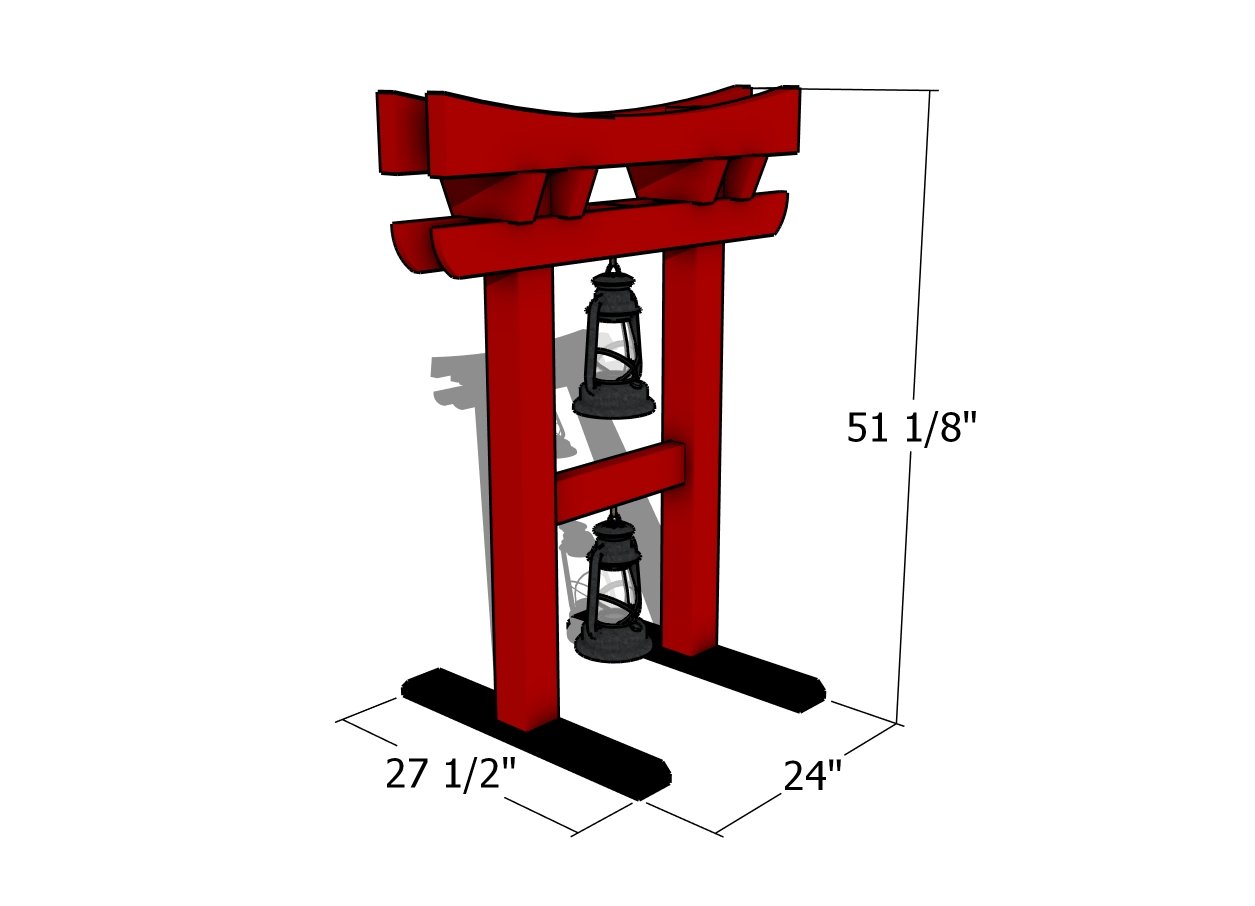
Japanese lantern tower – dimensions
These Japanese-style garden tower plans are all about blending simplicity and elegance with nature. The finishing touches focus on clean lines and natural materials to give your tower that peaceful, Zen-like feel. Whether you choose to stain the wood in natural tones or let it weather gracefully over time, the choice is yours to create a space that complements your garden perfectly.
How to build a lantern tower for garden
Add decorative rocks, minimal plants, or even a small water feature around the base for that extra touch of serenity. The result is a tower that not only looks stunning but brings harmony to your outdoor space!
How to build a Japanese lantern
To complete your Japanese-style garden tower, consider adding two lanterns to hang from the structure. This simple addition not only enhances the traditional aesthetic but also creates a warm, inviting glow as the sun sets. The lanterns bring both function and beauty, making your tower a striking focal point in your garden, day or night. With these final touches, your tower is ready to blend seamlessly into your outdoor space, offering a touch of tranquility and timeless elegance.
If you want to get the Premium plans with all the extras, just press the GET PREMIUM PLANS button bellow. These plans are free to download.

This woodworking project was about DIY Japanese style garden tower plans. If you want to see more outdoor plans, check out the rest of our step by step projects and follow the instructions to obtain a professional result.