This step by step diy woodworking project is about how to build a porch swing. If you have a backyard and you want to add value to your property, we strongly recommend you to consider building a simple swing. Select the right plans for your needs before starting the project. Generally speaking, it is a better idea to take a look over the rest of the related plans, before starting the actual construction.
Make sure you invest in high quality materials, such as pressure-treated lumber, cedar, pine or redwood. Take accurate measurements and use a professional saw to get the job done. Always align the components at both ends before drilling the pilot holes and inserting the galvanized screws, in order to prevent the wood from splitting. Use waterproof glue to reinforce the joints. See all my Premium Plans HERE.
Projects made from these plans
How to build a porch swing
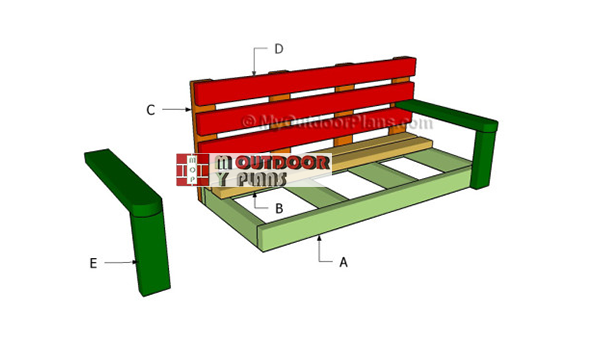
Building-a-2×4-porch-swing
Cut & Shopping Lists
- A – 2 pieces of 2×4 lumber – 48″ long, 4 pieces – 18″ long FRAME
- B – 5 piece of 2×4 lumber – 48″ long SEAT
- C – 4 pieces of 2×4 lumber – 21″ long SUPPORTS
- D – 3 pieces of 2×4 lumber – 48″ long BACKREST
- E – 2 pieces of 2×4 lumber – 11″ long, 2 pieces – 23 1/2″ long ARMRESTS
- 8 pieces of 2×4 lumber – 8 ft
- 2 1/2″ screws
- 1 5/8″ screws
- 1 1/4″ screws
- wood filler
- wood glue
- stain/paint
Tools
![]() Hammer, Tape measure, Framing square, Level
Hammer, Tape measure, Framing square, Level
![]() Miter saw, Drill machinery, Screwdriver, Sander
Miter saw, Drill machinery, Screwdriver, Sander
![]() Post hole digger, Concrete mixer
Post hole digger, Concrete mixer
Time
Related
Building a porch swing
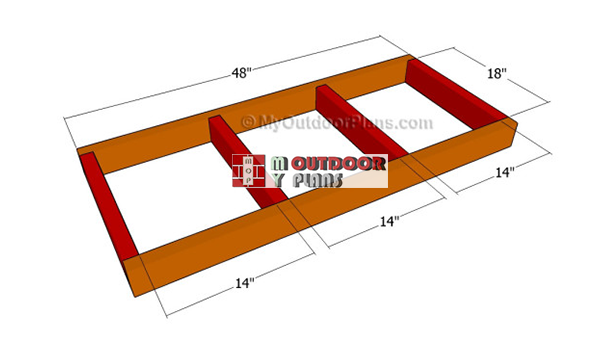
Building-the-frame-of-the-swing-bench
The first step of the woodworking project is to build the frame for the porch swing. As you can easily notice in the plans, we recommend you to cut the components at the right size out of 2×4 lumber.
Drill pilot holes at both ends of the red components and insert 2 1/2″ screws into the perpendicular components. Check if the corners are square and add glue to the joints in order to create a rigid structure.
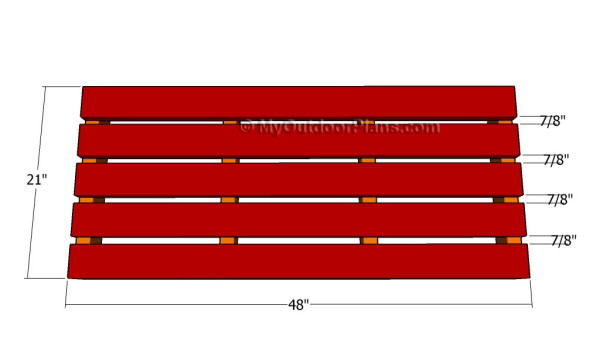
Attaching the seat slats
Continue the garden project by attaching the 2×4 slats to the frame of the swing. It is essential to place the slats equally-spaced and to drill pilot holes before inserting the screws, to prevent the wood from splitting.
Top Tip: Insert 2 1/2″ screws into the supports and add glue to the joints.
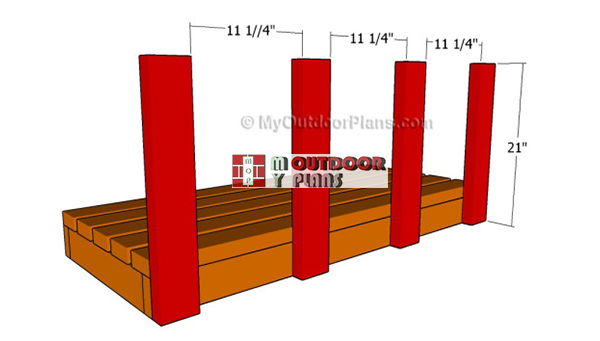
Fitting-the-backrest-supports
Next, attach the 2×4 supports to the back of the porch swing. As you can easily notice in the diagram, you need to cut the supports at the right size and to drill pilot holes, before securing them to the frame by using 2 1/2″ screws.
Top Tip: Add glue to the joints and plumb the supports with a spirit level. Place the supports equally-spaced and leave no gaps between the components.
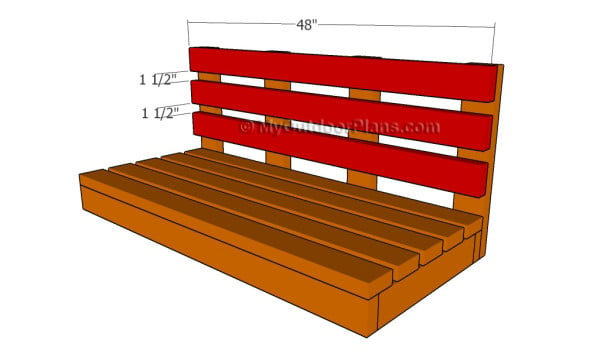
Attaching the back rest slats
Continue the project by attaching the 2×4 slats to the back of the porch swing. Make sure you align the components at both ends and place them equally-spaced. Drill pilot holes through the slats before inserting the screws, to prevent the wood from splitting. Add glue to enhance the rigidity of the joints.
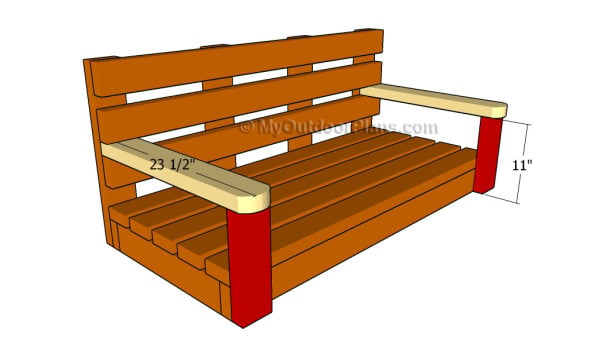
Building the armrests
Build the armrests for the porch swing and to lock them to the structure. In order to get the job done in a professional manner, we recommend you to build the supports out of 2×4 lumber. Drill pilot holes, align them at both ends and secure them to the structure using 2 1/2″ screws.
Build the top armrest and round the ends by using a jigsaw. Drill pilot holes at the top of the supports and at the end of the armrest. Lock the components into place by using 2 1/2″ screws.
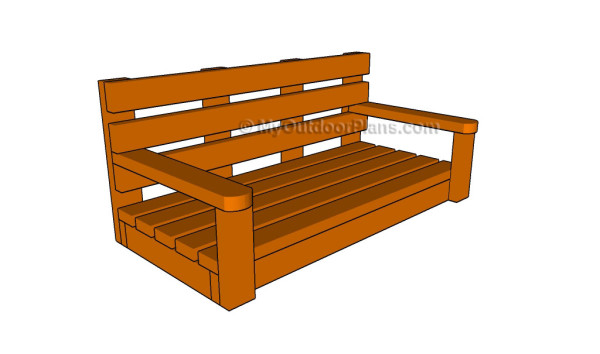
How to build a porch swing
After assembling the wooden bench we recommend you to check if the components are locked together properly. Insert the galvanized screws properly, making sure they are at the same level with the wooden surface.
Top Tip: Don’t forget to take a cover the components with paint, if you want to enhance the look of the bench and to make it stand out. Use glue to lock the components into place.
This woodworking project was about how to build a porch swing. If you want to see more outdoor plans, we recommend you to check out the rest of our step by step projects. SHARE our projects and follow us on the social networks to help us keep adding free woodworking plans. LIKE us on Facebook to be the first that gets our latest updates and submit pictures with your DIY projects.


2 comments
I have reviewed your simple porch swing plan but it doesn’t show where to mount the eye bolts for hanging the swing
On the seat frame, front and back of side supports.