This step by step diy woodworking project is about child chair plans. If you want to build a nice chair for your kids, we recommend you to check out the following instructions with attention and to invest in high quality materials. Cedar, redwood or pine are excellent choices, as they combine the advantages of a great durability with the convenience of a beautiful finish.
There are many other chair and kids projects on our site, so we strongly encourage you to browse through the rest of the plans. Plan every step with great attention and buy all the materials from the very beginning. If you want to get save time and money, we recommend you to ask a skilled friend to give you a hand, as to reduce the wastes and to get a professional result from the very first attempt. See all my Premium Plans HERE.
Projects made from these plans
Cut & Shopping Lists
- A – 2 pieces of 1×4 lumber – 18″ long, 1 piece of 1×3 lumber – 12″ long FRAME
- B – 2 pieces of 1×3 lumber – 10″ long LEGS
- C – 2 pieces of 2×2 – 12″ long SUPPORTS
- D – 4 pieces of 1×3 lumber – 12″ long SEAT
- E – 2 pieces of 1×4 lumber – 14″ long ARMRESTS
- F – 5 pieces of 1×3 lumber – 16 1/2″ long BACKREST
Tools
![]() Hammer, Tape measure, Framing square, Level
Hammer, Tape measure, Framing square, Level
![]() Miter saw, Drill machinery, Screwdriver, Sander
Miter saw, Drill machinery, Screwdriver, Sander
![]() Post hole digger, Concrete mixer
Post hole digger, Concrete mixer
![]() Safety Gloves, Safety Glasses
Safety Gloves, Safety Glasses
Time
![]() One day
One day
Related
Child Chair Plans

Building a child chair
Top Tip: There are many designs you could choose from when building a chair, so make sure you have a short list of alternatives, before starting the actual assembly of the wooden structure.
Building a child chair
Building-the-chair-back-legs
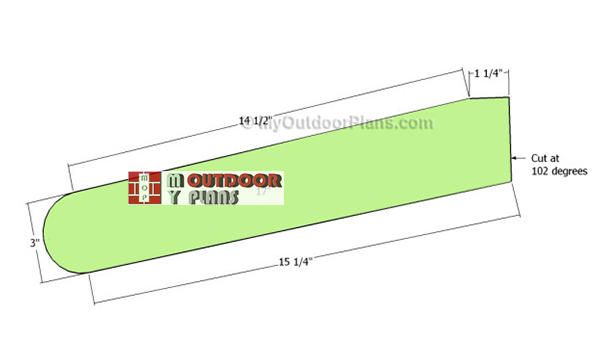
The first step of the woodworking project is to build the frame of the child chair. As you can easily notice in the image, you should build the supports out of 1×4 lumber. Mark the cut lines on the slats, by using a really good carpentry pencil.
Top Tip: In order to make the straight cuts we recommend you to use a circular saw, while for the curved ones, we strongly recommend you to use a jigsaw.
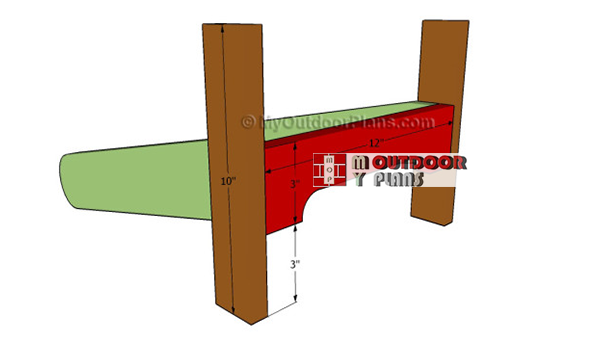
Attaching-the-front-legs-
Continue the woodworking project by attaching the front legs and the support between them. If you want to get the job done in a professional manner, we recommend you to drill pilot holes before inserting the screws, to prevent the wood from splitting.
Use a good spirit level to plumb the legs before inserting the screws into the frame. In addition, we recommend you to add waterproof glue to the joints, if you want to enhance the rigidity of the chair.

Attaching the seat slats
Continue the project by attaching the 1×3 slats to the supports, as shown in the image. Cut the slats at the right size and lay them to the supports, making sure they are equally spaced.
Top Tip: It is essential to drill pilot holes through the slats before inserting the galvanized screws, to prevent the wood from splitting. It will also be a great idea to round the exterior edge of the slat with a router.
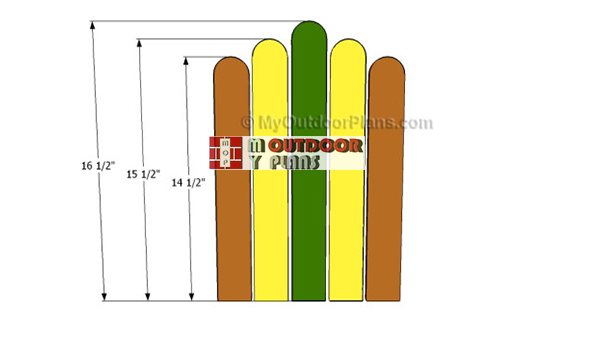
Building-the-backrest-slats
Building the back support is a straight-forward process, as it doesn’t require complex woodworking skills or power tools. If you want to add a little character to the woodworking project, you should consider making the top of the slats round. In this manner, the child chair will have a neat appearance.

Fitting the back supports
Use several pieces of 2×2 lumber to lock the back support slats together, as shown in the image. Place a spirit level on top of the supports, to check if they are perfectly horizontal.

Attaching the armrests
Last but not least, you have to attach the armrests to the wooden structure, using the information shown in the plans. Cut the pieces of 1×4 lumber to the right size and fit them into place.
Use finishing nails to lock the armrests into place properly. In addition, it would be a great idea to round the corners of the armrests, as to get a nice appearance. Smooth the edges with a piece of sandpaper.

Child chair plans
One of the last steps of the woodworking project is to take care of the finishing touches. Therefore, fill the pilot holes with wood putty and smooth the surface with 120-grit sandpaper.
Top Tip: In order to protect the lumber from water damage, we recommend you to cover the components with several coats of paint. Place the child chair in a proper location and move it whenever necessary.
This woodworking project was about child chair plans. If you want to see more outdoor plans, we recommend you to check out the rest of our step by step projects. LIKE us on Facebook and Google + to be the first that gets out latest projects.
- EXPLORE MORE IDEAS FOR -
 |
 |
 |
 |
1 comment
these plans are incomplete. the measurements provided are not sufficient to complete the chair. the builder is left to figure out how and where to put things together – see back of chair detail.