This step by step diy project is about 4×4 free chicken coop plans. This is a small chicken coop that is suitable for a few chickens and it features a super simple design. In addition, I have designed a large run. This coop features a side nesting box so you can harvest the eggs daily. Take a look over the rest of my woodworking plans, if you want to get more building inspiration.
When buying the lumber, you should select the planks with great care, making sure they are straight and without any visible flaws (cracks, knots, twists, decay). Investing in cedar or other weather resistant lumber is a good idea, as it will pay off on the long run. Use a spirit level to plumb and align the components, before inserting the galvanized screws, otherwise the project won’t have a symmetrical look. If you have all the materials and tools required for the project, you could get the job done in about a day. See all my Premium Plans HERE.
Projects made from these plans
4×4 Chicken Coop Plans
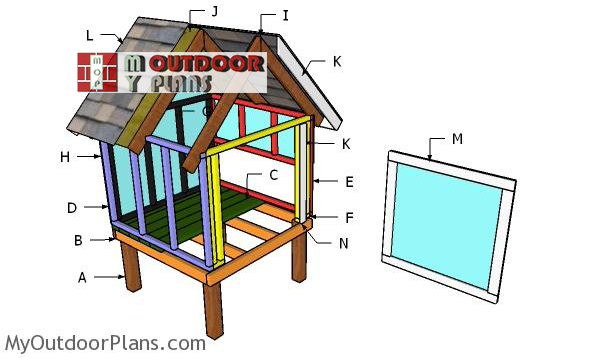
Building-a-4×4-chicken-coop
Cut & Shopping Lists
- A– 2 pieces of 2×4 lumber – 48″ long, 4 pieces – 45″ long BASE
- B – 4 pieces of 4×4 lumber – 24″ long SKIDS
- C – 9 pieces of 2×6 lumber – 48″ long FLOOR
- D – 2 pieces of 2×2 lumber – 48″ long, 4 pieces – 33″ long SIDE WALL
- E – 2 pieces of 2×2 lumber – 48″ long, 2 pieces – 33″ long, 1 piece – 45″ long, 2 pieces – 15 1/2″ long SIDE WALL
- F – 4 pieces of 2×2 lumber – 33″ long, 1 piece – 45″ long, 1 piece – 4 1/2″ long, 1 piece – 6″ long FRONT WALL
- G – 2 pieces of 2×2 lumber – 45″ long, 4 pieces – 33″ long BACK WALL
- H – 2 pieces of 1/2″ plywood – 48 x63 1/2″ long, 1 piece – 17″x48″ long, 1 piece – 36″x48″ long PANELS
- I – 6 pieces of 2×4 lumber – 42″ long, 3 pieces of 1/2″ plywood – 8″x16″ long RAFTERS
- J – 2 pieces of 1/2″ plywood – 42″x60″ long ROOF
- K – 2 pieces of 1×4 lumber – 60″ long, 4 pieces – 43 1/4″ long TRIMS
- L – 40 sq ft of tar paper, 35 sq ft of asphalt shingles ROOFING
- M – 1 piece of 1/2″ plywood – 34 1/2″x34 1/2″ long, 2 pieces of 1×3 lumber – 29 1/2″ long, 2 pieces – 34 1/2″ long CHICKEN DOOR
- N – 2 pieces of 1×3 lumber – 34 1/2″ long, 1 piece – 39 1/2″ long JAMBS
- 1 piece of 4×4 lumber – 8′
- 6 pieces of 2×4 lumber – 8′
- 5 pieces of 2×6 lumber – 8′
- 10 pieces of 2×2 lumber – 8′
- 5 pieces of 1/2″ plywood – 4’x8′
- 4 pieces of 1×4 lumber – 8′
- 3 pieces of 1×3 lumber – 8′
- hinges for chicken door
- latch for large door
- 40 sq ft of tar paper, 40 sq ft of asphalt shingles
- 2 1/2″ screws, 3 1/2″ screws, 1 5/8″ screws
- 4d nails, 2″ nails, 1 1/2″ nails
- wood filler , wood glue, stain/paint
Tools
![]() Hammer, Tape measure, Framing square, Level
Hammer, Tape measure, Framing square, Level
![]() Miter saw, Drill machinery, Screwdriver, Sander
Miter saw, Drill machinery, Screwdriver, Sander
![]() Safety Gloves, Safety Glasses
Safety Gloves, Safety Glasses
Time
Related
- PART 1: 4×4 Chicken Coop with Run Plans
- PART 2: 4×4 Chicken Coop Nesting Boxes Plans
- Easy chicken coop plans
- 4×8 Barn chicken coop plans
4×4 Chicken Coop – Video
How to build a 4×4 backyard chicken coop
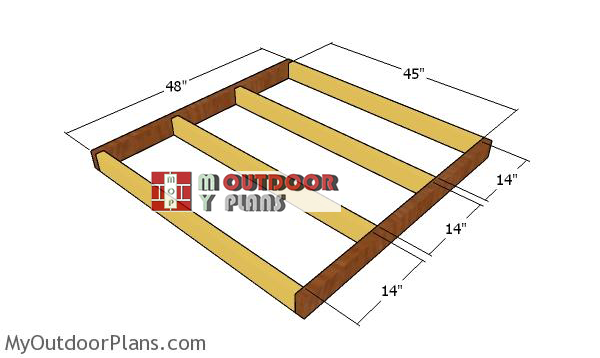
floor-frame-4×4-coop
The first step of the project is to build the floor frame for the 4×8 chicken coop. Cut the joists from 2×4 lumber, as shown in the diagram. Drill pilot holes through the 96″ long joists and insert 3 1/2″ screws into the perpendicular components. Place the joists every 24″ on center and make sure the corners are square.
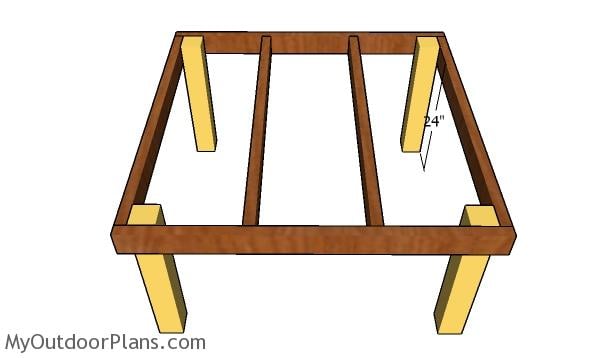
Fitting the posts
Fit the 4×4 posts to the frame of the chicken coop. Make sure the corners are square and clamp the posts to the floor frame. Drill pilot holes and insert 3 1/2″ screws to assemble everything together.
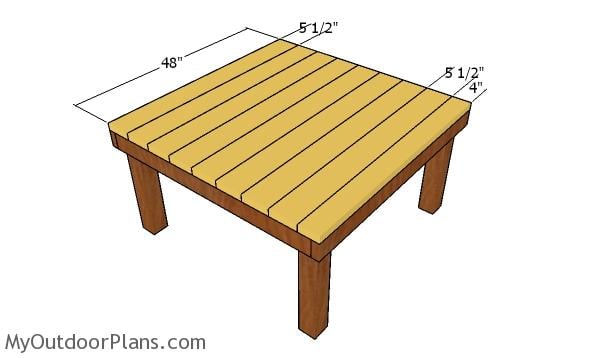
Fitting the floor slats
Fit the 2×6 boards to the floor of the chicken coop and align the edges flush. Leave no gaps between the boards, drill pilot holes and insert 3 1/2″ screws to lock them to the floor frame.
Building the walls
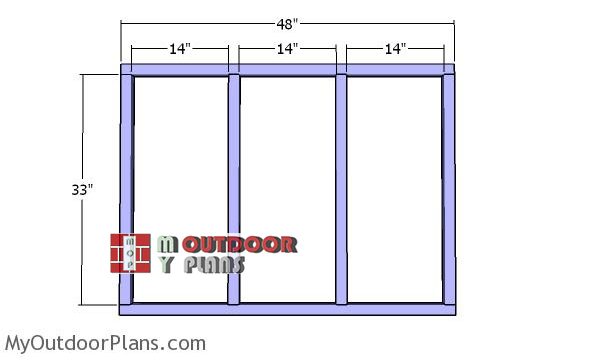
Side-wall-frame-4×4-coop
Build the side wall frame from 2×2 lumber. Cut the components at the dimensions shown in the image. Drill pilot holes through the plates and insert 2 1/2″ screws into the studs. Align the edges flush and make sure the corners are square.
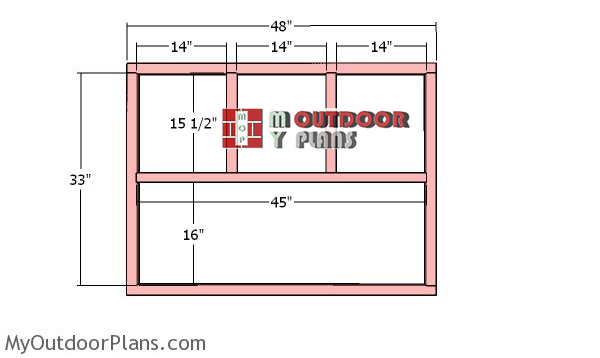
Side-wall-for-coop
Build the opposite wall frame from 2x2s, in the same manner described above. As you can see in the diagram, leave an opening for the nesting boxes.
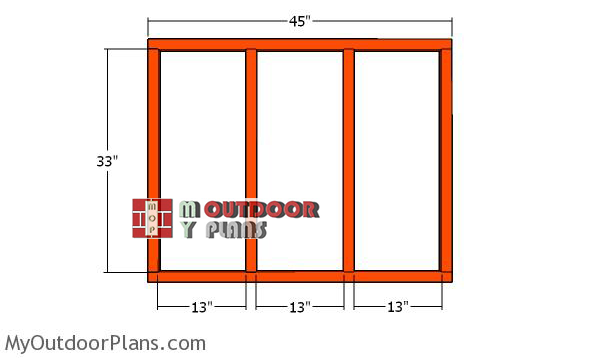
Back-wall-frame-4×4-coop
Build the back wall frame for the 4×4 coop using the info in the diagram.
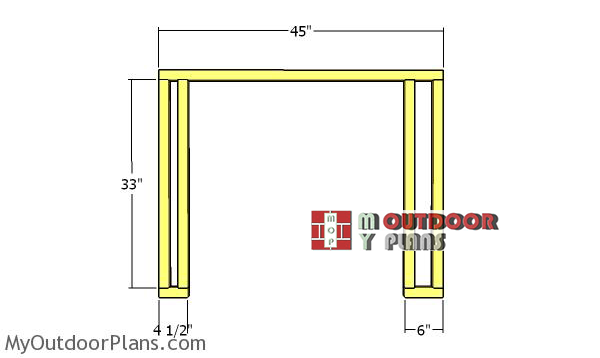
Front-wall-frame
Next, frame the front wall frame for the 4×4 chicken coop. You can adjust the size of the door of the coop to suit your needs.
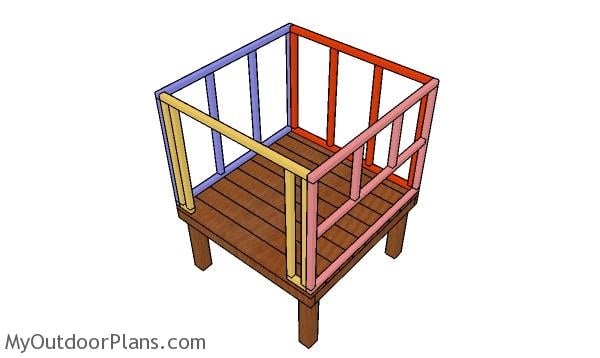
Assembling the frame of the chicken coop
Fit the wall frames to the floor of the coop. Align the edges and plumb the wall frames with a spirit level. Drill pilot holes through the bottom plates and insert 3 1/2″ screws into the floor. Lock the adjacent walls together tightly with 2 1/2″ screws.
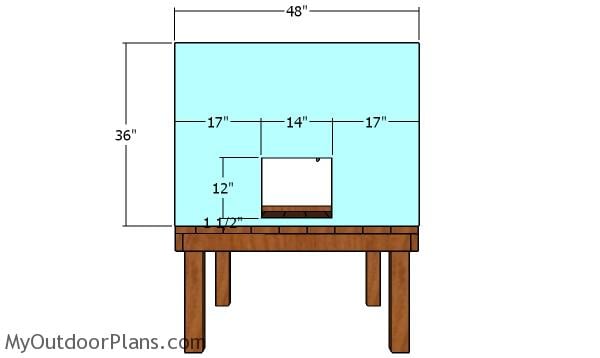
Side panel – chicken coop
Use 1/2″ plywood for the side panel. Make a door opening for the chicken to go into the run. You can adjust the opening to suit your needs. Use 1 5/8″ screws to secure the panel to the frame of the coop.
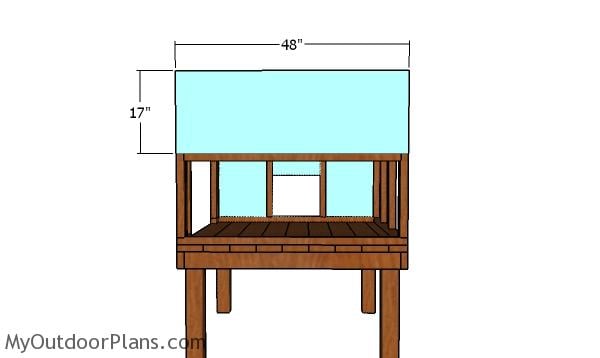
Side panel – 4×4 chicken coop
Attach the panel to the other side of the coop. Align the edges flush and insert 1 5/8″ screws, to lock them panel into place tightly.
Building the roof
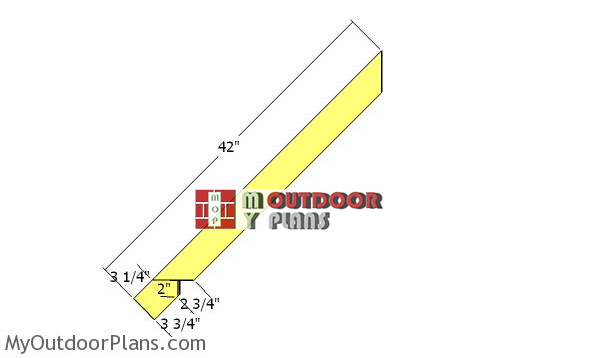
chicken-coop-rafters
Use 2×4 lumber for the rafters. Mark the cut lines on the rafters and make the cuts with a circular saw.
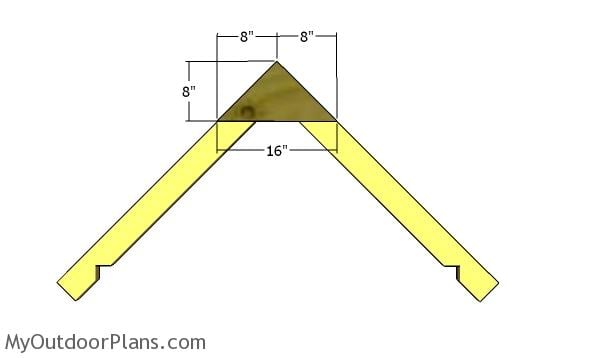
Fitting the gussets
Lay the rafters on a level surface and use 1/2″ plywood for the gusset. Attach the gusset to the rafters and insert 1 5/8″ screws to lock them into place tightly.
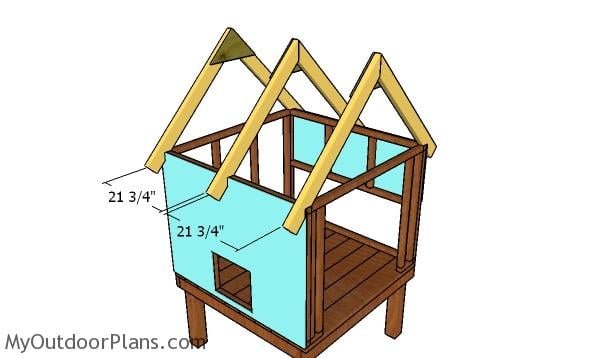
Fitting the trusses
Fit the trusses to the top of the 4×4 coop, making sure you place them equally spaced. Plumb the trusses with a spirit level, drill pilot holes and insert a 3 1/2″ screws to lock them into place tightly.
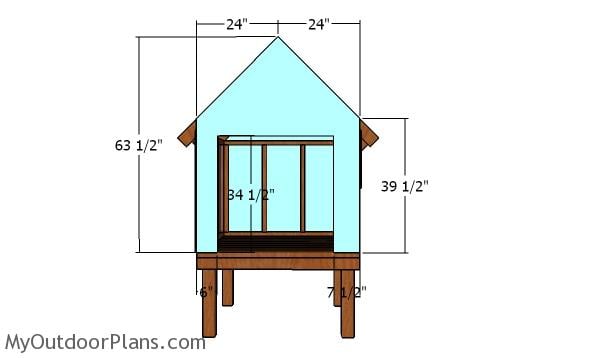
Front wall panel
Use 1/2″ plywood for the front wall panel of the coop. Align the edges flush and insert 1 5/8″ screws to lock the panel into place tightly.
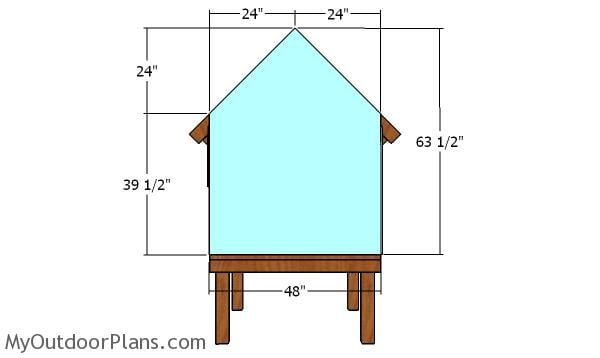
Back wall panels – 4×4 chicken coop
Cut and fit the plywood panel to the back of the coop.
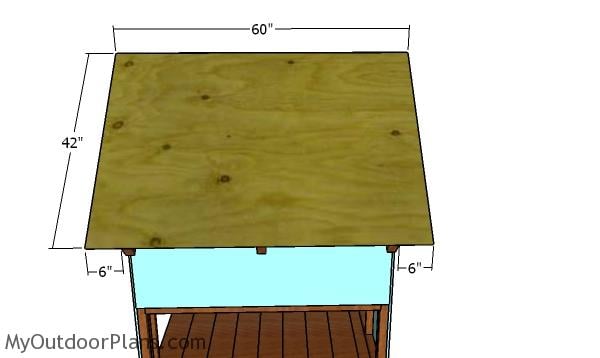
Fitting the roof sheets
Next, cut the roof panels from 1/2″ plywood. Center the panels to the top of the coop so you have 6 ft overhangs on both sides. Insert 1 5/8″ screws to lock the panels to the rafters.
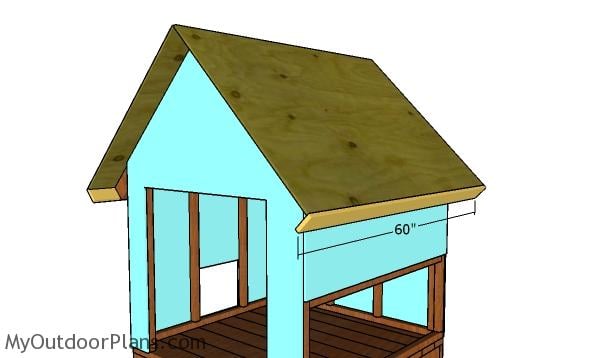
Side roof trims
Fit the 1×4 trims to the sides of the chicken coop. Align the edges flush and insert 1 5/8″ screws to lock the trims into place tightly.
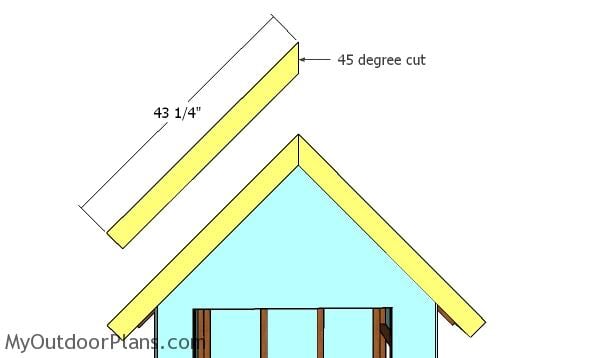
Front and back roof trims
Use 1×4 trims for the front and back roof trims. Use a miter saw to make angle cuts at one end. Fit the trims to the chicken coop.
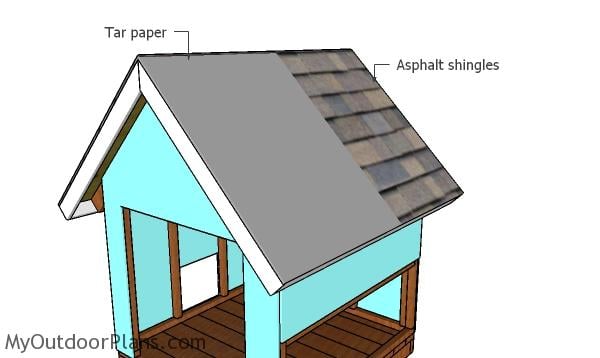
Fitting the roofing to the chicken coop
Fit the tar paper to the roof of the chicken coop. Afterwards, install the roofing shingles to the top of the 4×4 chicken coop.
Building the door
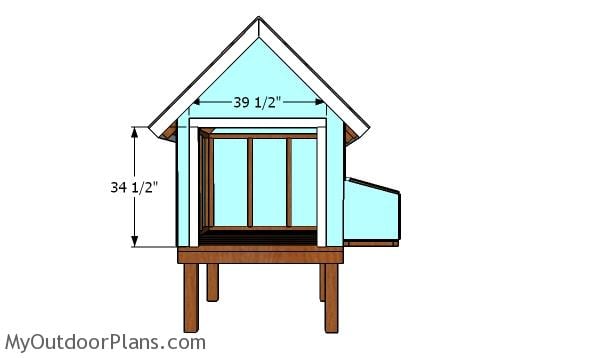
Fitting the door jambs
Use 1×3 trims for the front wall door jambs. Align the edges flush and insert 1 5/8″ screws to lock the jambs into place tightly.
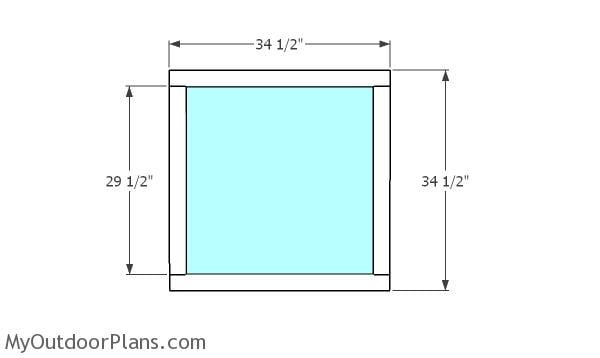
Building the front door
Use the panel that you cut out in the previous step for the door. Attach the 1×3 trims to the door and insert 1 1/4″ nails and glue to lock them together.
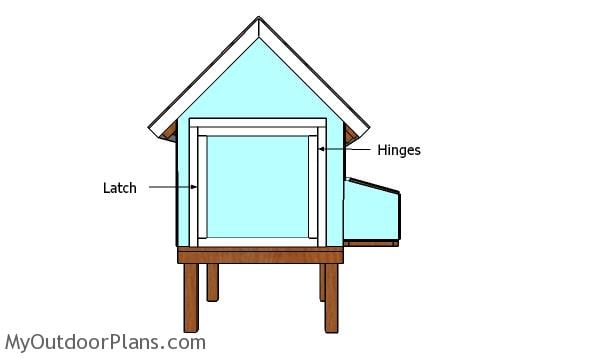
Fitting the front door
Fit the door to the front of the coop and align everything with attention. Use hinges to lock the door to the jambs and install a latch, as well.
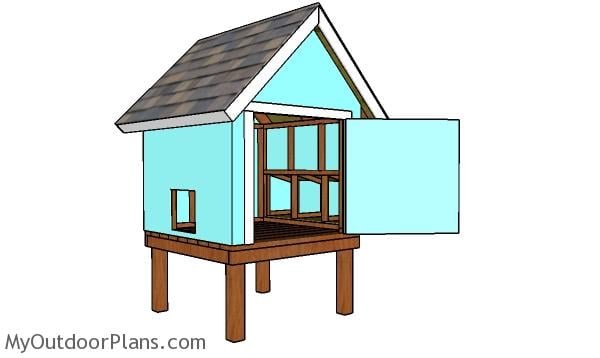
How to build a 4×4 chicken coop
Last but not least, you need to take care of the finishing touches. Fill the holes with wood putty and smooth the surface with sandpaper. Apply a few coats of paint to the exterior of the coop to protect the components from decay.
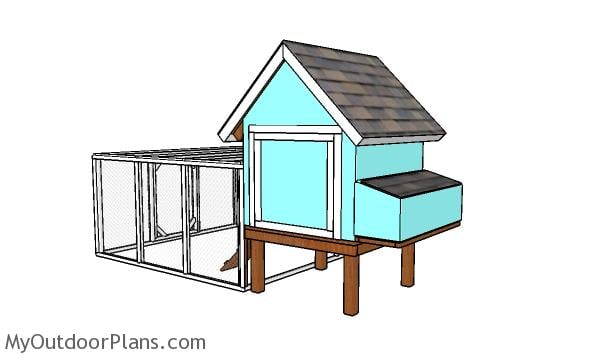
4×4 Chicken coop plans
This 4×4 chicken coop is easy to build and extremely durable. This coop is the perfect candidate if you want to go further and add insulation between the studs. I have tons of other chicken coop designs, so make sure you look over them to get some more building inspiration.

How to build a 4×4 chicken coop with run
You can knock out a 4×4 chicken coop with a run in just a weekend or two, depending on how much time you can dedicate. With a simple design and a straightforward build, this is a project you can tackle without a ton of stress. By the end of it, you’ll have a cozy, secure home for your chickens that’s ready to go in no time.

4×4 chicken coop – free plans
Building a 4×4 chicken coop with a run is a budget-friendly project that will likely cost you between $300 and $600, depending on the materials and finishes you choose. With some basic lumber, wire mesh, and a few hardware items, you can create a sturdy, functional space for your chickens without breaking the bank. It’s a small investment that pays off big with fresh eggs and happy hens right in your backyard.

Dimensions – 4×4 chicken coop plans
If you want to get this plan as a PDF file with 1 full Cut list and 1 full Shopping list, please take a look over the GET PDF PLANS button bellow. Thank you for your support.
This woodworking project was about 4×4 chicken coop plans free. If you want to see more outdoor plans, check out the rest of our step by step projects and follow the instructions to obtain a professional result.


17 comments
These plans worked for the most part. Some concerns and confusions I had while putting this together were:
1. The fact that for the trussing, it directs you to use 2x2s, but the picture and measurements clearly are show and use 2x4s I caught this and purchased 2x4s but this was the most blatant example. There were some other places that I had to scratch my head at and decipher what was really meant.
2. The gap that occurs from the notch in the truss to the plywood on the roof. There’s about 3in of gapping and I know a few not chicken friendly creatures that could squeeze through that gap. Plus if I left it this way, there would be too much venting and become frigid cold for the chickens in the winter.
3. The lack of any windows in this design was kind of odd to me seeing as chickens enjoy having natural light in their coop, so I added in a window using the same technique as the door really, I just had it swing upwards and put some chicken wire over the opening.
Other than these few things, the plans were easy to follow and easy to make adjustments to. Just seemed to be some typos here and there, but were easy to figure out following the measure twice cut once rule. Good plans and the nesting box plans were also easy to read and follow. Thanks for posting these! They were a tremendous help in putting together a home for our birds!
Thank you for the feedback and tips. Much appreciated by me and fellow DIY-ers reading this blog. I would love to feature your project on the blog. I’d appreciate if you send a few pics here: https://myoutdoorplans.com/contact/ Thanks.
That gap you are talking about between the roof and the top plate between your trusses you usually cap with a piece of 2×4, also it says to use 2×4 for the trusses, and there isn’t a window because it’s a coop with an attached run, meaning they won’t be in the coop untill they are going to sleep so natural light doesn’t matter really.
I built it and it looks great but it was hard because of the pictures and stuff, it was hard for me. I think you should do a video on someone actually building it. Mostly because it is much easier to see someone build it step by step talking about what size it is and what it is. I am more of a visual learner.
Also it was lacking natural light and ventilation. I fix that with a slide window with chicken wire on the inside so that when it is open no Predators can go in.
Congrats for the project and thanks for the feedback. I would love to see your coop. You can send a few pics here: https://myoutdoorplans.com/contact/
Do you have the plans for the run part of the 4 by 4 coop?
i’m doing it, i think your plans are excellent…really scared of doing the rafters though..will send pics when it is done…might be a while…ps. 68 yrs old and no woodworking experience..
Good luck. Looking forward to seeing your coop.
headed to lowes to get the supplies now and build it with my kids. will upload a pic for you when done
Have fun. Looking forward to seeing your project
Does the shopping list include materials for the run?
I bought the plans, and so far so good (though I’m not very far along). When I attach the wall frames to to the base, am I supposed to have the walls go edge to edge on the platform, or am I supposed to have a 1/2 gap all around the outside of them (so that the plywood sits flush /even with the platform), OR is the wall frame supposed to be flush to the outer edges and the plywood will sit 1/2 proud of the platform? The drawings & instructions are not fully answering my question, and I want to make sure I’m doing it correctly. But so far, things are looking great!
Building this coop now 04/2024. The 2×2 framing seems very unstable . And also, there is no way the 2×2 nesting boxes are going to hold with no type of leg support . All I did was attach the frame and just the weight of that alone it’s sagging un level. Seems like you didn’t actually build this coop you just designed it on a computer .
Once you assemble the wall frames together everything should be stable and rigid. You can even use 1×1 lumber and it will still be rock solid. As for the nesting boxes, when you attach the exterior plywood panels everything will hold together tightly. If your coop is “very unstable” you either built it wrong or you used other plans. Cheers
Will this be comfortable for about 4 chickens
Yes, a chicken needs 3-4 sq ft