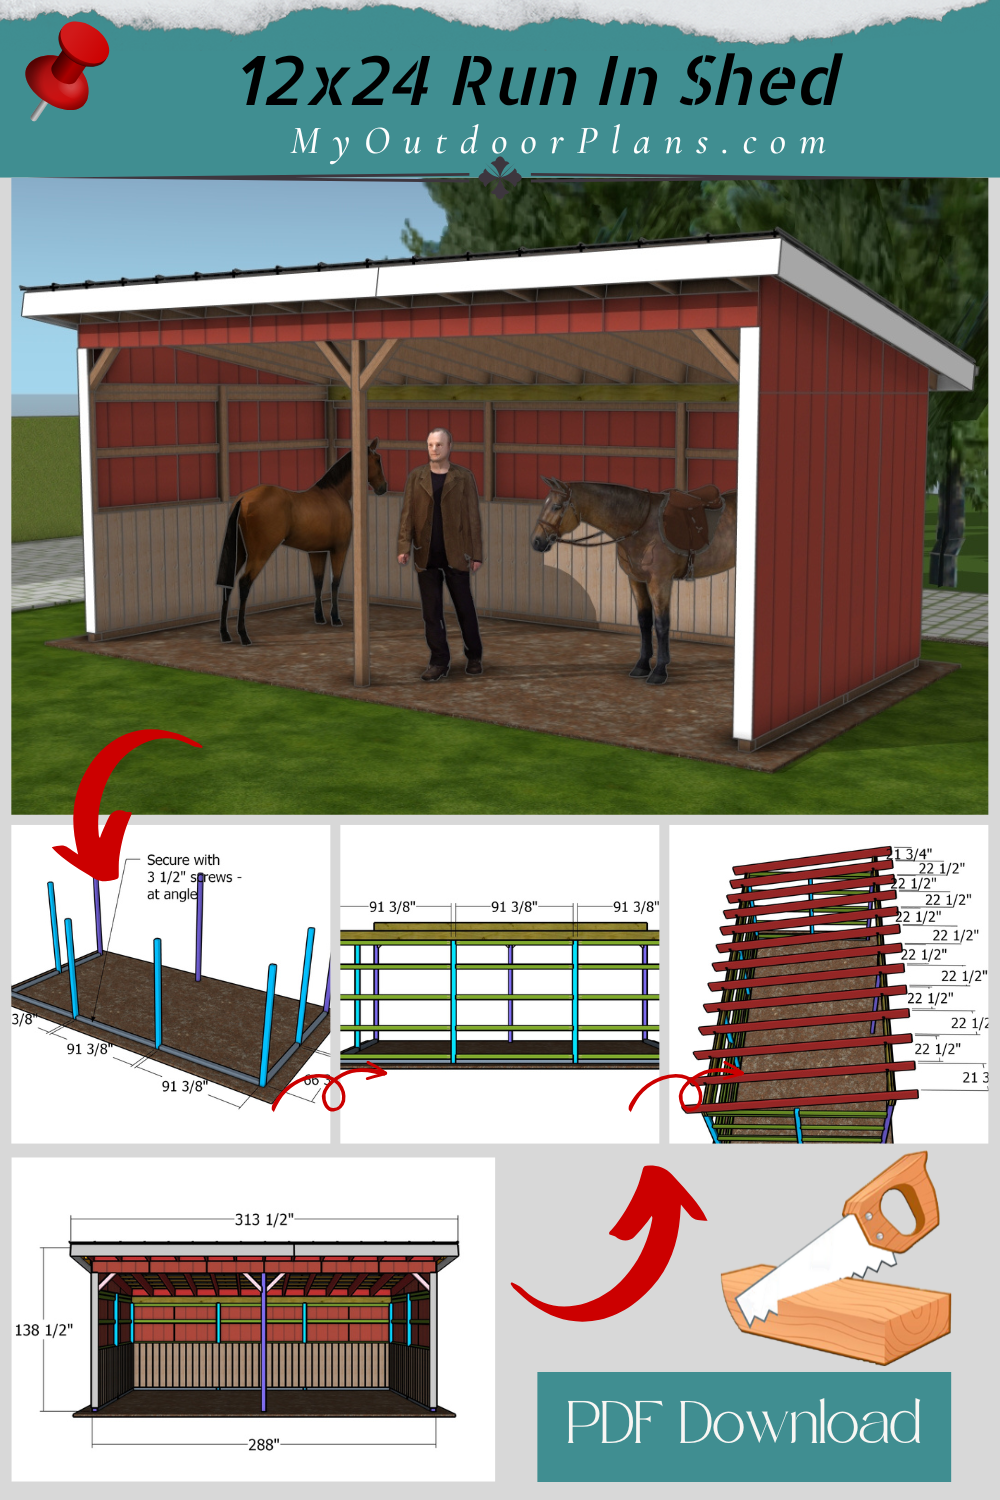
Building a 12×24 run-in shed is a practical and efficient way to provide shelter for livestock, store equipment, or protect firewood from the elements. This size offers ample space while maintaining a straightforward construction process, making it a great DIY project for those looking to enhance their property. The key to a sturdy shed lies in a solid foundation, whether it’s built on pressure-treated skids for portability or anchored with concrete footings for long-term stability.
Customization is key to making the shed fit your needs. Adding kickboards along the lower walls protects against wear and tear from animals, while an open front design provides easy access and natural airflow. If extra protection is needed, half-wall panels or windbreaks can be installed to shield against strong winds. The siding choice—whether T1-11 plywood, board and batten, or metal panels—will depend on budget, durability requirements, and aesthetic preferences. Proper drainage around the shed, such as gravel pads or slight elevation, prevents water pooling and enhances long-term stability. With thoughtful planning and quality materials, a 12×24 run-in shed can be a long-lasting, functional addition to any property.
When buying the lumber, you should select the planks with great care, making sure they are straight and without any visible flaws (cracks, knots, twists, decay). Investing in cedar or other weather resistant lumber is a good idea, as it will pay off on the long run. Use a spirit level to plumb and align the components, before inserting the galvanized screws, otherwise the project won’t have a symmetrical look. If you have all the materials and tools required for the project, you could get the job done in about a day.
Projects made from these plans
Modern 12×24 Run In Shed – Free DIY Plans
Building-a-12×24-run-in-shed
Cut and Shopping Lists
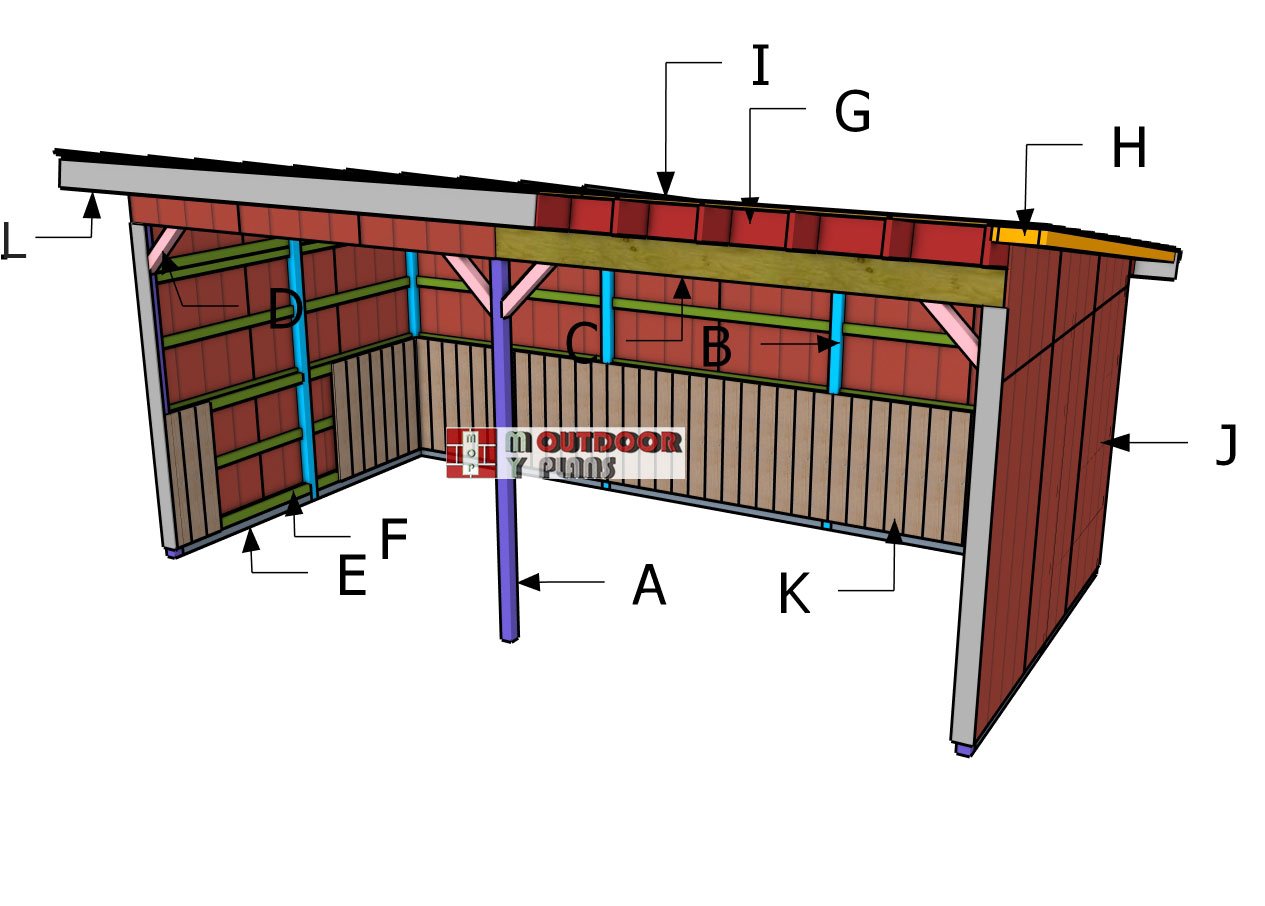
A – 4×4 lumber – 117 1/8″ POSTS – 3 pieces
A – 4×4 lumber – 103 1/4” POSTS – 2 pieces
B – 4×4 lumber – 8 ft POSTS – 4 pieces
C – 1 3/4″x7 1/4″ LVL beam – 24 ft SUPPORT BEAMS – 2 pieces
C – 1 3/4″x9 1/2″ LVL beam – 24 ft SUPPORT BEAMS – 2 pieces
D – 4×4 lumber – 24” BRACES – 4 pieces
E – 4×4 lumber – 66 3/4″ SKIDS – 4 pieces
E – 4×4 lumber – 91 3/8″ SKIDS – 3 pieces
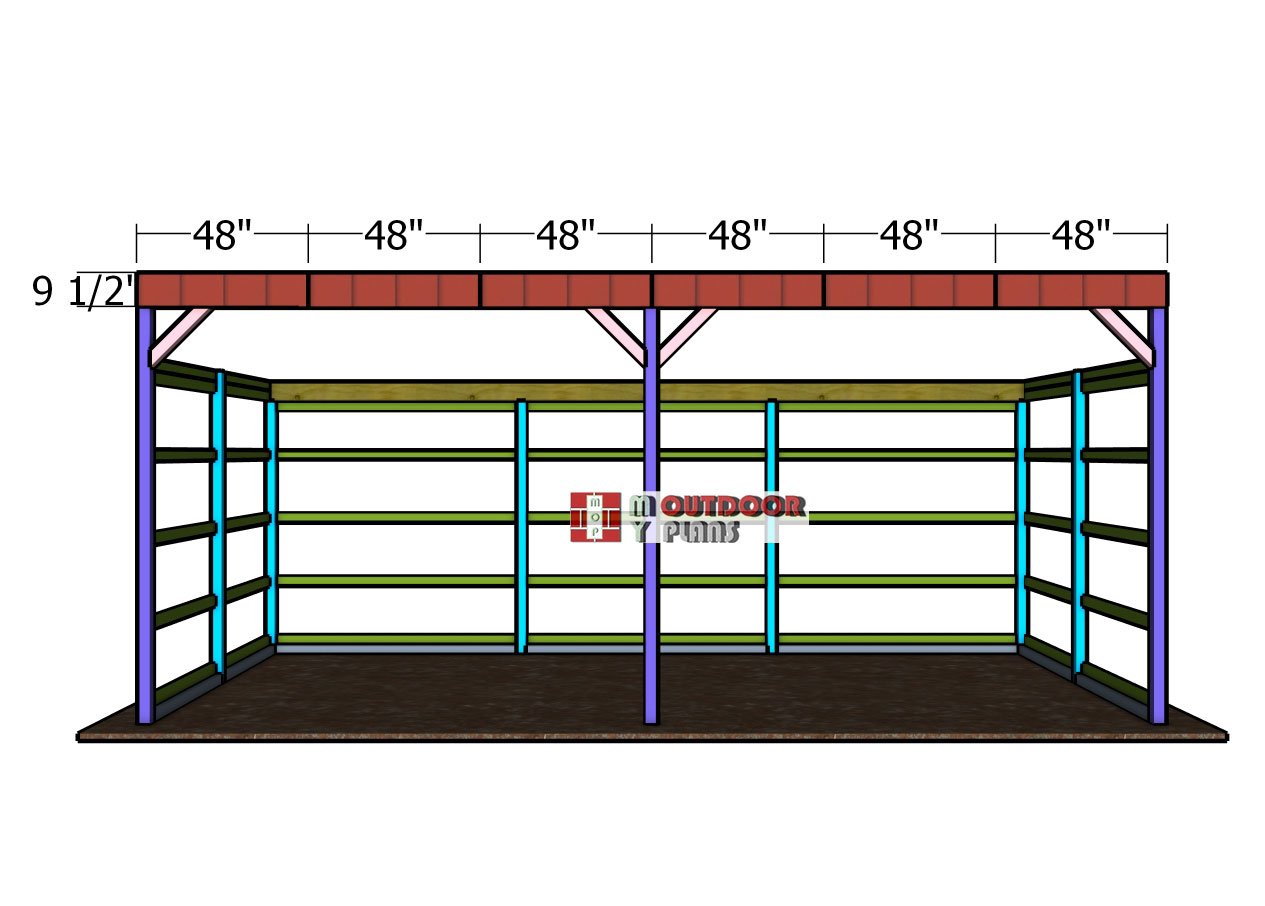
F – 2×4 lumber – 66 3/4” GIRT BOARDS – 32 pieces
F – 2×4 lumber – 91 3/8″ GIRT BOARDS – 21 pieces
G – 2×10 lumber – 220″ RAFTERS – 13 pieces
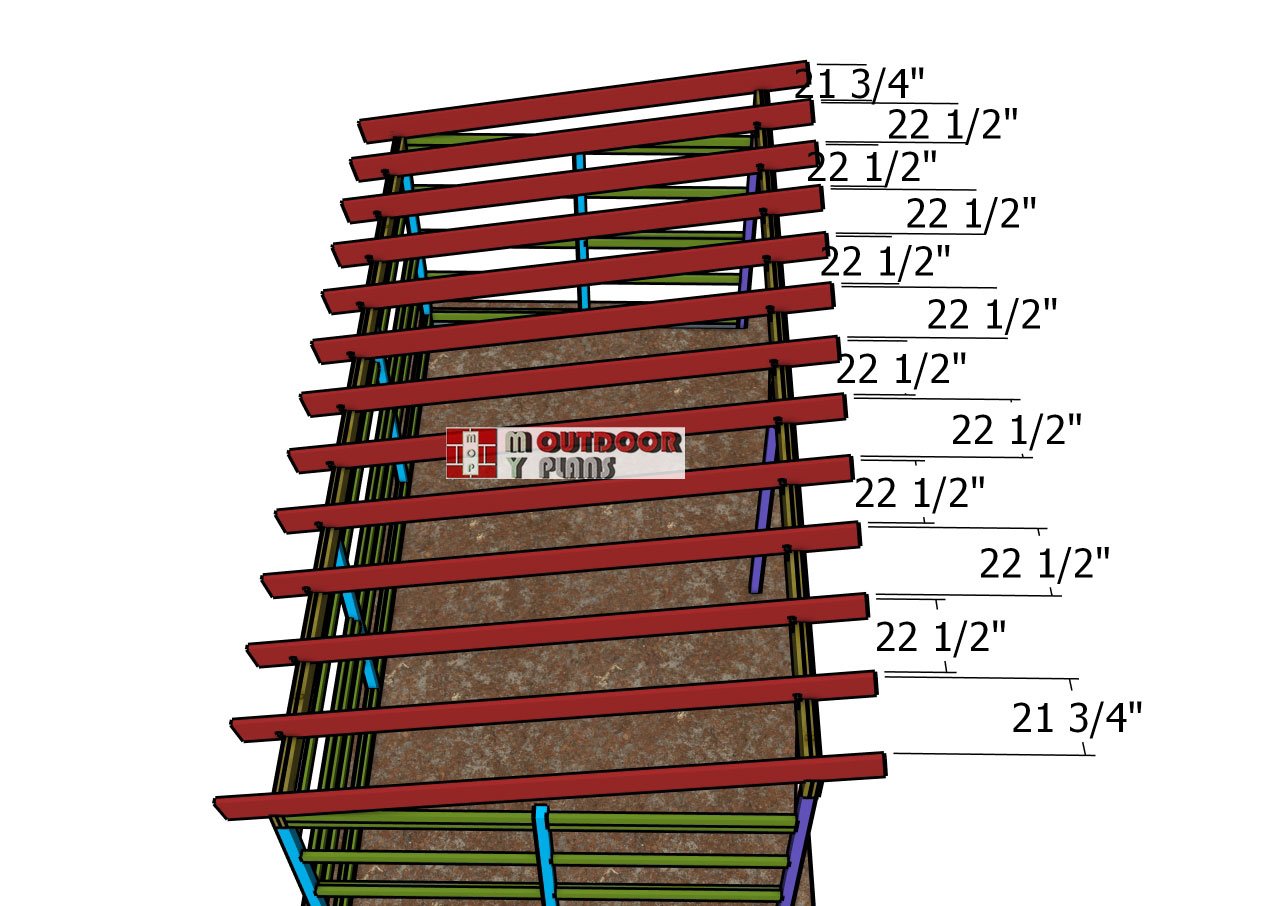
G – 2×10 lumber – 21 3/4″ BLOCKINGS – 4 pieces
G – 2×10 lumber – 22 1/2″ BLOCKINGS – 20 pieces
Tools
![]() Hammer, Tape measure, Framing square, Level
Hammer, Tape measure, Framing square, Level
![]() Miter saw, Drill machinery, Screwdriver, Sander
Miter saw, Drill machinery, Screwdriver, Sander
![]() Safety Gloves, Safety Glasses
Safety Gloves, Safety Glasses
Time
![]() One week
One week
Related
- PART 1: 12×24 Run in shed plans
- PART 2: 12×24 Run in shed roof plans
- 16×24 Run in shed plans
Pin it for later!
It’s that easy to build a run in shed!
STEP 1: Setting the posts
Midpoint-layout
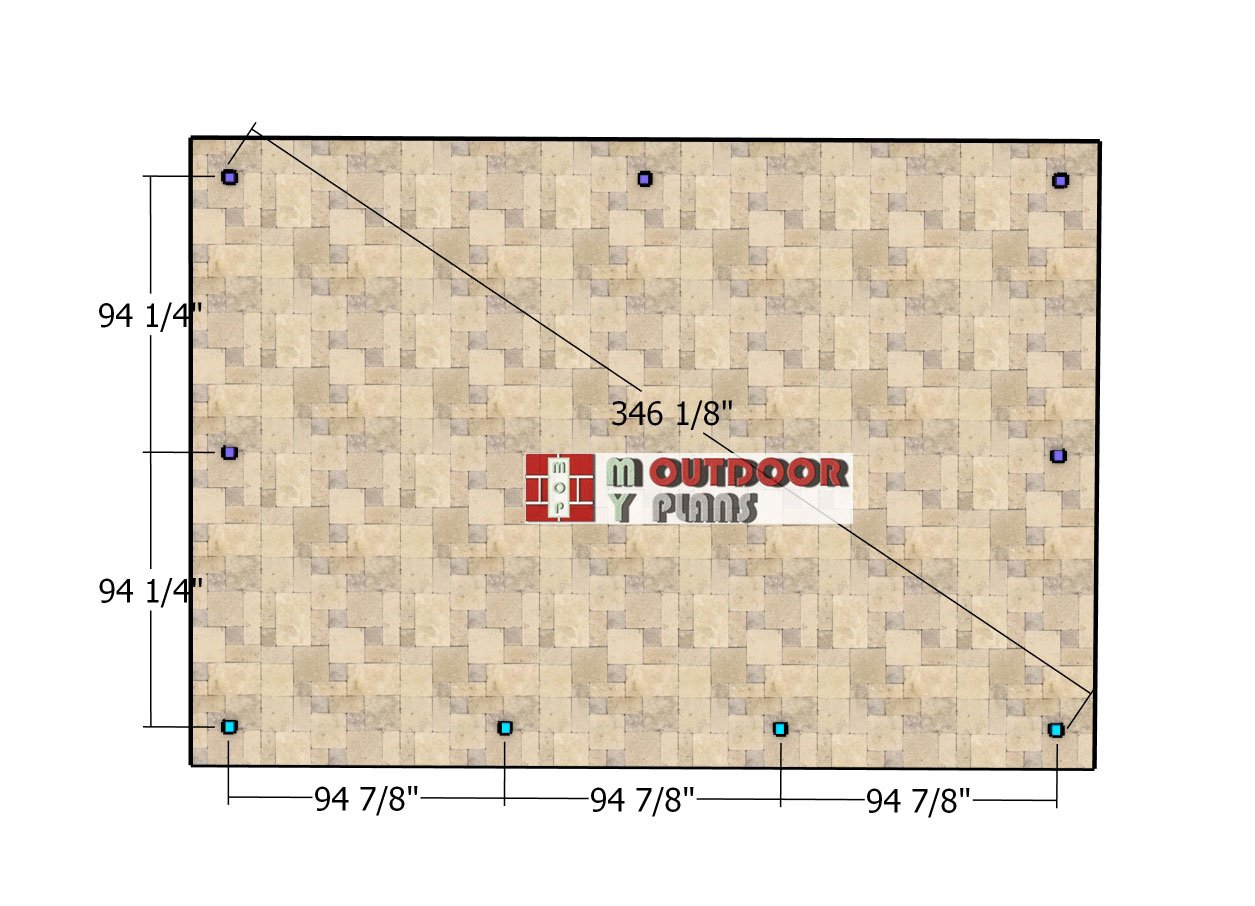
First things first, let’s lay out those posts. Grab the diagram and use it to pinpoint the exact center of each post location. Trust me, getting this right now will save you a ton of headaches later. Take your time, mark your spots, and double-check your layout. Once everything’s lined up, it’s time to break out the post hole digger and start digging for those concrete footings. Let’s get this build rolling!
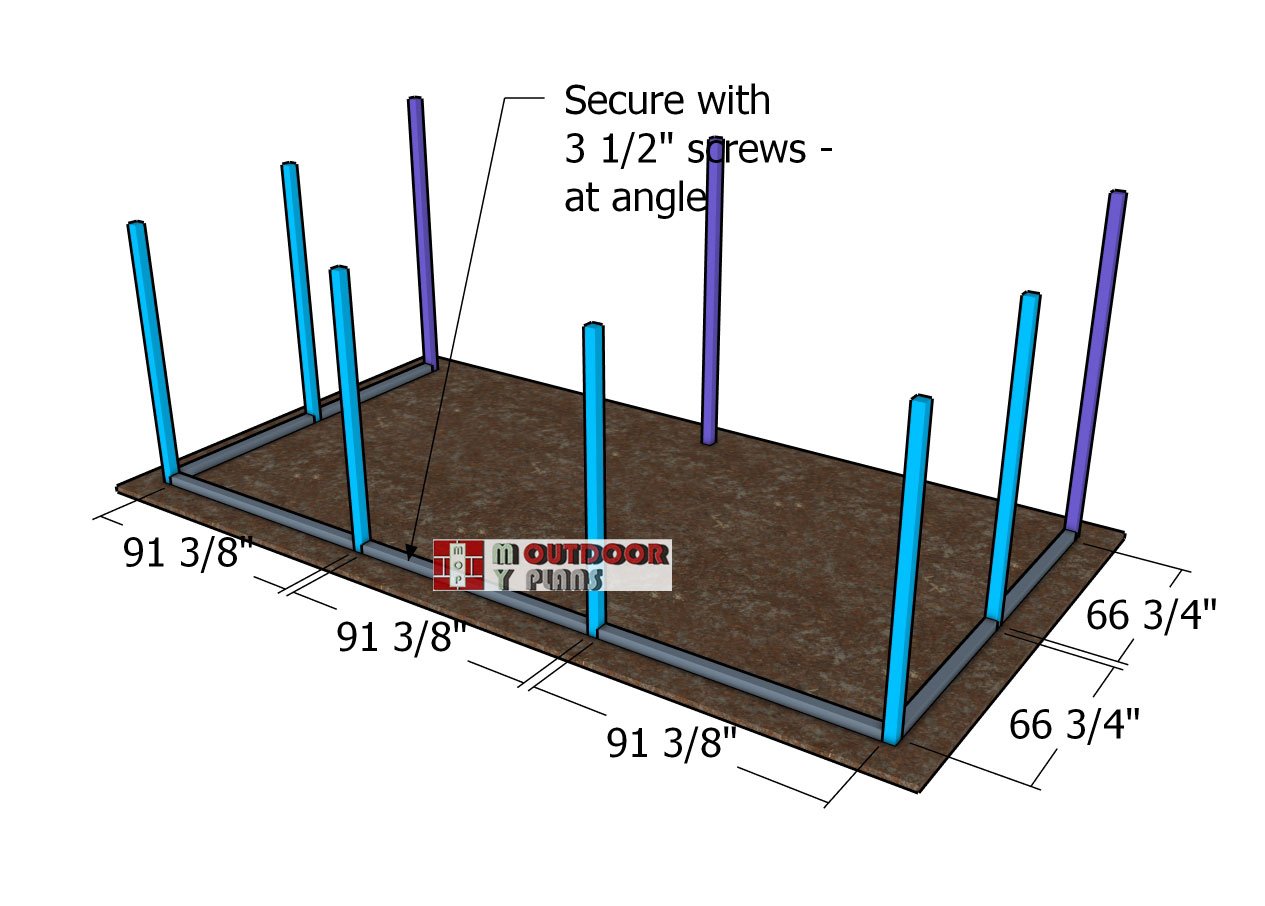
Base-skids
Time to install the 4×4 skids! Fit them snugly between the posts as shown in the diagram, then cut them to size for a perfect fit. Secure each skid with 3 1/2″ screws, but don’t just start driving them in—drill pilot holes at an angle first to keep the wood from splitting. Lock them in place by adding screws on both the interior and exterior sides, using two screws per joint for rock-solid stability.
Now, here’s why these skids matter: they don’t just support the structure—they also act as a barrier, lifting the siding 3 1/2″ off the ground to keep it safe from moisture. It’s a small step that makes a big difference in the long-term durability of your shed. Future-you is gonna love this decision!
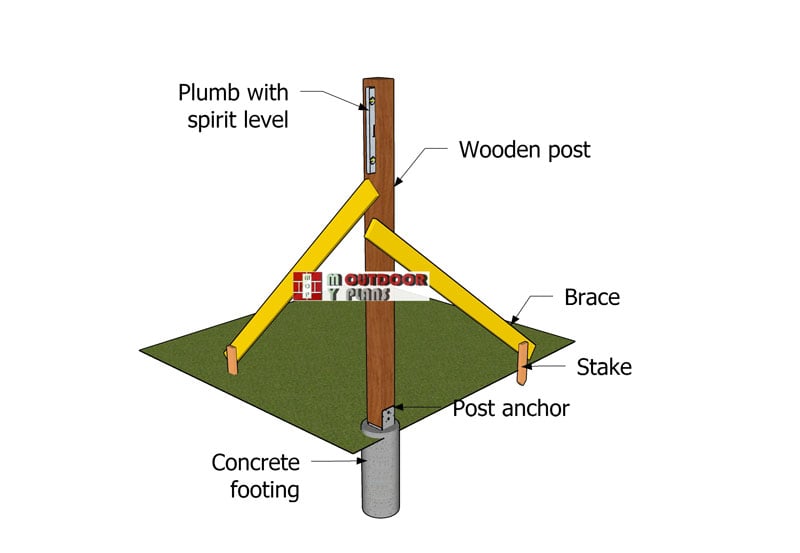
Setting-the-posts
First up, we’re digging holes for our concrete footings. Grab your shovel and maybe a friend to lend a hand, because we’re going to dig down to the frost line to ensure our structure stands strong through all seasons. The depth will vary depending on your local codes, so make sure to check those before you start. A good starting depth is 3 ft deep.
Once you’ve got your 14″ in diameter holes dug, it’s time to set the tube forms in place. These cylindrical forms are essential, they shape the concrete and keep everything neat and tidy. Place the tube forms into the holes, making sure they’re centered and standing nice and straight. This is where your level becomes your best friend.
Now, let’s talk leveling across all your footings. Lay a straight board across the tube forms and place a level on top to ensure they’re all at the same height. Adjust as necessary by adding or removing soil beneath the forms. Getting this right is crucial for a level structure, so don’t rush this step.
With everything leveled and secure, we’re ready for the fun part, pouring the concrete! Mix up your concrete according to the manufacturer’s instructions until you have a good consistency, not too watery, not too thick. Carefully pour the concrete into the tube forms, filling them up to the top. Use a piece of rebar or a wooden dowel to poke down into the concrete and eliminate any air pockets. This ensures maximum strength and durability.
Before the concrete sets, it’s time to insert the post anchors. Place an anchor into the center of each footing, pressing it down so it’s embedded firmly in the concrete. Make sure the anchors are aligned correctly with where your posts will go and use your level to ensure they’re perfectly plumb. Allow the concrete to cure, usually 24 to 48 hours, but refer to your concrete mix for exact times. I know it’s tempting to move ahead, but patience here pays off big time. You want those footings to be rock solid before adding any weight.
Set the posts into place and secure them with temporarily braces, as shown in the diagram. This will allow you to add the rest of the components for the large run in shed, while everything stays into place tightly.
STEP 2: Shed structure
Fitting-the-support-beams
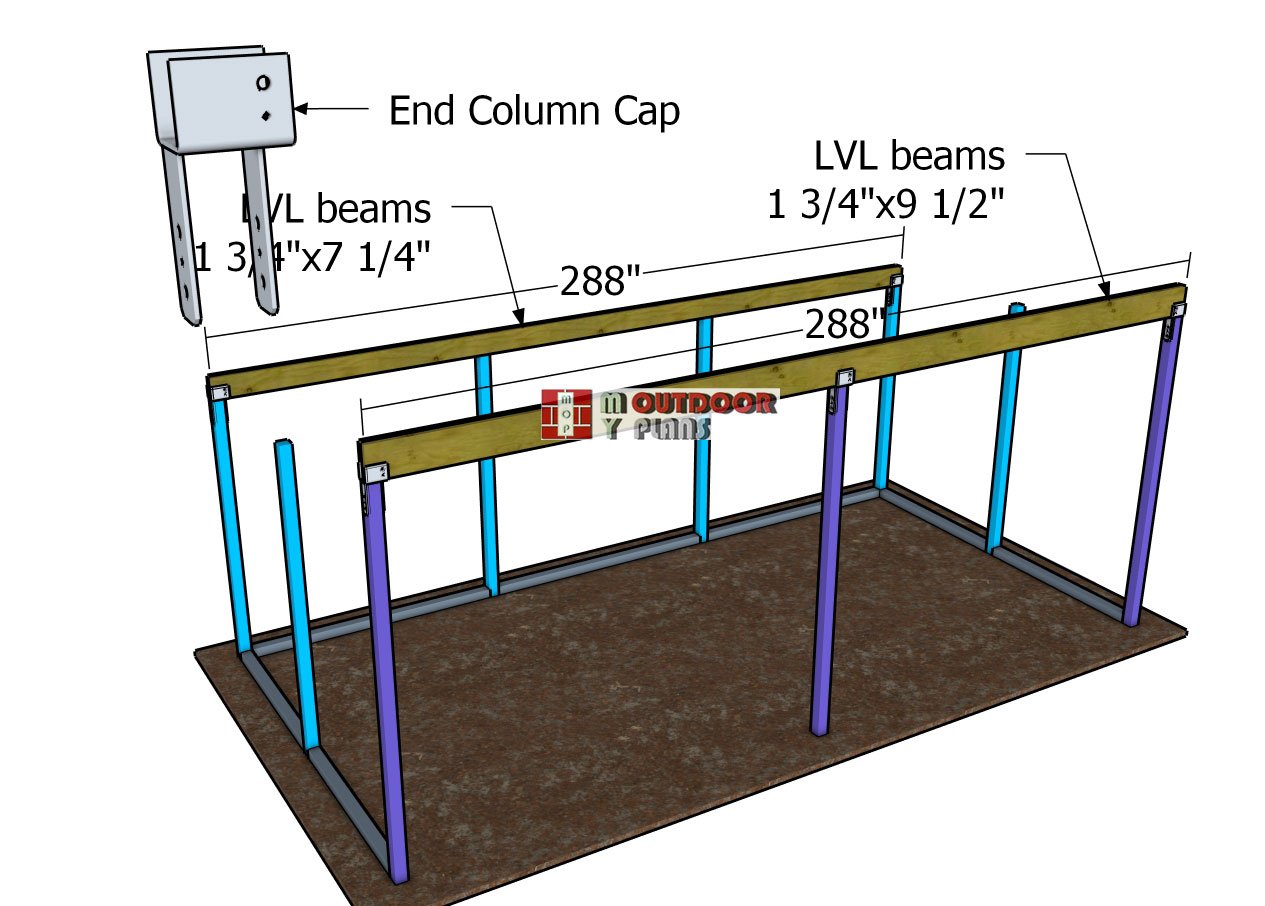
Let’s talk support beams. We’re using LVL beams, and these things are built for business. They’re perfect for handling wide openings like the ones in this project. For maximum strength, we’re gluing and stacking two LVL beams together for both the front and back. Once they’re lined up just right, lock them in with 2 1/2″ screws from both sides. No shortcuts here—we’re building something that’s going to last.
Now for the fun part—lifting the beams onto the posts. This is where the whole structure really starts taking shape! To lock them down tight, we’re using end column caps and 1 1/2″ structural nails or screws (check the diagram for exact placement). For the end posts, grab ECCQ44SDS2.5 column caps, and for the middle posts, you’ll need CCQ44SDS2.5 caps. These pieces aren’t just for show—they’re doing some serious heavy lifting, keeping your structure rock solid for years to come.

Front-wall-diagonal-braces
For the front wall braces, we’re using 4×4 lumber because stability is the name of the game. Cut both ends at a 45-degree angle for a snug, secure fit. Once they’re cut, position them on the structure and lock them in with 3 1/2” screws. Quick pro tip—drill pilot holes first! This prevents splitting and gives you a clean, pro-level finish. These braces aren’t just for looks; they’re adding serious strength to your structure.
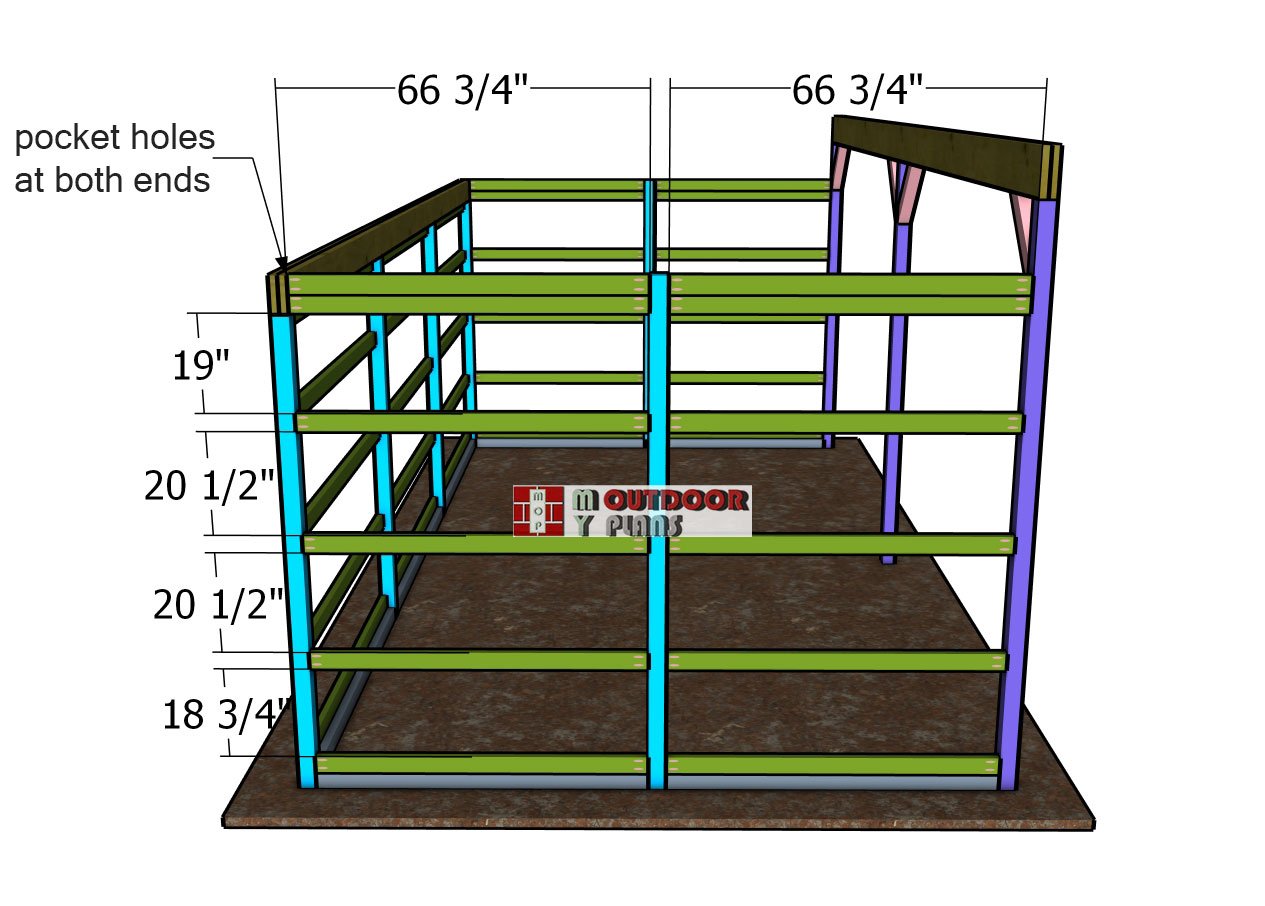
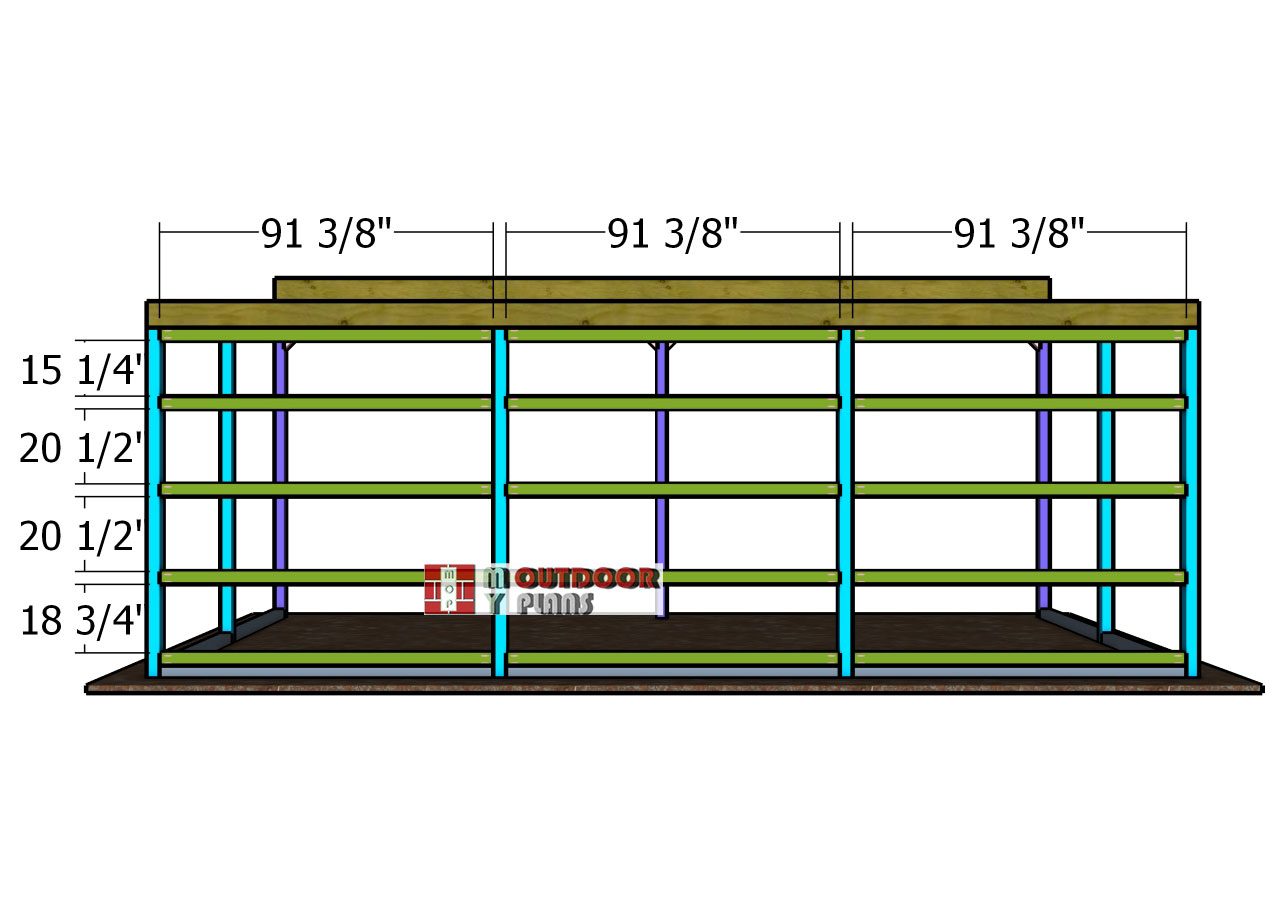
Side-girt-boards
Next up—girt boards! We’re using 2×4 lumber, and precision is key here. Cut each board to 66 3/4” for a snug fit, then secure them to the posts with 3” nails. If you’ve got a nail gun, this part is a breeze—just drive the nails at an angle for some extra hold. Prefer screws instead? No problem! Just drill pocket holes at both ends and lock them in with 2 1/2” screws. Both methods get the job done, so go with whatever fits your style and tools best. Either way, these boards are locking everything together, so let’s keep this build rolling!
Girt-boards—back-of-the-shed
Now, repeat the process for the back of the loafing shed, making sure everything lines up perfectly. Take your time here—double-check measurements and positioning as you go. A little extra precision now means way less hassle later.
Front-siding-sheets
Next up—let’s build the rafters! We’re using 2×10 boards for this part, so grab your plans and mark those cut lines carefully. Precision is key here—it’ll make the assembly process way smoother down the road. Once you’ve got your marks in place, fire up your circular saw and make those cuts, keeping your lines straight and clean. Take your time—clean cuts = a solid fit. Repeat the process for all the rafters, and just like that, you’ll have a sturdy set ready to go. Let’s keep this build moving!
STEP 3: Rafters

Rafters
Next up—let’s build the rafters! We’re using 2×10 boards for this part, so grab your plans and mark those cut lines carefully. Precision is key here—it’ll make the assembly process way smoother down the road. Once you’ve got your marks in place, fire up your circular saw and make those cuts, keeping your lines straight and clean. Take your time—clean cuts = a solid fit. Repeat the process for all the rafters, and just like that, you’ll have a sturdy set ready to go. Let’s keep this build moving!
Fitting-the-rafters
Now it’s time to fit the rafters onto the top of your lean-to shed! Set them 24″ on center to keep the spacing even and the structure rock solid. To lock them down, use rafter ties and secure each one firmly with 1 1/2″ structural nails or screws. And here’s the pro move—double-check alignment as you go. A little extra attention here means you’ll end up with a strong, professional-looking roof that’s built to last. Let’s get those rafters in place!
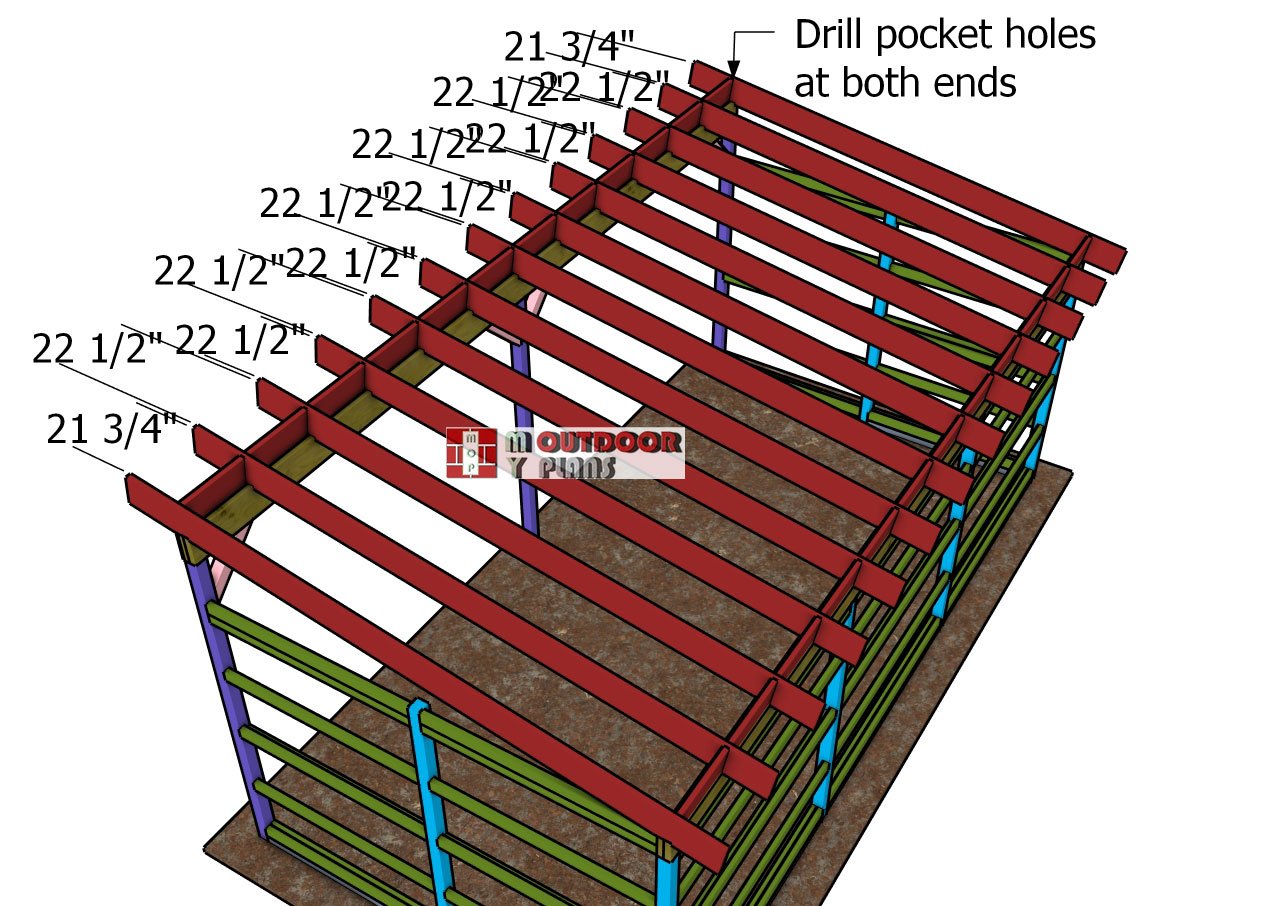
Installing-the-roof-blockings
Now, let’s cut and install the roof blockings! Grab some 2×10 lumber and cut each piece to fit snugly between the rafters—just like in the image. Carefully position each blocking for a tight, secure fit, then toenail them into place with 3″ nails. Prefer screws instead? No problem! Just drill pocket holes at both ends and fasten them with 2 1/2″ screws. Either method works, so go with what feels right. These blockings add stability and support to your roof, so take your time and lock them in nice and tight. Let’s keep this build moving!
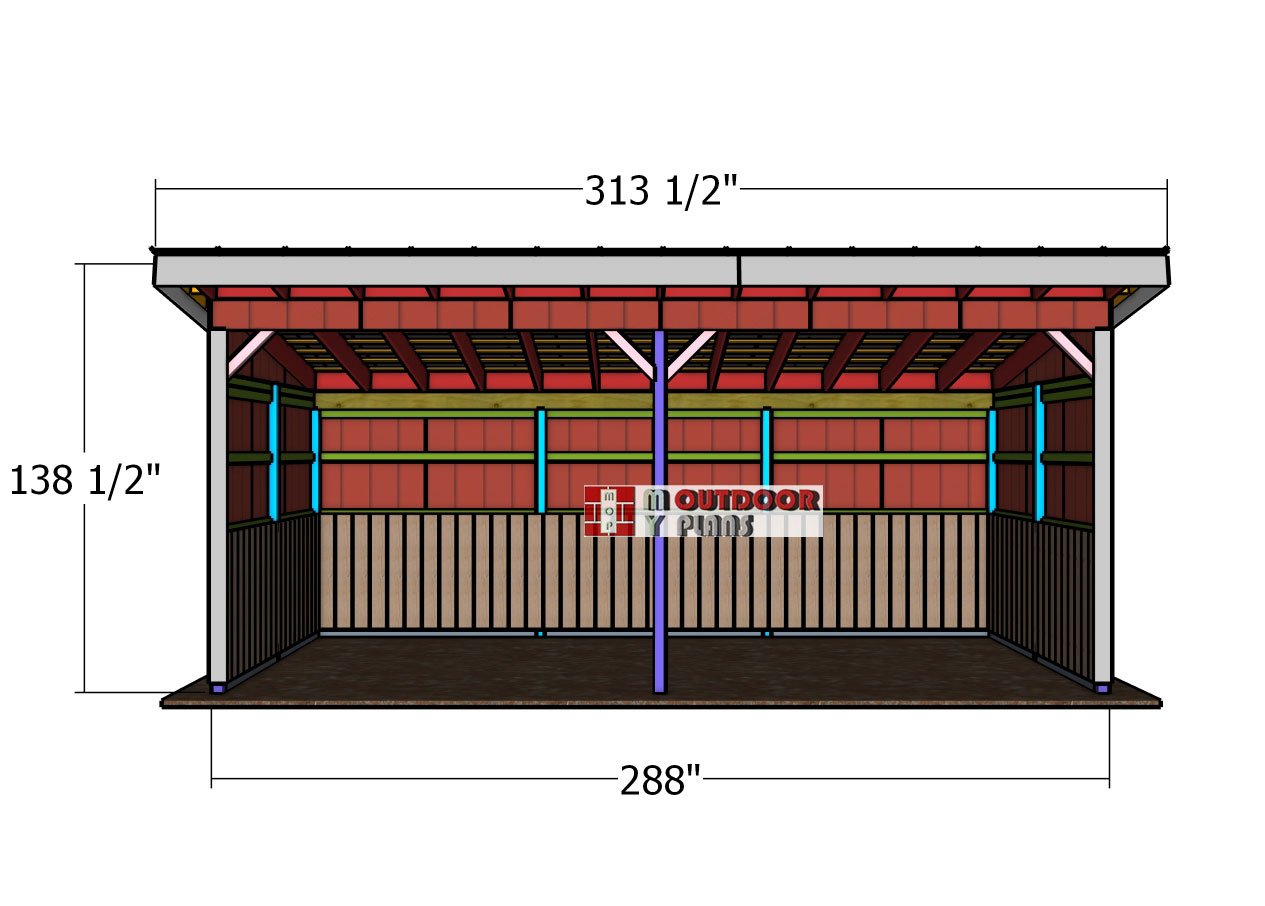
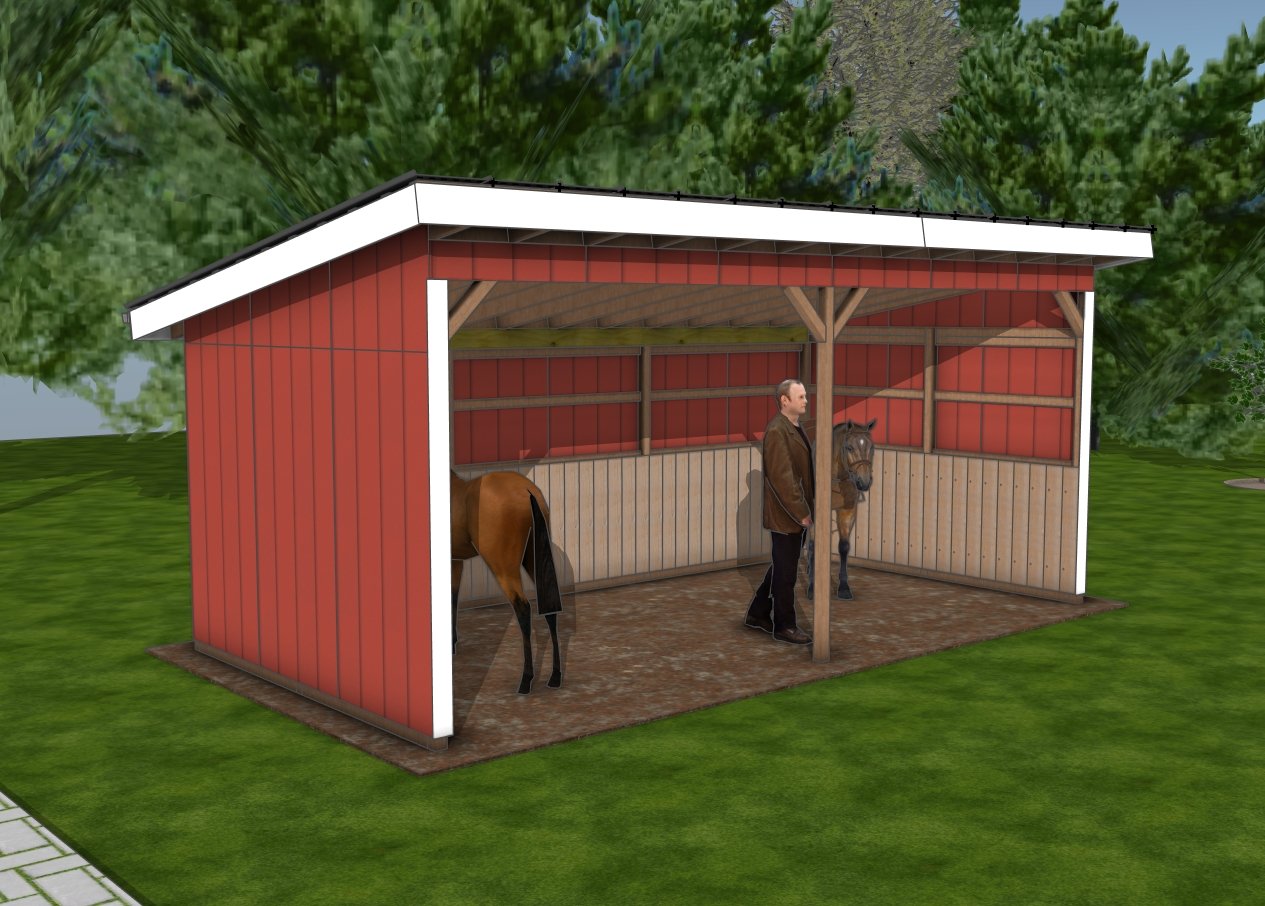
12×24-run-in-shed—-front-view
A 12×24 run-in shed is an excellent shelter option for two horses, offering ample space for them to seek refuge from the elements while still maintaining good airflow and accessibility. With a spacious open-front design, horses can come and go freely, reducing stress and allowing for a more natural environment. Ensuring the shed is positioned in a well-drained area with proper footing, such as gravel or compacted screenings, helps prevent mud buildup and keeps the interior dry. The addition of kickboards along the lower walls protects against damage from pawing or rubbing, extending the shed’s lifespan and maintaining a safe environment for the horses. Ventilation is also a key factor—whether through gable vents or an open ridge design, proper airflow helps reduce moisture buildup and ammonia levels from bedding and manure.
With the structure complete, small finishing touches can enhance the functionality of the shed. Adding feed or tack storage in a separate enclosed corner provides convenience, while stall dividers can create individual sections if needed. A gutters and rainwater collection system can help manage runoff and provide an eco-friendly way to collect water for drinking or dust control. Regular maintenance—such as checking for loose boards, reinforcing fasteners, and cleaning out manure—will ensure that the shed remains in top condition for years to come. Whether used as a primary shelter or a supplemental turnout option, a well-built 12×24 run-in shed offers a safe, durable, and comfortable space for two horses to enjoy in all seasons.
How to build a 12×24 run in shed
Don’t miss PART 2 of this project, where we bring the shed to life by tackling the roof construction and adding the all-important finishing touches. Ready to see it all come together? Head over now to watch the final steps and transform your shed into a complete, functional structure!
If you want to get Premium Plans, just press the GET PDF PLANS bellow. If you want to get the free version, please read the blog FAQs.

This woodworking project was about 12×24 run shed plans. If you want to see more outdoor plans, check out the rest of our step by step projects and follow the instructions to obtain a professional result.
