With the frame of the 12×24 run-in shed complete, it’s time to move on to the next crucial phase—installing the roof and siding. These elements not only define the shed’s appearance but also play a vital role in its strength, durability, and weather resistance. A sturdy, well-secured roof will protect the horses from sun, rain, and snow, while properly installed siding adds structural integrity and helps block harsh winds. Choosing high-quality, weather-resistant materials, ensuring proper ventilation, and securing everything with strong fasteners will make all the difference in the shed’s longevity. In this section, we’ll go through the best techniques and materials to create a sturdy, functional, and long-lasting shelter for your horses.
When buying the lumber, you should select the planks with great care, making sure they are straight and without any visible flaws (cracks, knots, twists, decay). Investing in cedar or other weather resistant lumber is a good idea, as it will pay off on the long run. Use a spirit level to plumb and align the components, before inserting the galvanized screws, otherwise the project won’t have a symmetrical look. If you have all the materials and tools required for the project, you could get the job done in about a day.
Projects made from these plans
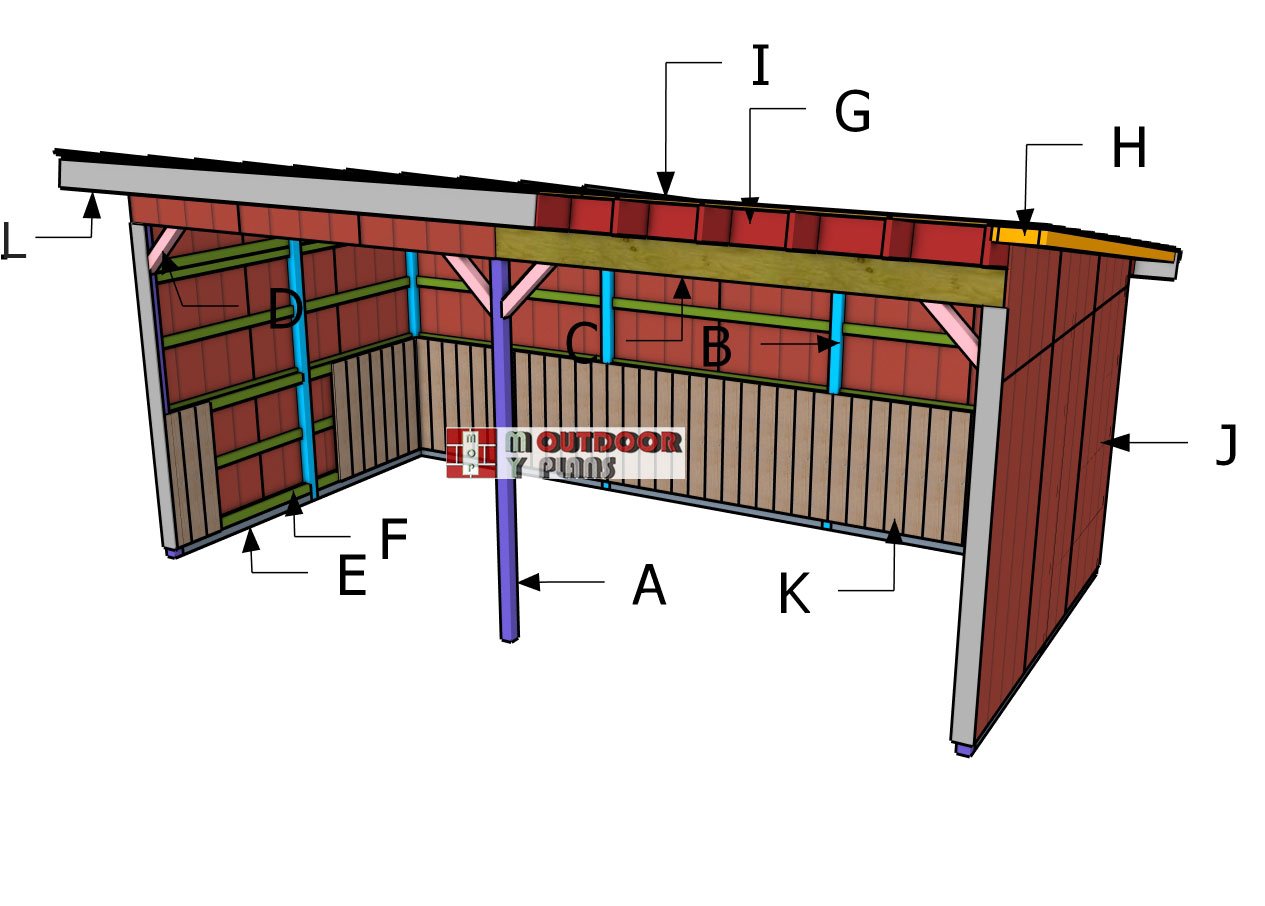
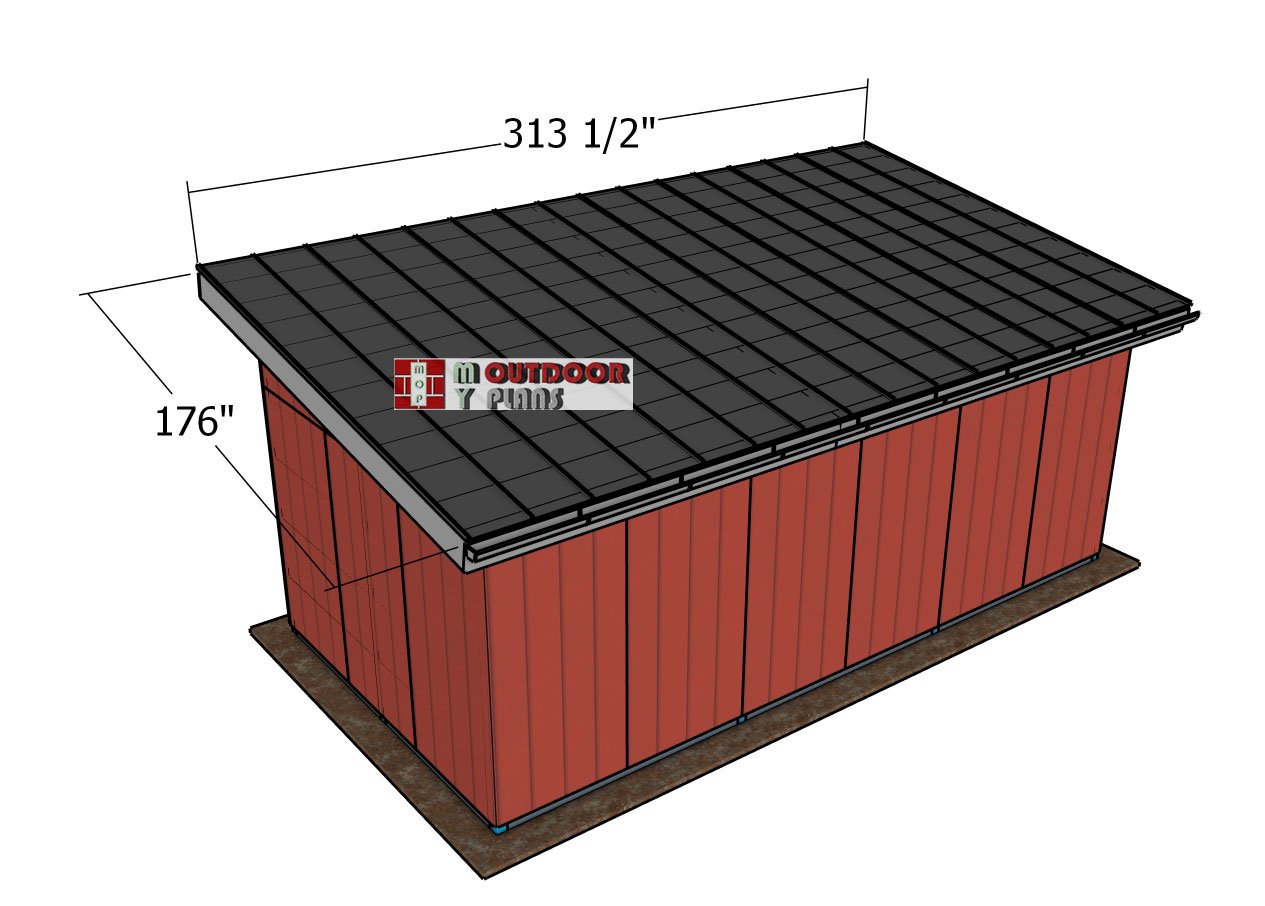
12×24 Run in Shed Roof Plans
Building-a-12×24-run-in-shed
Cut and Shopping Lists
H – 2×4 lumber – 174 1/2″ OVERHANGS – 4 pieces
H – 2×4 lumber – 9″ OVERHANGS – 22 pieces
I – 2×4 lumber – 132” PURLINS – 12 pieces
I – 2×4 lumber – 180″ PURLINS – 12 pieces
J – 5/8″ T1-11 siding – 4’x8′ SIDING – 12 pieces
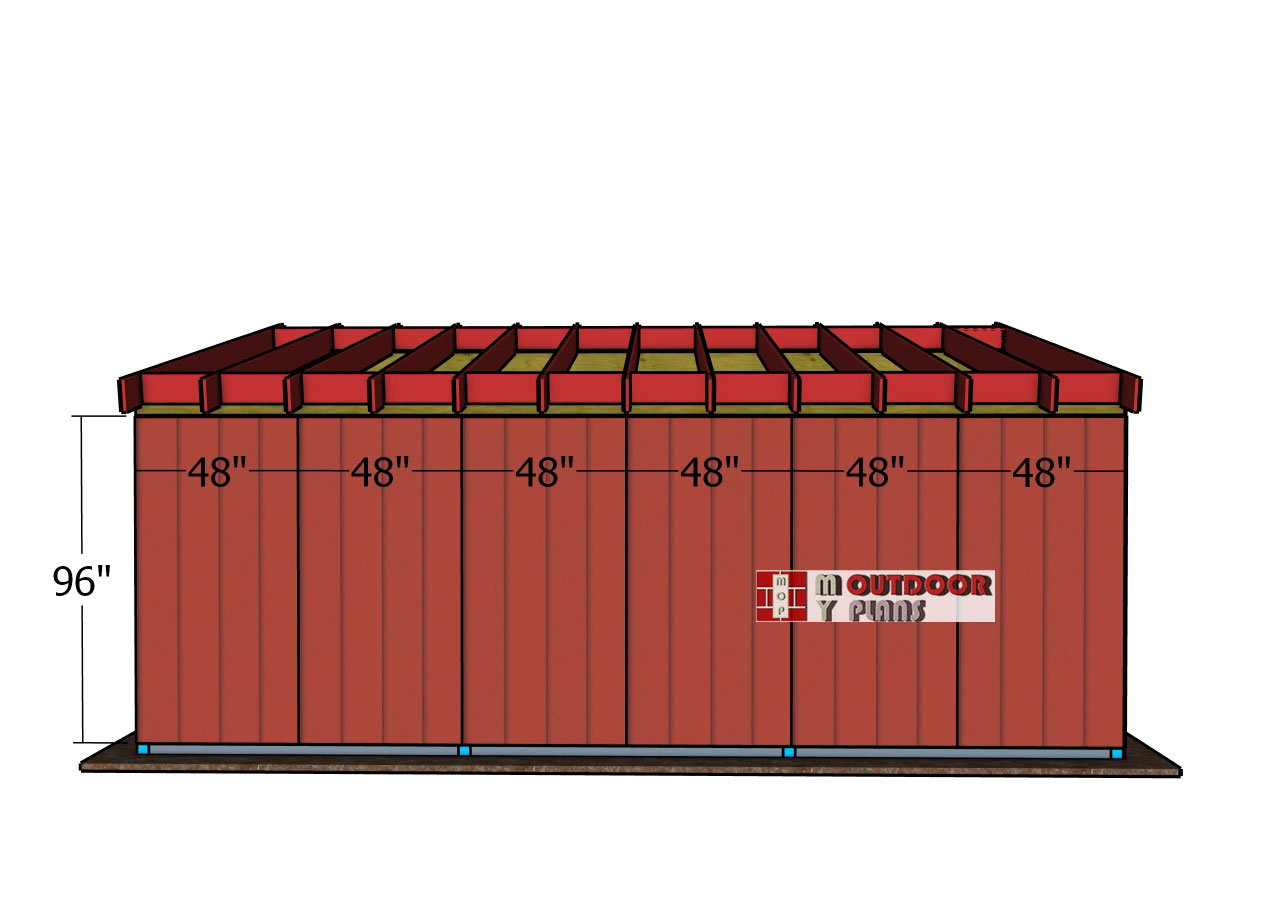
J – 5/8″ T1-11 siding – 9 1/2″x48″ SIDING – 6 pieces
J – 5/8″ T1-11 siding – 16 75/8″x48″ SIDING – 2 pieces
J – 5/8″ T1-11 siding – 24 7/8″x48″ SIDING – 2 pieces
J – 5/8″ T1-11 siding – 32 7/8″x48″ SIDING – 2 pieces
K – 1×10 lumber – 174 1/2″ ROOF TRIMS – 2 pieces
K – 1×10 lumber – 132 3/4″ ROOF TRIMS – 2 pieces
K – 1×10 lumber – 180 3/4″ ROOF TRIMS – 2 pieces
Tools
![]() Hammer, Tape measure, Framing square, Level
Hammer, Tape measure, Framing square, Level
![]() Miter saw, Drill machinery, Screwdriver, Sander
Miter saw, Drill machinery, Screwdriver, Sander
![]() Safety Gloves, Safety Glasses
Safety Gloves, Safety Glasses
Time
![]() One week
One week
Related
- PART 1: 12×24 Run in Shed Plans
- PART 2: 12×24 Run in Shed Roof Plans
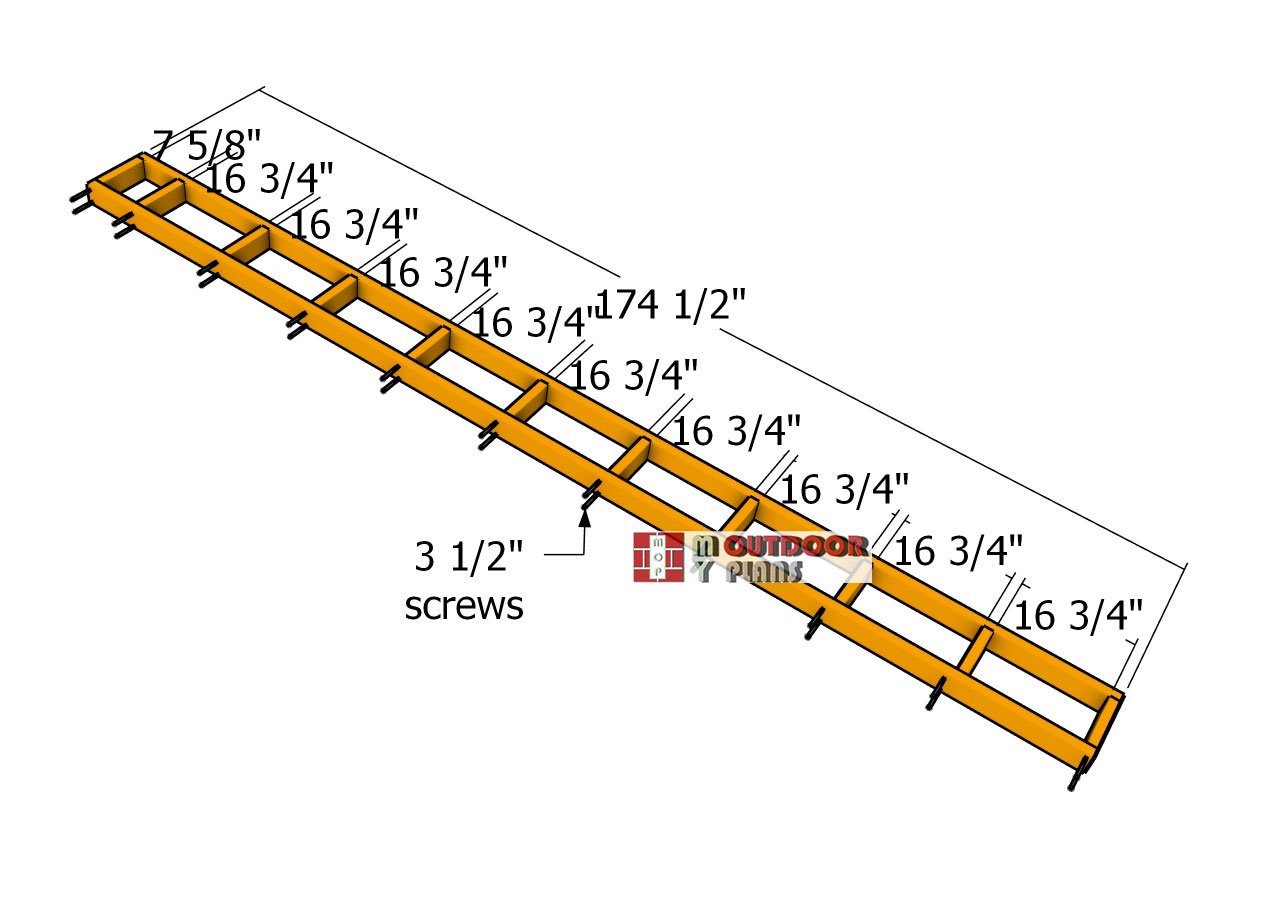
STEP 4: Overhangs
Assembling-the-overhangs
Next up—let’s build the side overhangs for this large post-and-beam structure. We’re using 2×4 lumber, so cut the long beams to 220” and the blockings to 9”. Lay everything out on a level surface—trust me, this makes assembly a whole lot easier. Now, position the blockings between the rafters, making sure they’re evenly spaced. Drill pilot holes through the rafters to prevent splitting, then lock the blockings in place with 3 1/2″ screws. Not only do these overhangs add extra stability, but they also give your shed a clean, finished look.
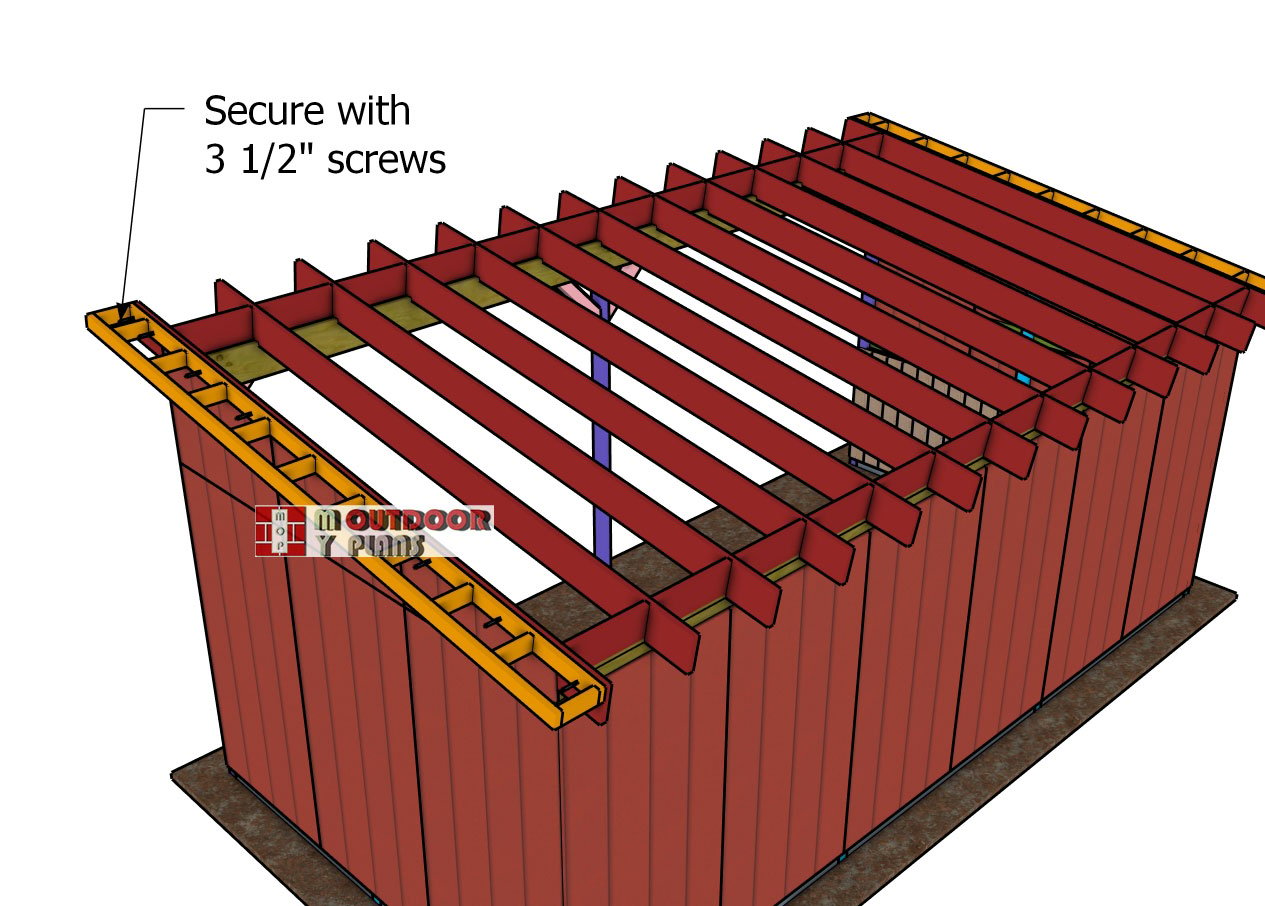
Attaching-the-side-overhangs
Now, let’s attach the side overhangs to the shed! Line them up perfectly with the top of the roof structure for that clean, polished look we’re going for. Lock them in place with 3 1/2″ screws, spacing them about every 8” along the roof frame. Take your time here—make sure everything is straight and flush. This step isn’t just about looks; it also reinforces the entire structure.
STEP 5: Siding
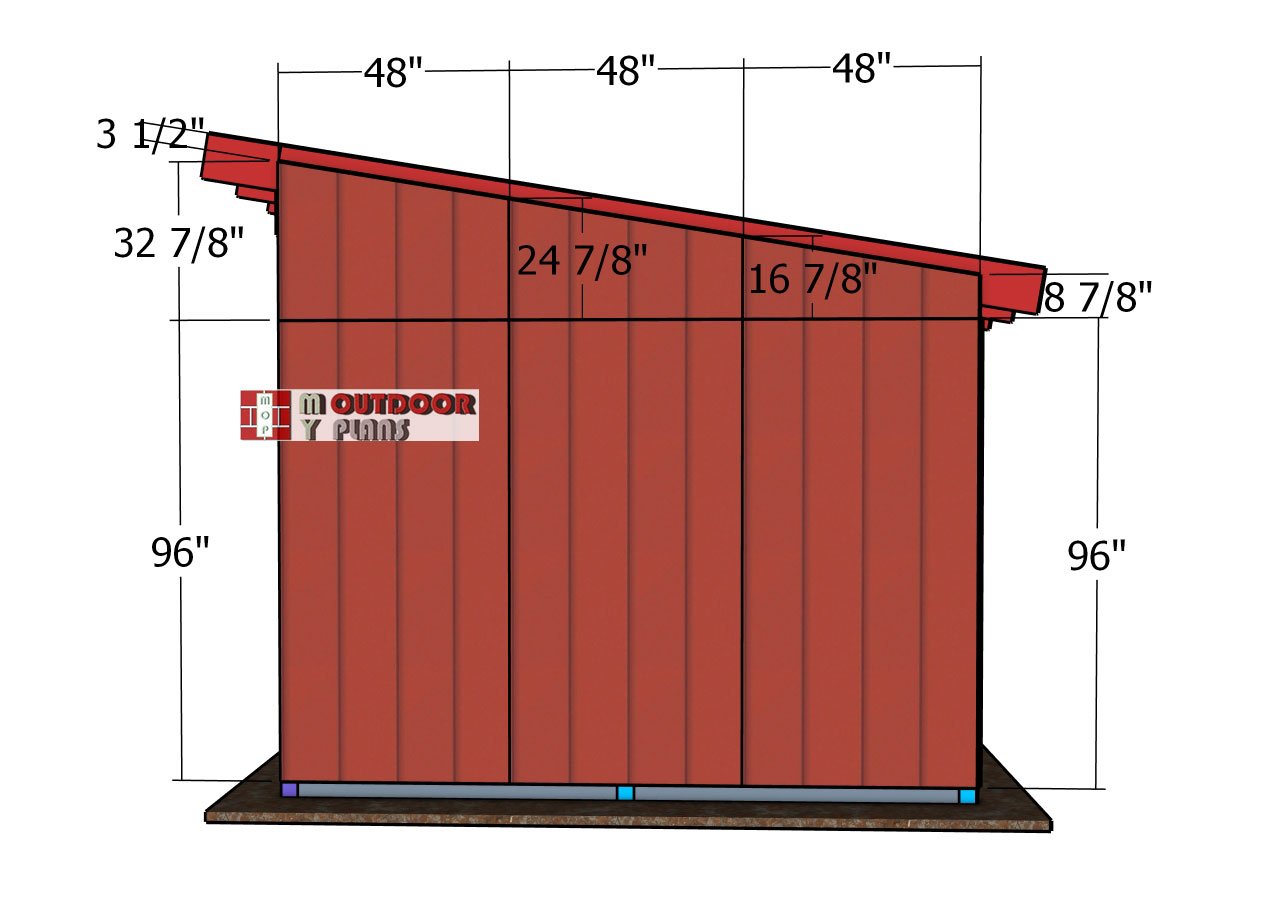
Side-siding-sheets
Time to lock in the siding! Attach the sheets to the sides of the shed, making sure everything fits snug and precise. For the top panels, grab your tape measure and cut them at an angle to match the roof pitch. Take your time—a perfect fit now makes everything look clean and professional later. Once cut, position the panels carefully and secure them with 8d nails—spacing them 6″-8″ along the edges and 12″ in the center of each panel. This step isn’t just about looks; it’s about locking everything in and protecting your shed from the elements.
Back-wall-panels
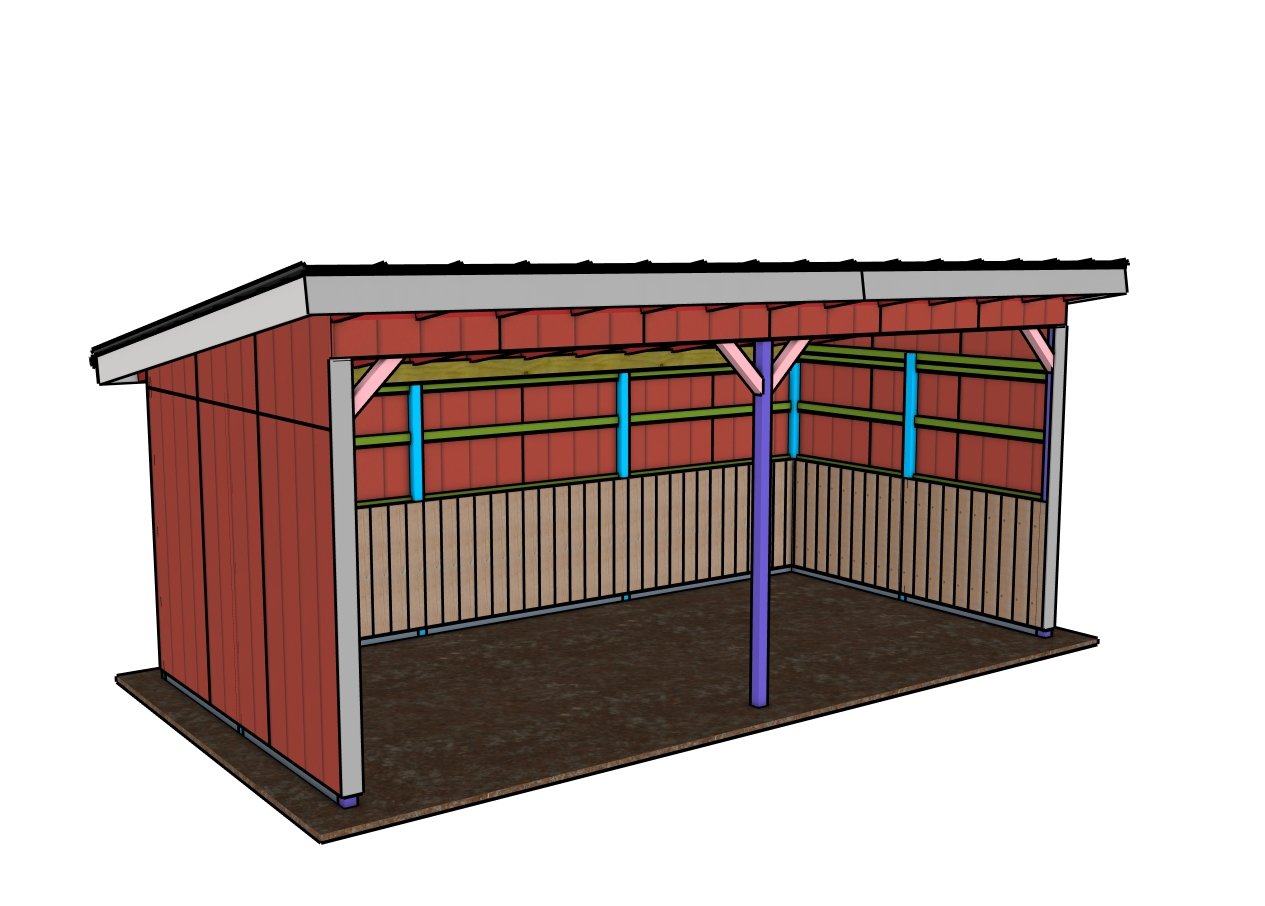
With the main structure locked in, it’s time to wrap this shed up with exterior panels! You’ve got a few options—metal panels, OSB, plywood—but for this build, we’re rolling with 5/8″ T1-11 siding sheets. Carefully position each panel, making sure the edges line up perfectly for a clean, professional look. Secure them in place with 8d nails, spacing them 6″-8″ apart along the edges and 12″ apart in the center of each panel. Take your time here—getting everything flush and sturdy is what makes this shed look sharp and last for years.
STEP 6: Roofing
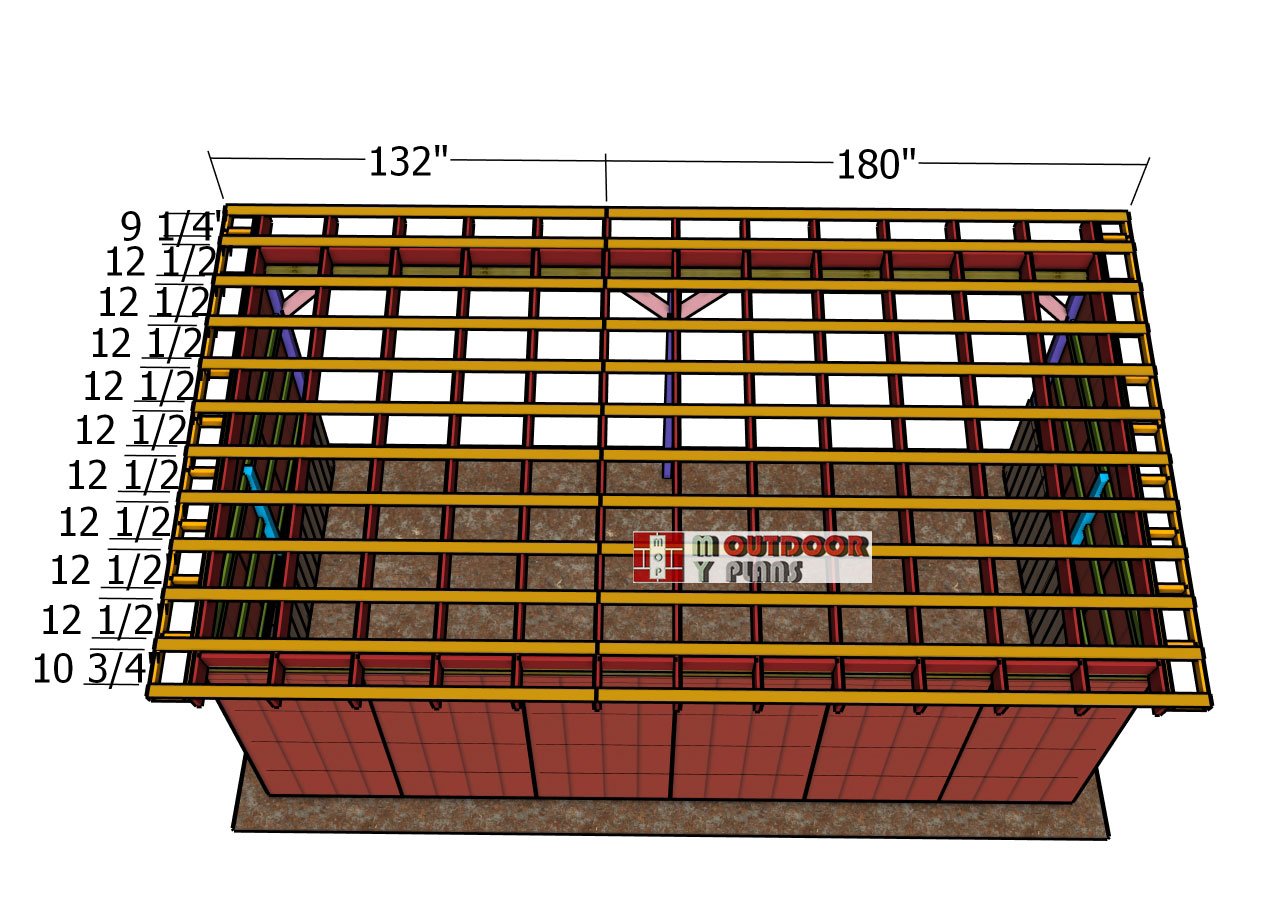
Attaching-the-purlins
Now, let’s head back to the lean-to roof and get those 2×4 purlins in place! Position them evenly, spacing them 16″ on center for solid support and perfect alignment. Once they’re lined up, secure each purlin to the rafters using 3 1/2″ screws. Take your time here—keeping them straight and flush is key because these purlins will be the foundation for your roofing material. With this step done, your roof framework is locked in and ready to go!
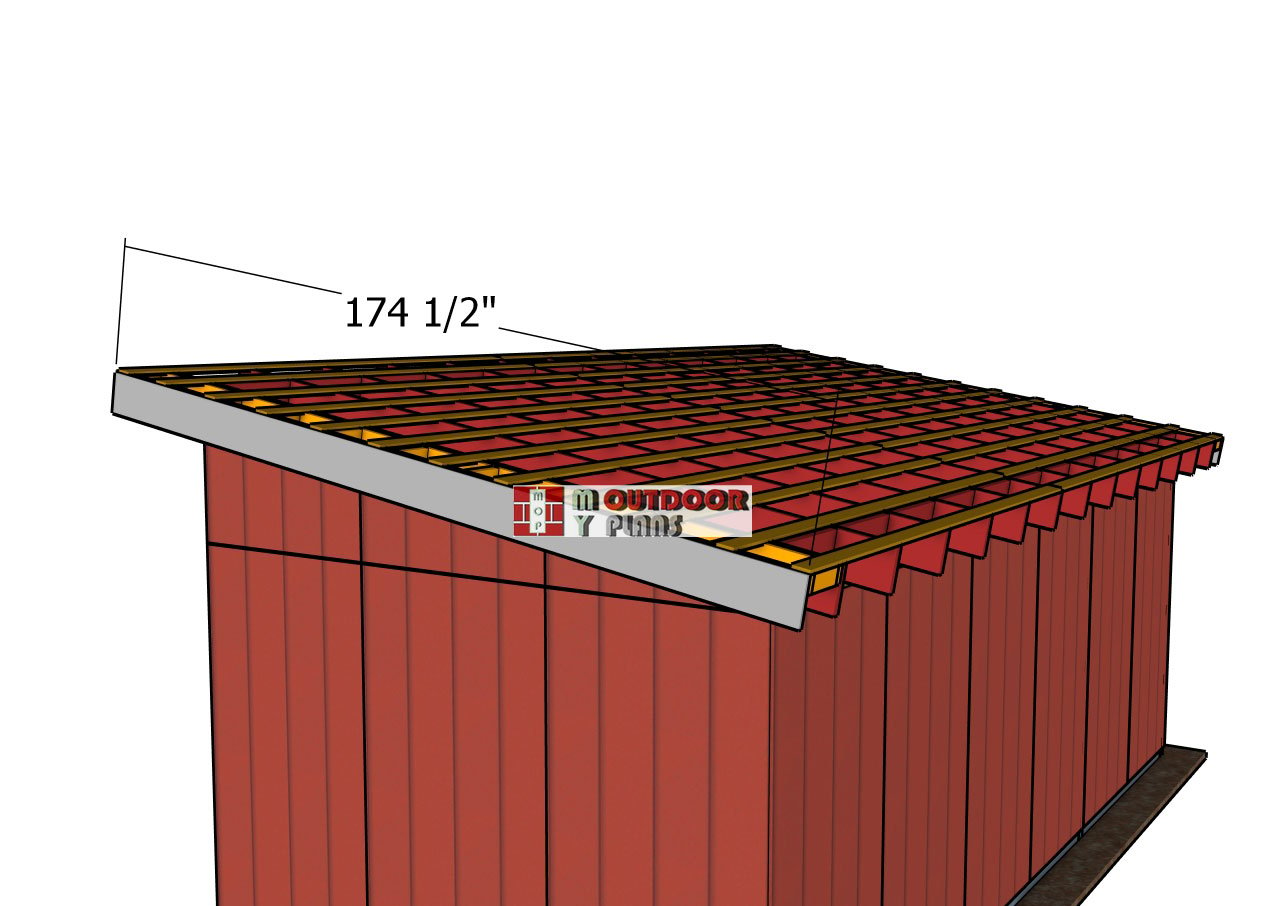
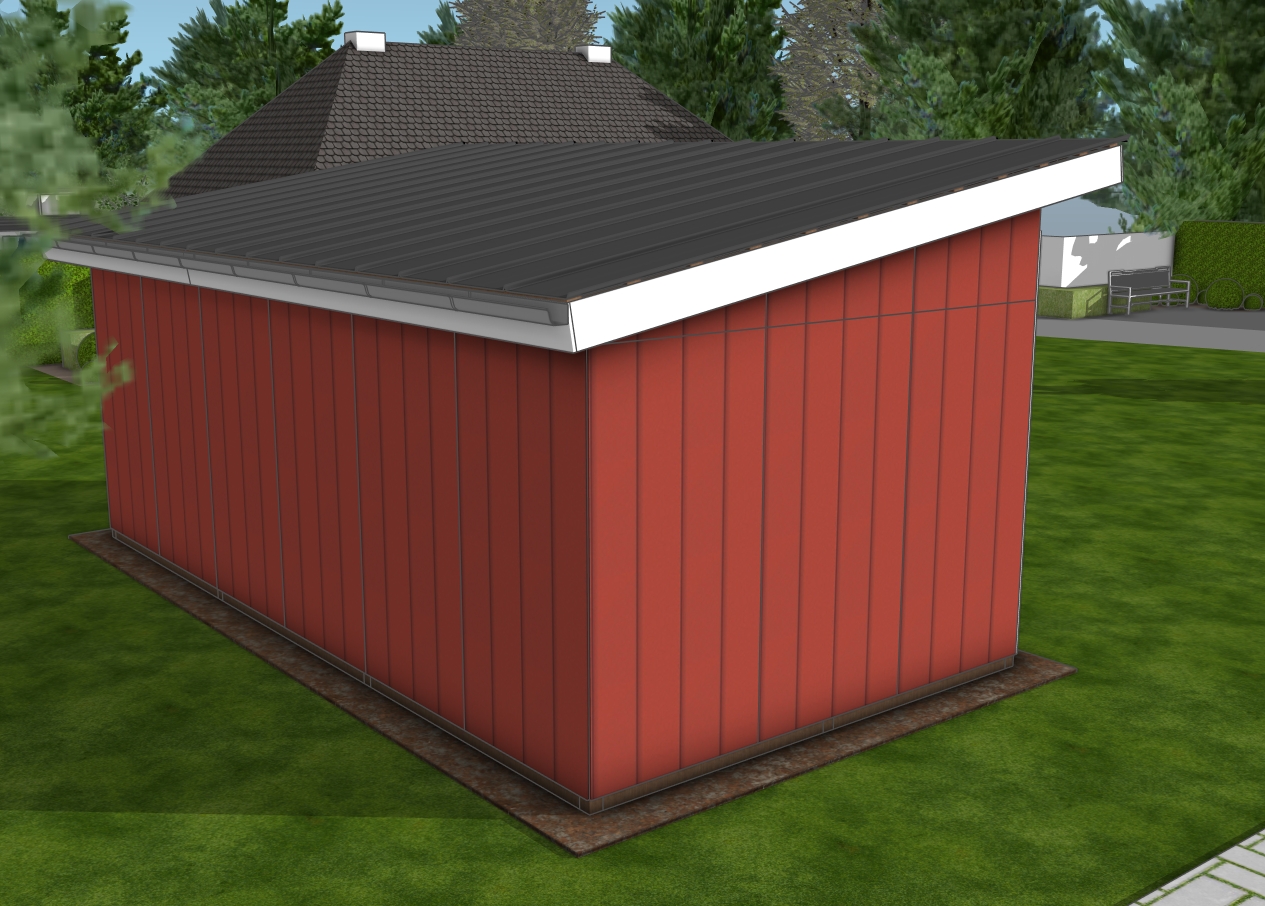
Side-roof-trims
Now, let’s add the finishing touches by attaching the 1×10 trims to the sides of the roof. These trims give the shed a clean, polished look while adding extra protection to the structure. Carefully align the edges for a seamless fit, making sure everything is straight and flush. Once everything looks spot on, lock them in place using 2 1/2″ screws. This step is all about style and durability—so take your time and wrap it up right!
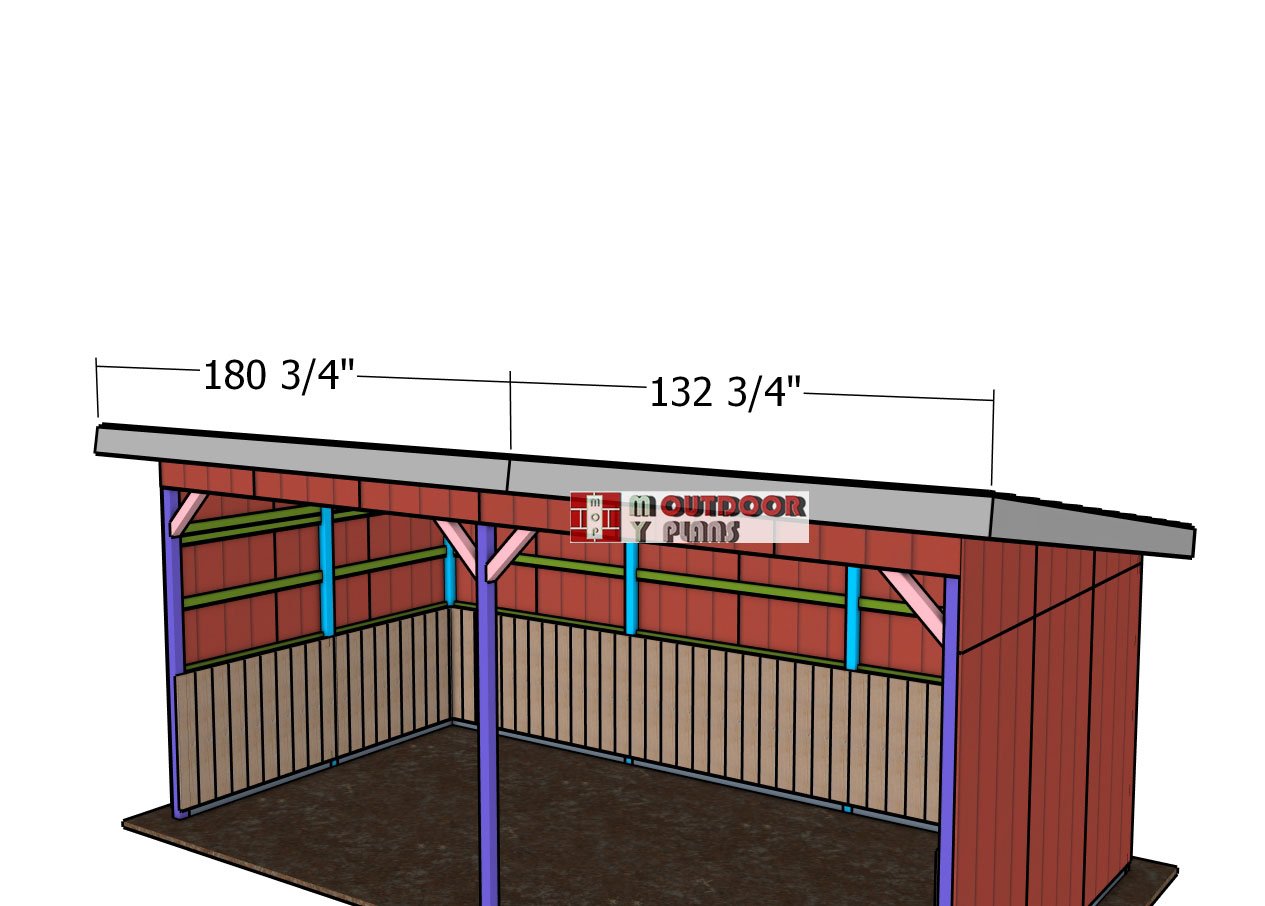
Front-roof-trims
Now, let’s finish off the roof by attaching the front and back trims. These pieces bring everything together for that clean, polished look while adding extra protection to the edges. Carefully align the trims with the roof edges, making sure they’re straight and seamless. Once everything looks spot on, secure them in place with 2 1/2″ screws, just like you did with the side trims. With this step done, your shed is looking sharp and ready for the final touches!
Roof sheets
Installing metal roofing on your lean-to run-in shed is a straightforward but game-changing step—it adds serious durability and keeps the elements in check. Start by attaching drip edges along the eaves and rake edges to channel water away and protect the roof decking. This small step goes a long way in keeping your shed dry and sturdy. Next, lay the metal panels, starting from one end of the roof. Overlap each panel by at least one rib to keep things watertight.
Secure them with self-tapping screws with rubber washers, driving screws along the ridges and edges for a tight, leak-proof seal. Work your way across the roof, making sure each panel is square and aligned. A little extra attention here means a flawless, professional-looking finish. Cut the metal sheets to size using metal shears, an angle grinder, or a circular saw with a metal-cutting blade, ensuring clean and precise edges for a perfect fit.
STEP 7: Finishing Touches
How to build a 12×24 run in shed
With the main structure complete, it’s time to focus on the finishing touches that enhance both durability and appearance. Start by filling any visible nail or screw holes with wood putty for a smooth, seamless look. Once the putty dries, give the entire structure a light sanding to remove any rough edges or splinters, ensuring a safe and polished finish. If you plan to stain or paint the shed, now is the perfect time—a weather-resistant exterior stain or paint will help protect the wood from the elements while enhancing the overall aesthetic. Adding gutters along the roofline can also help direct rainwater away from the foundation, preventing excess moisture buildup around the shed.
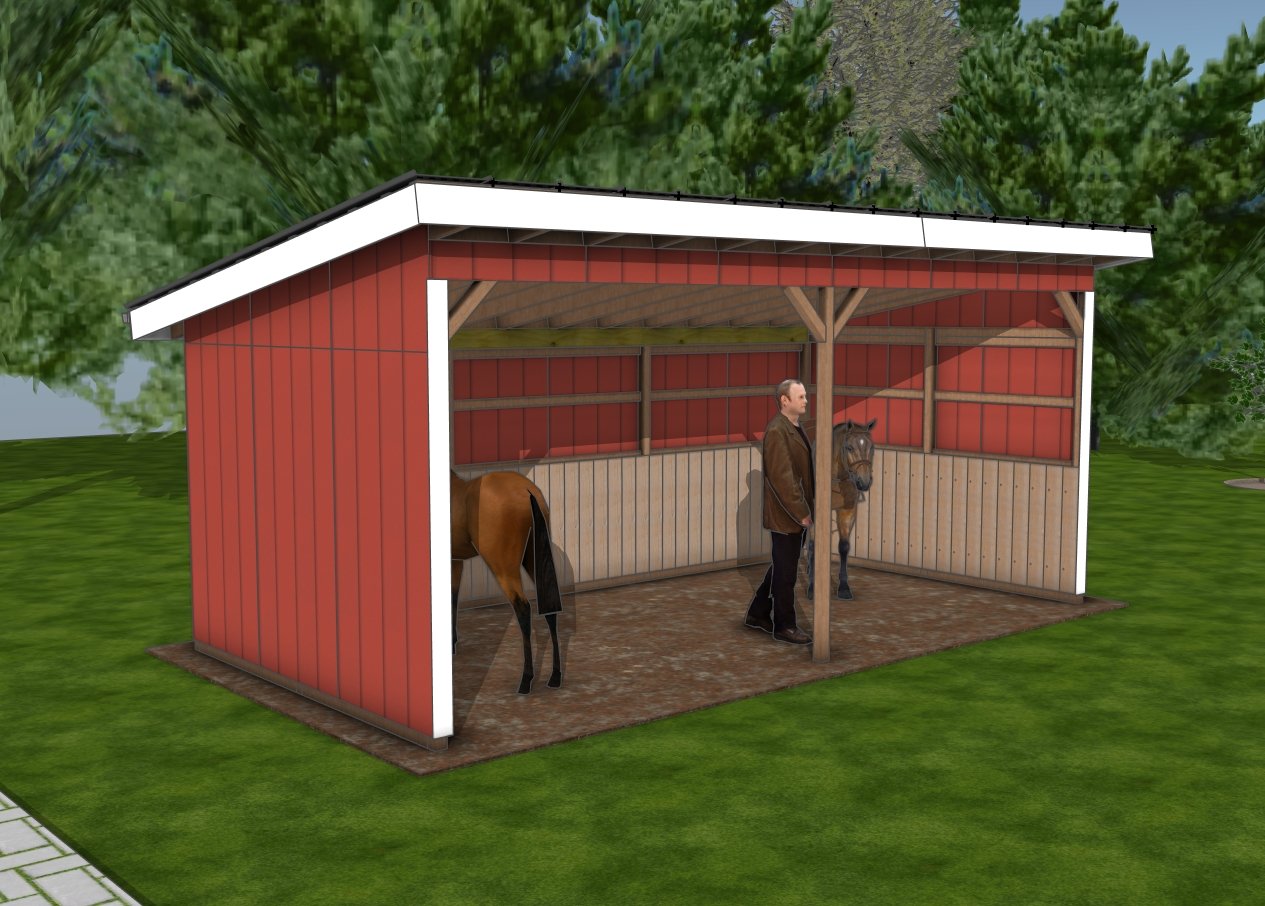
This 12×24 run-in shed is a versatile and practical addition to your property, perfectly suited for two horses. The open-front design provides ample airflow and easy access, while raised kickboards protect the interior walls from wear and tear. The weather-resistant siding and sturdy post-and-beam framing ensure long-term durability, even in harsh conditions. Whether you’re using it as a primary horse shelter, additional turnout space, or even storage for hay and tack, this multi-purpose structure is built to last. With regular maintenance and proper drainage, this shed will continue to provide a safe, comfortable, and functional space for your horses for years to come.
DIY 12×24 run in shed plans
Depending on your style, you can apply a stain to enhance the natural beauty of the wood or paint it to match your existing décor. Don’t forget to seal the wood with a weather-resistant finish to protect it from the elements and extend its lifespan.
12×24 run in shed
If you enjoyed this build, be sure to check out PART 1, where I walk you through the step-by-step process of constructing the main frame of this shed. It’s the foundation that set the stage for this entire project, and you won’t want to miss those key details!
This woodworking project was about 12×24 run in shed roof plans. If you want to see more outdoor plans, check out the rest of our step by step projects and follow the instructions to obtain a professional result.
