There’s something truly rewarding about building a functional and charming DIY outhouse, and this 4×8 design with a porch and gable roof is as practical as it is good-looking. Whether you’re adding it to your off-grid cabin, a backyard retreat, or even a campsite, this outhouse is the perfect combination of utility and style. With a front porch for a welcoming touch and a gable roof to keep the elements at bay, it’s built to last while blending seamlessly with its surroundings. And the best part? You don’t need to be a master carpenter to tackle this project, just a little patience, some tools, and a can-do attitude.
This project is designed with both cost and time in mind, making it accessible for most DIYers. With an estimated build time of 1-2 weekends (depending on your experience level) and a cost of around $500-$700, this outhouse fits the bill for a budget-friendly yet high-quality addition to your outdoor space. The detailed step-by-step instruction plans, complete with diagrams, make the process straightforward from the ground up. By the end, you’ll have a structure that not only serves a vital purpose but also adds character to your outdoor setup. Ready to get started? Let’s build your outdoor world!
When buying the lumber, you should select the planks with great care, making sure they are straight and without any visible flaws (cracks, knots, twists, decay). Investing in cedar or other weather resistant lumber is a good idea, as it will pay off on the long run. Use a spirit level to plumb and align the components, before inserting the galvanized screws, otherwise the project won’t have a symmetrical look. If you have all the materials and tools required for the project, you could get the job done in about a day. See all my Premium Plans HERE.
Projects made from these plans
DIY 4×8 Outhouse with Porch Plans
Building-an-outhouse
Cut + Shopping Lists
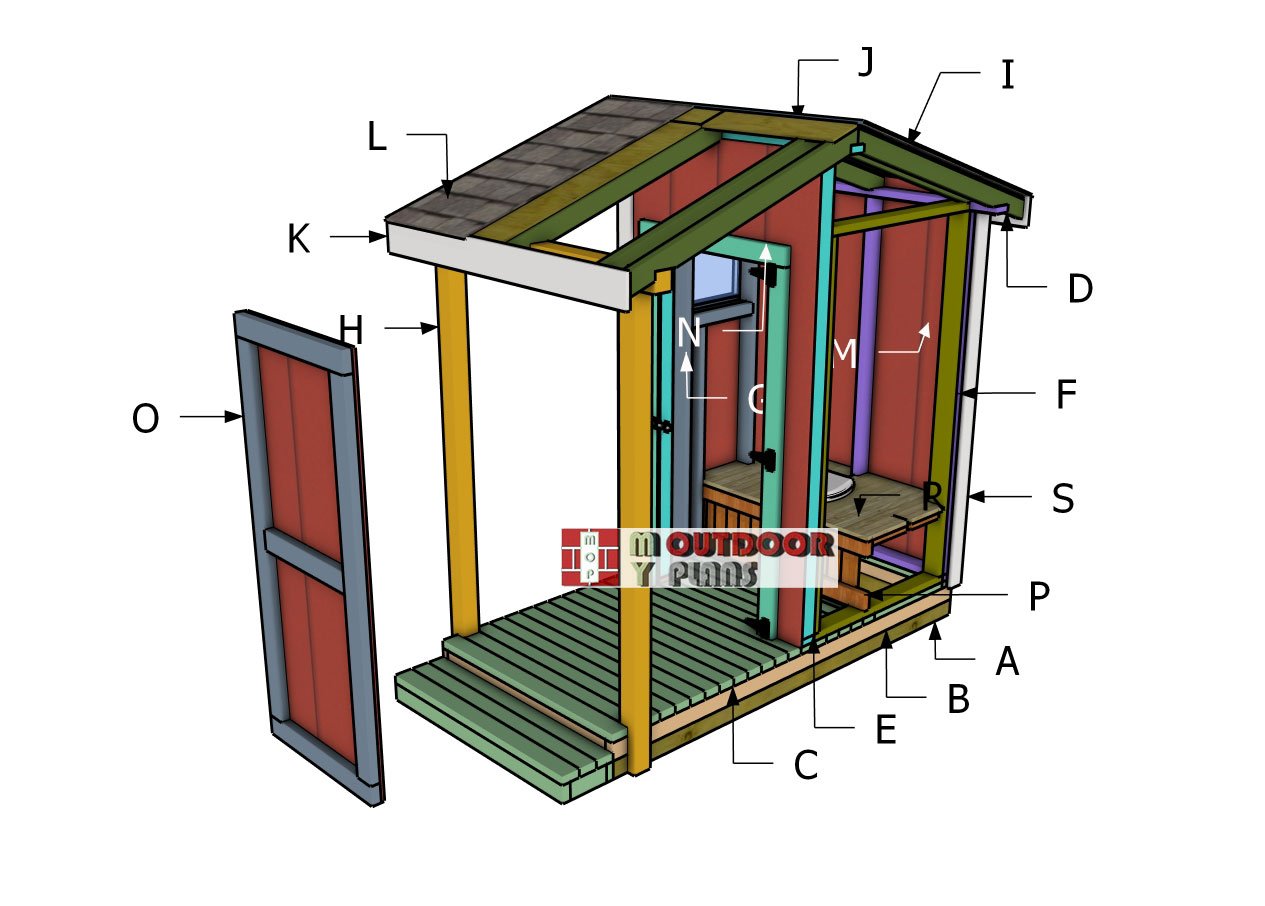
- A – SKIDS – 4×4 PT lumber 8′ – 2 pieces
- A – SKIDS – 4×4 lumber 41″ – 4 pieces
- B – FLOOR FRAME – 2×4 lumber 8′ – 2 pieces
- B – FLOOR FRAME – 2×4 lumber 45′ – 6 pieces
- B – FLOOR FRAME – 2×4 lumber 32 3/8′ – 4 pieces
- C – FLOOR – 2×4 lumber 48″ – 20 pieces
- C – FLOOR – 2×4 lumber 22 1/2″ – 2 pieces
- D – BACK WALL – 2×4 lumber 48″ – 1 piece
- D – BACK WALL – 2×4 lumber 60″ – 1 piece
- D – BACK WALL – 2×4 lumber 76″ – 3 pieces
- D – BACK WALL – 2×4 lumber 21 3/4″ – 2 pieces
- E – FRONT WALL – 2×4 lumber 60″ – 1 piece
- E – FRONT WALL – 2×4 lumber 9″ – 2 pieces
- E – FRONT WALL – 2×4 lumber 33″ – 2 pieces
- E – FRONT WALL – 2×4 lumber 90 7/8″ – 6 pieces
- E – FRONT WALL – 2×4 lumber 70 1/2″ – 2 pieces
- E – FRONT WALL – 2×4 lumber 16 7/8″ – 3 pieces
- F – SIDE WALL – 2×4 lumber 76″ – 4 pieces
- F – SIDE WALL – 2×4 lumber 41″ – 2 pieces
- G – SIDE WALL WINDOW – 2×4 lumber 76″ – 4 pieces
- G – SIDE WALL WINDOW – 2×4 lumber 41″ – 2 pieces
- G – SIDE WALL WINDOW – 2×4 lumber 48 5/8″ – 1 piece
- G – SIDE WALL WINDOW – 2×4 lumber 18 1/4″ – 4 pieces
- H – POSTS – 4×4 lumber 84″ – 2 pieces
- H – TOP BEAM – 4×4 lumber 60″ – 1 piece
- I – RAFTERS – 2×4 lumber 55 7/8″ – 10 pieces
Tools
![]() Hammer, Tape measure, Framing square, Level, Shovel
Hammer, Tape measure, Framing square, Level, Shovel
![]() Miter saw, Drill machinery, Screwdriver, Sander
Miter saw, Drill machinery, Screwdriver, Sander
![]() Safety Gloves, Safety Glasses
Safety Gloves, Safety Glasses
Time
![]() One weekend
One weekend
Related
- 6×8 Lean to Shed Plans
- 16×20 Lean to Shed Plans
- PART 1: Outhouse Plans
- PART 2: Outhouse Plans
It’s that easy to build an outhouse – Video!
Pin it for later!
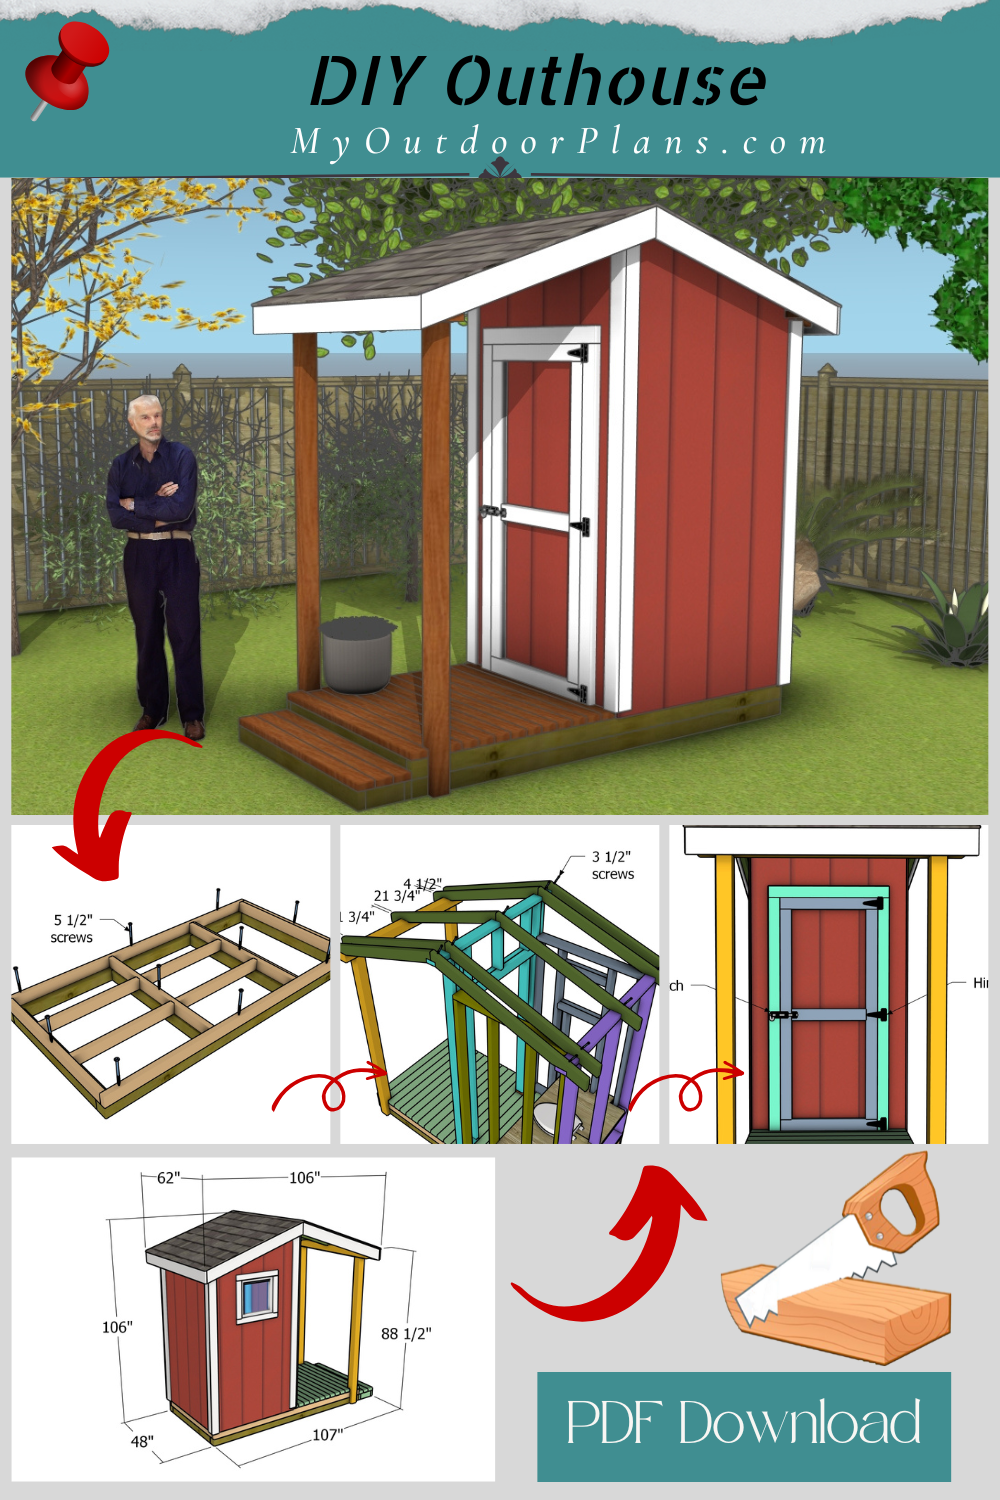
Step 1: Building the outhouse floor
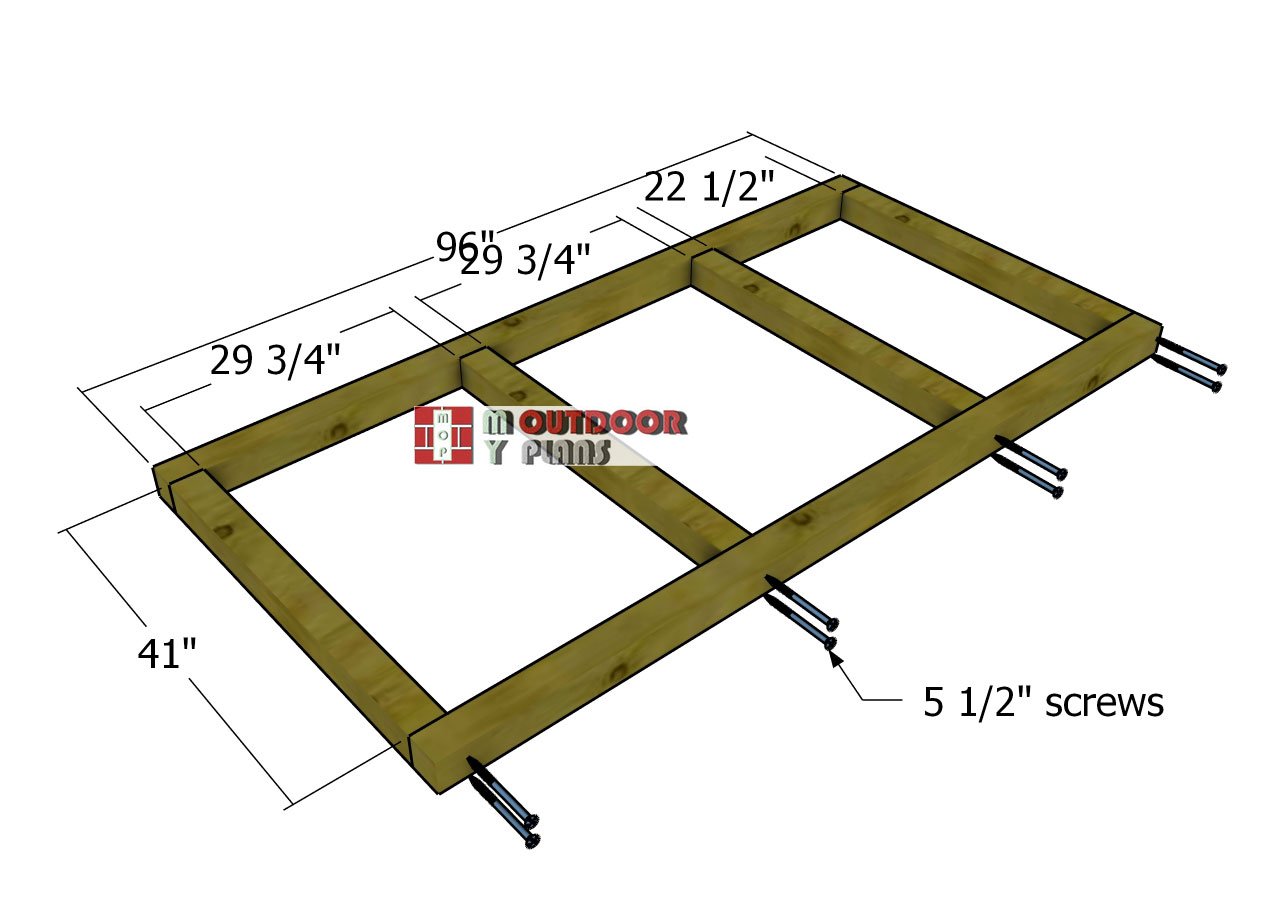
Assembling-the-skid-base
First up, let’s lay the foundation, literally. To kick off this DIY outdoor project, you’ll assemble the skid base using 4×4 pressure-treated lumber. Trust me, this stuff is built to handle the elements. Start by cutting the pieces to size, just like the diagram shows (pro tip: measure twice, cut once). Lay everything out on a nice, level surface, then line up those edges like a pro.
Don’t forget to check that the corners are square, your future self will thank you. Once everything’s looking sharp, drill pilot holes through the side skids and secure it all with 5 1/2″ screws.
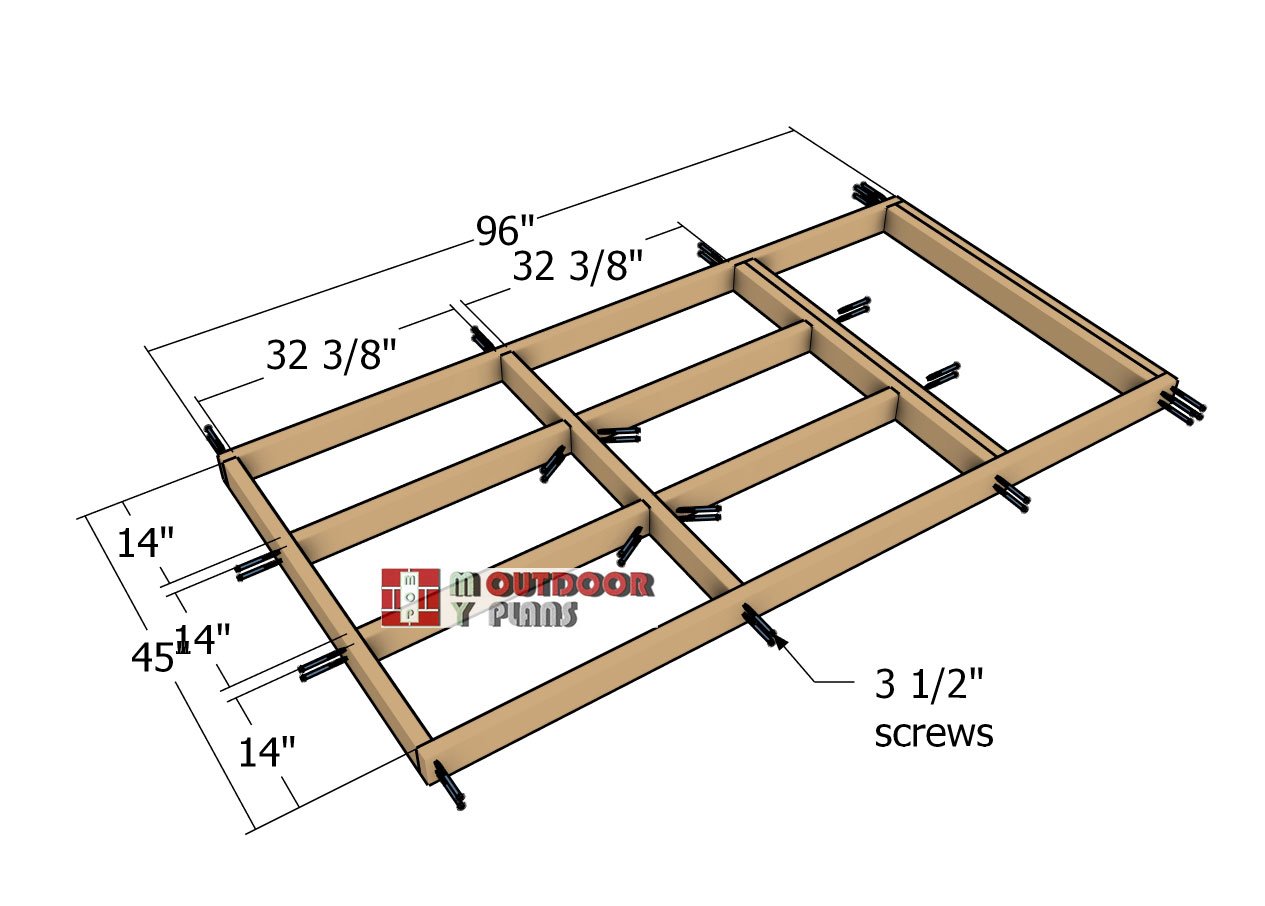
Assembling-the-floor-frame
Next up, it’s time to tackle the floor frame for your DIY outhouse. Grab some 2×4 lumber and cut all the pieces to size, following the diagram like a roadmap to success. Start assembling the frame by drilling pilot holes and securing everything with 3 1/2″ screws.
For the middle joist, you’ve got options—pocket holes work great, or you can go old-school and angle those screws. Before you call it done, check that the diagonals of the frame are equal. If they’re not, take a moment to adjust things. Remember, a little patience here saves headaches later!
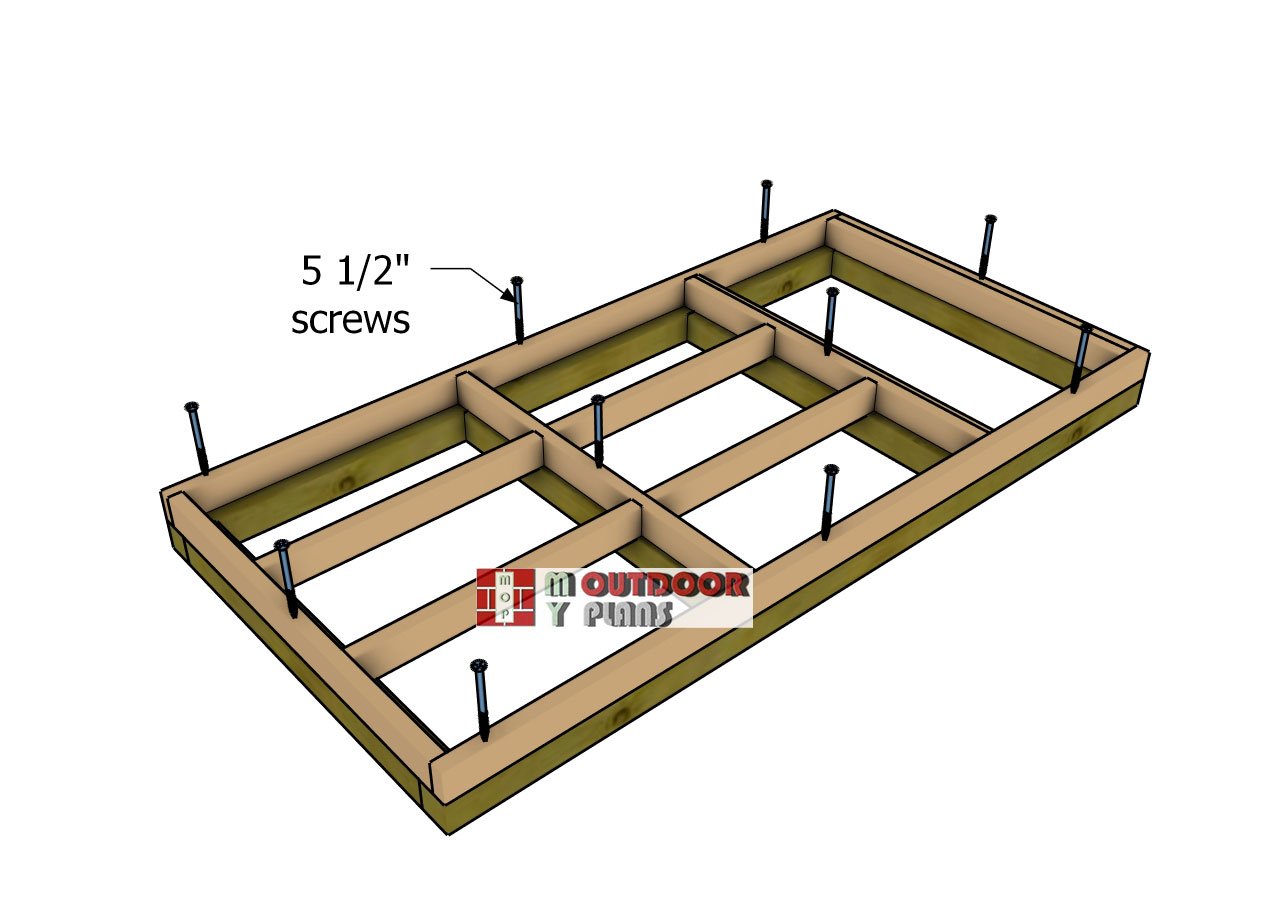
Attaching-the-frame-to-the-skids
Now it’s time to bring the floor frame and skids together. Carefully lay the floor frame onto the skids, making sure the edges are perfectly aligned with the exterior of the base—precision is key here! Once everything’s lined up like it was meant to be, drill pilot holes through the frame and into the skids.
Secure it all tightly with 5 1/2″ screws, and there you have it, your project is starting to take shape!
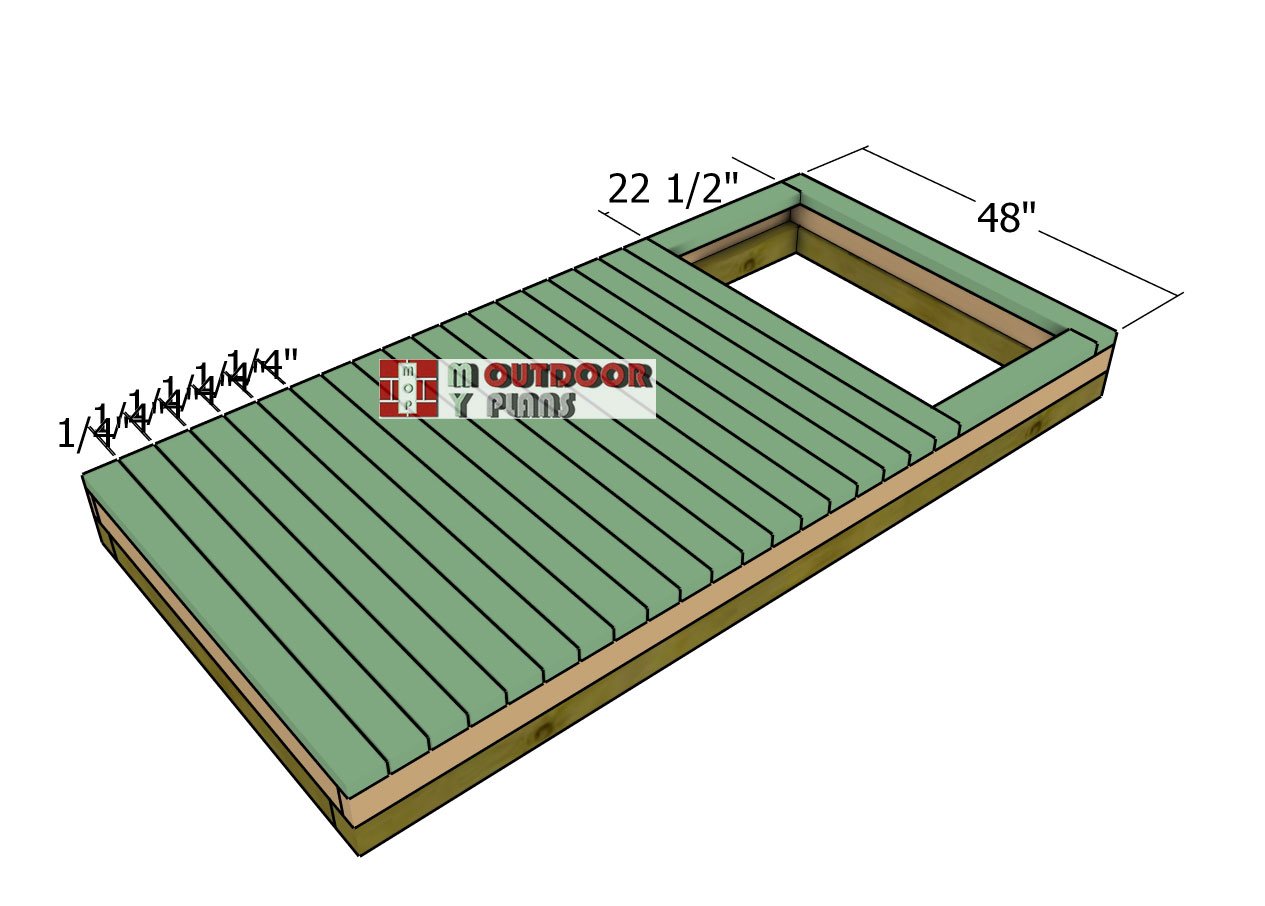
Fitting-the-floor-boards
Let’s deck out that floor frame! Grab your 2×4 boards and lay them across the frame. To get those clean, even gaps, use 1/4″ spacers between the boards, it’s a simple trick that makes a big difference. Once everything’s looking pro-level, drill pilot holes through each board and secure them with 2 1/2″ screws.
Don’t skimp here, add two screws at each joint, making sure to anchor both ends of the boards.
Step 2: Building the outhouse walls
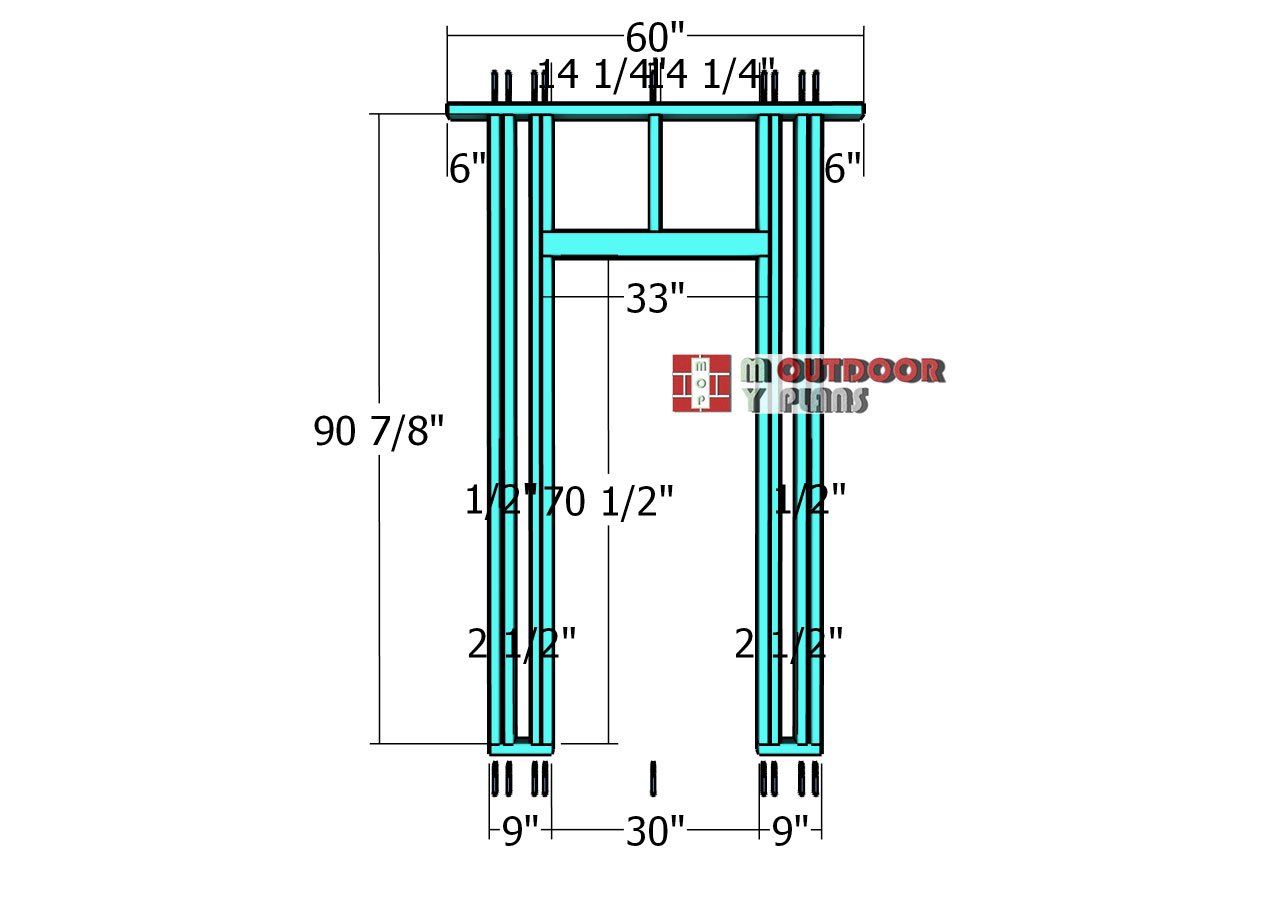
Front-wall-frame
Now let’s dive into the wall frames, starting with the front wall, because every great outhouse needs a strong face! You’ll be working with 2×4 lumber for the plates, studs, and the all-important double header. Cut everything to size, using your trusty diagram as a guide, and assemble the frame on a nice, level surface (level is life!).
Drill pilot holes through the plates and secure the studs in place with 3 1/2″ screws. For the double header, angle two screws on each side (both interior and exterior) and lock it down tight to the studs.
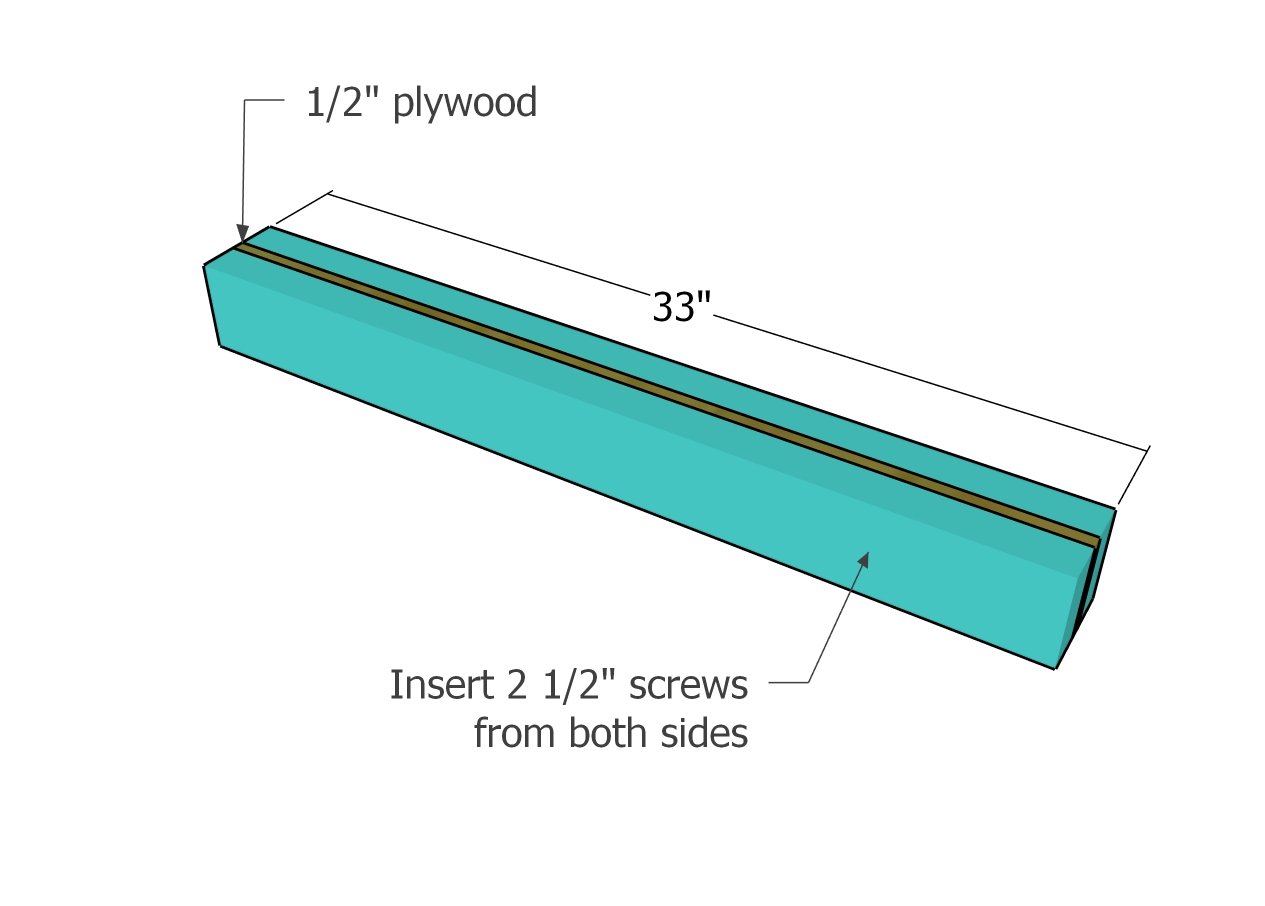
Double header
Build the double header by sandwiching a 1/2″ plywood sheet between two 2x4s. Start by applying a generous layer of wood glue to the joints for added strength and stability. Once the pieces are aligned, secure them by driving 2 1/2″ screws through both sides of the header. Space the screws evenly, about every 8″, to ensure a solid and durable bond.
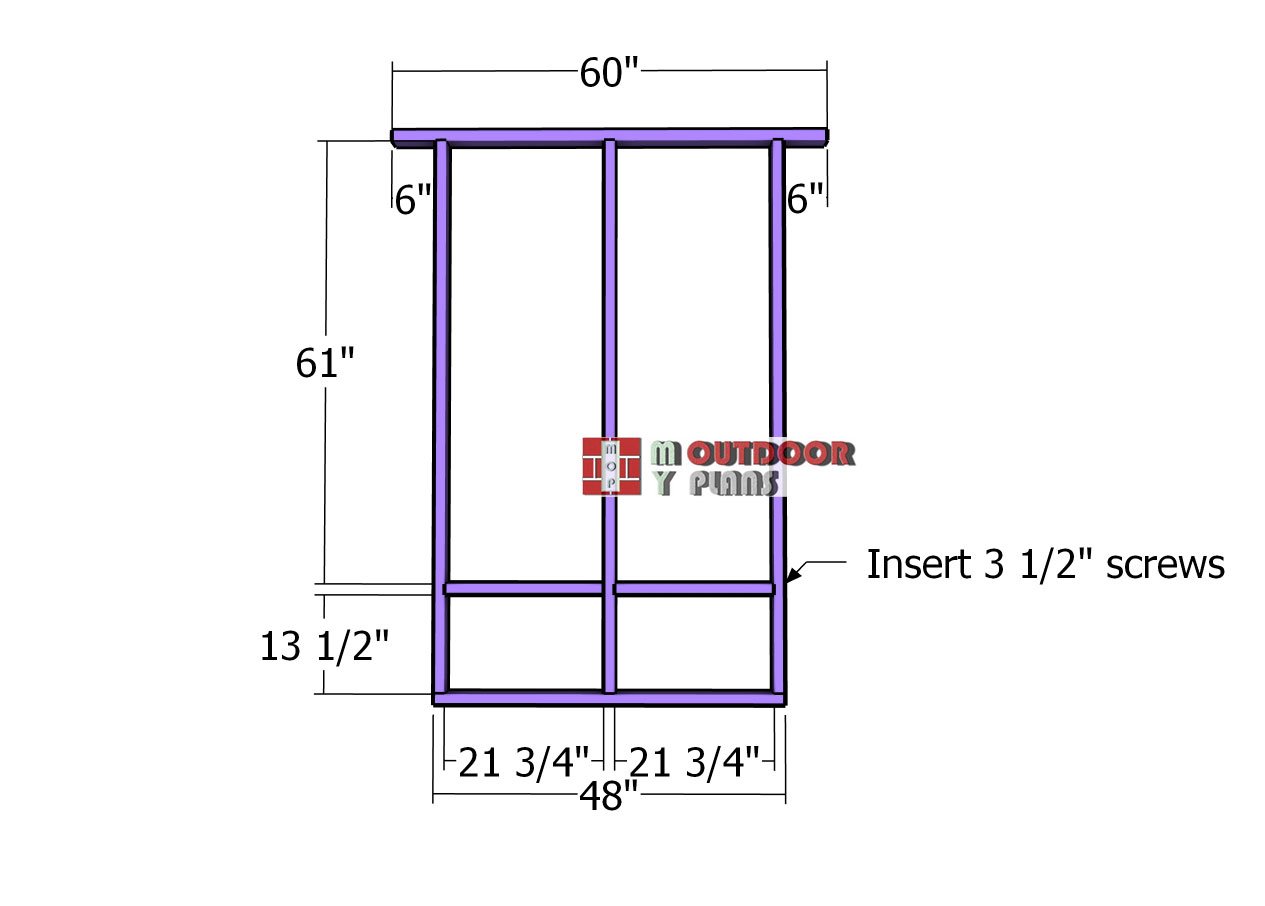
Back-wall-frame
Next up, it’s time to build the back wall for the outhouse. Pay special attention to the details here—the top plate should overhang on both sides. Why? To create those handy side roof overhangs that’ll shield your masterpiece from the elements (and add a touch of style). You’ll also notice 2×4 blockings placed snugly between the studs.
These aren’t just for show, they’re essential for supporting the toilet seat later on. Secure the blockings with 3 1/2″ screws, angling them if necessary to keep everything locked in tight.
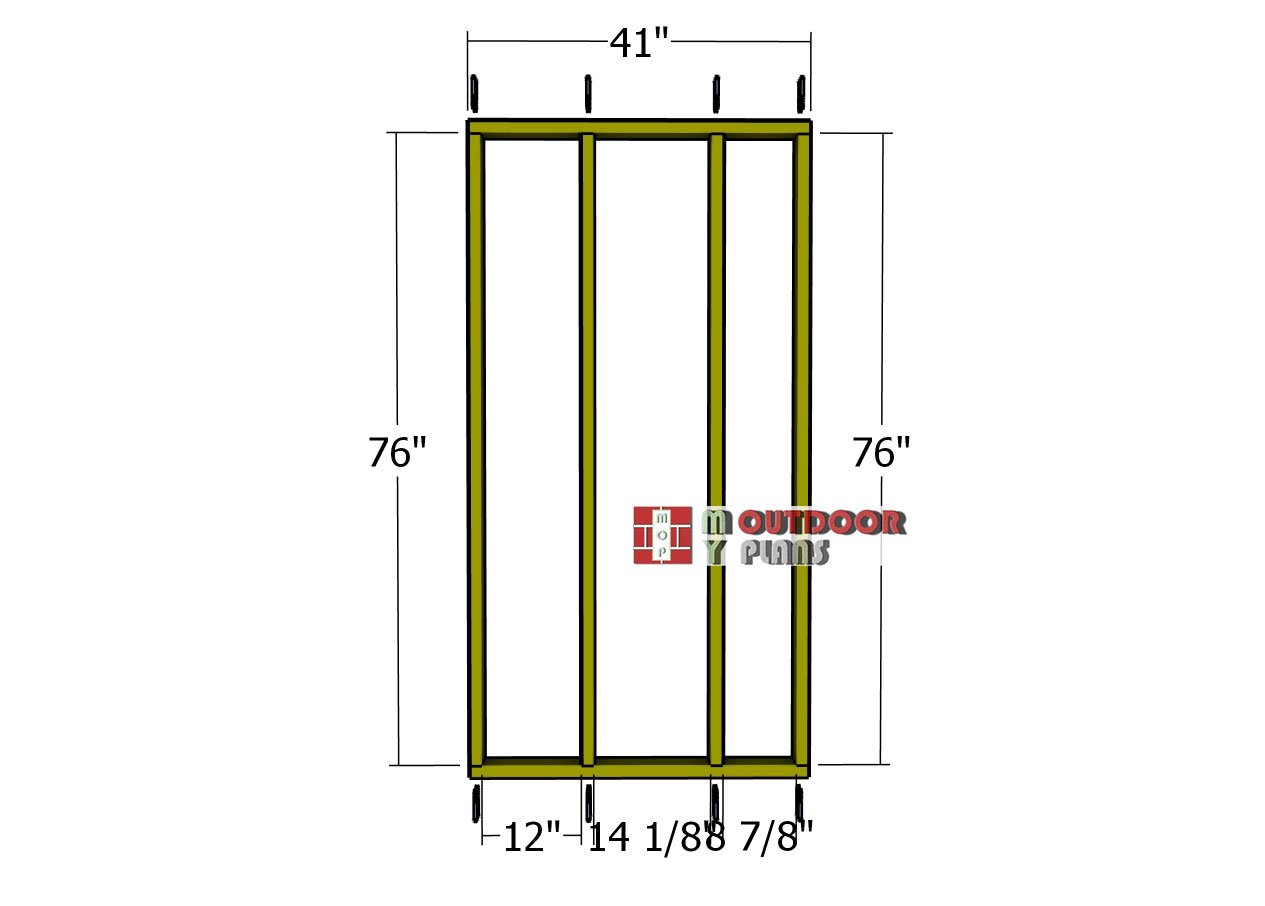
Side-wall-frame
Alright, let’s keep the momentum going and tackle the side walls! First up is the simpler frame, no window opening here, so it’s smooth sailing. Just follow the same steps: cut your 2x4s to size, lay them out on a level surface, and drill pilot holes. Secure everything with 3 1/2″ screws, making sure the studs are perfectly aligned.
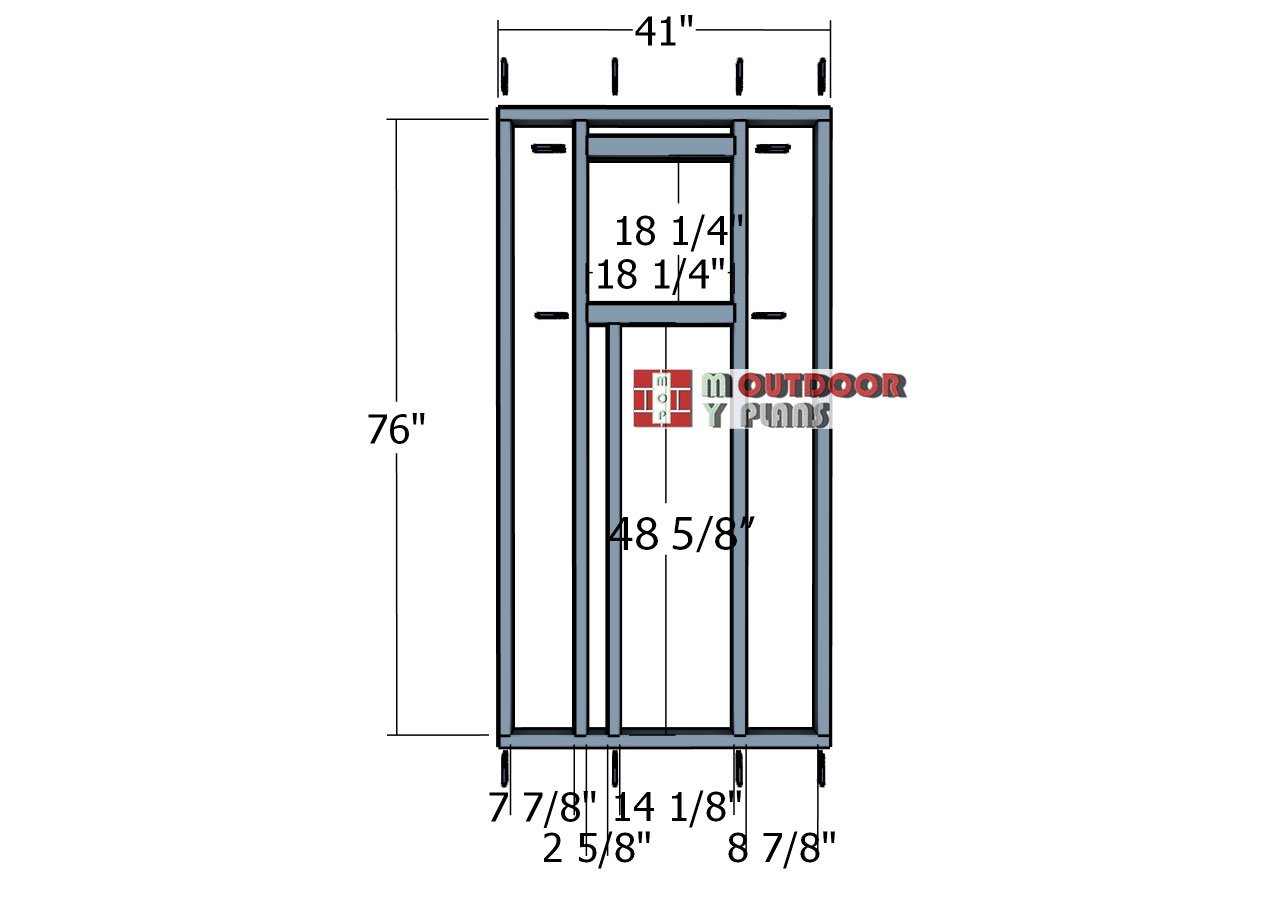
Side-wall-frame
Now let’s move on to the other side wall, this one’s got a little extra flair! As shown in the diagram, I’ve included an opening for an 18″x18″ window. Why? Because even an outhouse deserves a bit of natural light to brighten things up and make the space feel more welcoming. To frame the window, you’ll need to assemble double headers and secure them into place. Since this is a smaller project, attaching the headers to the studs with 3 1/2″ screws is a breeze.
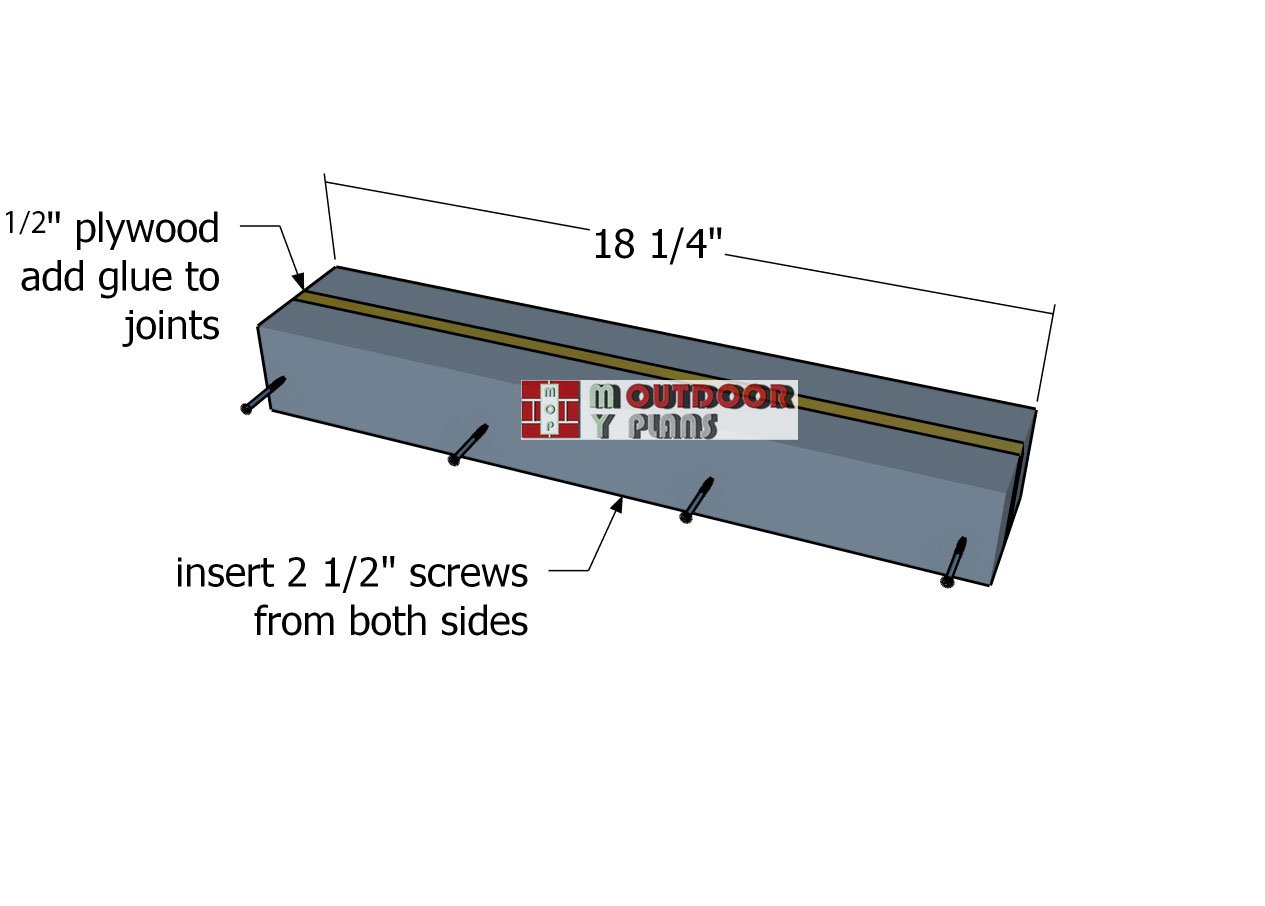
Double-header
To build the double header, you’ll want to craft a sturdy sandwich, no snack breaks, though, we’re serious about this! Start by taking two 2×4 beams and placing a 1/2″ plywood sheet snugly between them. This combo adds that extra strength and stability your project needs. Don’t forget to apply a hearty layer of wood glue to the joints—it’s the secret sauce for a bond that’s built to last.
Once everything is perfectly aligned, secure the layers together by driving 2 1/2″ screws through both sides. Space the screws evenly to ensure maximum hold, because this isn’t just about strength—it’s about creating a structure that’s tough enough to stand the test of time.
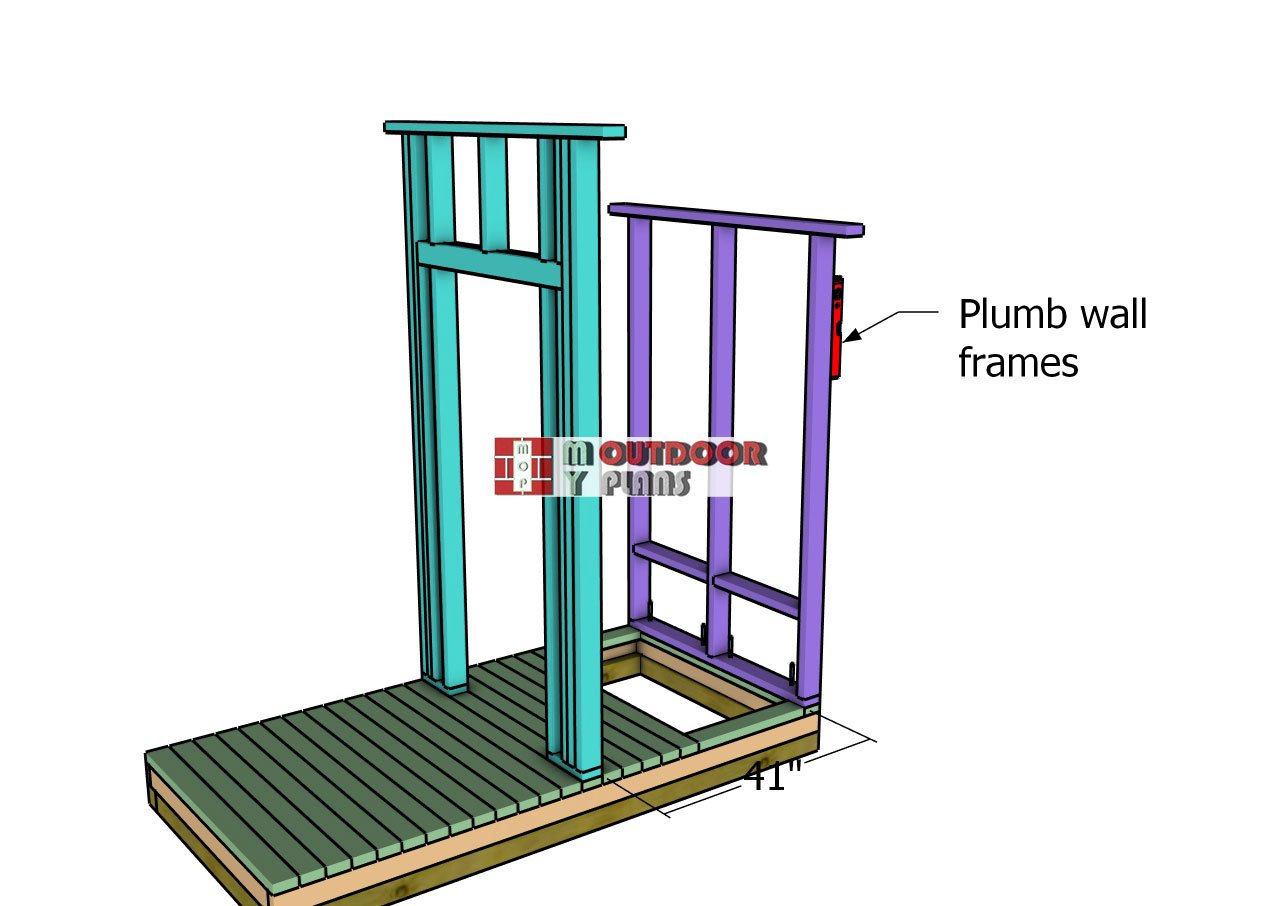
Attaching-the-front-and-back-wall-frames
Let’s start bringing it all together by attaching the front and back wall frames to the outhouse floor. Carefully align each frame with the edges of the floor, making sure everything lines up perfectly. Grab your trusty spirit level to check that the walls are plumb—precision here makes all the difference. Once they’re standing tall and straight, drill pilot holes through the bottom plates and secure them to the floor with 3 1/2″ screws.
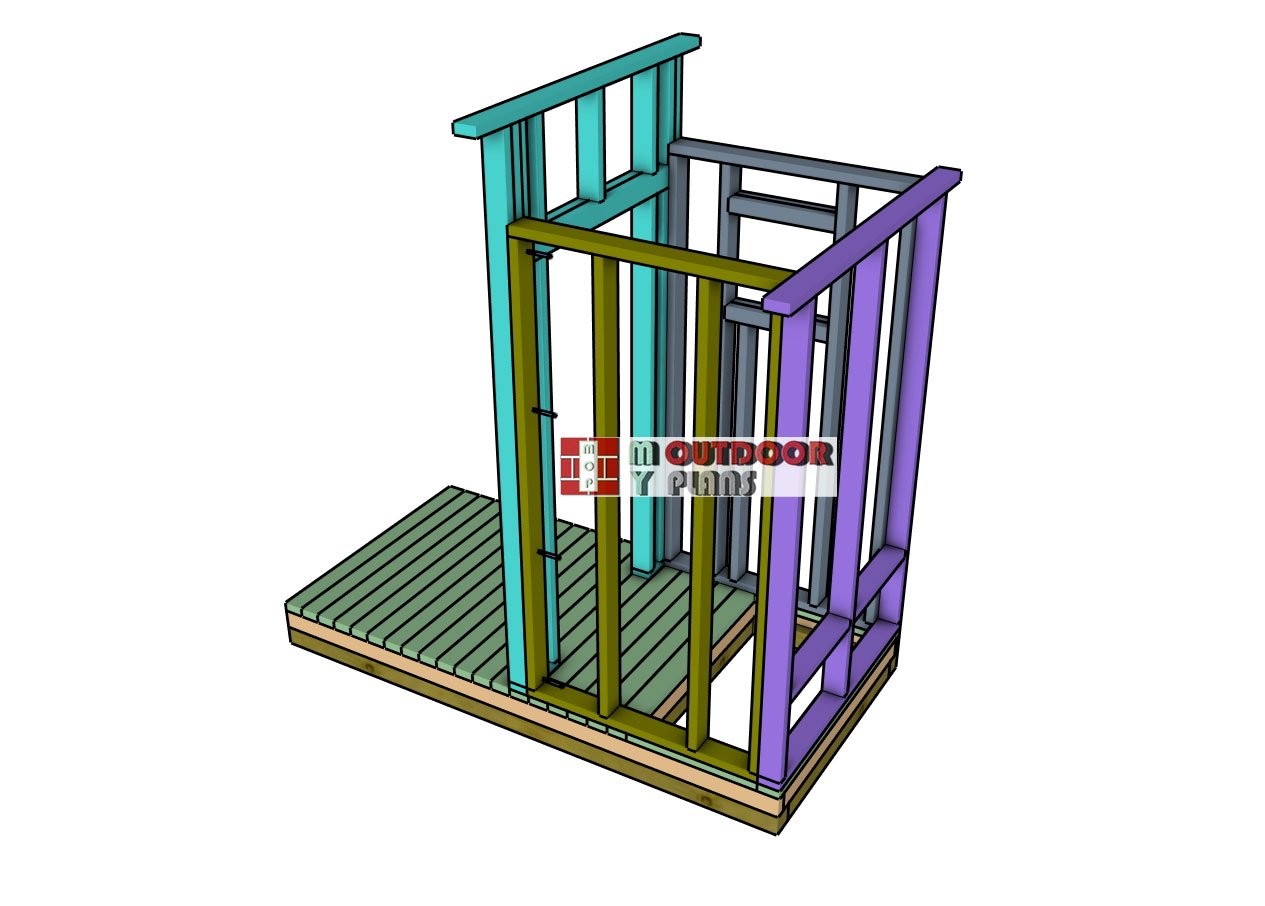
Attaching-the-side-walls
Now it’s time to fit the side walls to the floor of the outhouse. Here’s your chance to decide where you want the wall with the window—left side or right side, the choice is yours! Once you’ve made your call, align the edges flush with the floor and secure the wall frames in place using 3 1/2″ screws. But don’t stop there! Lock the side walls to the front and back wall frames as well, driving in 3 1/2″ screws every 12″ on center. With everything tied together, your outhouse is looking solid and ready for the next step!
Step 3: Building the roof
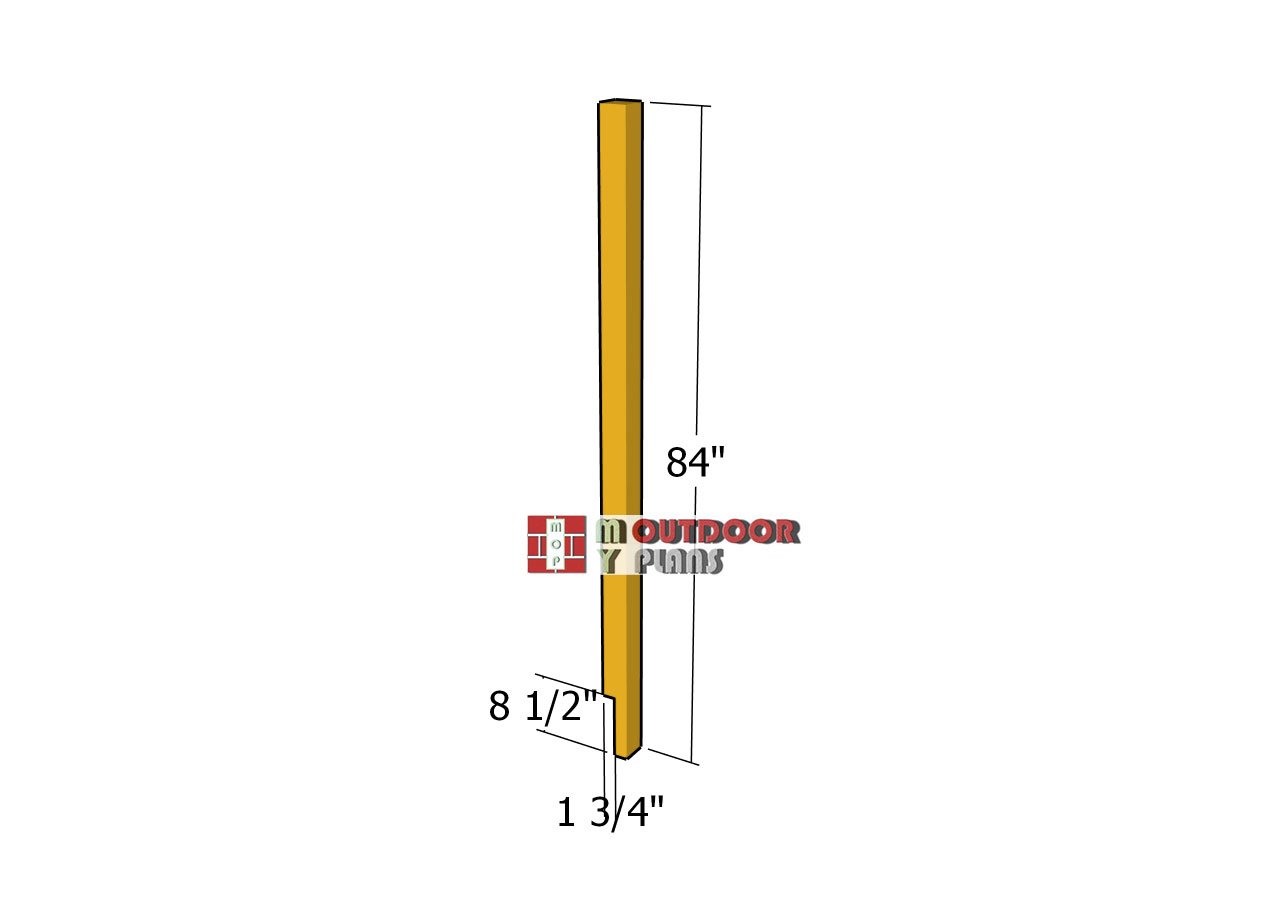
Posts
Next, it’s time to frame up the front side of the outhouse. Start by cutting the 4×4 posts to size and creating the notches as shown in the diagram, these are key for a snug and sturdy fit. To make the notches, grab your circular saw and set the blade depth to 1 3/4″. Carefully make parallel cuts within the marked area, then use a hammer and chisel to clean out the recess. Take your time here to ensure clean edges, this step lays the groundwork for a rock-solid front frame!
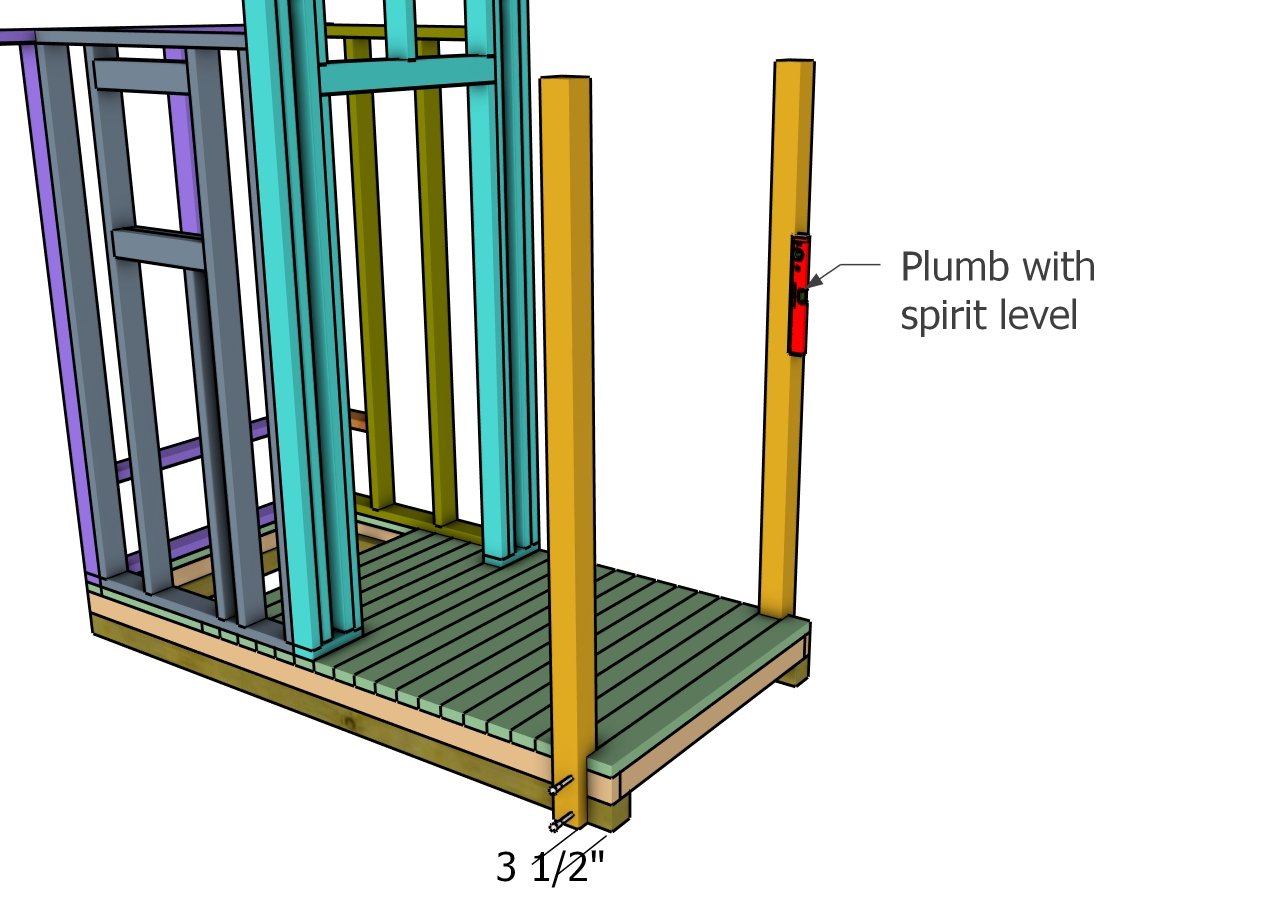
Fitting the posts
Now it’s time to fit the posts to the front of the outhouse. Position them carefully, making sure they’re perfectly plumb using a spirit level, because nobody wants a crooked outhouse! Once they’re aligned just right, drill pilot holes through the base and secure the posts using 3 1/2″ lag screws. Tighten everything up so those posts are rock-solid and ready to support the structure like champs.
Fitting-the-top-beam
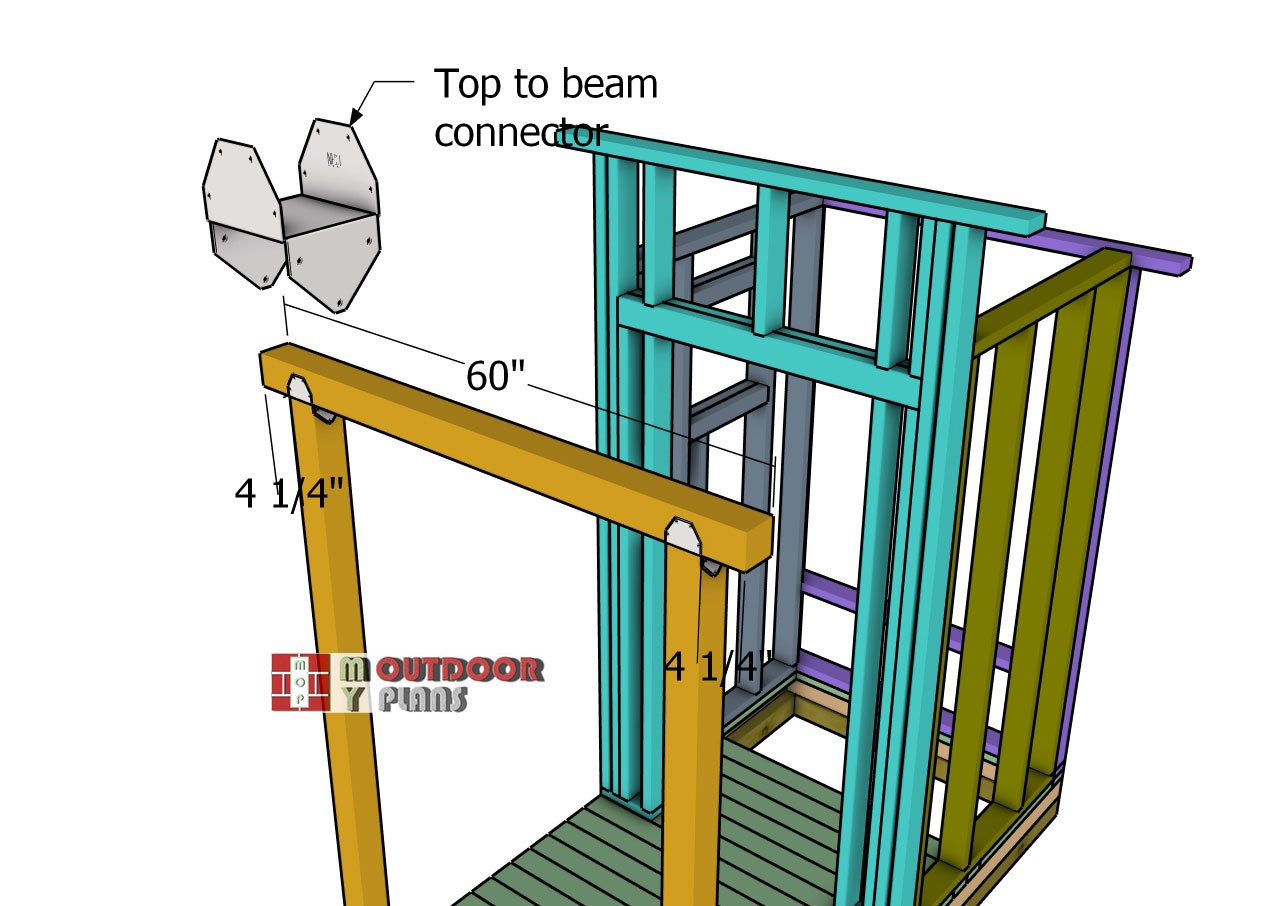
Next up, let’s attach the top support beam to tie it all together. Center the beam on the posts, leaving a 4 1/4″ overhang on each side for a clean, balanced look. Use post-to-beam connectors for a secure fit, and fasten everything in place with 2 1/2″ screws. Don’t forget to double-check that the corners are square before locking it all down, precision here sets the stage for a solid and professional finish.
Rafters
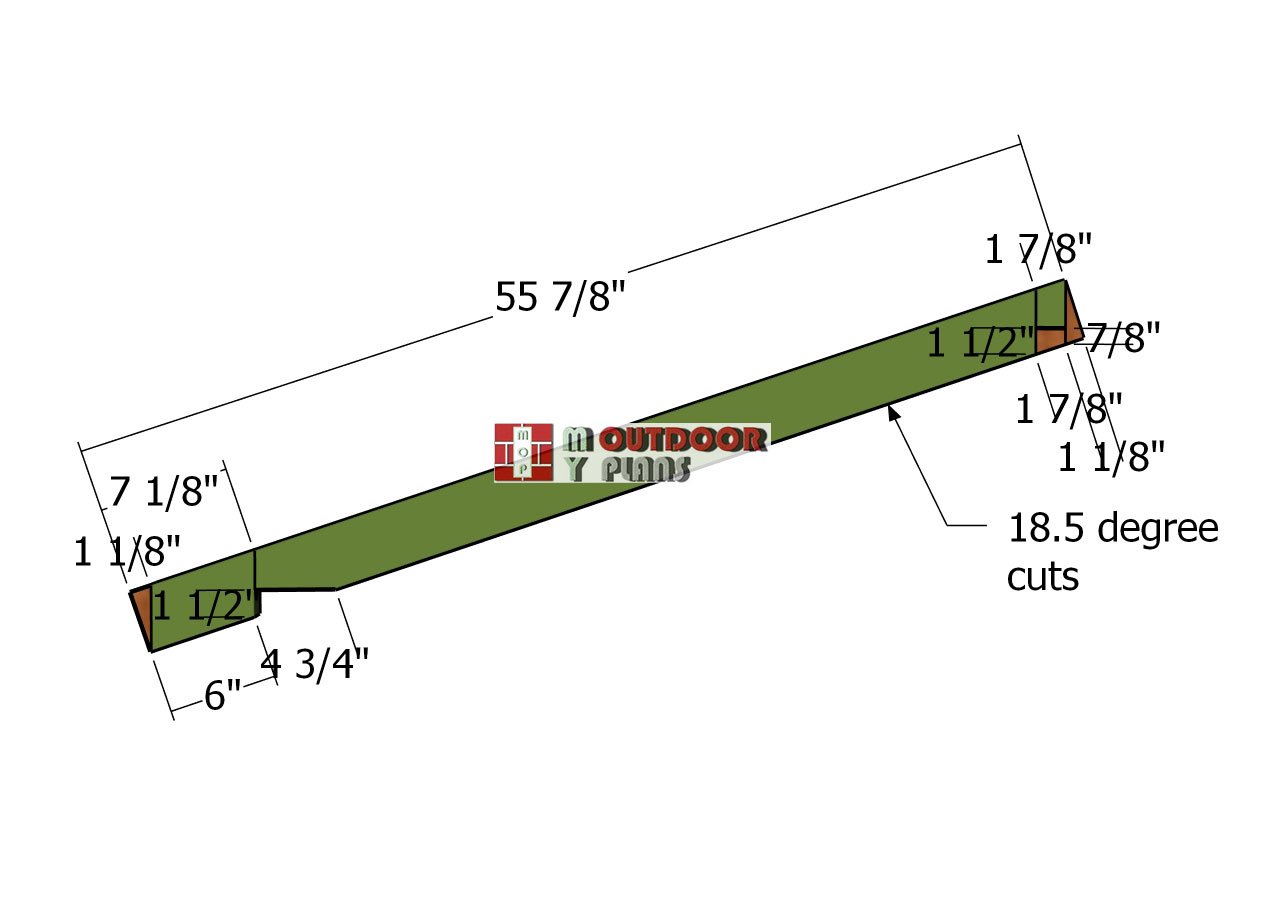
Now it’s time to prep the rafters for the gable roof! Start by marking the cut lines on the rafters—accuracy is key here to ensure everything fits like a glove. Use a circular saw to make the cuts, beginning with the 18.5-degree angles on both ends of each rafter. Once those are done, move on to the birdsmouth cuts. These notches are crucial because they’ll allow the rafters to sit snugly on the outhouse structure, giving you a solid and sturdy roof.
Fitting-the-rafters
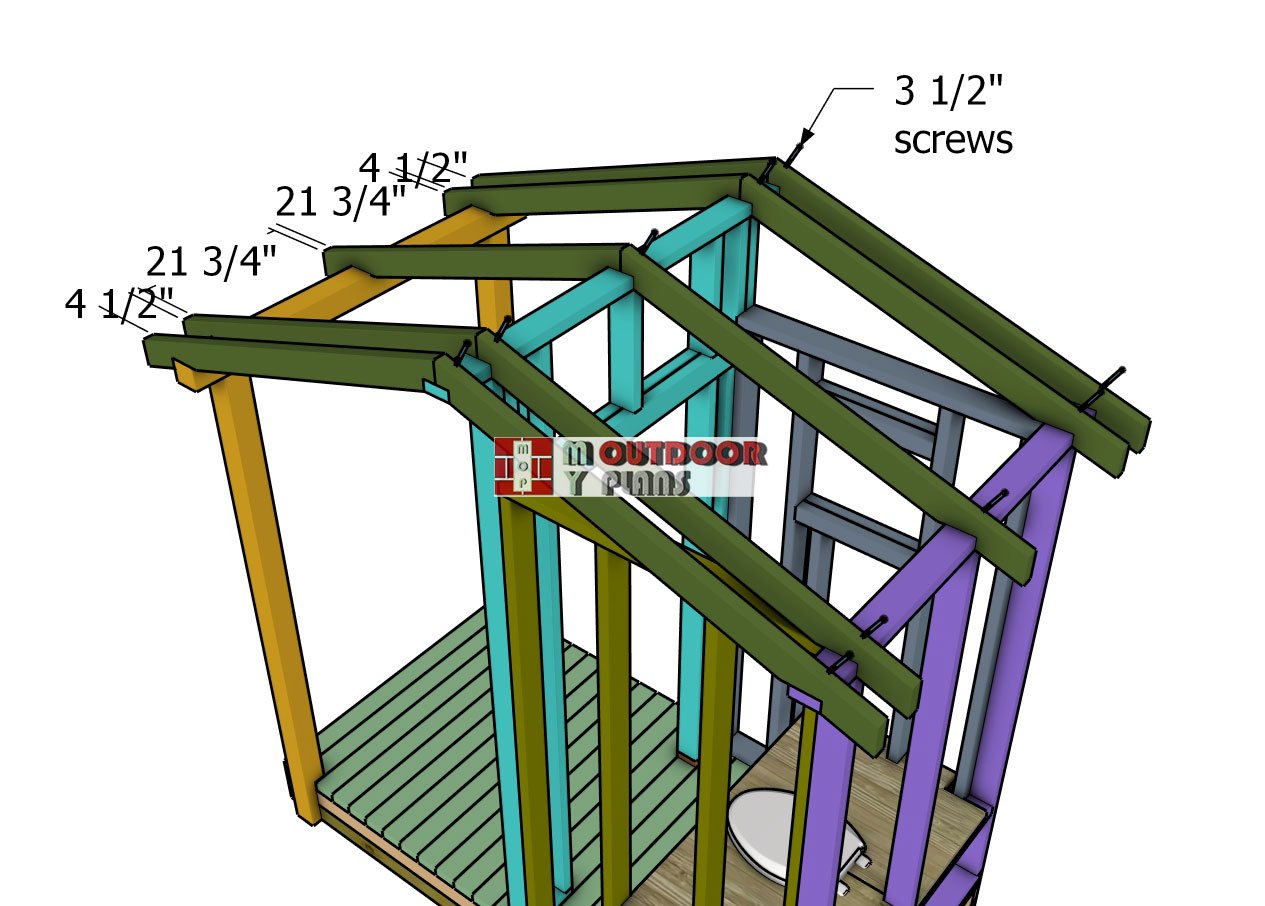
Now let’s attach those rafters to the top of the outhouse. Position them as shown in the diagram, making sure to space them evenly for a balanced and sturdy roof structure. Once you’ve got them lined up, drill pilot holes through each rafter and secure them tightly with 3 1/2″ screws. This step locks everything into place, so double-check that the rafters are sitting flush and evenly spaced before moving on.
DIY 4×8 Outhouse with Porch
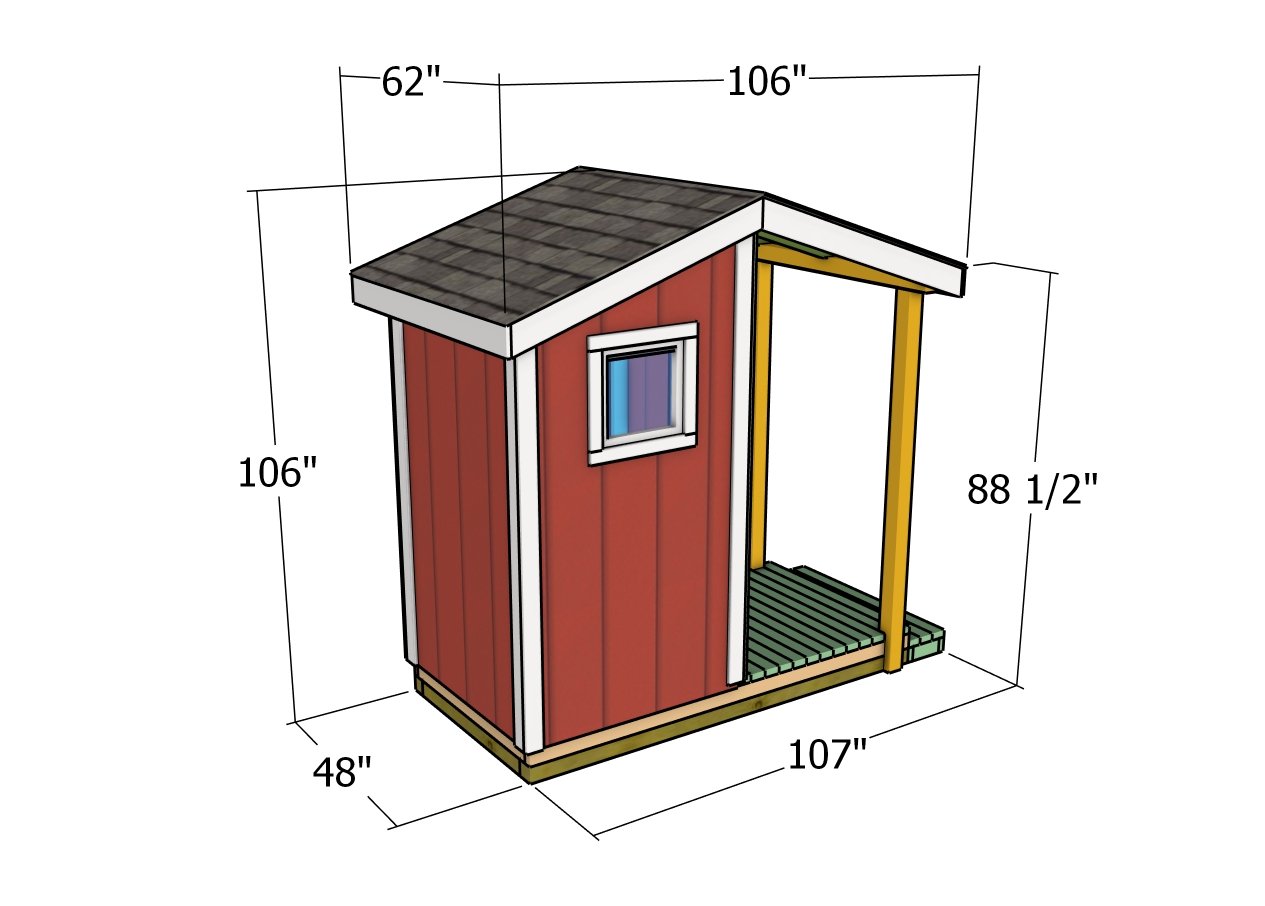
DIY outhouse – dimensions
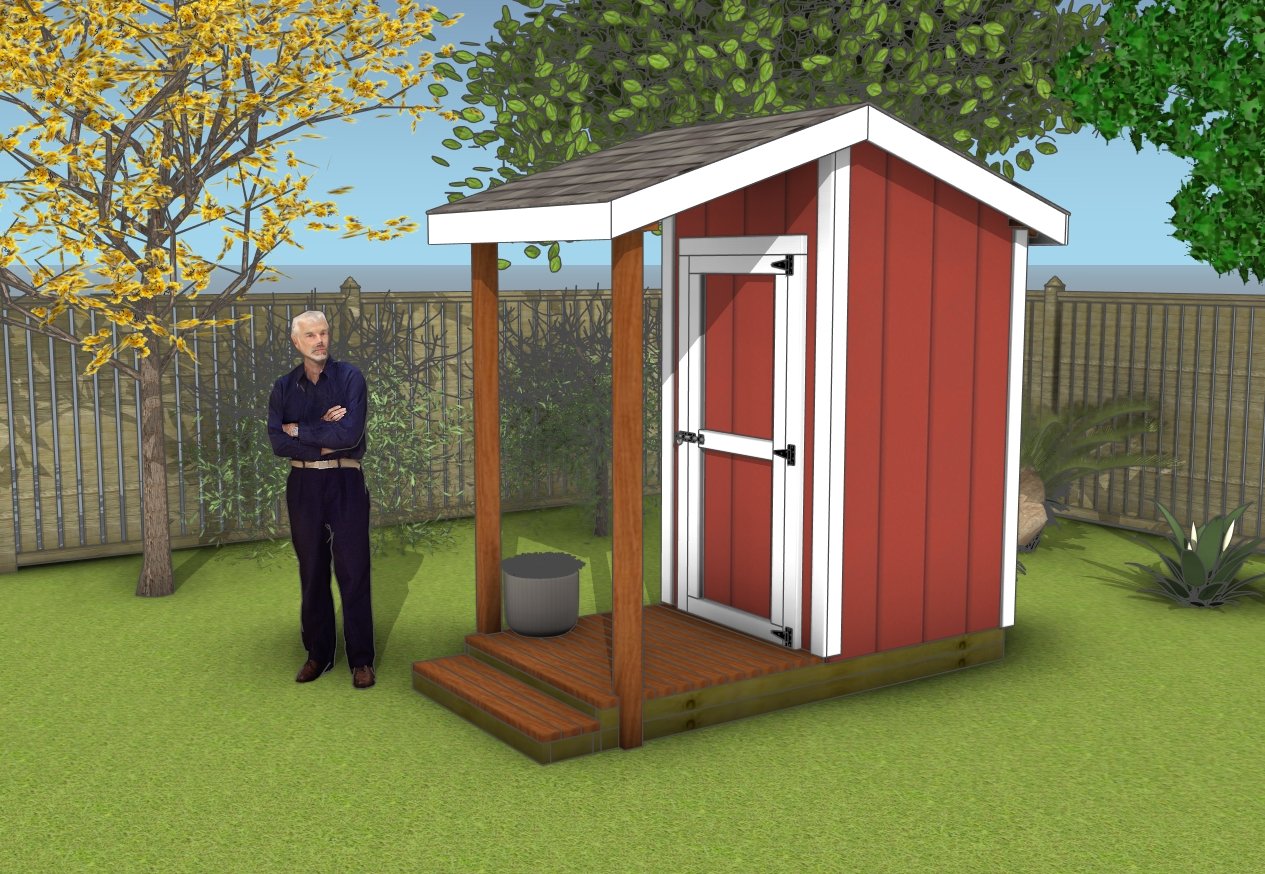
DIY Outhouse plans
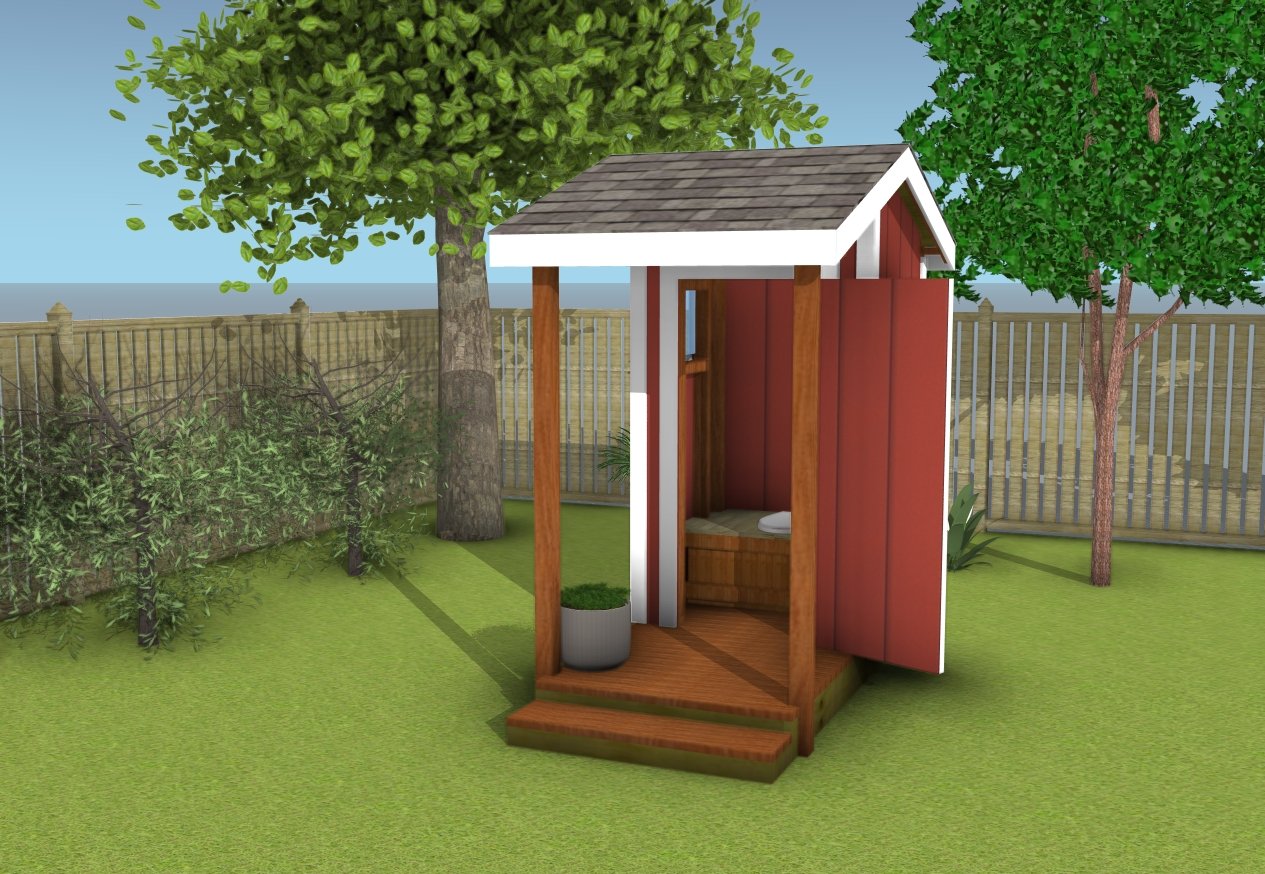
How to make an outhouse
For a complete guide to building this shed, including detailed plans for a front ramp, check out our premium plans for the ultimate step-by-step experience! If you’re ready to take your build to the next level, click the GET PDF PLANS button below! If you want to get the free version, just read the blog FAQs.
This woodworking project was about DIY outhouse with porch plans. If you want to see more outdoor plans, we recommend you to check out the rest of our step by step projects. LIKE us on Facebook to be the first that gets out latest projects and to hep us keep adding free woodworking plans for you.


