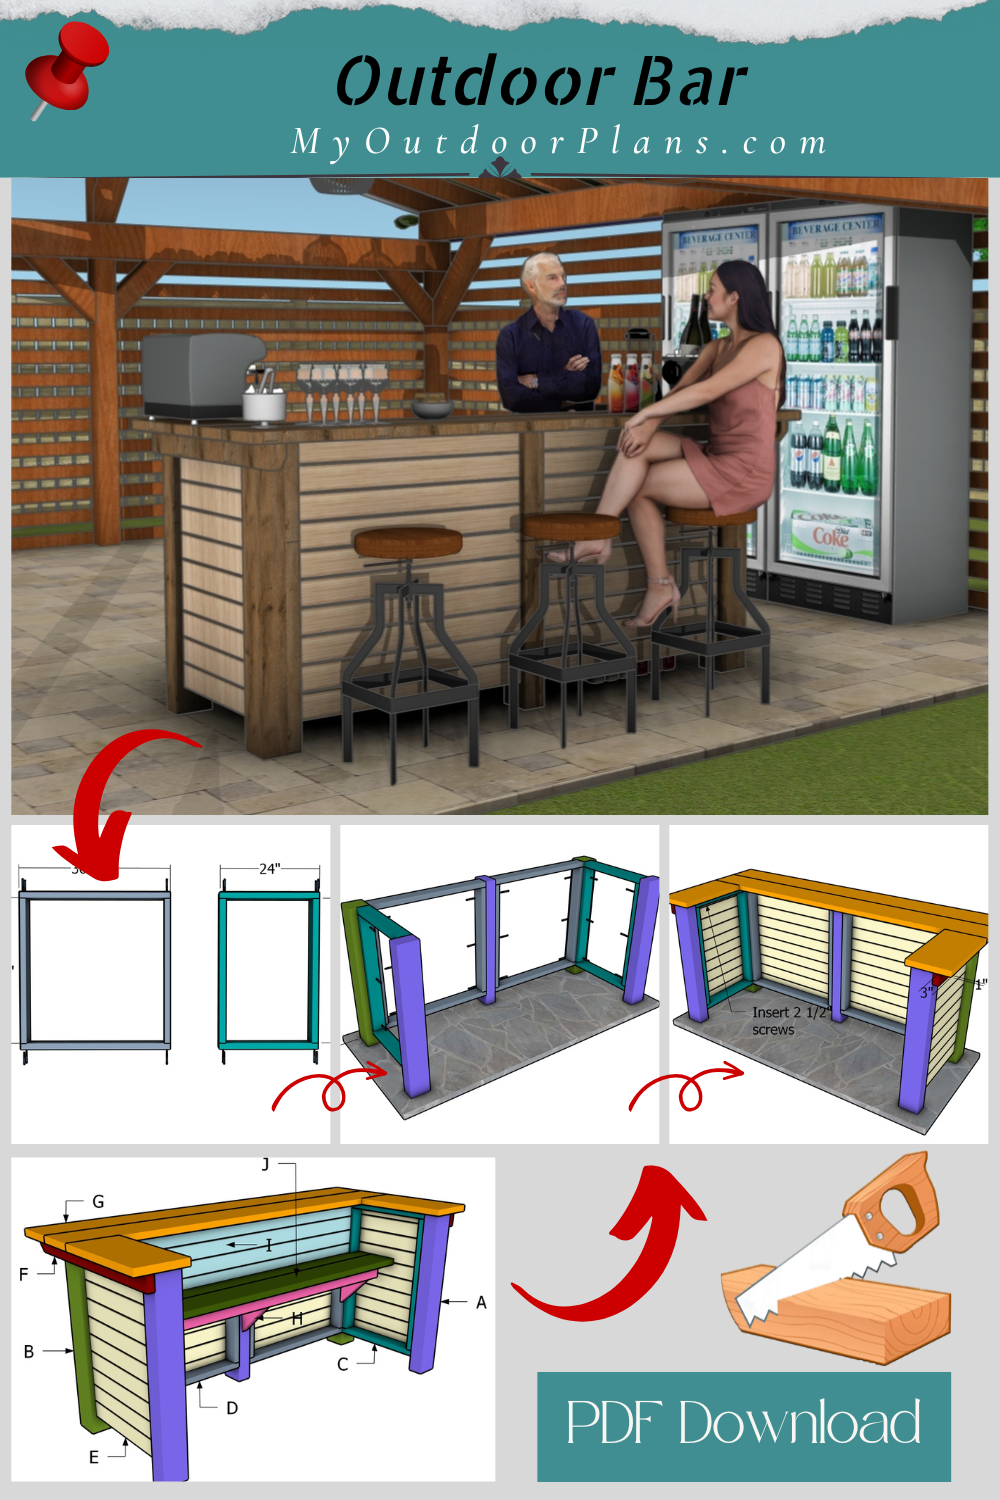
Looking to elevate your backyard with a custom-made wooden outdoor bar? You’re in the right place! In this guide, I’ll walk you through every step to build your own stylish bar with these free plans that are perfect for DIY enthusiasts of any skill level. This wooden outdoor bar offers the ultimate setup for entertaining, with sturdy storage, ample countertop space, and a design that complements any outdoor décor. Whether you’re planning summer gatherings or just want a cozy corner to enjoy a drink, this project will transform your space into the ultimate backyard retreat.
You can expect to spend about $150 to $250 on materials, depending on your choice of wood and any added finishes or hardware. If you go with basic pressure-treated lumber, costs will lean toward the lower end, while using high-quality or weather-resistant wood, like cedar or redwood, may bring the total closer to $250.
As for time, this project should take around 8 to 10 hours from start to finish, which includes cutting, assembling, sanding, and finishing. With some experience, you could complete it over a weekend. If you’re newer to woodworking, it might take a bit longer, but the project is straightforward and a great opportunity to hone your skills. Take a look over the rest of my woodworking plans, if you want to get more building inspiration. Premium Plans for this project available in the Shop.
For this project, I recommend using cedar or hardwood for their durability and natural resistance to the elements. Cedar is a fantastic option because it’s lightweight, rot-resistant, and has a beautiful, rustic look. Hardwood, on the other hand, provides superior strength and longevity, making your project a sturdy and stylish addition to your home.
Projects made from these plans
Wooden Outdoor Bar – Free Plans
Building-an-outdoor-bar
Cut and Shopping Lists
A – POSTS – 6×6 lumber 42″ long – 2 pieces
B – POSTS – 4×6 lumber 42″ long – 3 pieces
C – FRAME – 2×4 lumber 24″ long – 4 pieces
C – FRAME – 2×4 lumber 35″ long – 4 pieces
D – FRAME – 2×4 lumber 35″ long – 4 pieces
D – FRAME – 2×4 lumber 36 1/4″ long – 4 pieces
E – SLATS – 1×4 lumber 24″ long – 20 pieces
E – SLATS – 1×4 lumber 36 1/4″ long – 20 pieces
F – SUPPORTS – 2×4 lumber 41″ long – 2 pieces
G – COUNTERTOP – 2×10 lumber 96″ long – 2 pieces
G – COUNTERTOP – 2×12 lumber 23 1/2″ long – 2 pieces
H – SHELF FRAME – 2×4 lumber – 76″ long – 2 pieces
H – SHELF FRAME – 2×4 lumber – 8″ long – 3 pieces
H – SHELF FRAME – 2×4 lumber – 13 3/8″ long – 3 pieces
I – BACKSPLASH – 1×4 lumber – 76″ long – 4 pieces
J – SHELF – 2×6 lumber – 83″ long – 1 piece
J – SHELF – 2×8 lumber – 83″ long – 1 piece
- 1×4 lumber 8 ft – 9 pieces
- 1×4 lumber 10 ft – 7 pieces
- 2×4 lumber 8 ft – 5 pieces
- 2×4 lumber 10 ft – 6 pieces
- 2×6 lumber 8 ft – 1 piece
- 2×8 lumber 8 ft – 1 piece
- 2×10 lumber 8 ft – 2 pieces
- 2×12 lumber 4 ft – 1 piece
- 6×6 lumber 8 ft – 1 piece
- 4×6 lumber 8 ft – 1 piece
- 4×6 lumber 4 ft – 1 piece
- 30 pieces of 3 1/2″ screws
- 100 pieces of 2 1/2″ screws
- 100 pieces of 1 5/8″ screws
- Wood glue – 1 can
- Stain – 1 can
Tools
![]() Hammer, Tape measure, Framing square, Level
Hammer, Tape measure, Framing square, Level
![]() Miter saw, Drill machinery, Screwdriver, Sander
Miter saw, Drill machinery, Screwdriver, Sander
![]() Safety Gloves, Safety Glasses
Safety Gloves, Safety Glasses
Time
![]() One weekend
One weekend
Related
Pin it for Later!
Building the frame of the bar
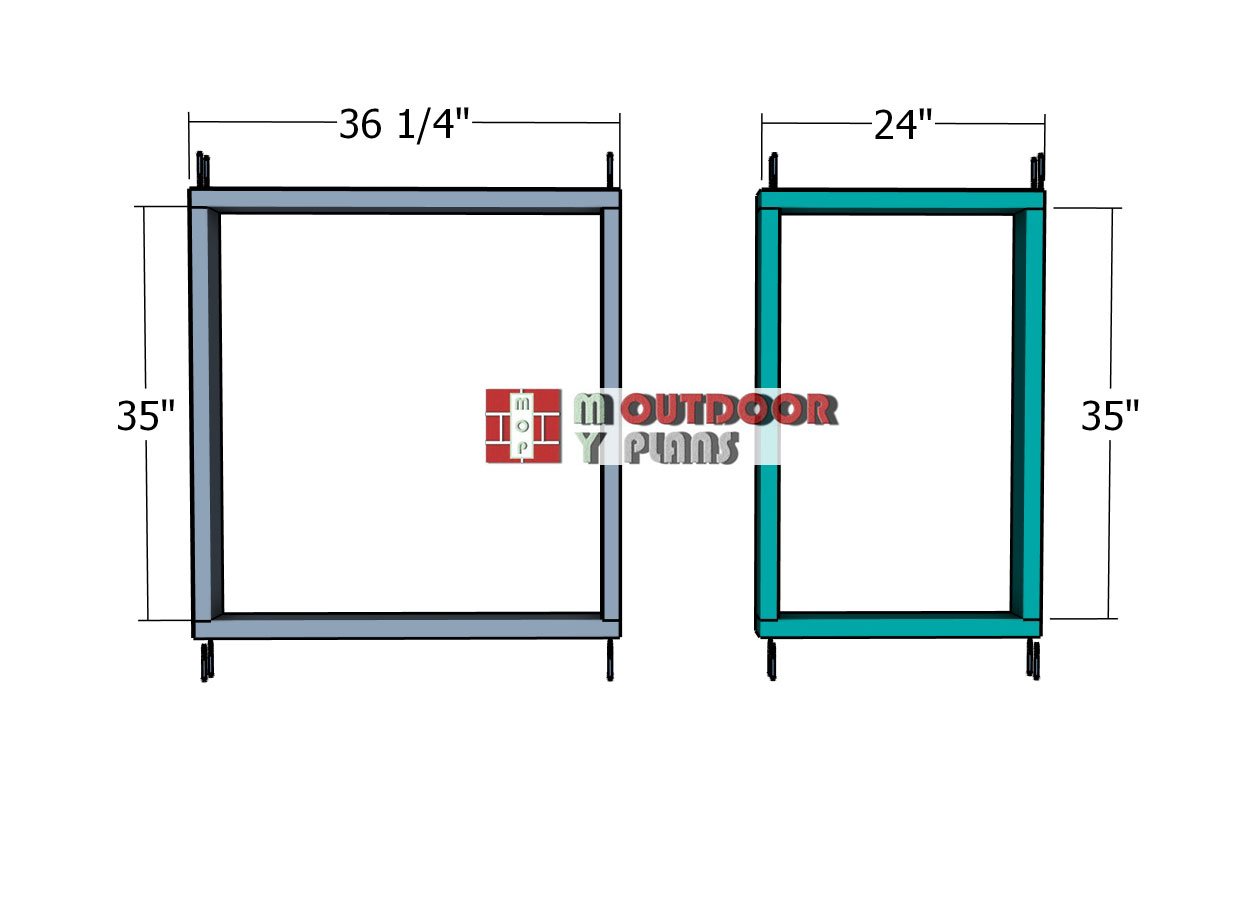
Building-the-frames
Let’s kick this project off by building the frames for your outdoor bar! You’ll need two frames for each section. Start by cutting your components from 2×4 lumber and laying everything out on a nice, flat surface. Make sure the edges line up flush, and double-check that those corners are perfectly square. Drill pilot holes to prevent splitting, then secure it all together with 2 1/2″ screws.
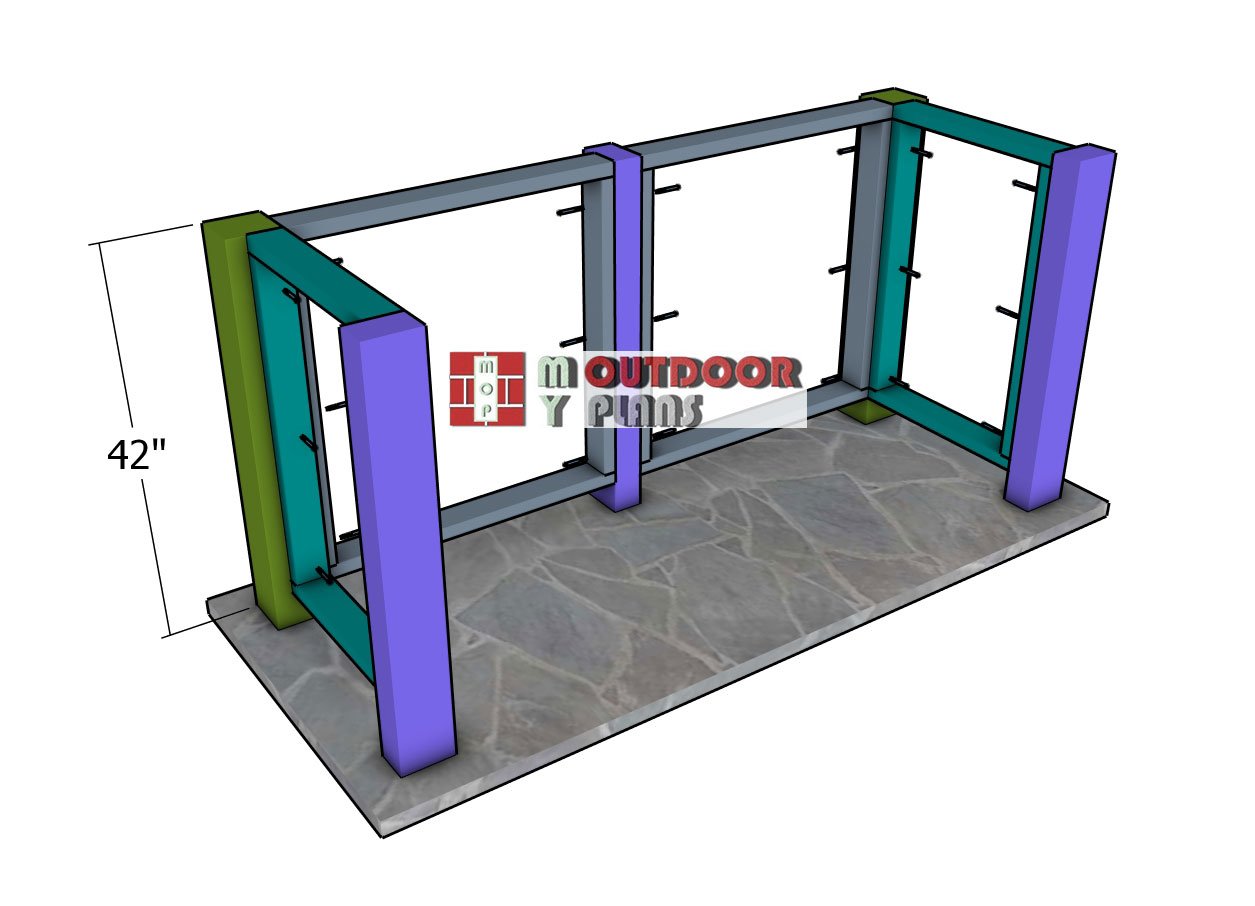
Assembling-the-frame-of-the-bar
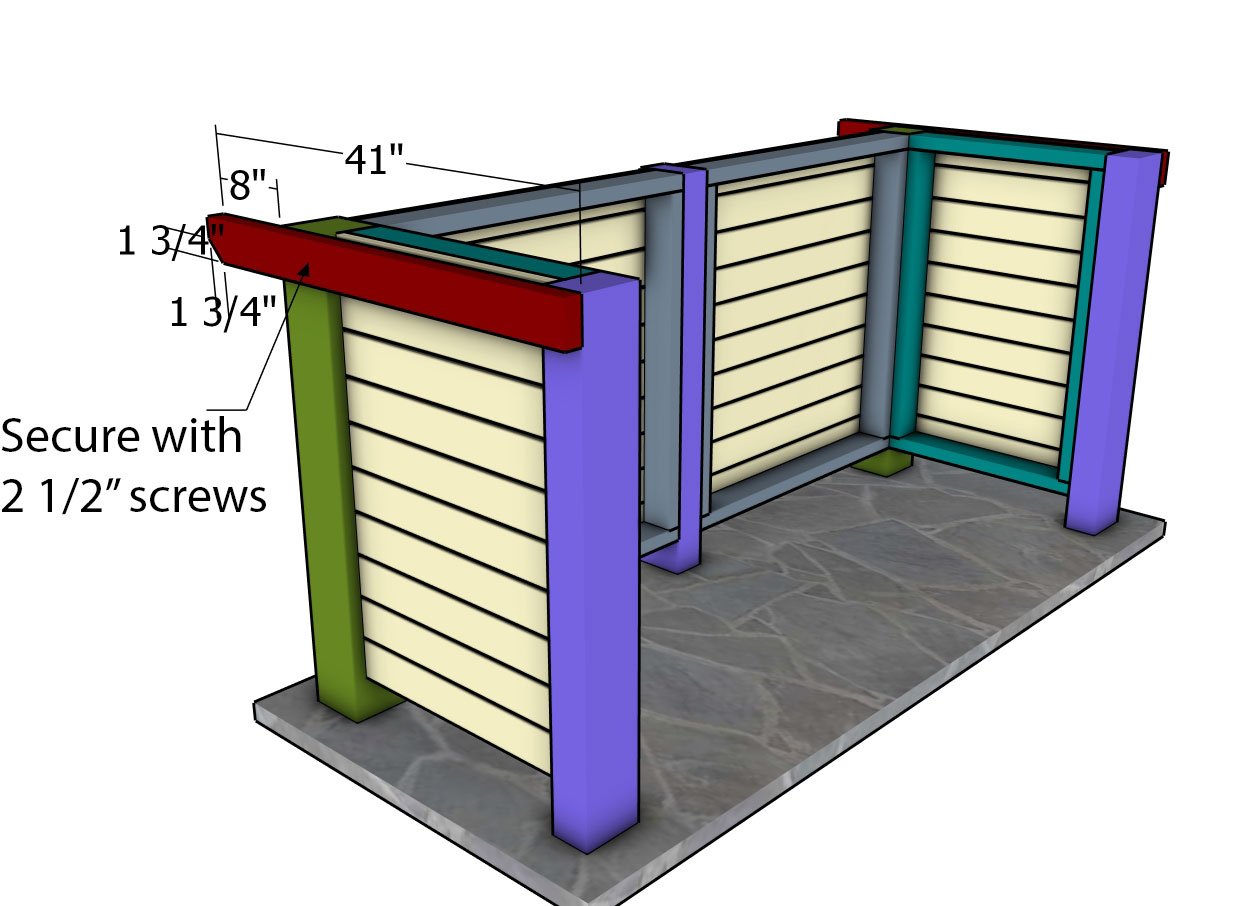
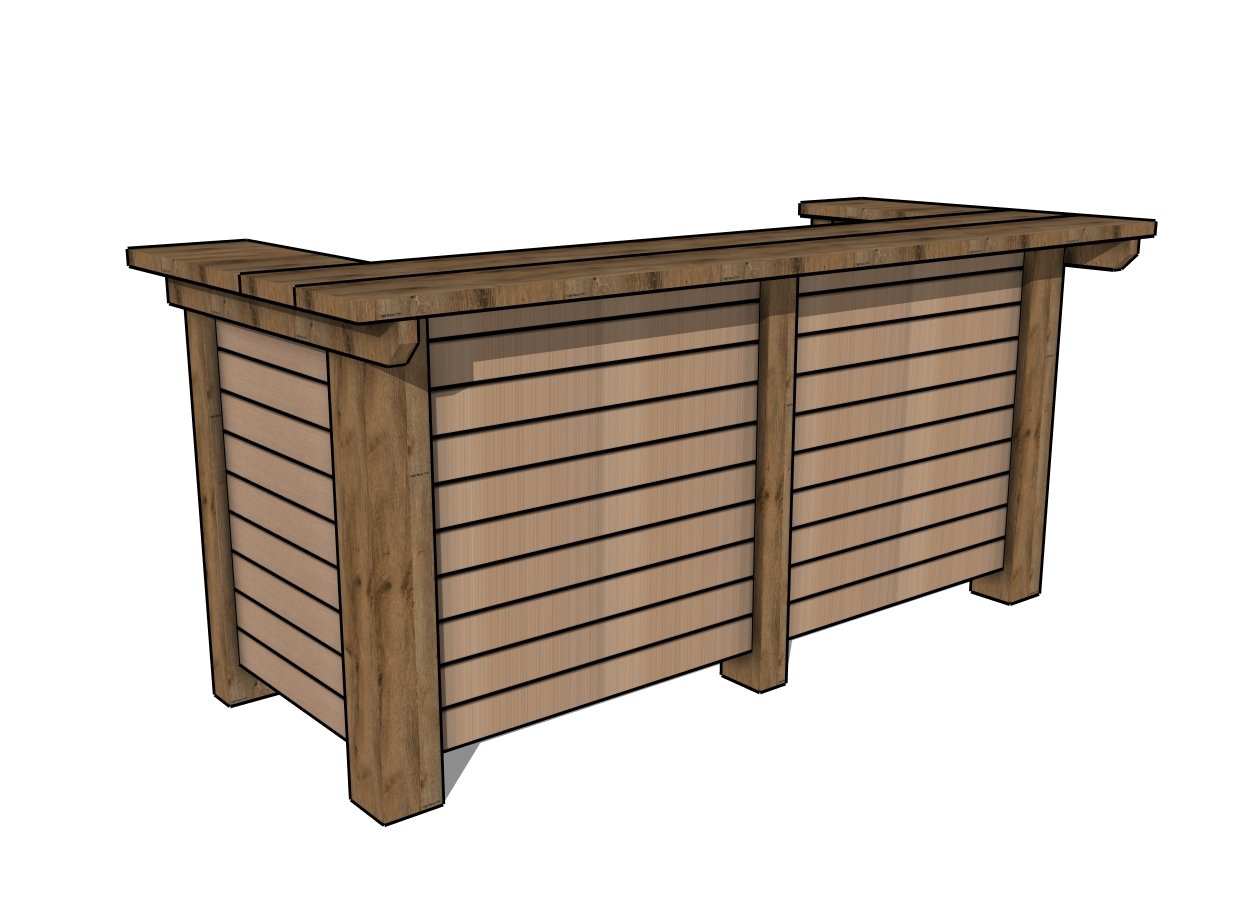
Next up, it’s time to assemble the frame for the wooden bar! Start by cutting the posts: use 6×6 lumber for the green posts and 4×6 lumber for the purple posts. Grab the frames you built earlier, and attach them to the posts using 2 1/2″ screws. Don’t forget to drill those pilot holes to keep the wood from splitting! Position the frames flush against the interior faces of the posts; this setup leaves you the perfect amount of space to add board paneling to the bar’s exterior.
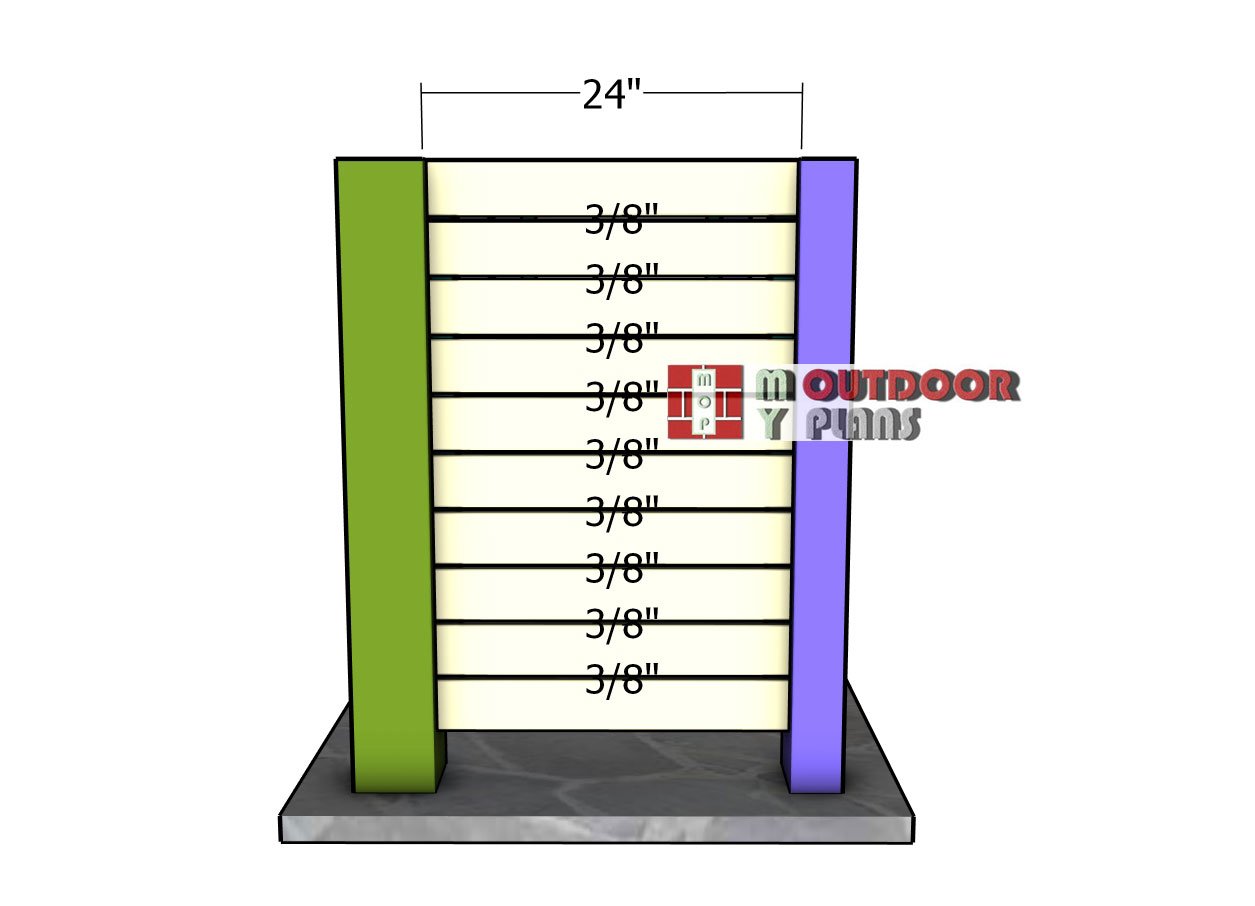
Side-panel-boards
For the exterior paneling, we’ll use 1×4 boards to give the bar a clean, finished look. Use 3/8″ spacers between each board to keep those gaps nice and even. Begin attaching the slats from the top, working your way down. Drill pilot holes to avoid any splitting, then secure the boards with 1 5/8″ screws.

Front-panel-slats
Attach the 1×4 boards to the front panels of the bar, keeping the look consistent. Just like before, use spacers to ensure even gaps between each board. Drill pilot holes and secure the boards with 1 5/8″ screws, working from top to bottom. This will give your bar a cohesive and professional finish.
Building the countertops
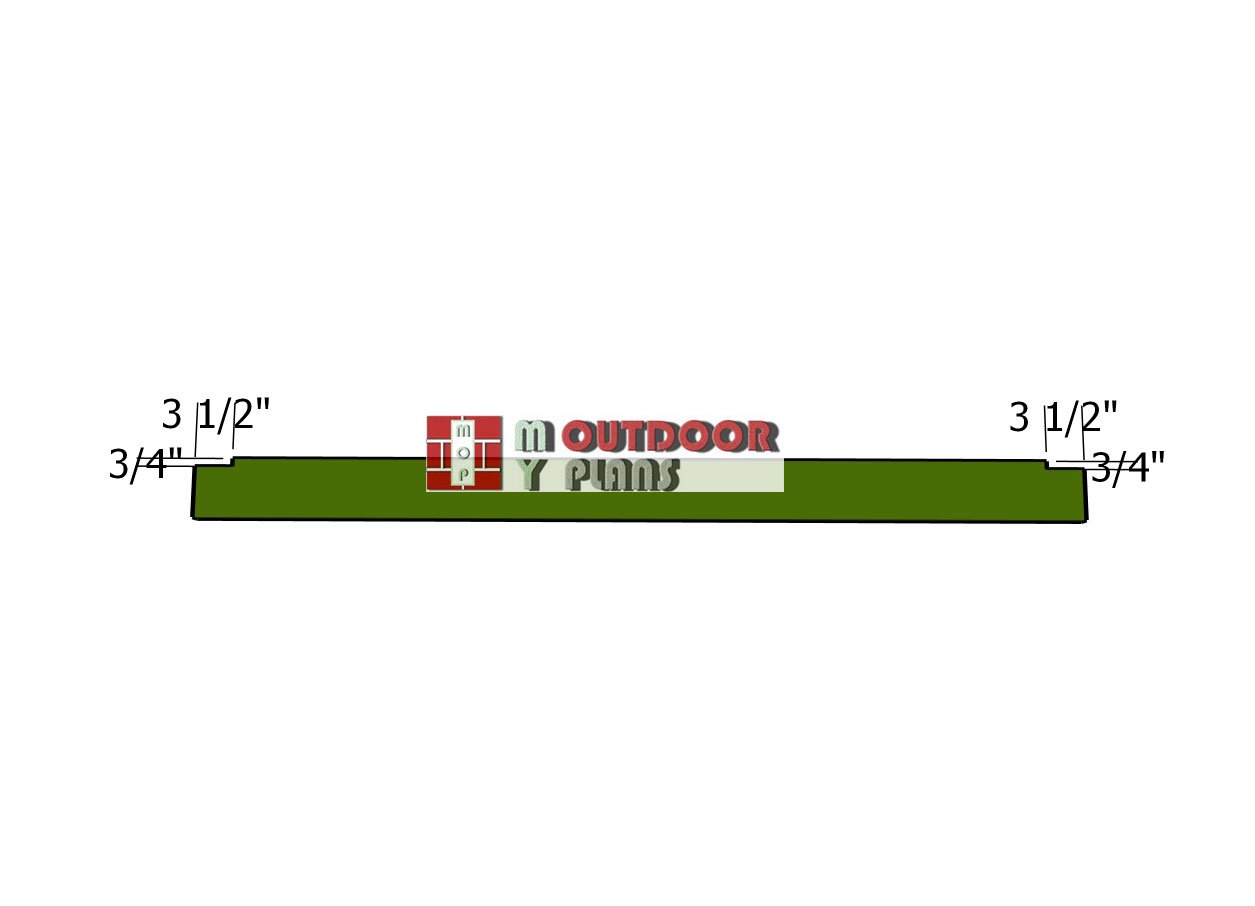
Tabletop-supports
Now, let’s tackle the countertops! To support the countertop, start by installing 2×4 supports on both sides of the bar. For a bit of style, make a decorative cut at one end of each support. Secure them in place with 2 1/2″ screws, making sure the edges are flush with the bar frame for a snug fit. This setup will give your countertop a solid, stylish foundation.
Assembling-the-countertop
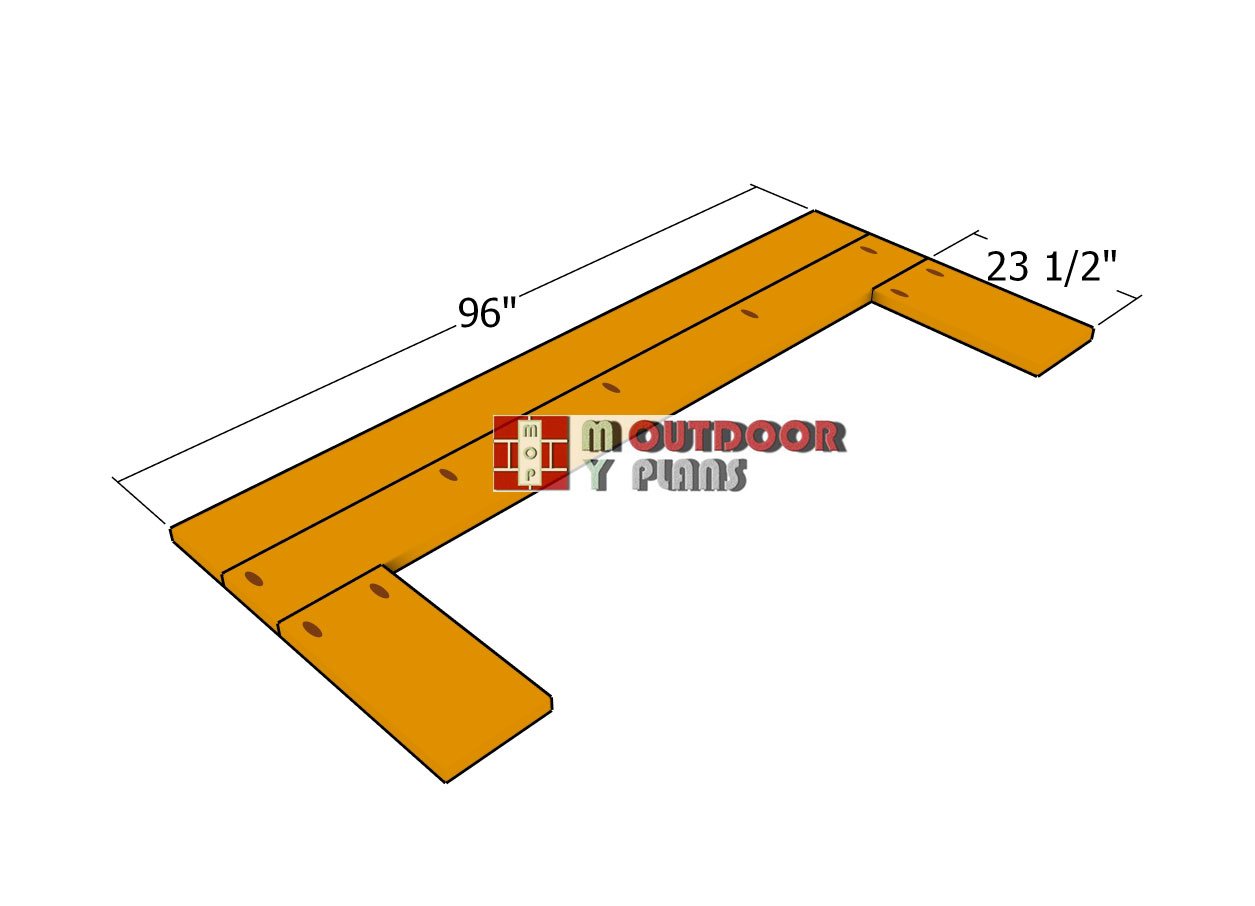
Time to put together the tabletop for the bar! Start by cutting the 96″ pieces from 2×10 lumber for the main surface and the side boards from 2×12 lumber. Drill pocket holes into each piece, then lay everything out on a flat surface. Make sure there are no gaps between the components for a smooth, seamless finish. Insert 2 1/2″ screws to secure the boards, ensuring the edges are flush. Add a bit of glue to each joint for extra stability. This will give your countertop a sturdy and polished look!
Attaching-the-countertop
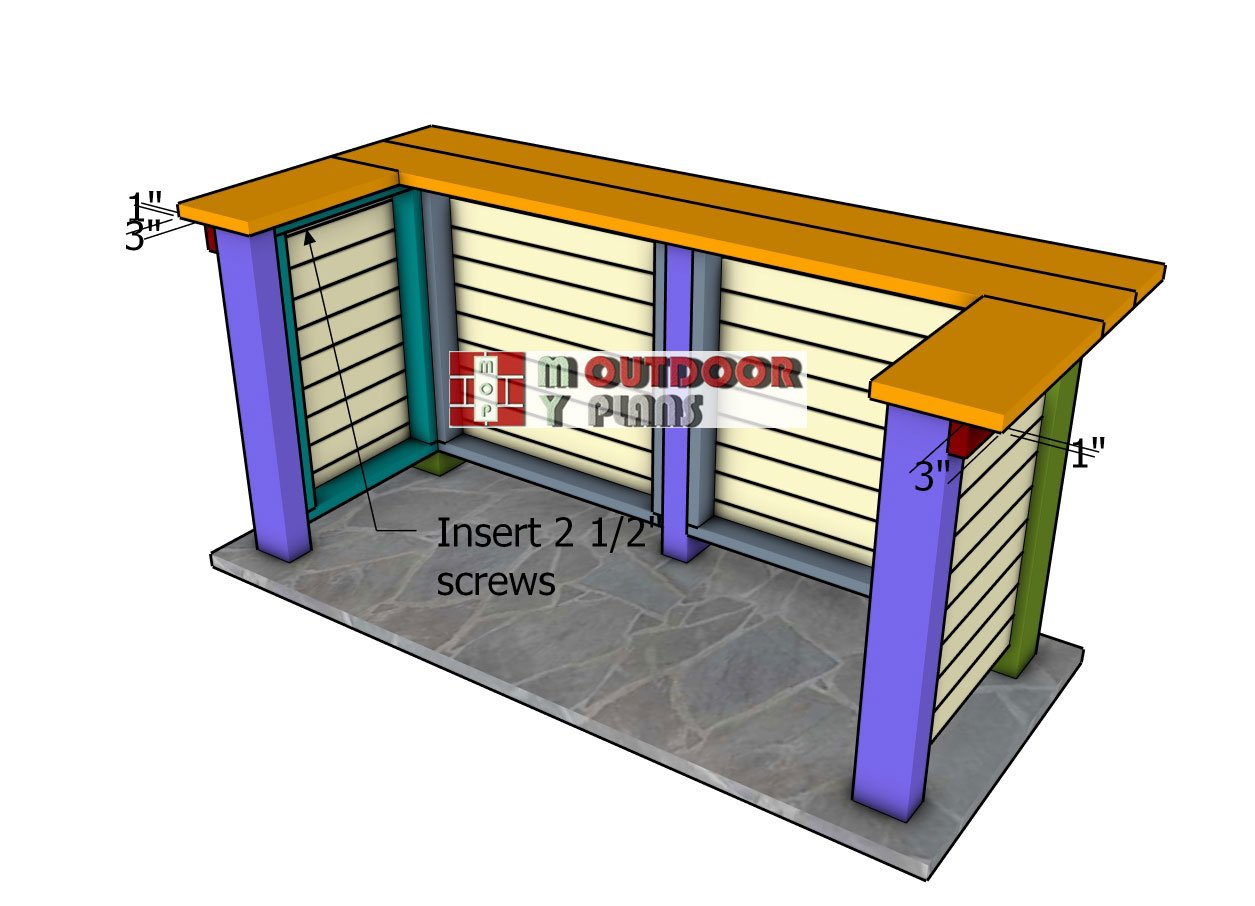
Now let’s secure the countertop to the outdoor bar! Position it according to the plans, with a 1″ overhang at the back and a 3″ overhang on each side. Drill pilot holes from underneath, then drive in 2 1/2″ screws through the frame and into the countertop—using three screws per frame for maximum hold. This setup will give your bar a balanced, professional finish with that perfect overhang.
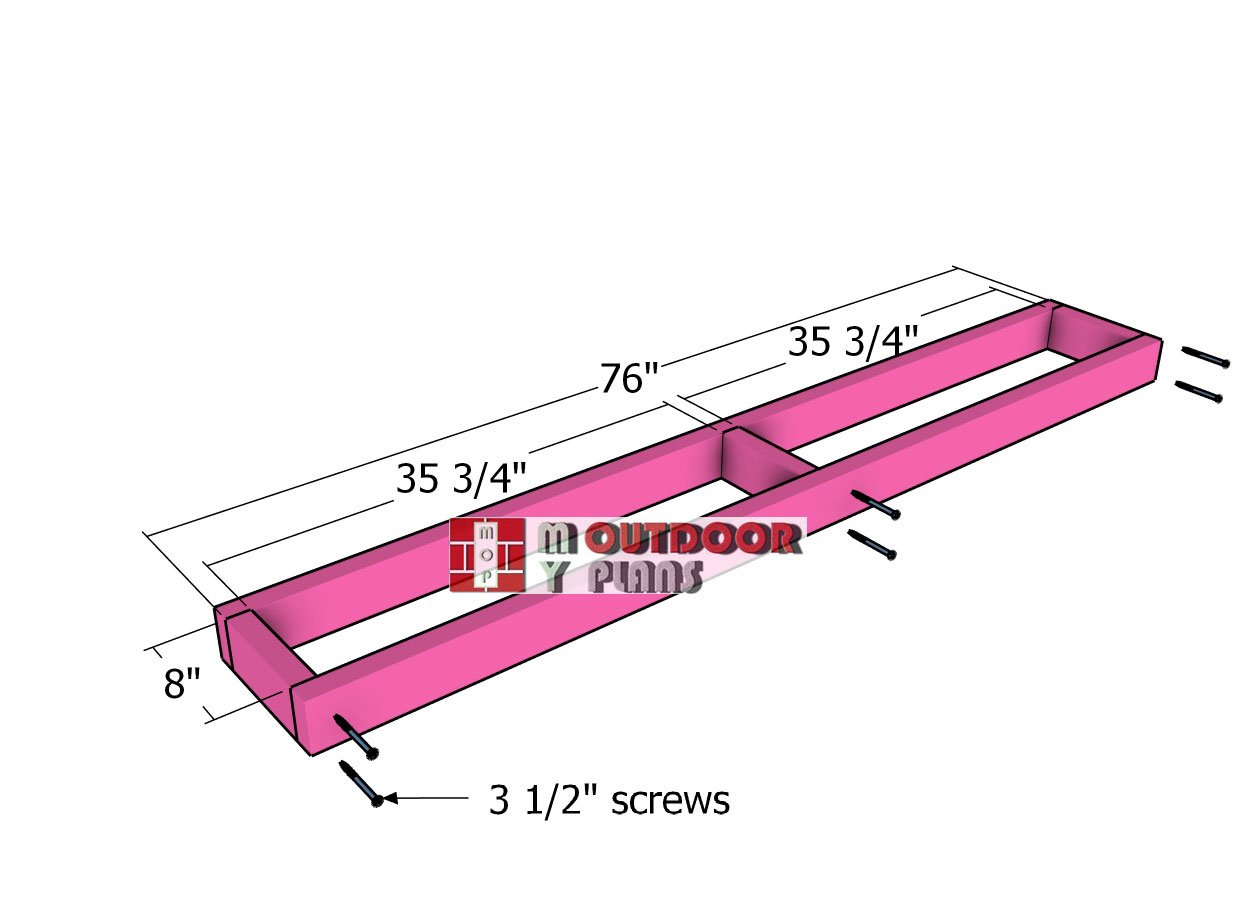
Lower-frame-assembly
Next up, let’s build the lower shelf for your outdoor bar. Use 2×4 lumber for the shelf components and arrange everything on a level surface. Drill pilot holes through the outer boards, then insert 3 1/2″ screws into the perpendicular supports to lock it all together. Double-check that your corners are square to ensure a solid, stable shelf structure.
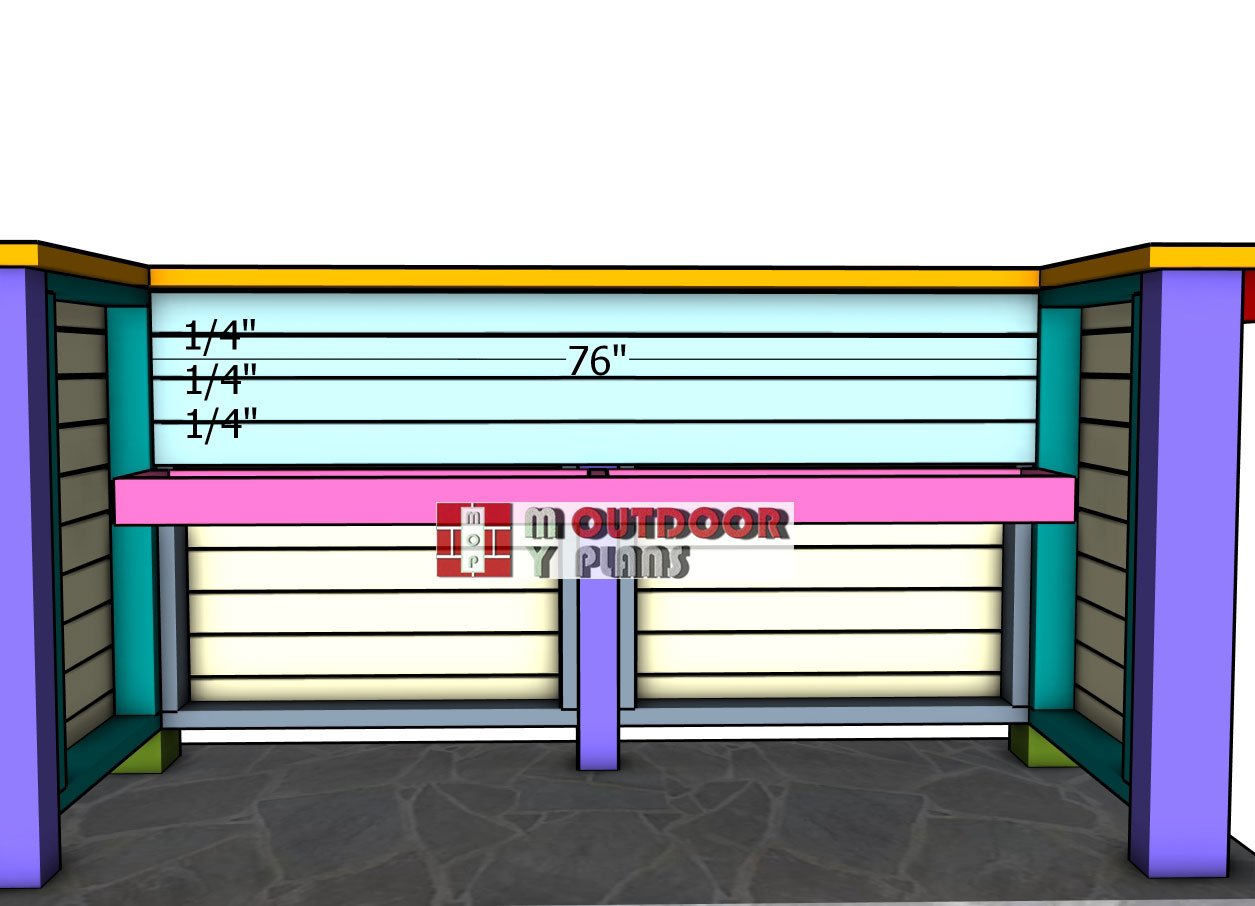
Backsplash-panel-board
Secure the shelf frame in place with 3 1/2″ screws, adjusting the height to suit your needs. For the backsplash, attach 1×4 boards, using 1/4″ spacers between each to create even gaps. Drill pilot holes through the slats, then lock them down with 1 5/8″ screws. This will give your bar a functional and stylish finishing touch!
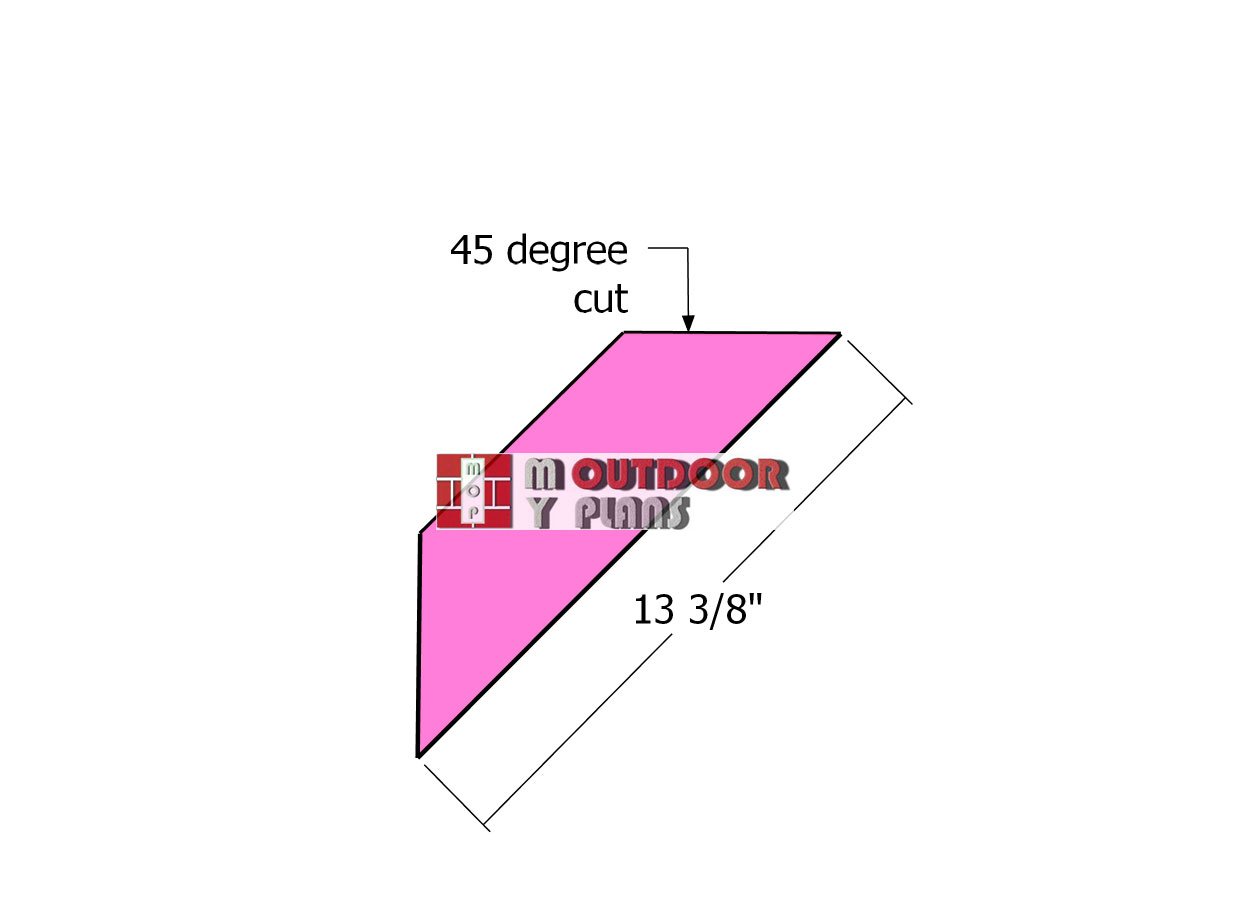
Braces
Now, let’s add some extra support to the shelf. Cut braces from 2×4 lumber, making 45-degree cuts at both ends for a clean fit. These angled braces will provide additional stability, ensuring your shelf is strong and secure.

Attaching-the-lower-countertop-braces
Level the shelf frame, then secure the braces to the frames using 3 1/2″ screws. These diagonal braces will lock everything in place, giving your shelf that rock-solid stability you’re after!
Lower-countertop-boards
Cut the shelf board from 2×6 lumber. Begin by marking the cut lines carefully on the board to ensure precision. Once marked, use a saw to make the cutouts. This will give you a custom fit for the shelf, making it snug and sturdy.
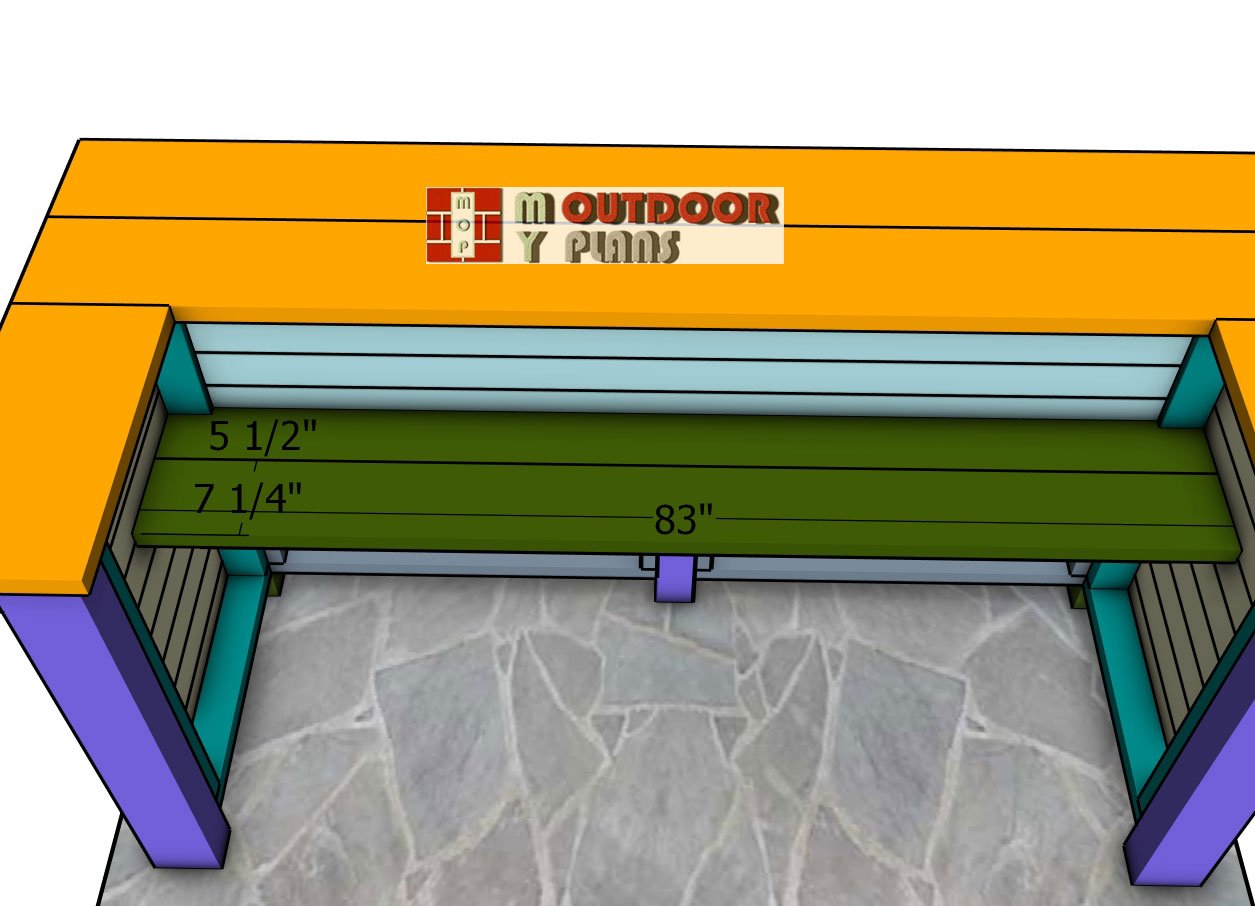
Lower-countertop
Place the boards onto the shelf frame, aligning the edges so they’re flush. Make sure there are no gaps between the boards for a seamless look. Drill pilot holes to prevent splitting, then secure each board to the frame with 2 1/2″ screws. This will lock everything together, giving your shelf a solid and polished finish!
Finishing touches
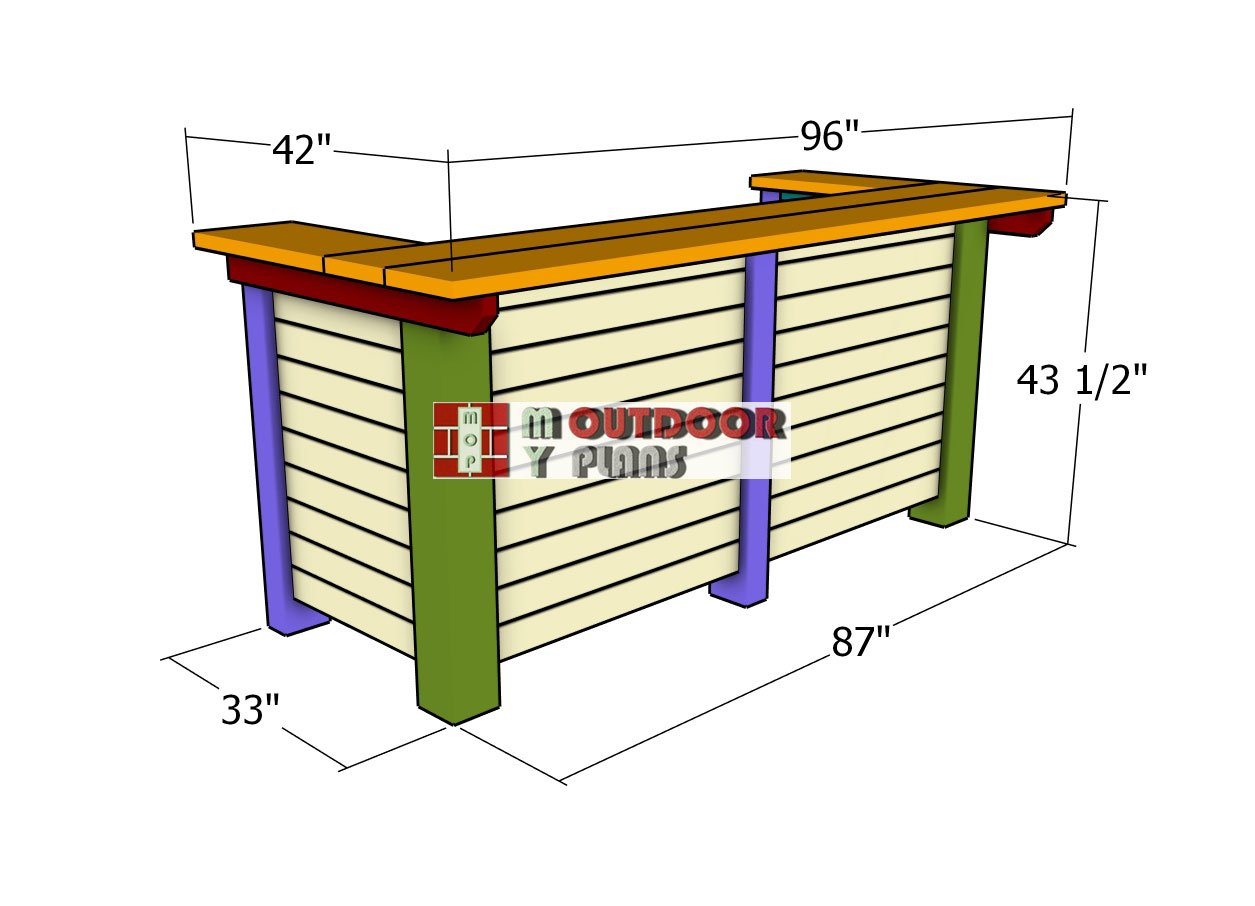
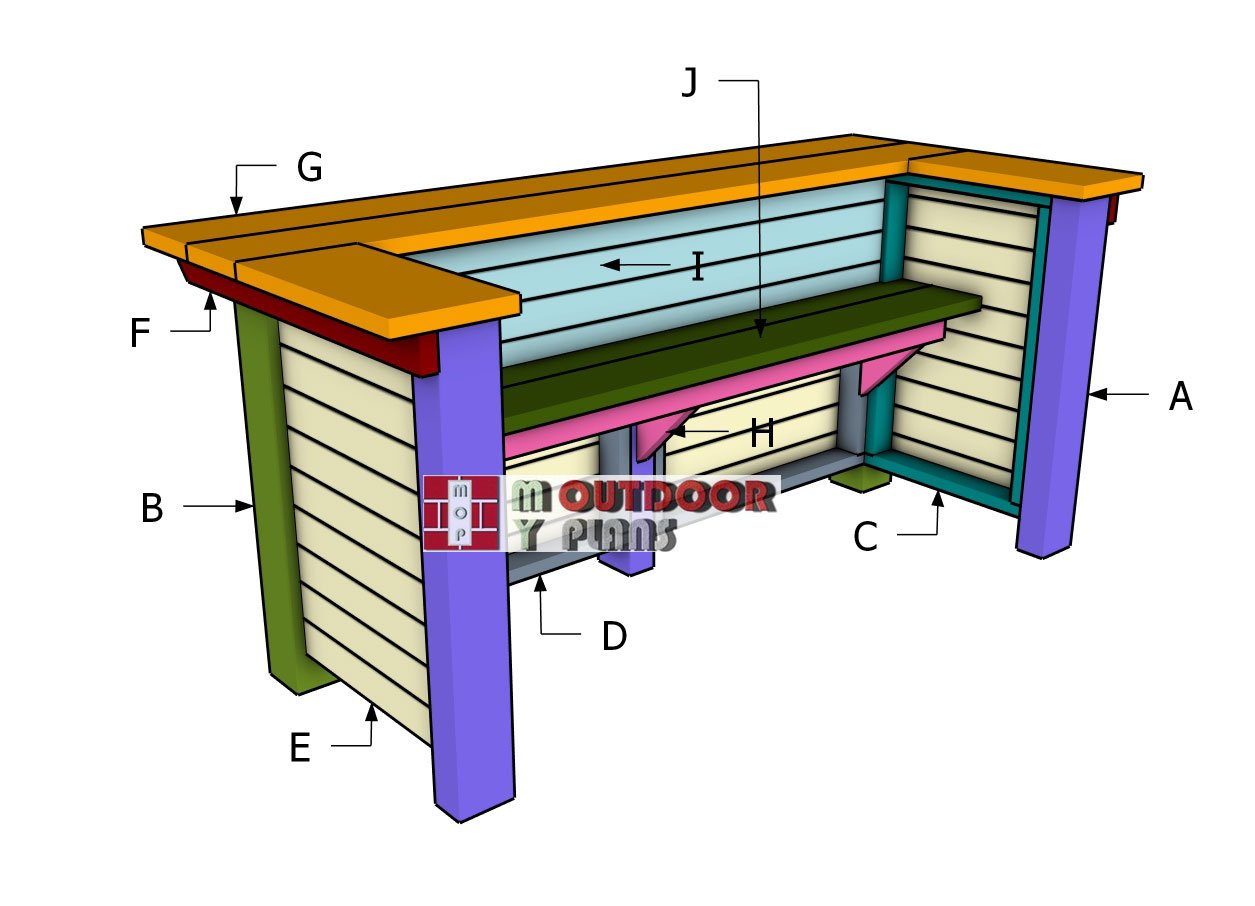
Outdoor-bar-dimensions
With the structure complete, it’s time for the finishing touches that will make your outdoor bar stand out! Sand down all surfaces to ensure they’re smooth and splinter-free, then apply a weather-resistant stain or sealant to protect against the elements and enhance the natural wood grain.
Outdoor bar – diy plans
For a pop of personality, consider adding hooks for hanging tools or a built-in bottle opener on the side. These final details will not only add durability but also give your bar a polished, professional look that’s ready for outdoor entertaining!
Wood bar
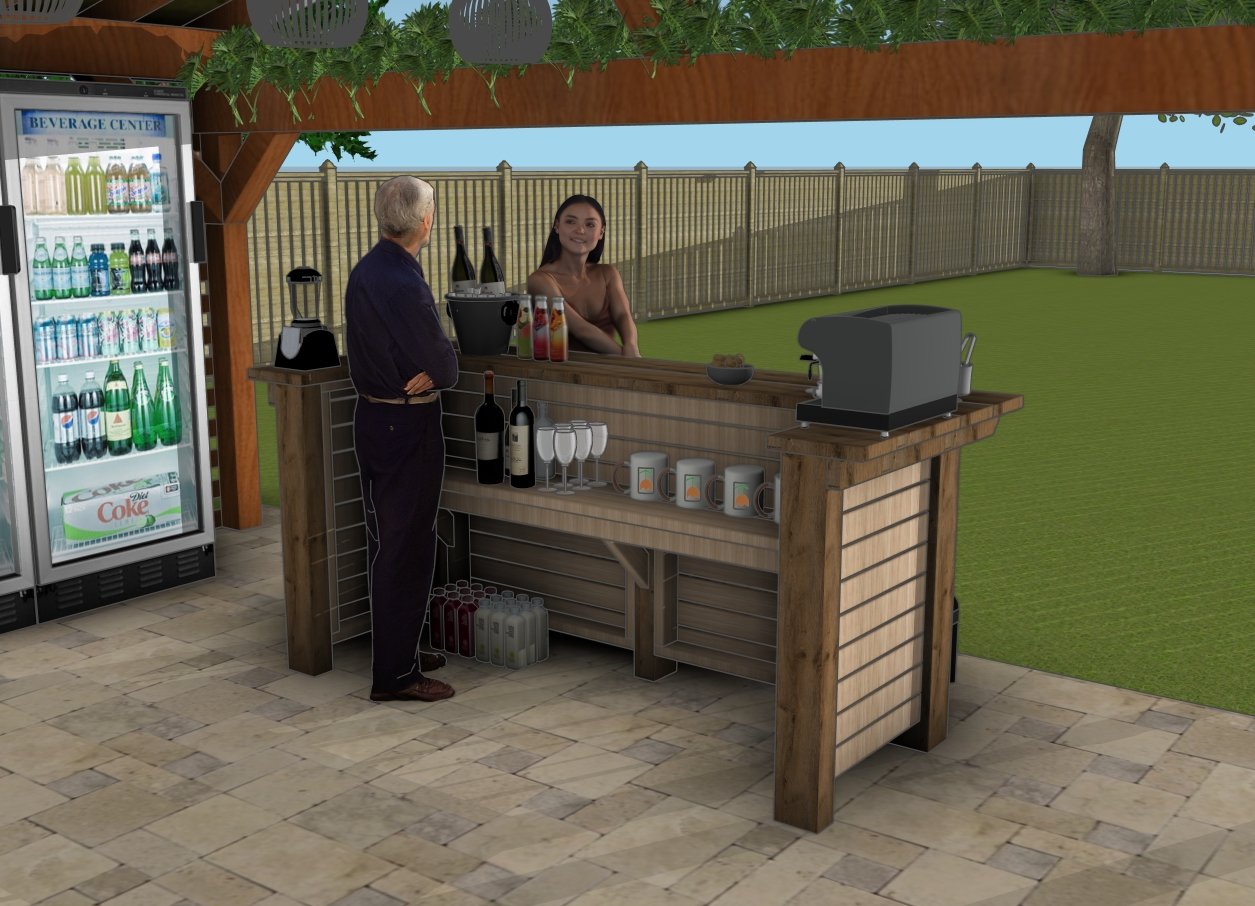
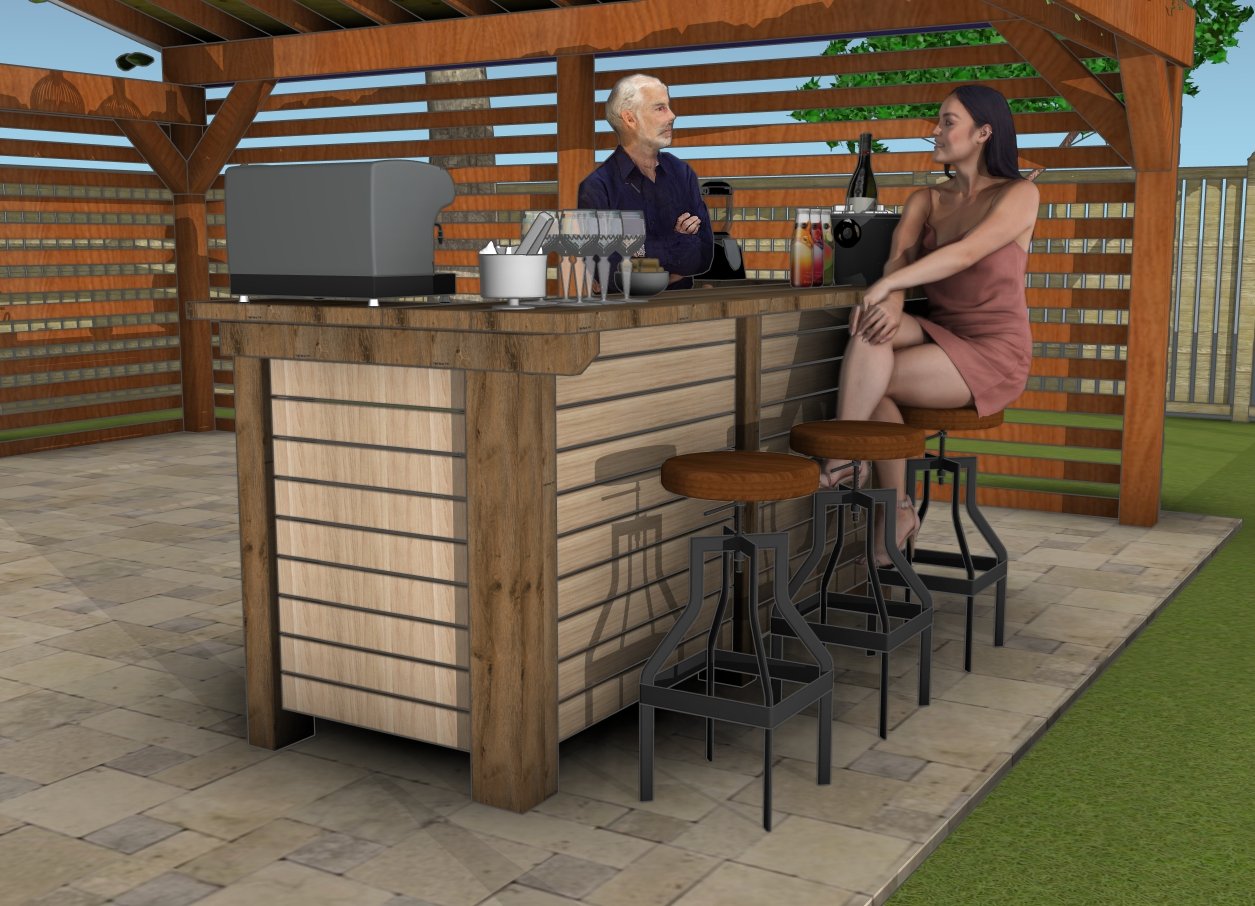
This outdoor bar is a fantastic addition to any backyard, creating a welcoming space for gatherings and casual evenings outdoors. With its sturdy build and customizable features, it’s designed to withstand the elements while adding a stylish focal point to your outdoor setup.
The spacious countertop is perfect for serving drinks or appetizers, and the lower shelf provides convenient storage for bar essentials, keeping everything you need within arm’s reach. Not only is it functional and attractive, but building it yourself adds a unique, personalized touch to your backyard oasis, making it a project you’ll be proud to show off!
How to build an outdoor bar
And there you have it: a DIY outdoor bar that’s ready to become the heart of your backyard gatherings! This project combines practicality with a touch of rustic charm, giving you a functional, stylish piece that you’ll enjoy for years to come. Whether you’re serving drinks at a summer BBQ or hosting a cozy fall gathering, this bar is built to impress. Thanks for following along, and don’t forget to check out my other woodworking plans for even more ways to enhance your outdoor space. Build your outdoor world, and cheers to new backyard adventures!
If you want to get the Premium plans with all the extras, just press the GET PREMIUM PLANS button bellow. If you want to get the free plans, just read the blog FAQs.

This woodworking project was about wooden outdoor bar – free plans. If you want to see more outdoor plans, check out the rest of our step by step projects and follow the instructions to obtain a professional result.