Building your own firewood shed doesn’t just keep your firewood dry and organized, it adds a functional, yet stylish structure to your outdoor space. In this project, we’re going to walk through how to build a 6×8 modern firewood shed that’s not only sturdy but also has a sleek design perfect for any backyard. With some basic tools, a little know-how, and some elbow grease, you’ll have a shed that looks great and keeps your firewood ready to burn all year long. Let’s dive in and get started on this build—because there’s nothing better than tackling a project that combines practicality with good design! See the rest of my firewood shed free plans HERE. Take a look over the rest of my woodworking plans, if you want to get more building inspiration. Premium Plans for this project available in the Shop.
The estimated cost for building your modern firewood shed will depend on material prices in your area, but here’s a rough estimate. For the lumber (including 2x6s for the joists, uprights, and rafters, as well as 4×4 skids for the foundation), you’re looking at about $300-$450. Add in the hardware, like rafter ties, screws, nails, and T straps, which can range from $30-$50. Factor in gravel for drainage, which will cost around $20-$30, and you’re looking at a total cost between $350 and $550 for materials. As for time, you can expect the project to take about 1 week, depending on your experience and how quickly you work through each step.
When buying the lumber, you should select the planks with great care, making sure they are straight and without any visible flaws (cracks, knots, twists, decay). Investing in cedar or other weather resistant lumber is a good idea, as it will pay off on the long run. Use a spirit level to plumb and align the components, before inserting the galvanized screws, otherwise the project won’t have a symmetrical look. If you have all the materials and tools required for the project, you could get the job done in about a day.
Projects made from these plans
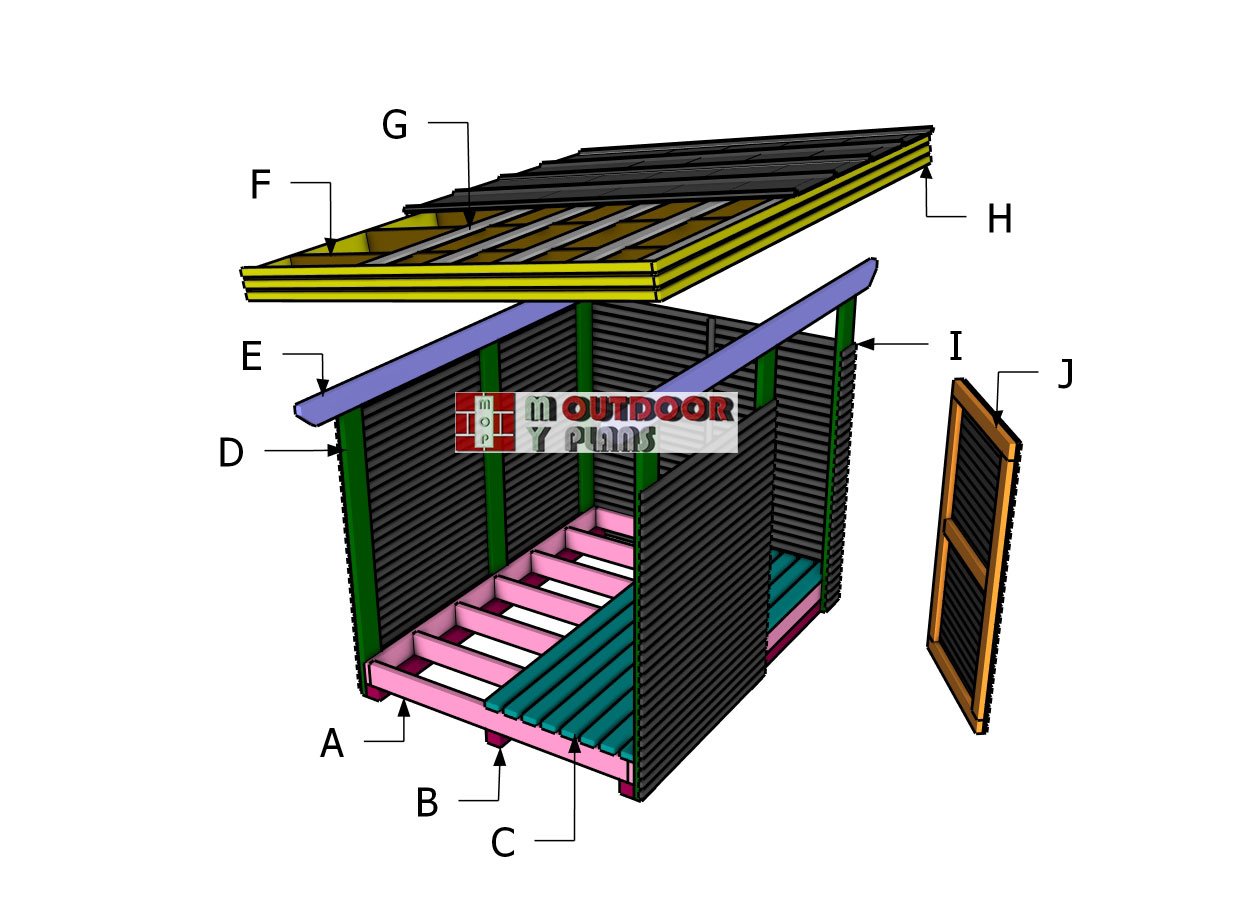
Modern 6×8 Firewood Shed – Free Plans
Building-a-6×8-wood-shed
Cut and Shopping Lists
A – 2 pieces of 2×6 lumber – 8 ft, 7 pieces – 69” FLOOR FRAME
B – 3 pieces of 4×4 lumber – 8 ft SKIDS
C – 15 pieces of 2×4 lumber – 8 ft FLOOR BOARDS
D – 3 pieces of 2×6 lumber – 82 1/2”, 3 pieces – 70 1/4” UPRIGHTS
E – 2 pieces of 2×6 lumber – 10 ft TOP BEAMS
F – 7 pieces of 2×6 lumber – 94 1/2” RAFTERS
G – 7 pieces of 1×4 lumber – 10 ft PURLINS
H – 2 pieces of 1×6 lumber – 10 ft ROOF TRIMS
H – 3 pieces of 1×2 lumber – 121 1/2” SLATS
H – 6 pieces of 1×2 lumber – 96” SLATS
- 2 pieces of 4×4 PT lumber – 8 ft
- 5 pieces of 2×6 PT lumber – 8 ft
- 7 pieces of 2×6 lumber – 8 ft
- 2 pieces of 2×6 PT lumber – 10 ft
- 5 pieces of 2×6 PT lumber – 12 ft
- 15 pieces of 2×4 PT lumber – 8 ft
- 3 pieces of 1×2 lumber – 12 ft
- 6 pieces of 1×2 lumber – 8 ft
- 2 pieces of 1×6 lumber – 10 ft
- 8 pieces of 1×4 lumber – 10 ft
- 4 pieces of 3’x8′ metal roof sheets
- 18 pieces of 3″ lag screws
- 100 pieces of 3 1/2″ screws
- 300 pieces of 2 1/2″ screws
- 200 pieces of 2″ finish nails
- 6 pieces of T straps 12″x12″
- 20 pieces of rafter ties
- 1 box of 1 1/2″ structural screws
- 1 can of paint / stain
- 1 can of outdoor glue
Tools
![]() Hammer, Tape measure, Framing square, Level
Hammer, Tape measure, Framing square, Level
![]() Miter saw, Drill machinery, Screwdriver, Sander
Miter saw, Drill machinery, Screwdriver, Sander
![]() Safety Gloves, Safety Glasses
Safety Gloves, Safety Glasses
Time
![]() One week
One week
Related
- Firewood Shed Plans
- Modern 18×20 Lean to pavilion plans
- 5×12 Firewood Shed Plans
- PART 1: Modern 6×8 Firewood Shed Plans
- PART 2: Door Plans for 6×8 Wood Shed
Pin it for later!

Step 1: Building the floor frame
Building-the-floor-frame
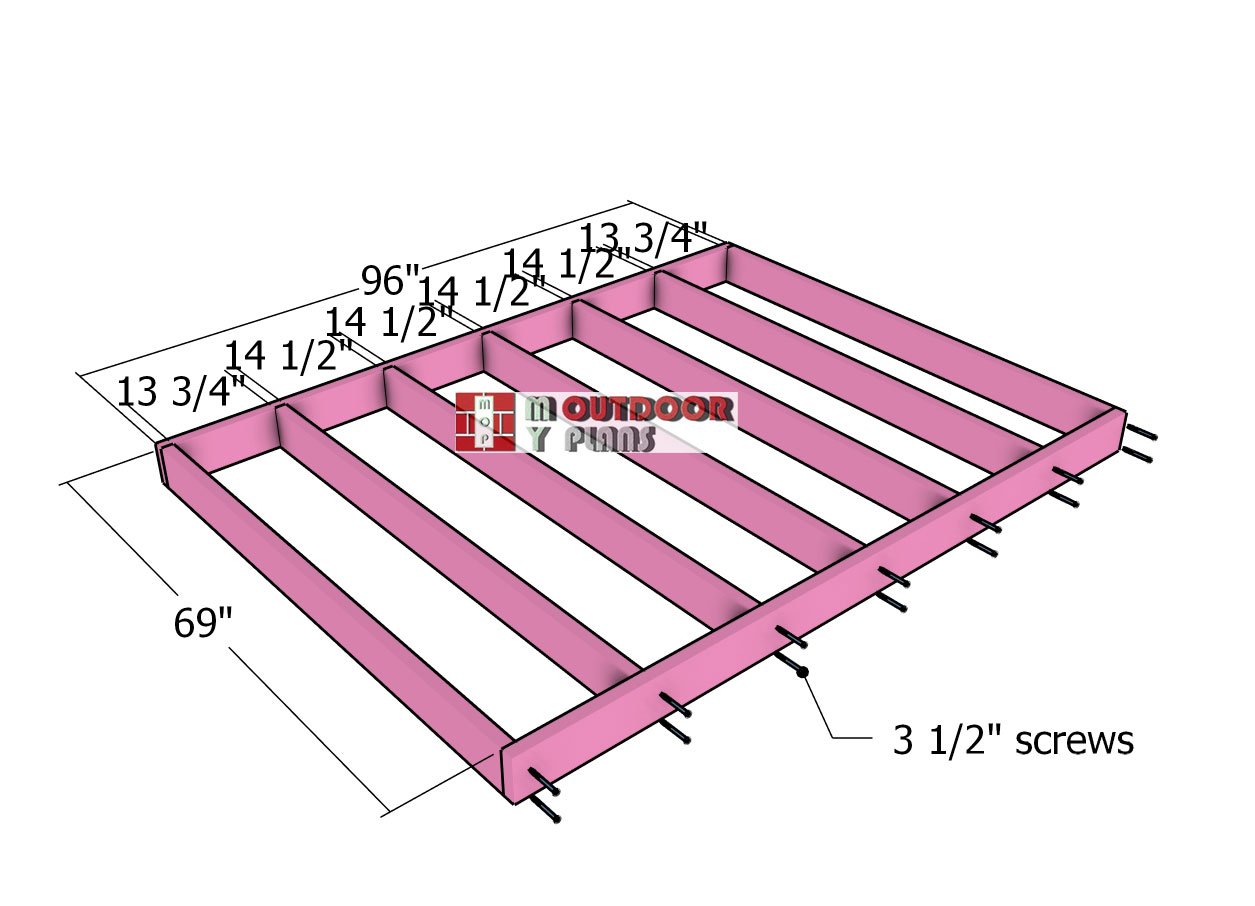
The first step to tackle in this modern firewood shed project is building the floor frame. Grab your 2×6 pressure-treated lumber and cut them down to 96” and 69”. Lay the joists out on a flat surface, making sure everything is aligned just right, with the joists spaced 16” on center.
Double-check those corners to ensure they’re square, and measure the diagonals to be sure they’re equal—it’s all in the details! Once it’s lined up, drill pilot holes through the rim joists and drive in those 3 1/2” screws to lock the floor frame into place. Let’s get this project off to a solid start!
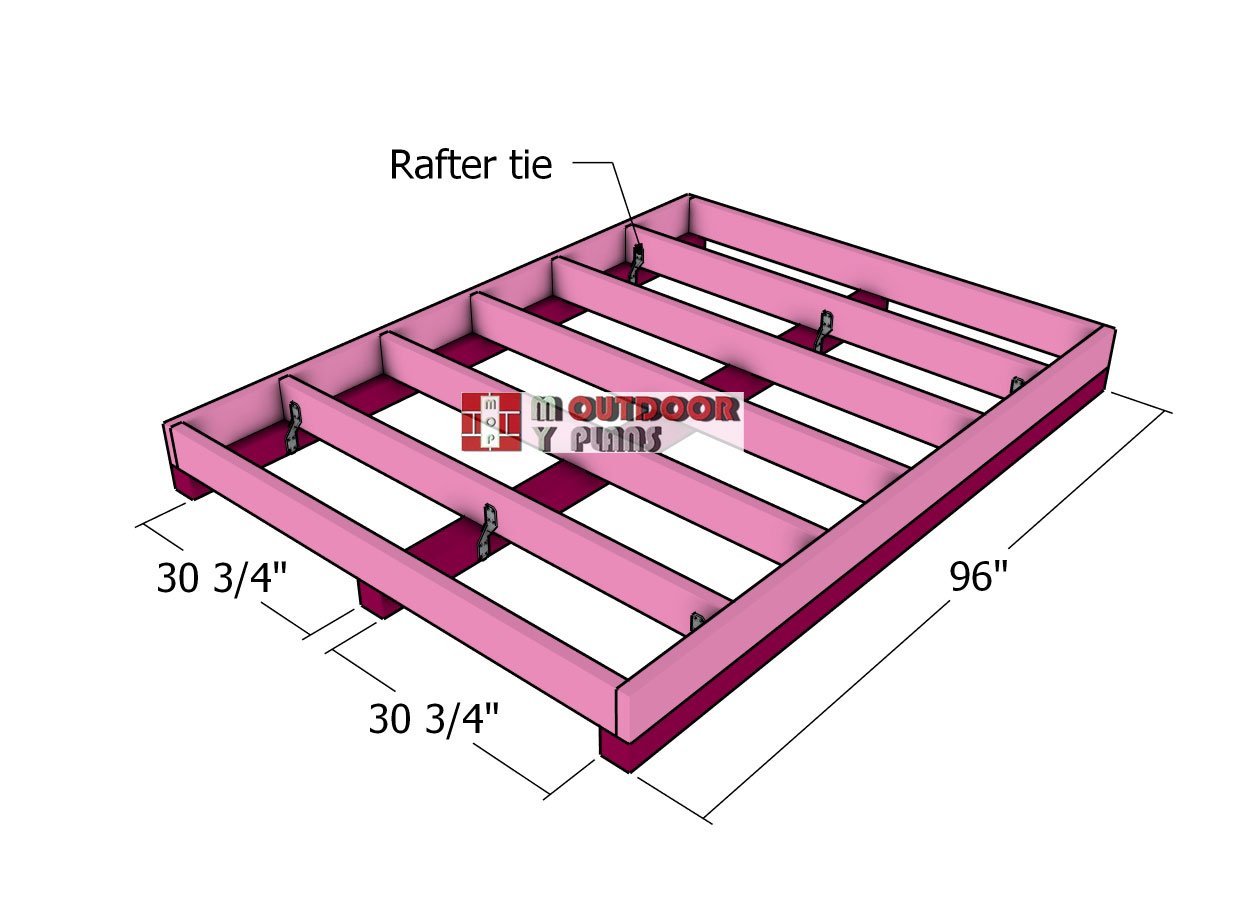
Installing-the-skids
First up, find the perfect spot for your wood shed! Once you’ve picked it, clear off the vegetation and get the surface nice and level. Lay down about 1″ of gravel—this will help with water drainage and keep things solid over time. Now, grab your 4×4 skids and position them under the floor frame, making sure the edges are flush, just like in the diagram.
To secure everything, use rafter ties and 1 1/2″ structural screws, attaching one tie at each end of the skids. This will give your shed a sturdy base to last through the seasons!
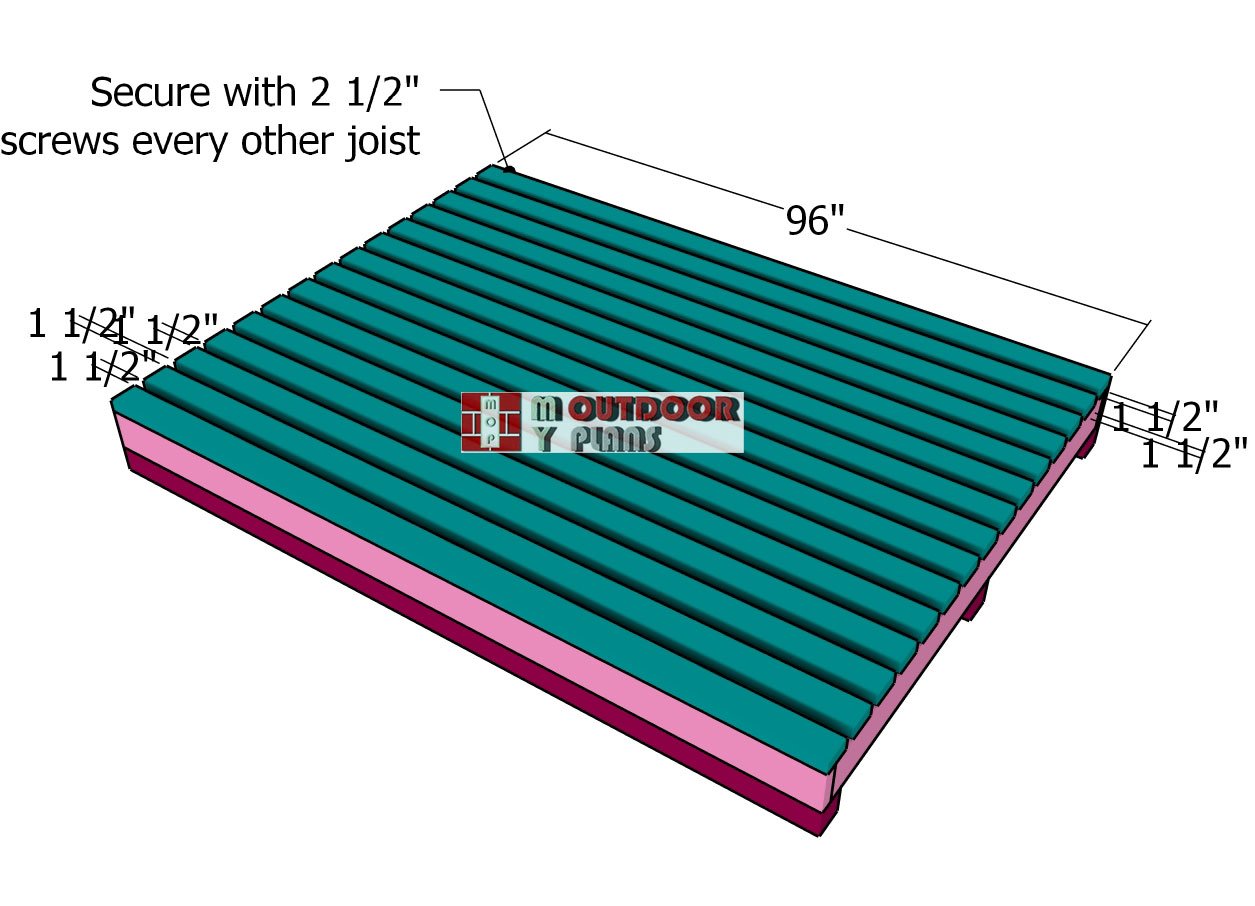
Laying-the-floor-boards
Next, it’s time to attach the 2×4 boards to the floor frame. Use 1 1/2″ spacers between the boards to keep those gaps nice and even. These gaps aren’t just for looks—they allow airflow to circulate through your firewood stacks, helping them dry out faster. Drill pilot holes and secure each board with 2 1/2″ screws, driving them into every other joist to keep everything locked down tight. This way, you’ve got a sturdy, well-ventilated base for your firewood!
Step 2: Building the Roof
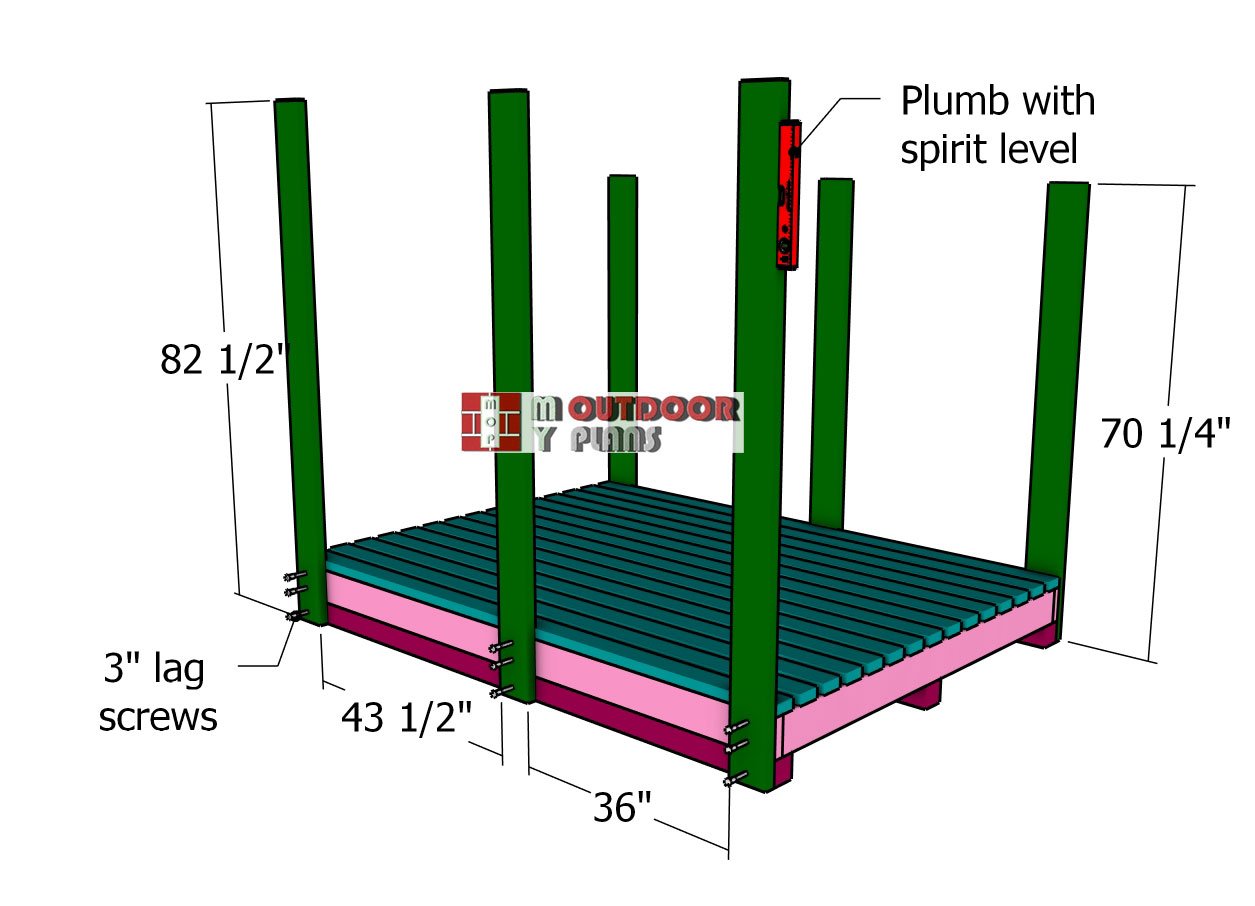
Setting-the-uprights
Now, let’s get those 2×6 uprights in place at the front and back of the shed. Since these pieces will face the elements and play a key structural role, be sure to use pressure-treated (PT) lumber. Stand the uprights and use a spirit level to make sure they’re perfectly plumb. Once they’re lined up, drill pilot holes to avoid splitting the wood, then secure them to the floor frame with 3″ lag screws. These uprights will provide a rock-solid foundation for the rest of your shed build!
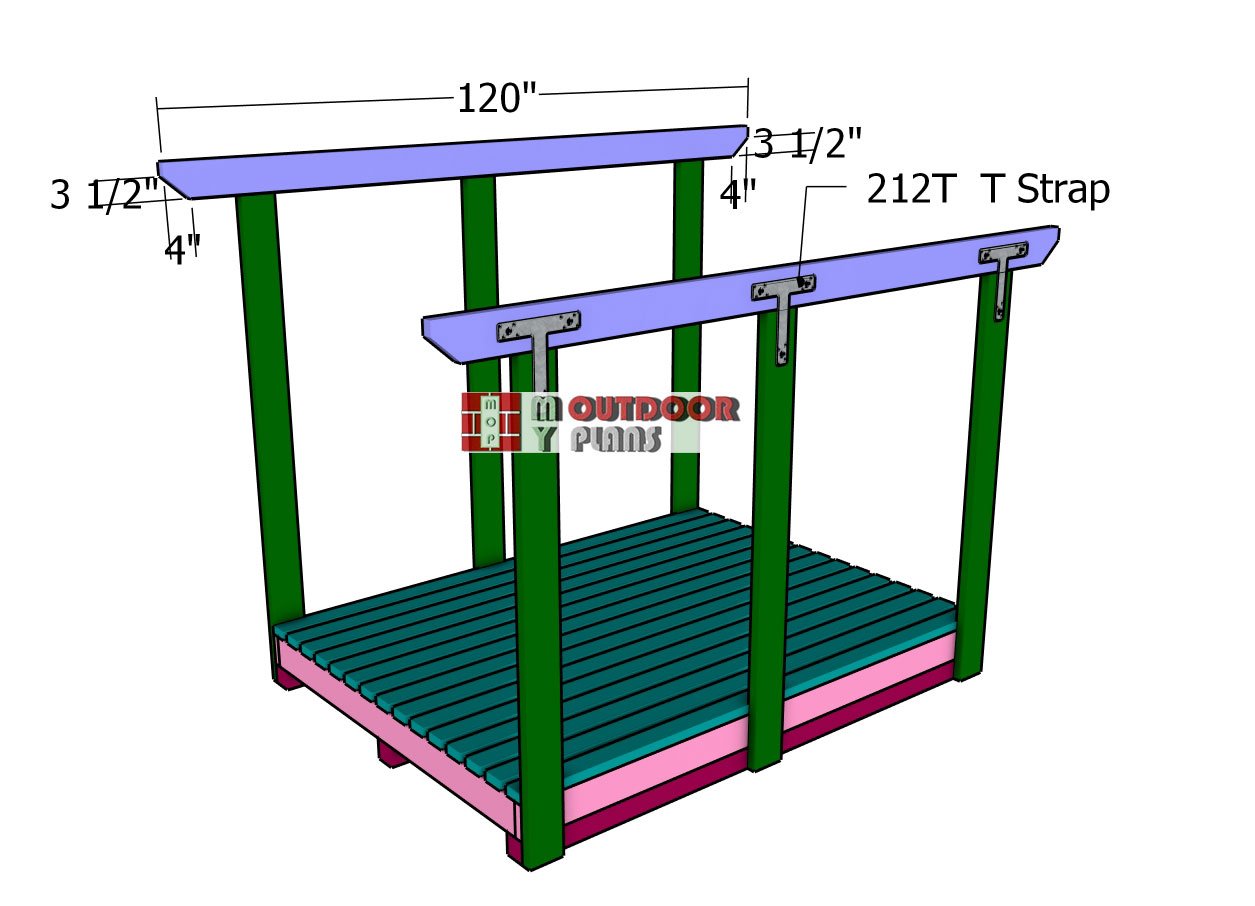
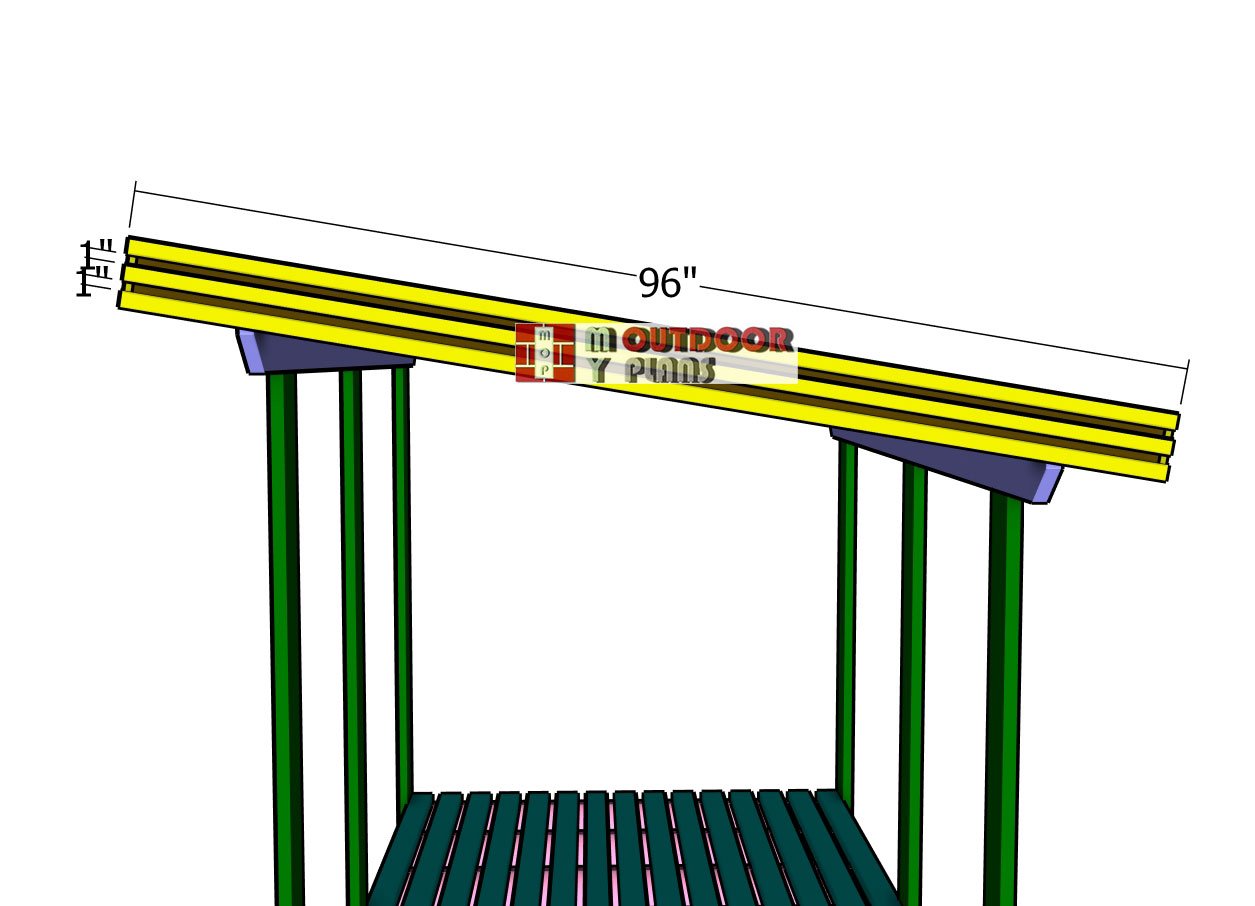
Attaching-the-support-beams
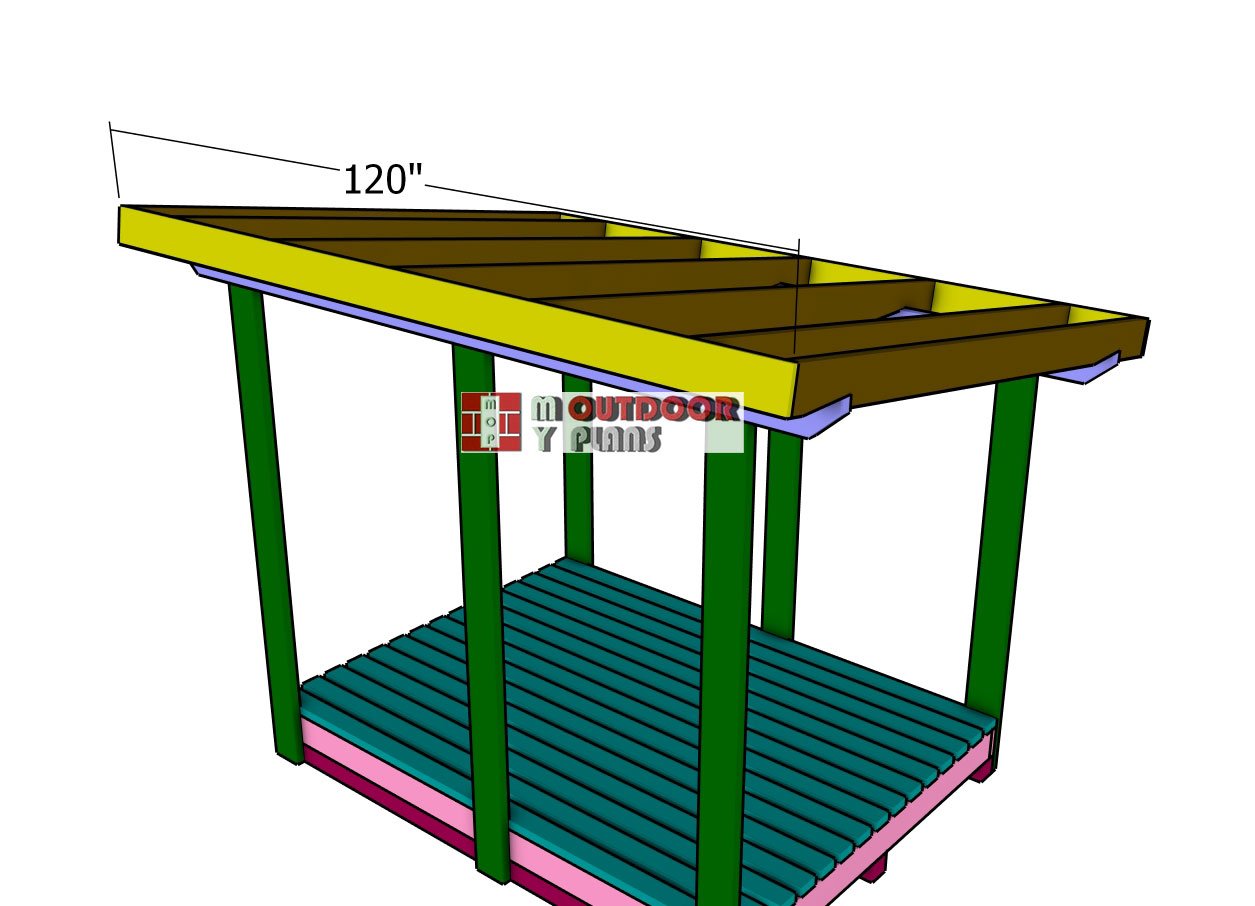
Next, it’s time to attach the 2×6 support beams to the top of the uprights. Center the beams carefully so you get a nice, even 12″ overhang on both sides—this will add both style and protection from the elements. To secure the beams, use 12″x12″ T straps and 1 1/2″ structural screws, making sure they’re snugly fastened to the uprights. Follow your firewood shed plans closely, and these beams will add strength and stability to the structure, while giving it that clean, finished look!
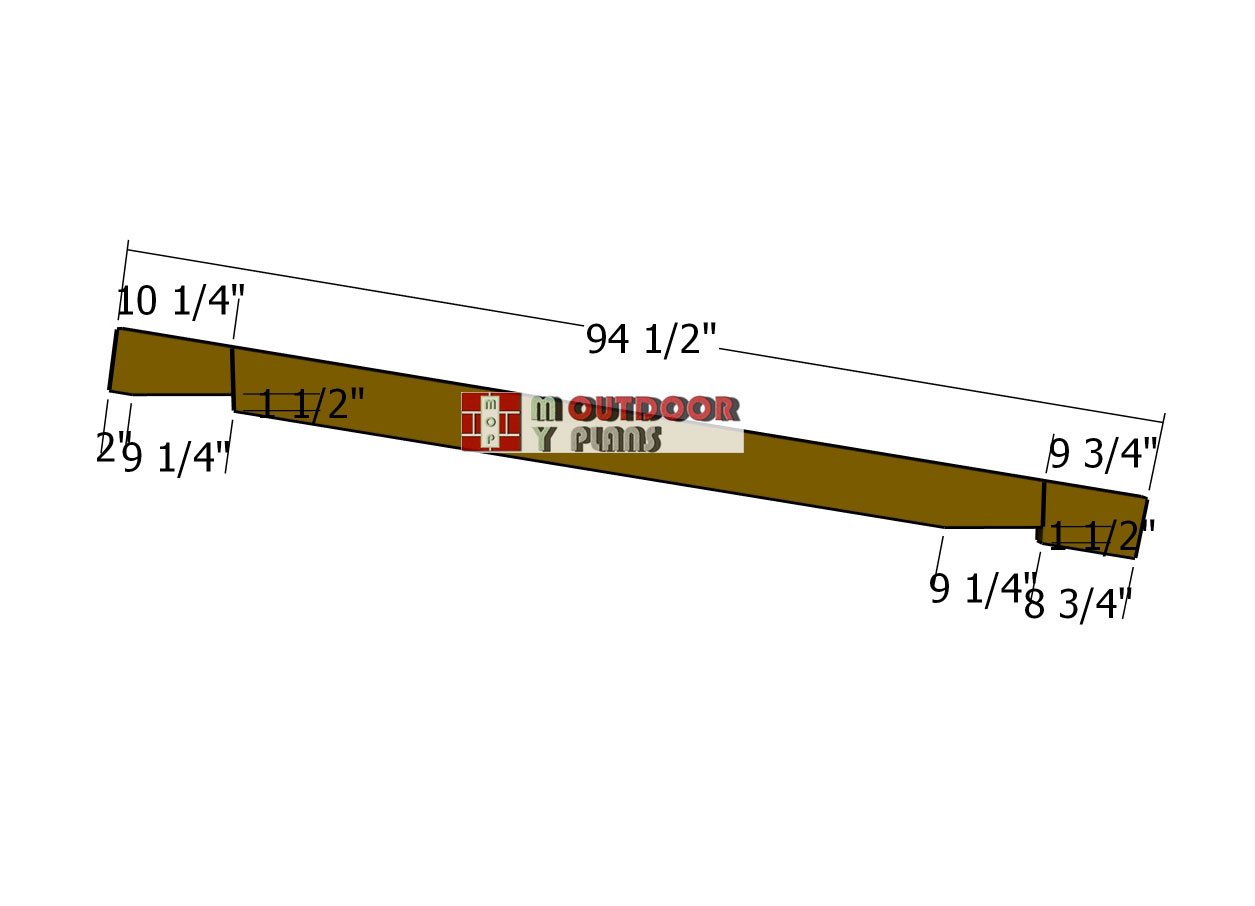
Rafters
We’re moving on to building the rafters, and for that, we’ll be using 2×6 lumber. Start by marking your cut lines directly onto the boards, following the measurements from your plans to ensure a precise fit. Once everything is marked, grab your circular saw and carefully make the cuts. Take your time, accurate cuts mean the rafters will fit perfectly, giving your firewood shed the strong roof it needs. Let’s get those rafters ready to go!
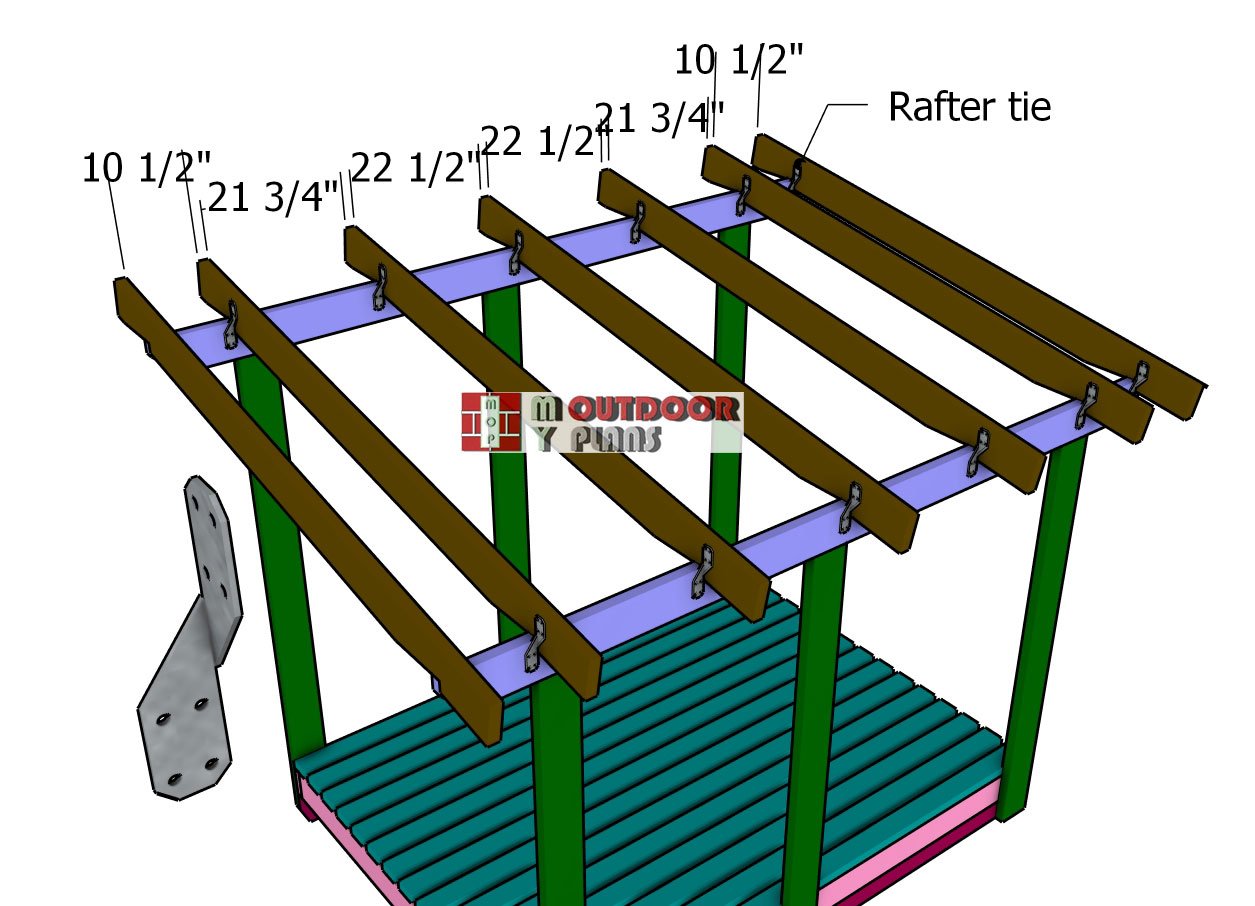
Fitting-the-rafters
Now it’s time to attach the rafters to the top of your firewood shed structure. Refer to the diagram for the exact spacing between the rafters, those measurements are key to getting everything evenly aligned. Use rafter ties and 1 1/2″ structural screws to secure each rafter to the support beams, following the layout in your plans. These ties will ensure the rafters stay locked in place, providing solid support for your roof. Once all the rafters are up, you’re one step closer to a sturdy, weatherproof firewood shed!
Front-and-back-roof-trims
Let’s finish off the roof structure by attaching the 1×6 trims to the front and back. Start by aligning the edges of the trims so they’re flush with the rafters, this will give your shed a clean, polished look. Once everything is lined up, secure the trims using 2 1/2″ screws, making sure they’re driven into each rafter for a tight fit. These trims not only add a nice finishing touch but also help protect the ends of the rafters, giving your shed extra durability against the elements.
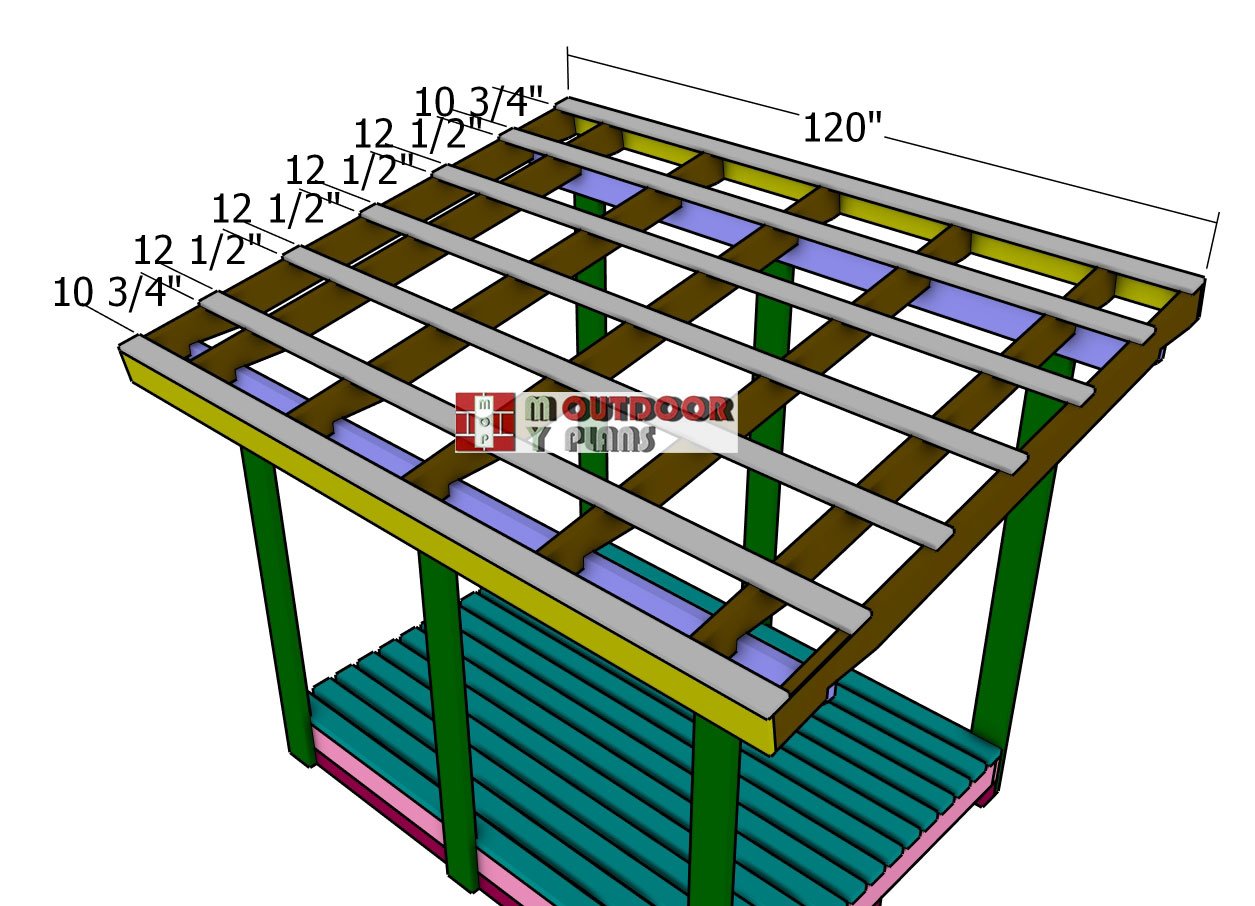
Attaching-the-purlins
Next, attach the 1×4 purlins to the top of the lean-to roof. Space the purlins evenly, placing them 16″ on center, and secure each one with 2 1/2″ screws. Make sure the edges are flush at both ends for a clean, professional finish. These purlins will provide solid support for the metal roofing sheets, ensuring they stay securely in place while adding durability to your roof structure.
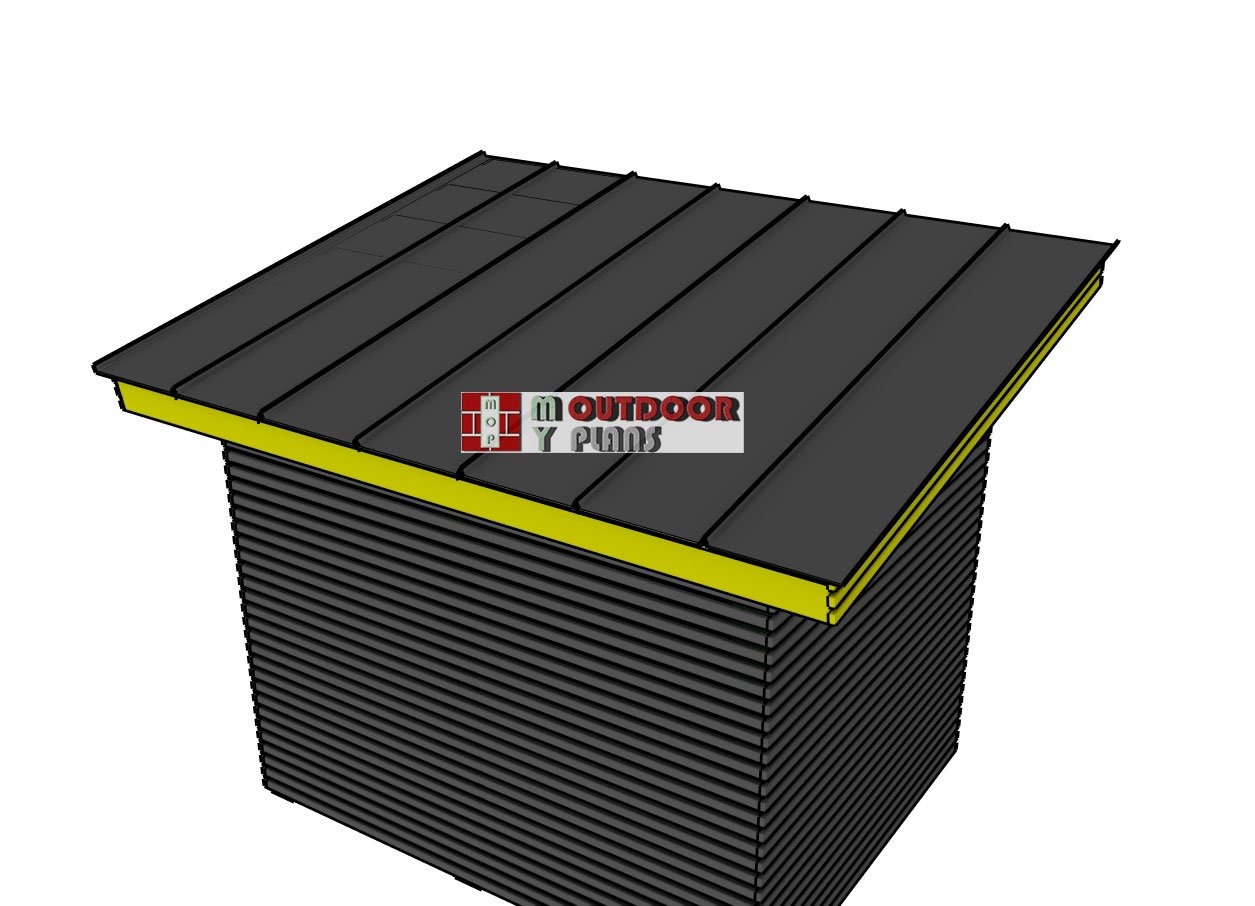
Roofing-sheets
To fit the metal roofing sheets, start by aligning the first sheet at the bottom edge of the roof, ensuring it overhangs slightly for water runoff. Secure the sheet to the purlins using roofing screws with rubber washers, placing screws about every 8-12 inches along the purlins to hold it firmly in place.
As you add each additional sheet, overlap the edges by at least one corrugation to create a tight seal and prevent leaks. Continue this process, working your way up the roof. Be sure to check that the sheets are aligned evenly as you go, and trim any excess at the edges if needed for a clean, finished look.
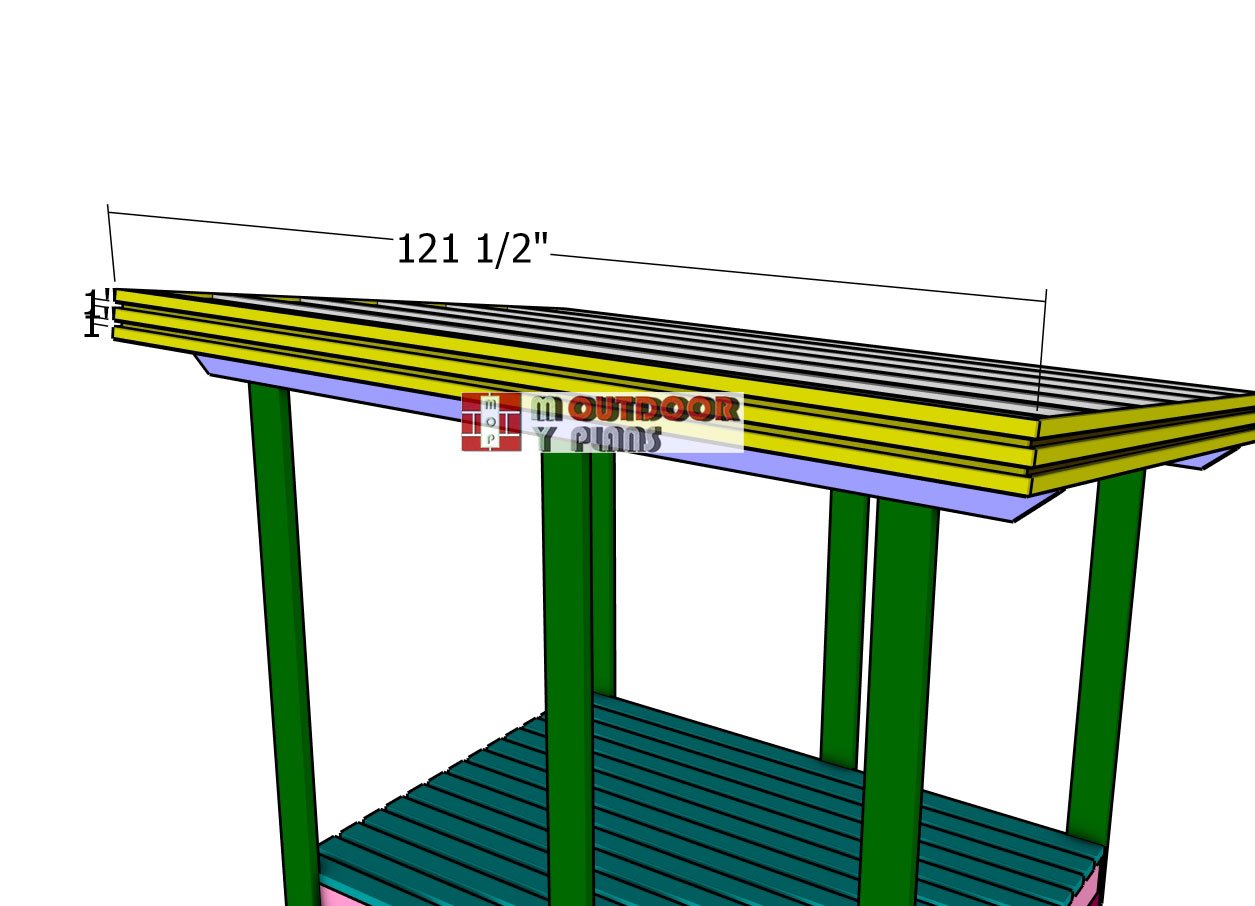
Side-roof-slats
Now, it’s time to add some style by fitting the 1×2 slats to the sides of the roof. Use 1″ spacers between the slats to keep the gaps even, which will create that modern, distinctive look for your project. Once everything is positioned, secure the slats with 2″ nails, making sure they’re firmly attached to the structure. These slats not only elevate the design but also help tie the whole look together, giving your shed a sleek and polished finish.
Front-roof-slats
Repeat the same process on the front of the shed to complete the look. Attach the 1×2 slats using 2″ nails, ensuring each slat is securely fastened. Don’t forget to use the 1″ spacers between the slats to maintain that clean, consistent gap. Once everything is in place, you’ll have a cohesive, modern finish that ties the whole structure together beautifully!
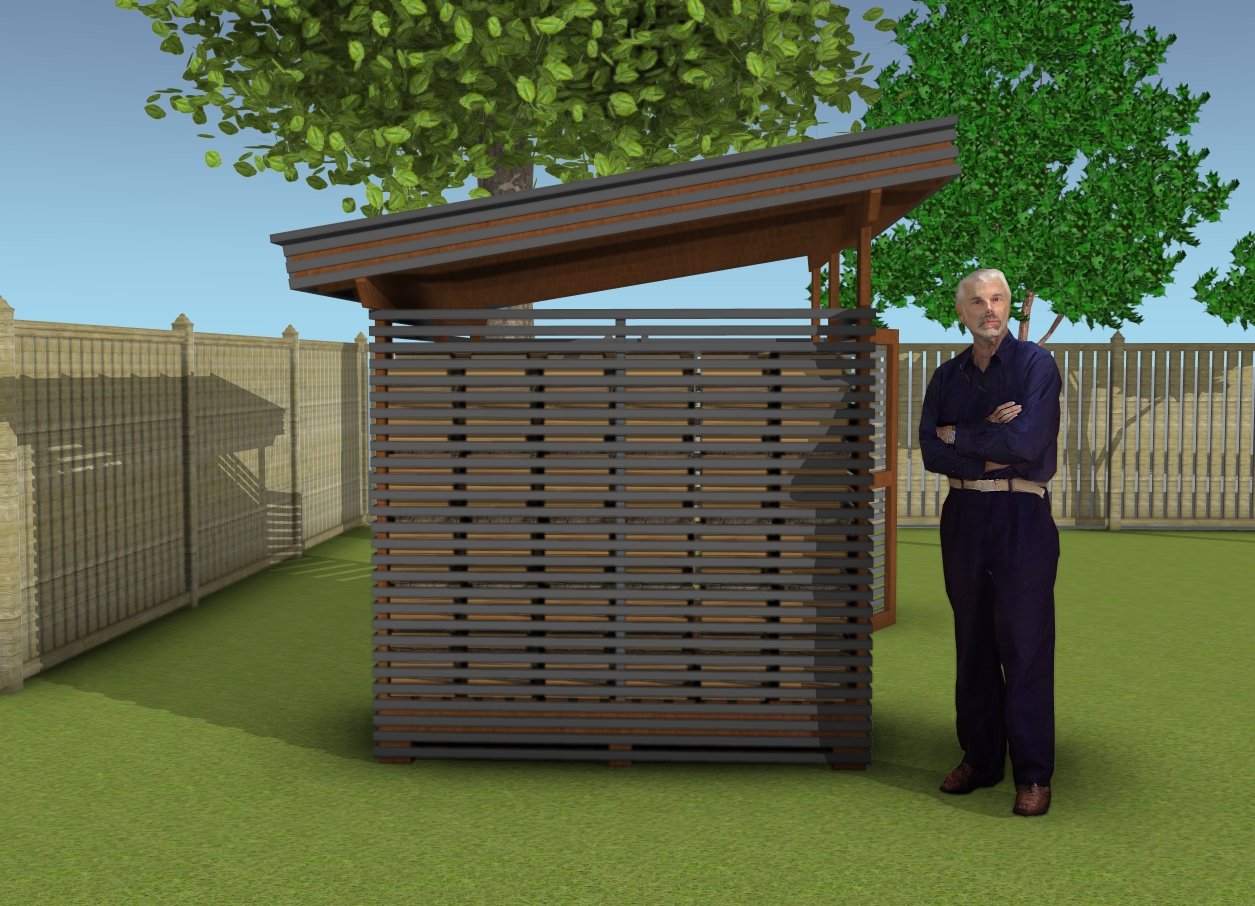
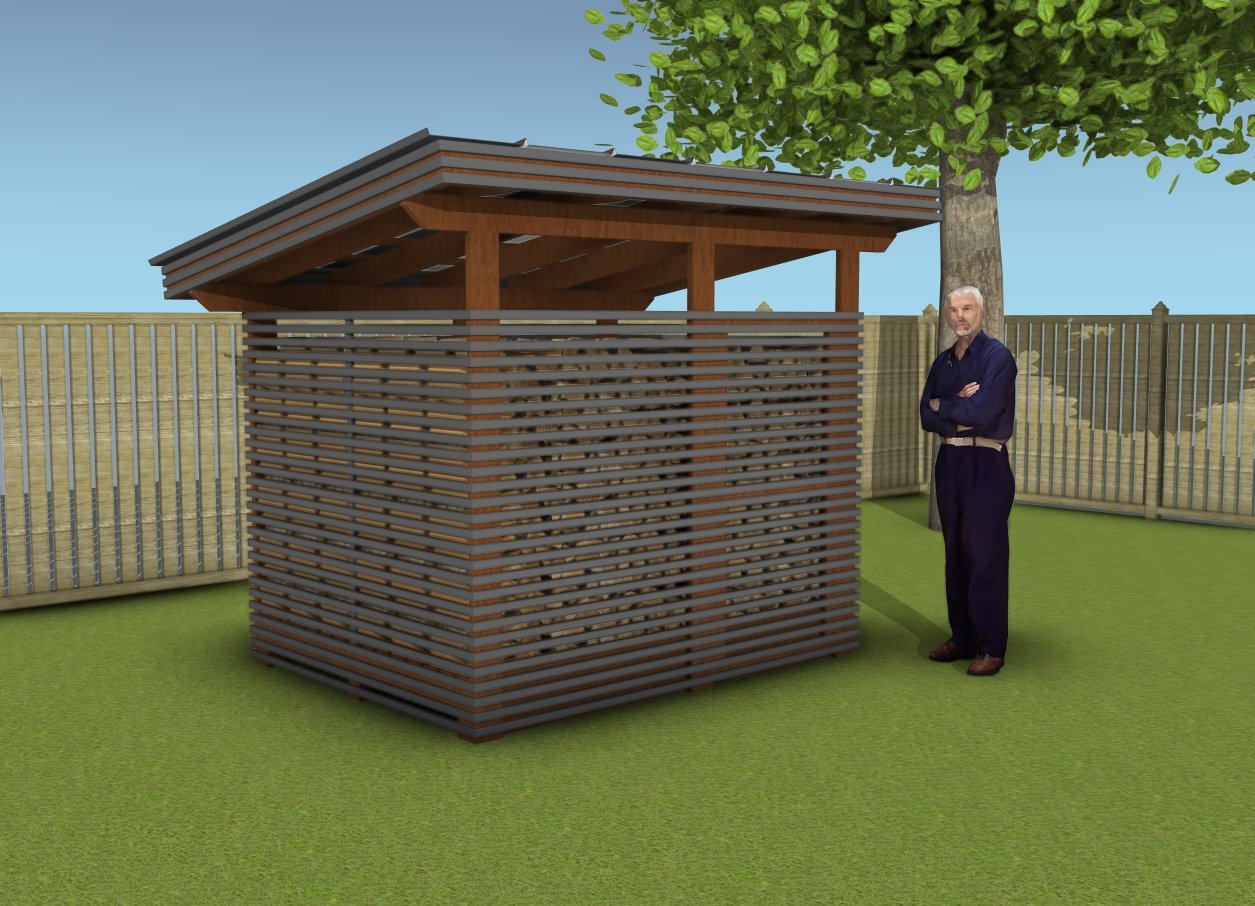
Side view – 6×8 wood storage shed
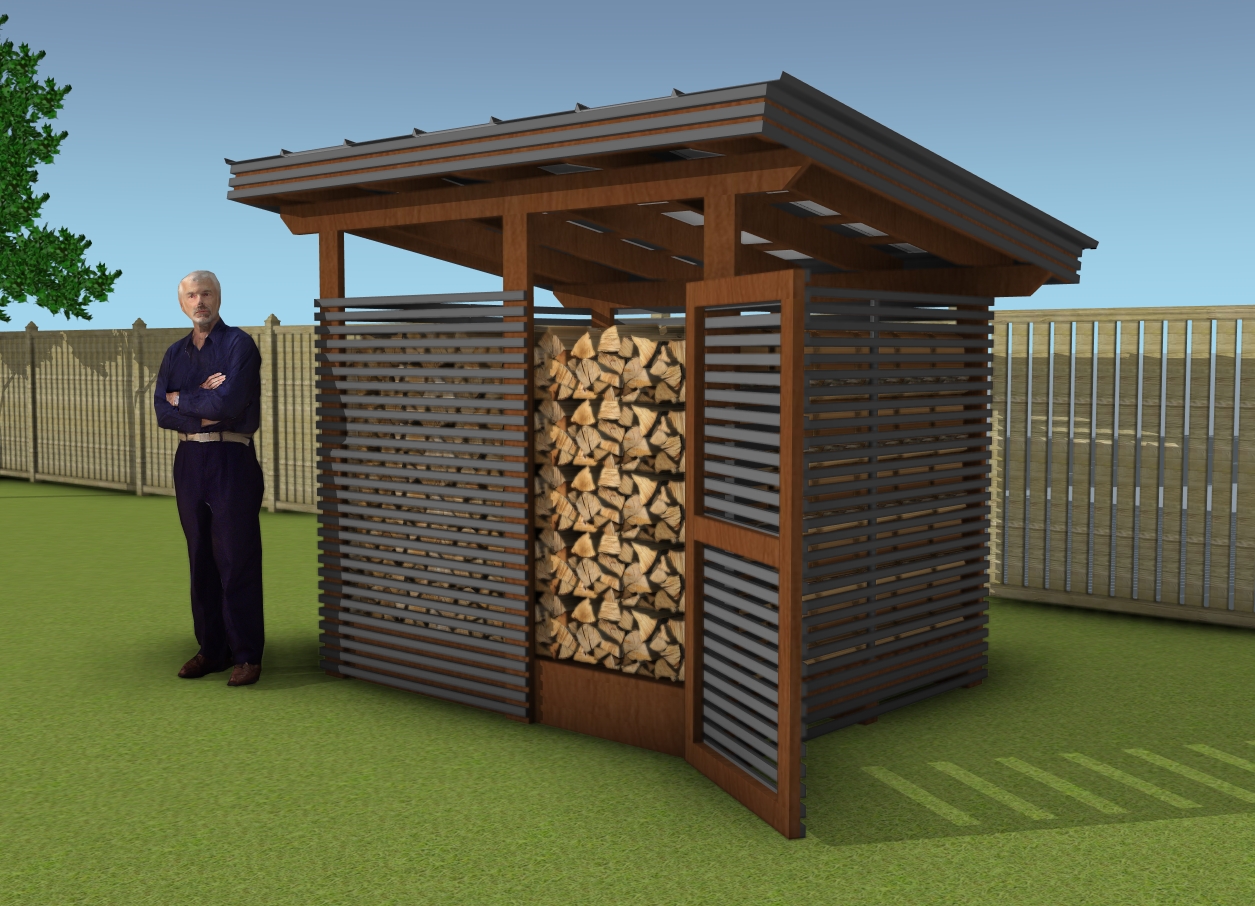
This modern firewood shed is not only stylish but incredibly functional, with enough space to hold up to 2 cords of firewood, keeping your wood dry and neatly organized. The sleek lean-to roof features a 2:12 pitch, perfect for shedding rain and snow, while maintaining a low-profile, modern aesthetic that fits right into any backyard.
The design allows for excellent airflow, helping your firewood dry faster, and the durable structure ensures it’ll stand strong for years to come. Whether you’re prepping for winter or just need a clean, organized solution, this project adds both practicality and a touch of modern design to your outdoor space.
How to build a 6×8 modern firewood shed
Modern 6×8 firewood shed plans
Now that we’ve laid the foundation and framed the structure for this modern firewood shed, the fun is just getting started! In PART 2, we’ll dive into building the door and adding the finishing touches that give the shed its sleek, modern look—specifically, fitting the slats to the exterior. This next phase is where your shed truly comes to life, combining functionality with style. So, if you’re ready to see how to complete this build and add those eye-catching details, don’t miss PART 2 where we wrap it all up and take this project to the next level!
If you want to get Premium Plans, just press the GET PDF PLANS bellow. If you want to get the free version, please read the blog FAQs.

This woodworking project was about 6×8 firewood shed plans. If you want to see more outdoor plans, check out the rest of our step by step projects and follow the instructions to obtain a professional result.

2 comments
This looks like fun to build and can not wait to get started
I’m glad you’re excited to get started. It’s definitely a rewarding project, and I’m confident you’ll enjoy the process. If you have any questions along the way, feel free to reach out.