Ready to take your backyard game up a notch? Let’s dive into building a 4×8 lean-to shed that’s as practical as it is stylish! This DIY project is perfect for creating some extra storage space while sharpening your woodworking skills. Whether you’re storing tools or garden supplies, this step-by-step guide will walk you through the process with ease. Grab your tools and let’s get building!
Building this 4×8 lean-to shed with a side door is a project you can comfortably tackle over a weekend with some basic tools and DIY know-how. In terms of cost, depending on the materials you choose—like plywood, siding, and hardware—you’re looking at a ballpark range of around $500 to $700. This estimate includes the lumber, roofing materials, siding, and fasteners, but you can adjust based on your local prices and any upgrades you want to make. It’s an affordable way to add functional storage space while keeping the budget in check!
When buying the lumber, you should select the planks with great care, making sure they are straight and without any visible flaws (cracks, knots, twists, decay). Investing in cedar or other weather resistant lumber is a good idea, as it will pay off on the long run. Use a spirit level to plumb and align the components, before inserting the galvanized screws, otherwise the project won’t have a symmetrical look. If you have all the materials and tools required for the project, you could get the job done in about a day. See all my Premium Plans HERE.
Projects made from these plans
4×8 Lean to Shed with Side Door Plans
Building-a-4×8-lean-to-shed
Cut + Shopping Lists
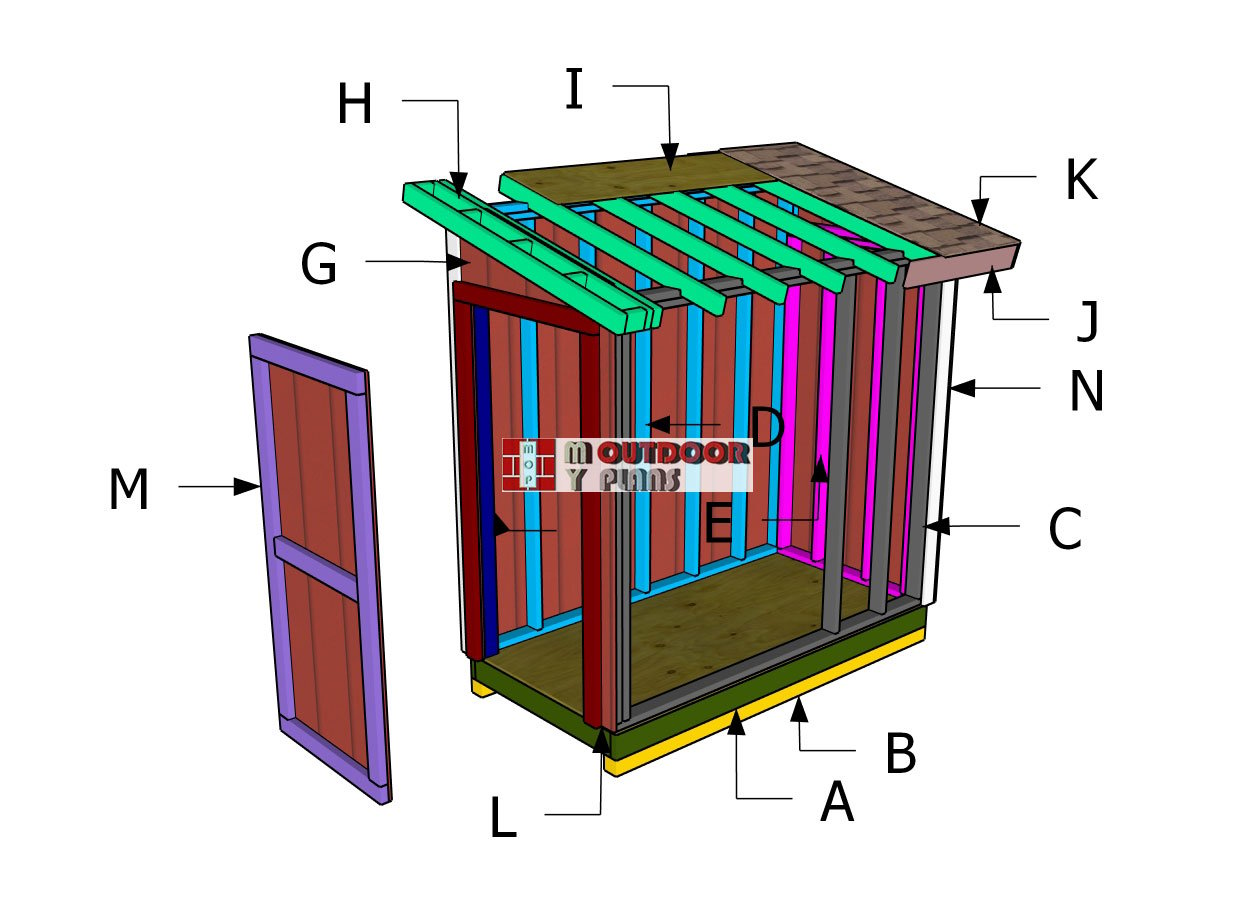
- A – FLOOR FRAME – 2×6 lumber 96″ – 2 pieces
- A – FLOOR FRAME – 2×6 lumber 45″ – 7 pieces
- B – SKIDS – 4×4 lumber 96″ – 2 pieces
- B – FLOOR – 3/4″ plywood 4’x8′ – 1 piece
- C – SHORT SIDE WALL – 2×4 lumber 96″ – 2 pieces
- C – SHORT SIDE WALL – 2×4 lumber 89″ – 1 piece
- C – SHORT SIDE WALL – 2×4 lumber 79 1/2″ – 9 pieces
- D – TALL SIDE WALL – 2×4 lumber 96″ – 3 pieces
- D – TALL SIDE WALL – 2×4 lumber 90 1/2″ – 9 pieces
- E – BACK WALL – 2×4 lumber 41″ – 2 pieces
- E – BACK WALL – 2×4 lumber 44 1/2″ – 1 piece
- E – BACK WALL – 2×4 lumber 79 1/2″ – 4 pieces
- F – FRONT WALL – 2×4 lumber 44 1/2″ – 1 piece
- F – FRONT WALL – 2×4 lumber 41″ – 1 piece
- F – FRONT WALL – 2×4 lumber 79 1/2″ – 2 pieces
- F – FRONT WALL – 2×4 lumber 81″ – 1 piece
- F – FRONT WALL – 2×4 lumber 3 1/2″ – 1 piece
- F – FRONT WALL – 2×4 lumber 36″ – 2 pieces
- G – SIDING – 5/8″ T1-11 siding sheets 4’x7′ – 2 pieces
- G – SIDING – 5/8″ T1-11 siding sheets 4’x95″ – 2 pieces
- 2×4 lumber 8 ft – 35 pieces
- 2×6 lumber 8 ft – 6 pieces
- 4×4 lumber 8 ft- 2 pieces
- 3/4″ plywood 4’x8′ – 1 piece
- 1/2″ plywood 4’x4′ – 1 piece
- 5/8″ T1-11 siding 4’x8′ – 4 pieces
- 200 pieces of 3 1/2″ screws
- 200 pieces of 1 5/8″ screws
- 200 pieces of 6d nails
- rafter ties – 4 pieces
- 1 box of 1 1/2″ structural screws
Tool
![]() Hammer, Tape measure, Framing square, Level
Hammer, Tape measure, Framing square, Level
![]() Miter saw, Drill machinery, Screwdriver, Sander
Miter saw, Drill machinery, Screwdriver, Sander
![]() Safety Gloves, Safety Glasses
Safety Gloves, Safety Glasses
Time
![]() One weekend
One weekend
Related
- PART 1: 4×8 Lean to Shed Plans
- PART 2: 4×8 Lean to Shed Roof Plans
- Trash shed plans
- 4×4 Lean to shed plans
Pin it for later!
Step 1: Building the shed floor
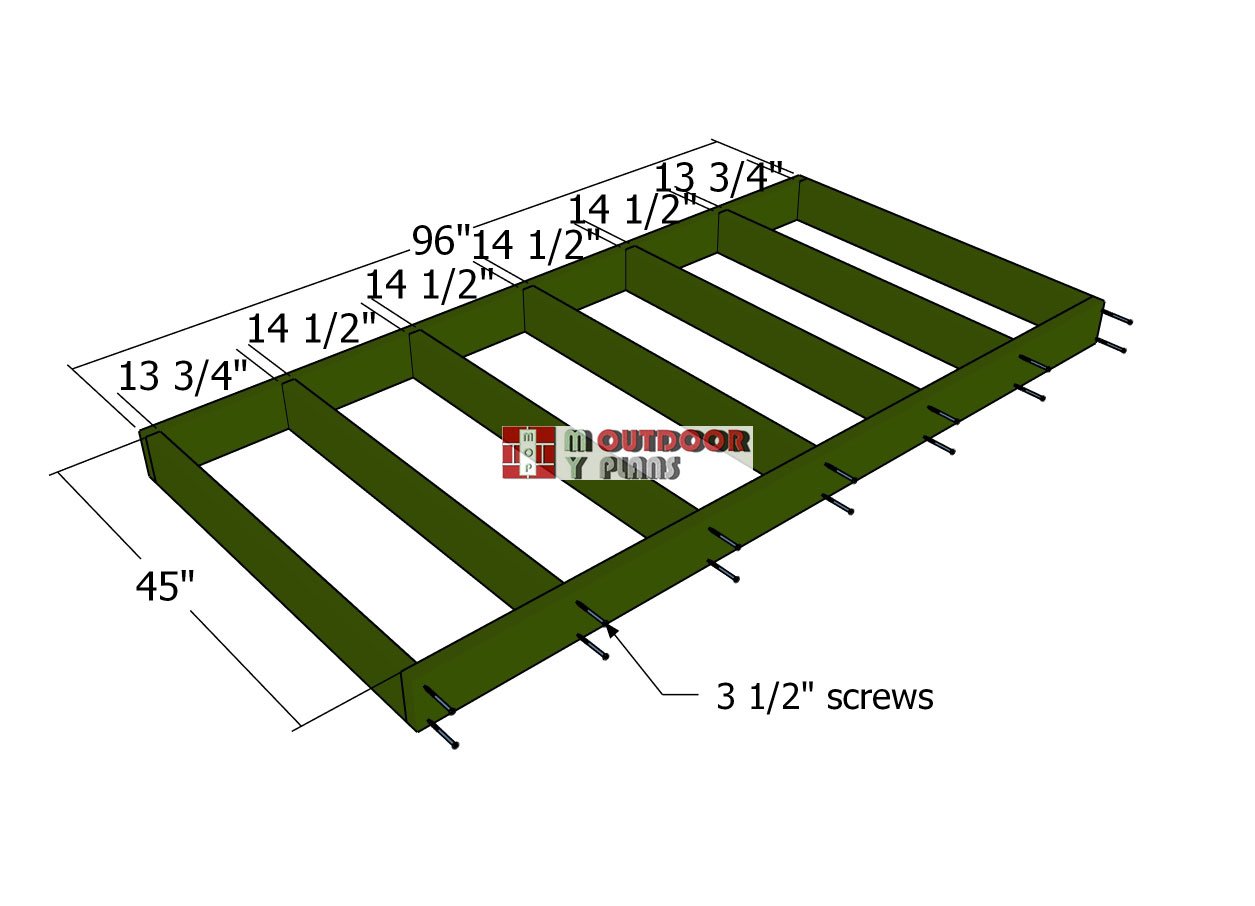
Assembling-the-floor-frame
The first step in building your shed is to construct the floor frame. Start by cutting the joists from 2×6 lumber and laying them out on a level surface. Drill pilot holes through the rim joists, then secure them to the perpendicular joists using 3 1/2″ screws.
Be sure to space the joists 16 inches apart, on center, for proper support. Don’t forget to measure the diagonals and adjust as needed until they are equal—this will ensure your frame is square and ready for the next steps.
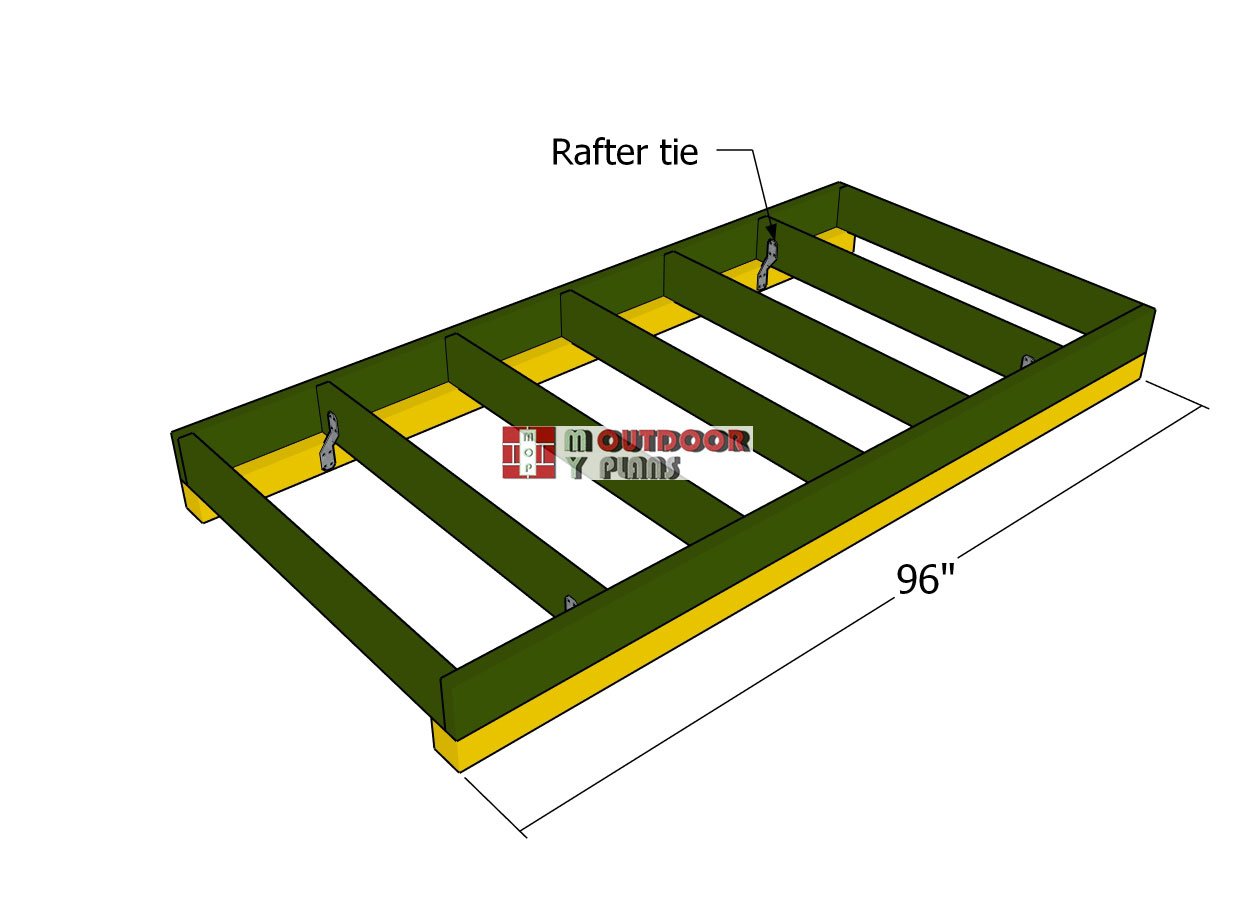
Fitting-the-skids
Next, fit the 4×4 skids beneath the floor frame to provide a strong foundation. Secure each skid in place using rafter ties and 1 1/2″ structural screws. Attach two ties to each skid—one at each end—following the layout in the diagram. This step ensures that your shed’s foundation is stable and durable, ready to support the structure for years to come.

Fitting-the-floor-sheet
Now, attach the 3/4″ plywood sheet to the floor frame, making sure the edges are perfectly flush. Secure the plywood in place using 1 5/8″ screws, spaced every 8 inches along the framing for a strong and sturdy surface. This step creates a solid base for the shed, providing both durability and a smooth platform to build upon.
Step 2: Building the shed walls
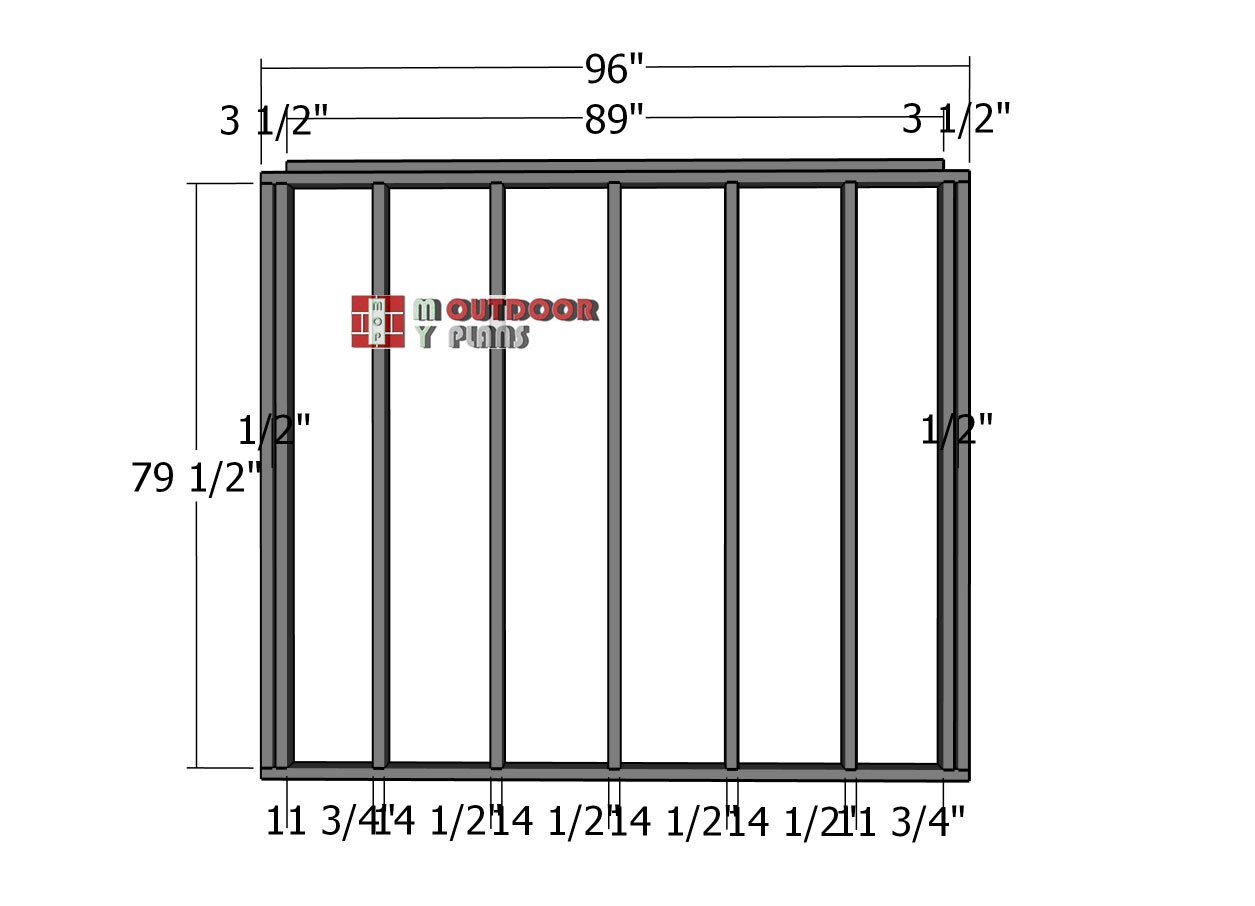
Short-side-wall-frame
The next step is to assemble the wall frames, starting with the short side wall. Begin by cutting all the components according to the measurements in the diagram and laying them out on a level surface. Drill pilot holes through the top and bottom plates, and secure the studs to the plates using 3 1/2″ screws.
Use two screws at each joint to ensure a strong connection. Be sure to note the double studs at both ends of the wall frame, and fit a piece of 1/2″ plywood between the double studs as shown in the diagram. This will add extra strength to the structure.
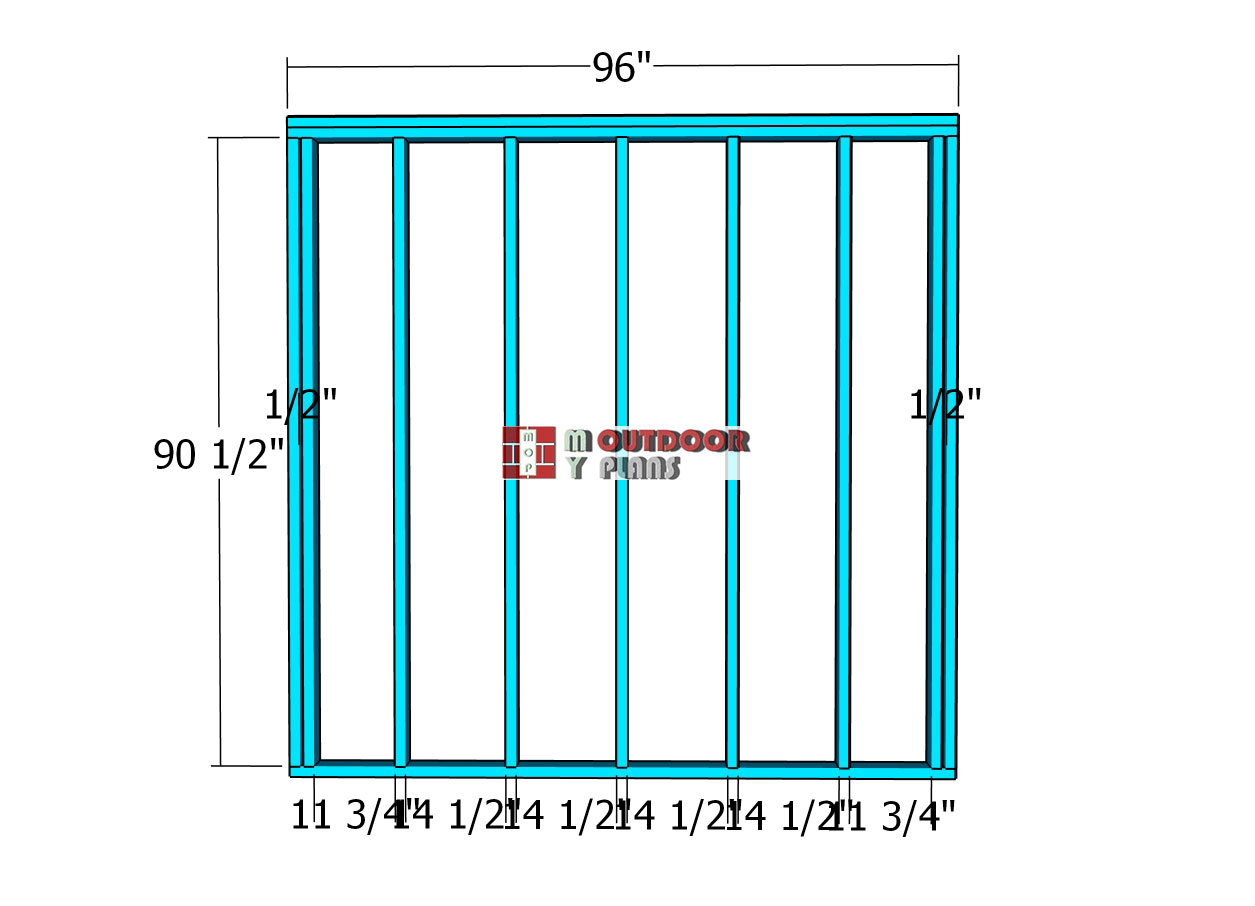
Tall-wall-frame
Next, build the opposite wall for the lean-to storage shed. Cut and lay out the studs, making sure they’re spaced 16 inches on center for proper support. Follow the same process as before: drill pilot holes through the top and bottom plates, and secure the studs with 3 1/2″ screws. This consistent spacing and solid construction will provide a strong framework for the shed.
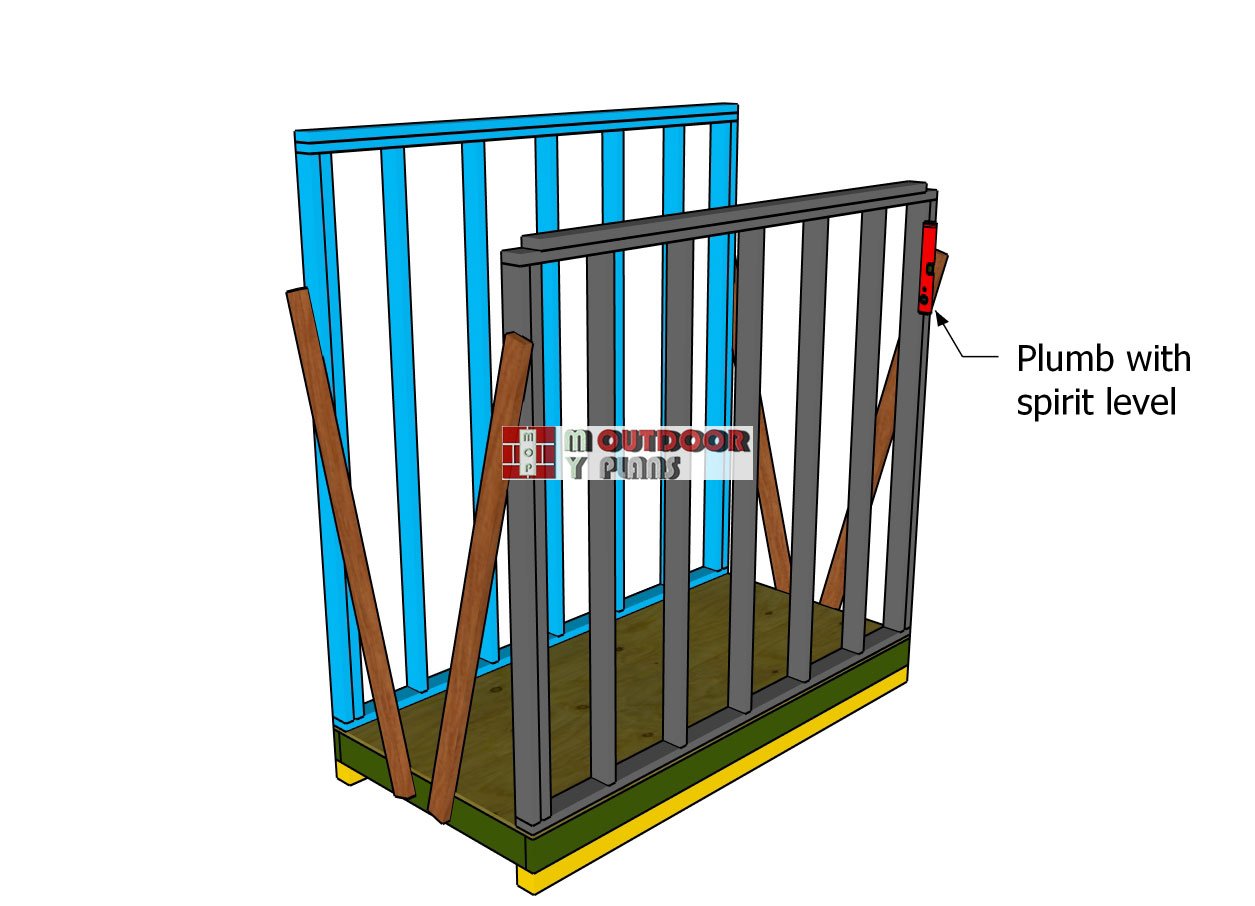
Attaching-the-side-walls
Now, it’s time to lift the wall frames and position them on the shed’s floor. Align the edges of the walls flush with the exterior edges of the floor. Using a spirit level, ensure the walls are plumb for a straight and sturdy structure.
Once everything is aligned, drill pilot holes through the bottom plates and insert 3 1/2″ screws to secure the walls tightly in place. This will lock the frames firmly and ensure the shed’s walls are stable and properly supported.

Front-wall-frame
To build the front wall of the shed, use 2x4s for the framing. Follow the diagram closely to frame the opening for the door or window. Pay special attention to the double header at the top of the opening, which provides extra support.
Secure the studs and header by drilling pilot holes and using 3 1/2″ screws to lock everything into place. This reinforced framing ensures the front wall is strong enough to support the structure while accommodating the opening. For the double header, insert the screws at angle into the studs.
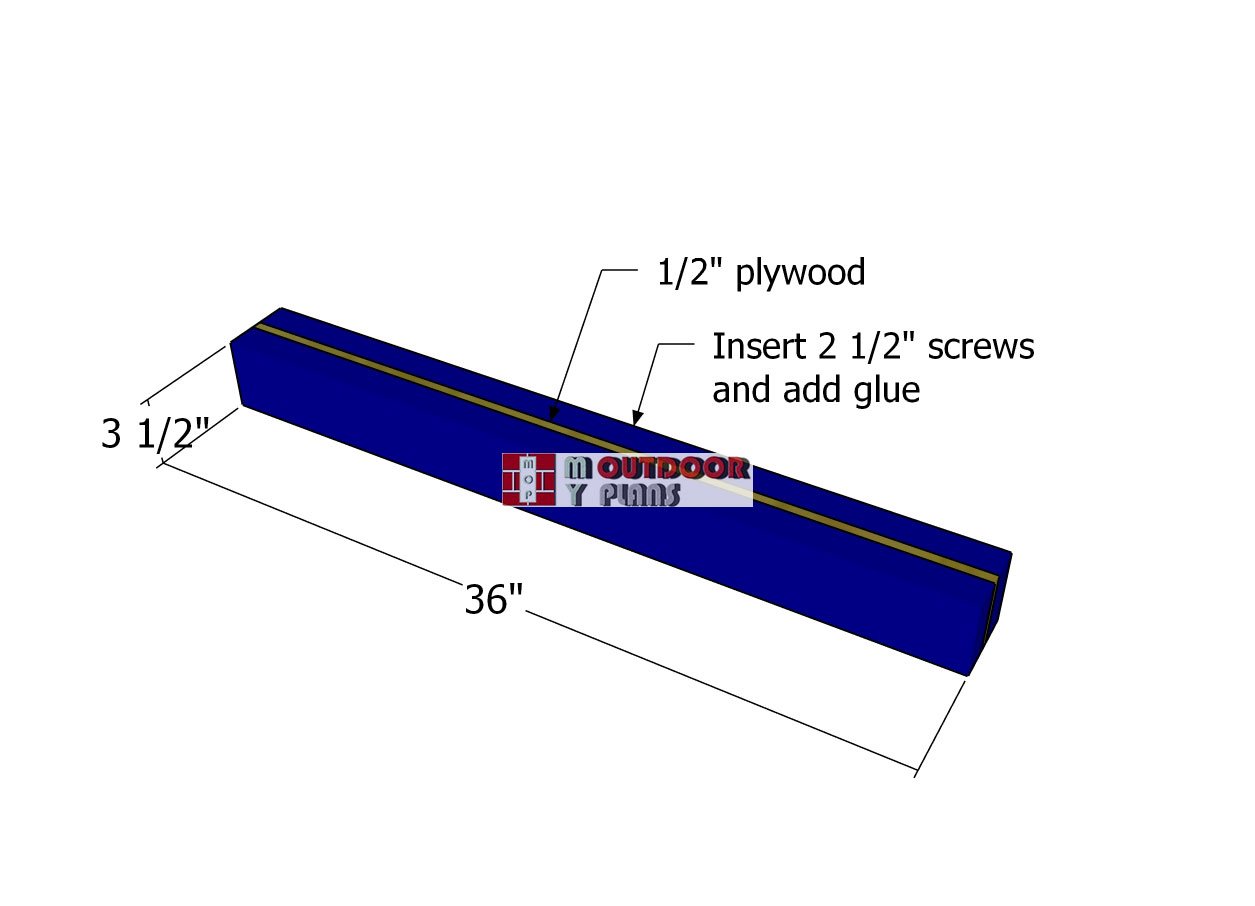
Double-header
To construct the double headers, sandwich a piece of 1/2″ plywood between two 2x4s. Apply wood glue to the joints for added strength, and make sure the edges are perfectly aligned.
Secure the components by inserting 2 1/2″ screws from both sides of the double header. This strong, reinforced header will provide the necessary support for the opening in the front wall of the shed.
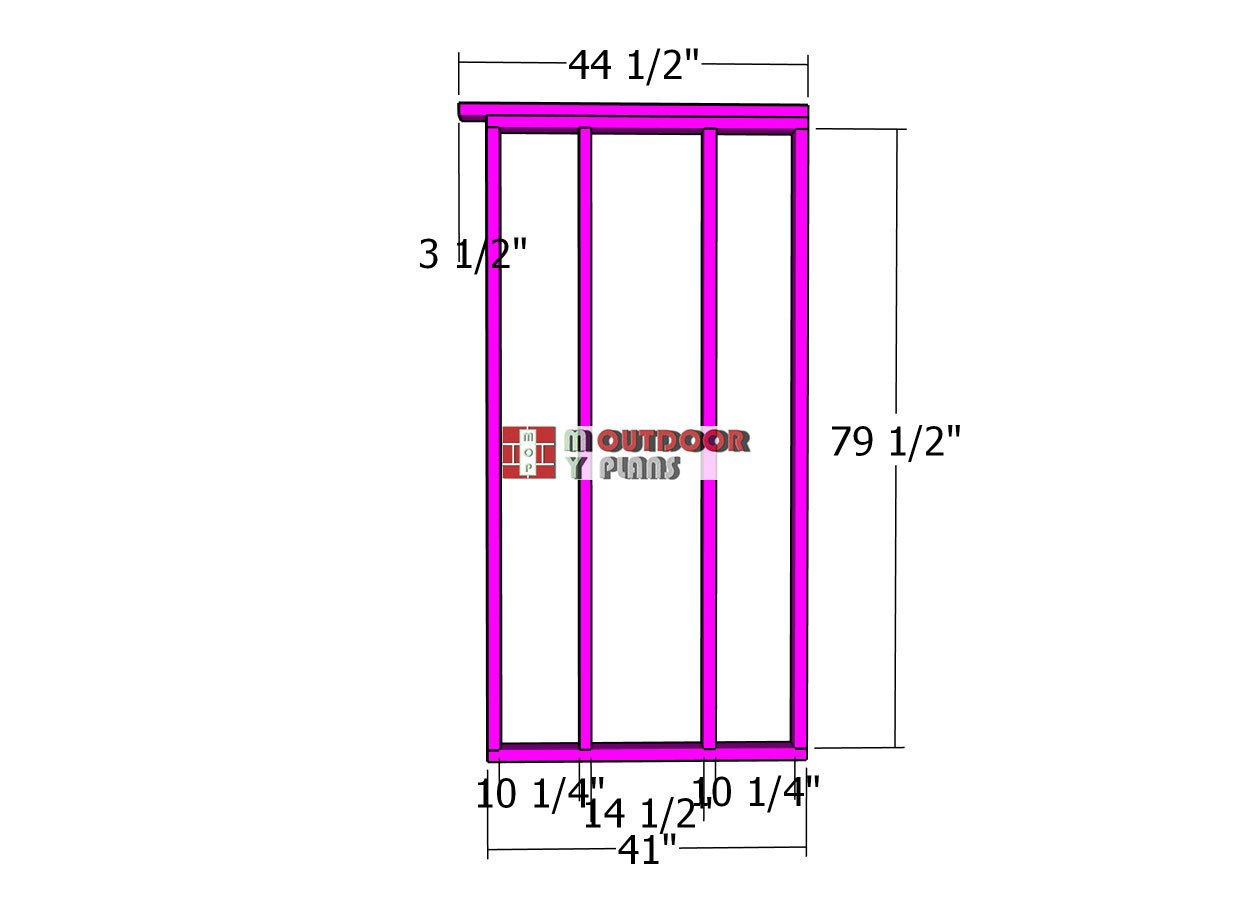
Back-wall-frame
The next step is to assemble the back wall frame for the shed. Using 2×4 lumber, cut and lay out the studs as shown in the plans. Place the studs 16 inches on center to ensure consistent support and alignment. Drill pilot holes through the top and bottom plates, then secure the studs with 3 1/2″ screws at each joint. This will create a sturdy back wall frame that complements the overall structure of your shed.
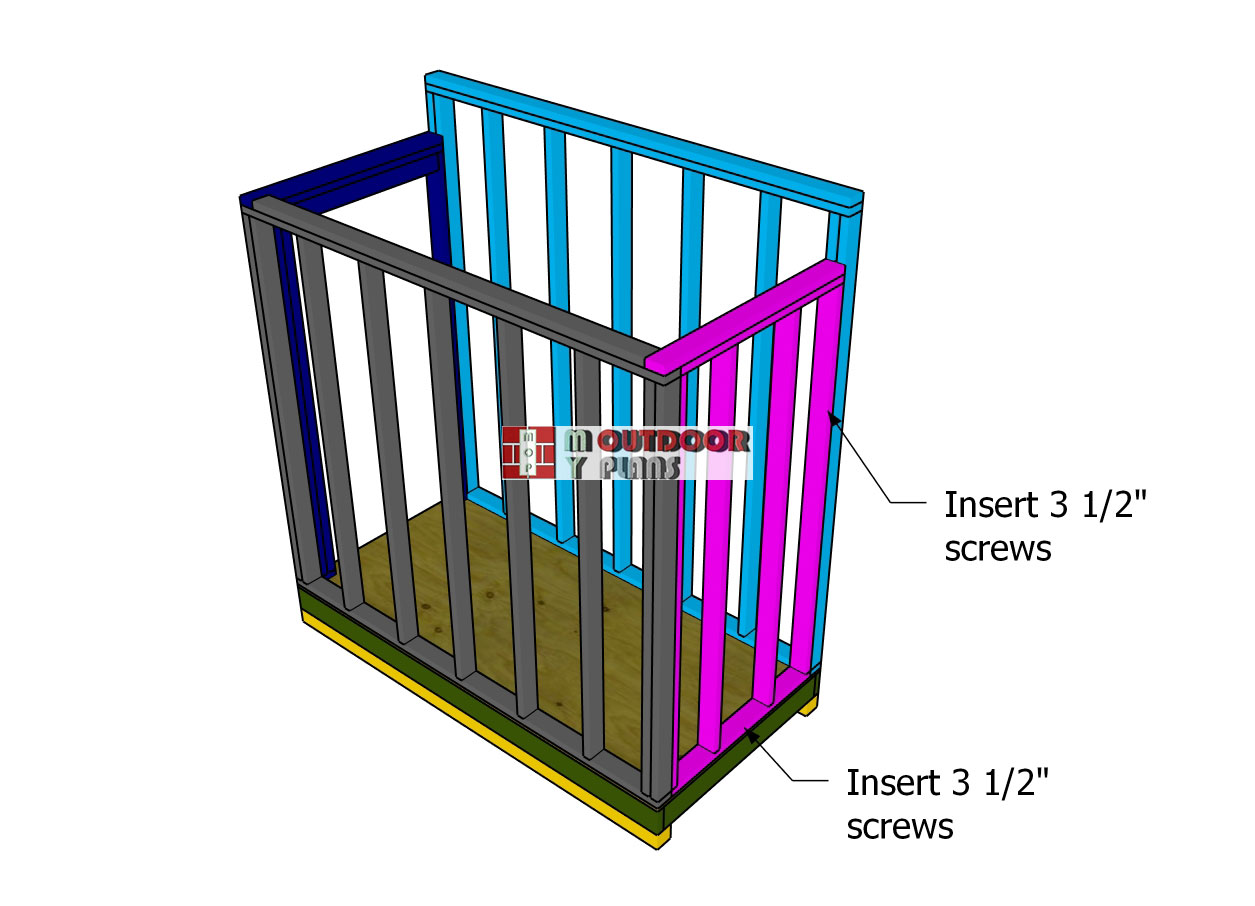
Assembling-the-shed-frame
Lay the wall frames onto the floor of the shed, ensuring the edges are perfectly aligned with the side walls. Once everything is positioned correctly, drill pilot holes through the bottom plates and into the floor. Secure the frames to the floor and the adjacent walls using 3 1/2″ screws. This will lock the walls together tightly and ensure the structure is solid and secure.
Step 3: Fitting the siding sheets
Short-wall-panels
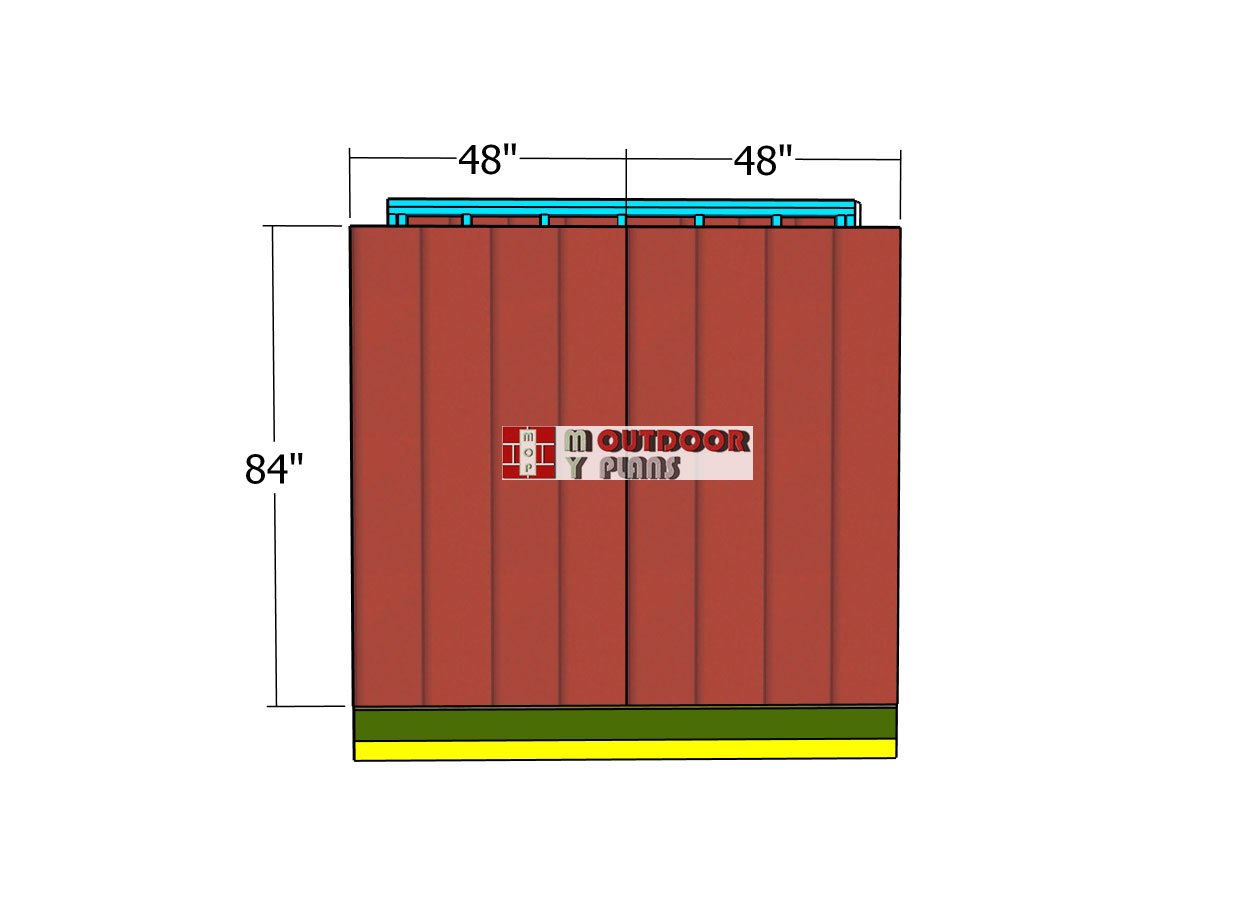
Attach the 5/8″ T1-11 siding sheets to the short wall of the shed. Make sure the edges are flush with the top board for a clean finish. Secure the siding sheets using 6d nails, spacing them every 8 inches along the framing for a strong hold. Ensure there are no gaps between the siding sheets to create a seamless and professional appearance. This step adds both protection and style to the exterior of your shed.
Tall-side-siding-sheets
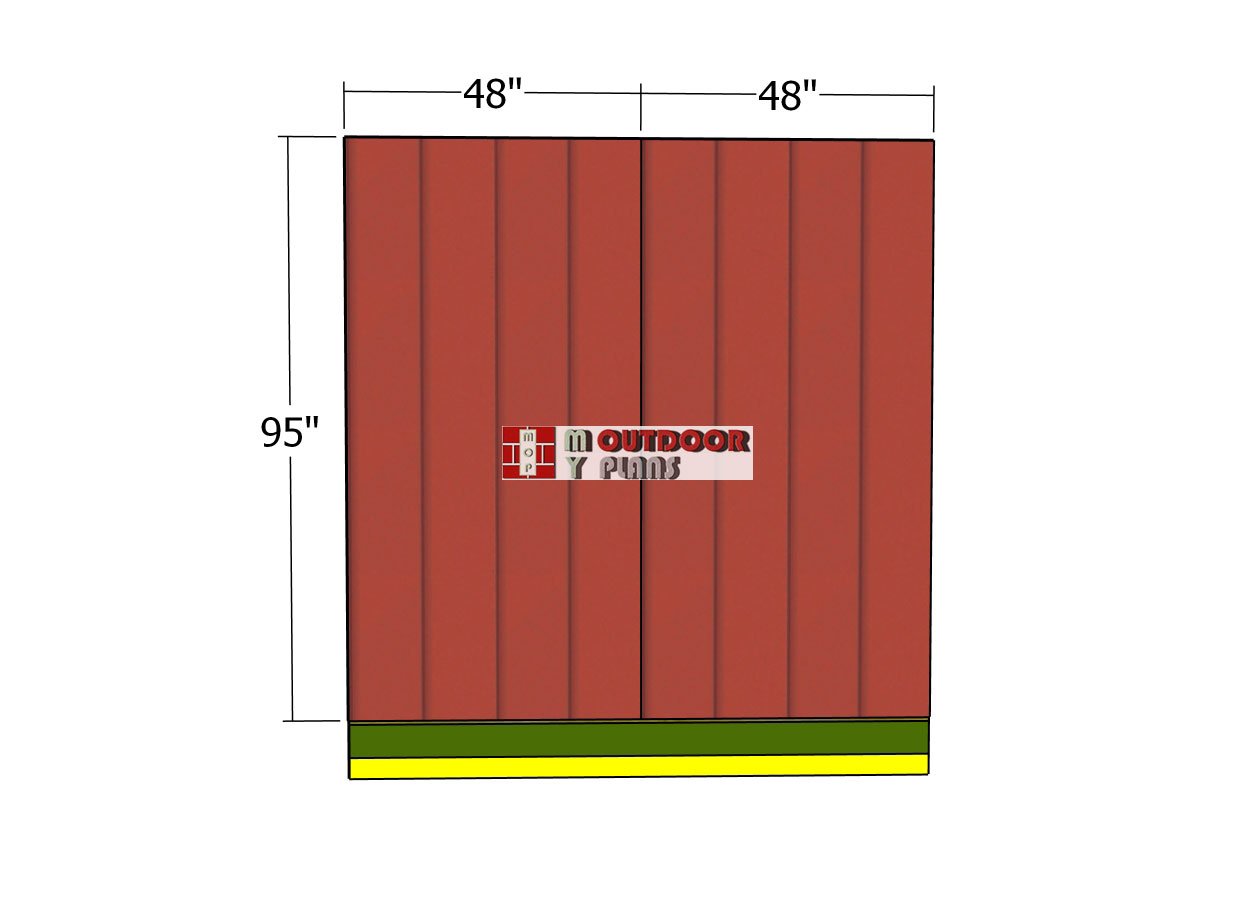
Attach the siding sheets to the tall wall of the shed, following the same process as before. Align the edges flush with the top board for a neat finish, and secure the sheets in place using 6d nails spaced every 8 inches along the framing. As with the short wall, make sure there are no gaps between the siding sheets for a seamless and sturdy exterior. This will complete the siding installation for your shed, giving it both durability and a clean, finished look.
How to build a 4×8 lean to shed
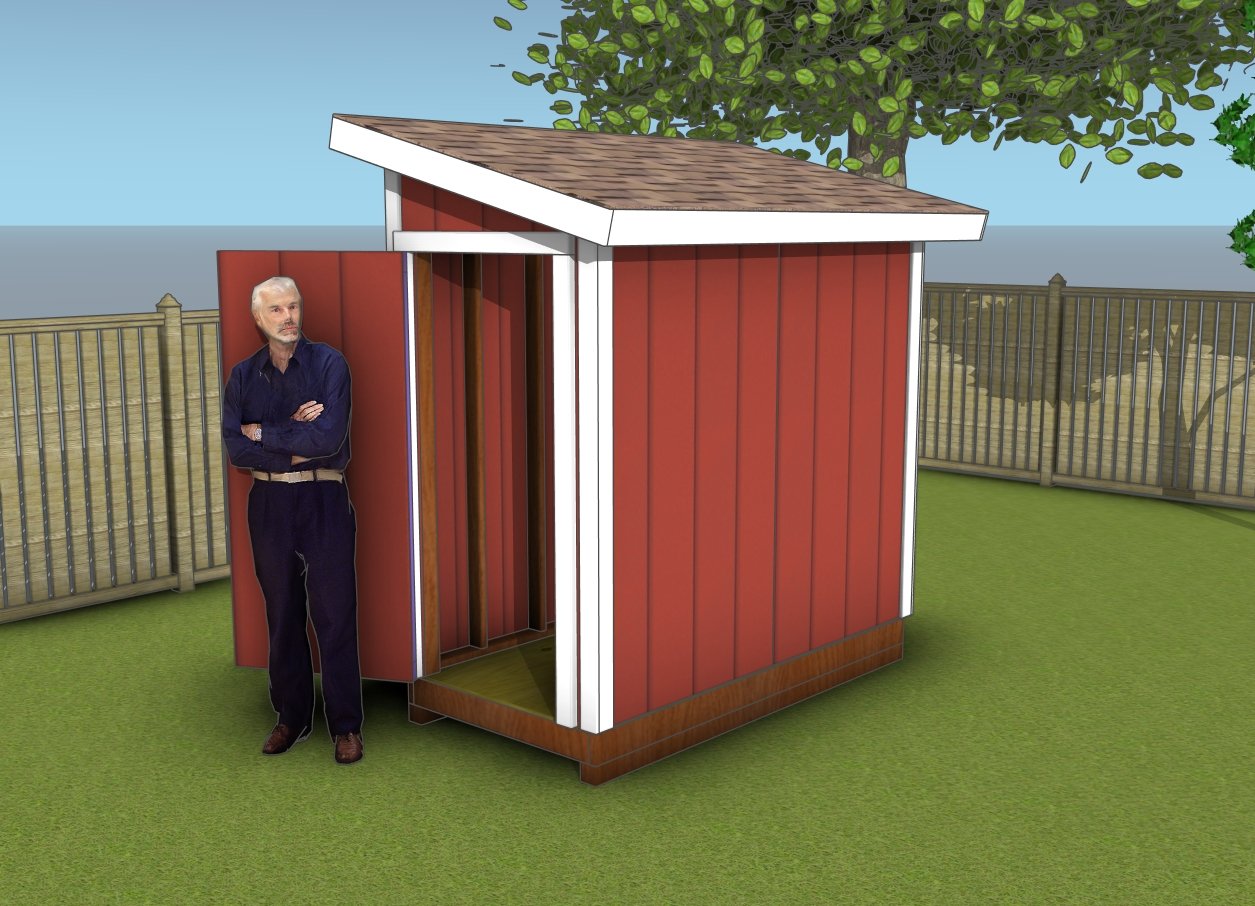
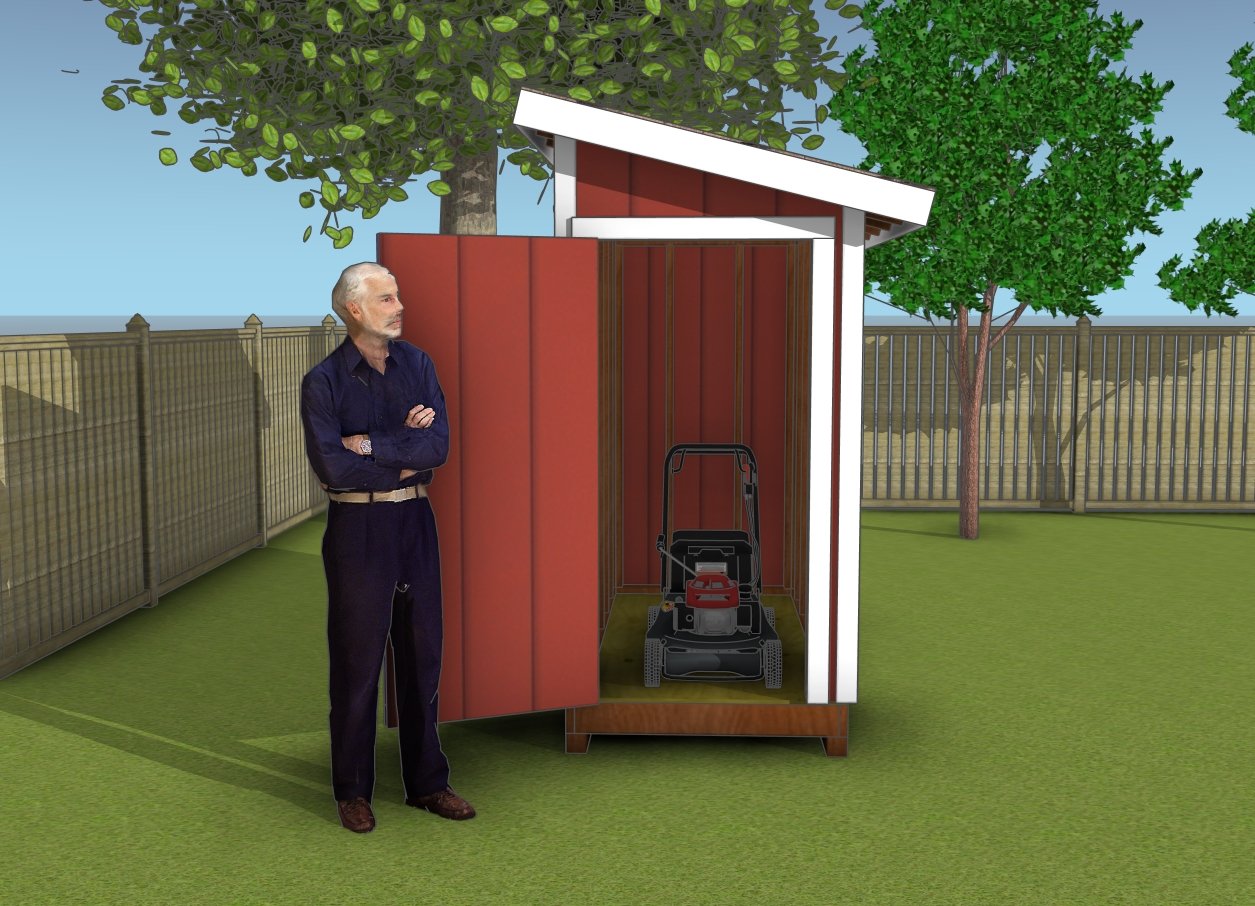
This 4×8 lean-to shed with a side door is a fantastic addition to any backyard, offering both practicality and style. Its compact footprint makes it ideal for small spaces, while still providing plenty of room for storing tools, gardening equipment, or outdoor gear.
The lean-to design ensures efficient water drainage and stability, plus the side door allows easy access without taking up extra space. It’s a versatile storage solution that’s perfect for keeping your yard organized, and it complements any outdoor setup with its simple, yet sturdy structure.
Front view – 4×8 lean to shed
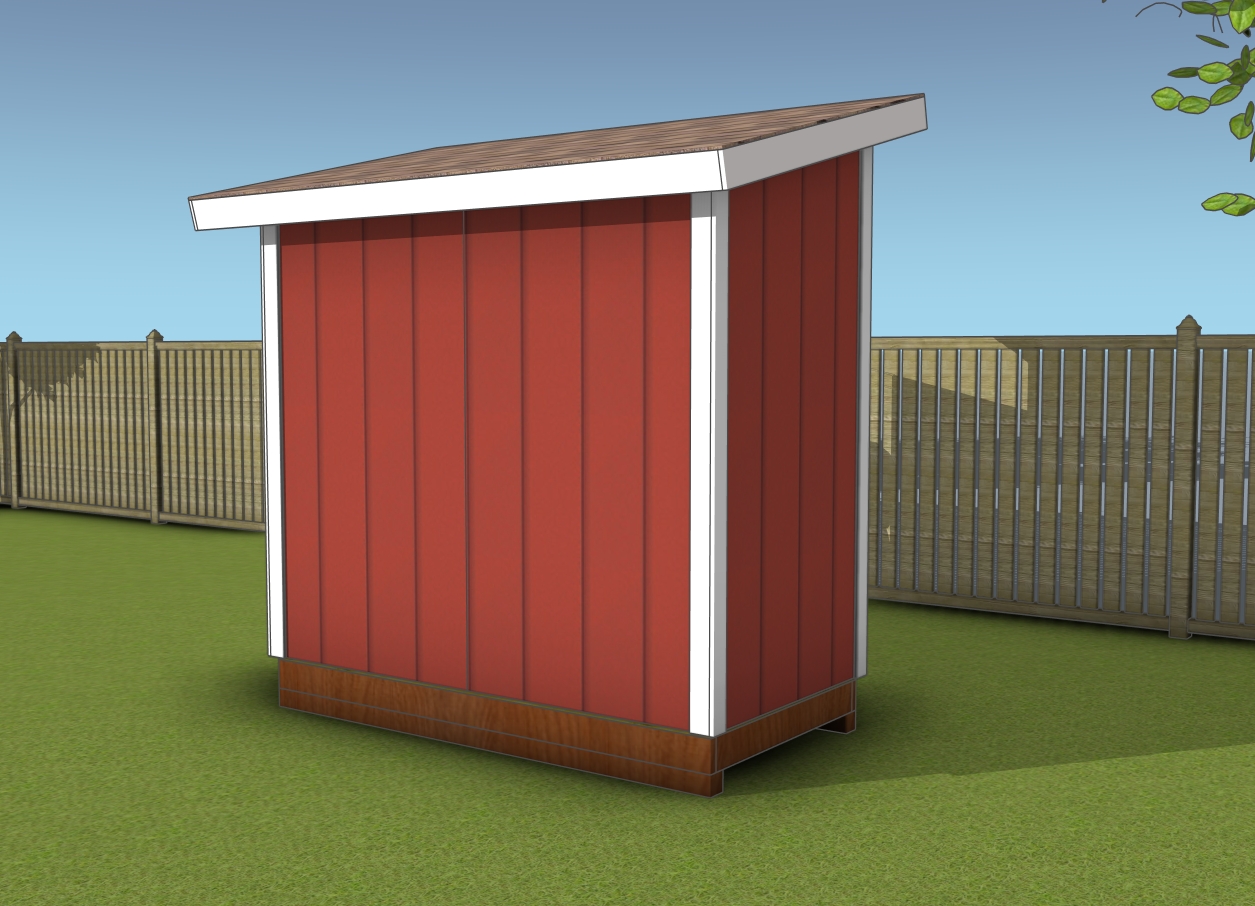
DIY 4×8 garden shed plans
Make sure to check out PART 2 of the project to learn how to build the roof and the door for your shed. For those looking for even more detailed guidance, I also offer premium plans for this project. These plans include a full cut and shopping list, an ad-free experience, and a cut layout diagram to help you minimize material waste.
If you’re ready to take your build to the next level, click the GET PDF PLANS button below! If you want to get the free version, just read the blog FAQs.

This woodworking project was about 4×8 lean to shed with side door plans. If you want to see more outdoor plans, we recommend you to check out the rest of our step by step projects. LIKE us on Facebook and Google + to be the first that gets out latest projects and to hep us keep adding free woodworking plans for you.
