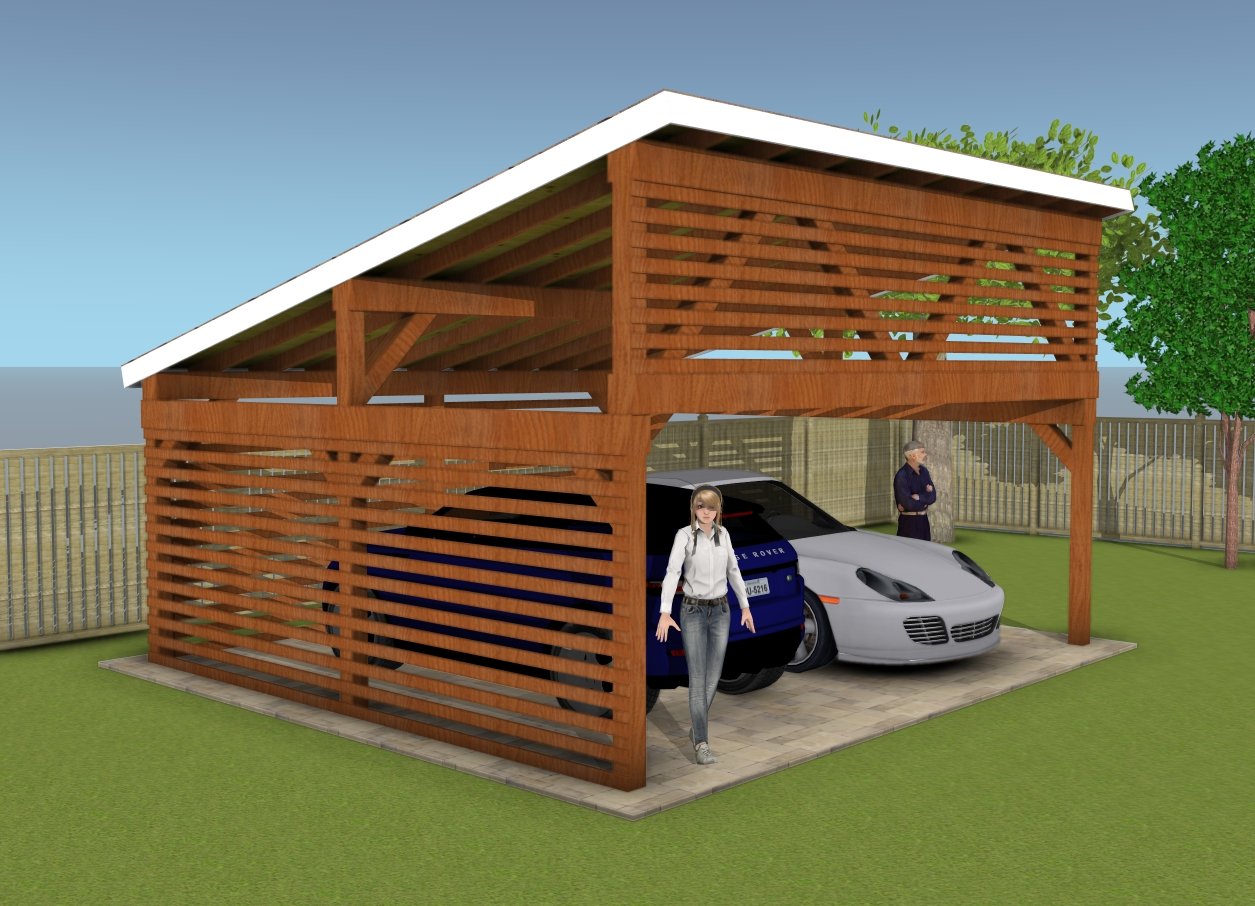
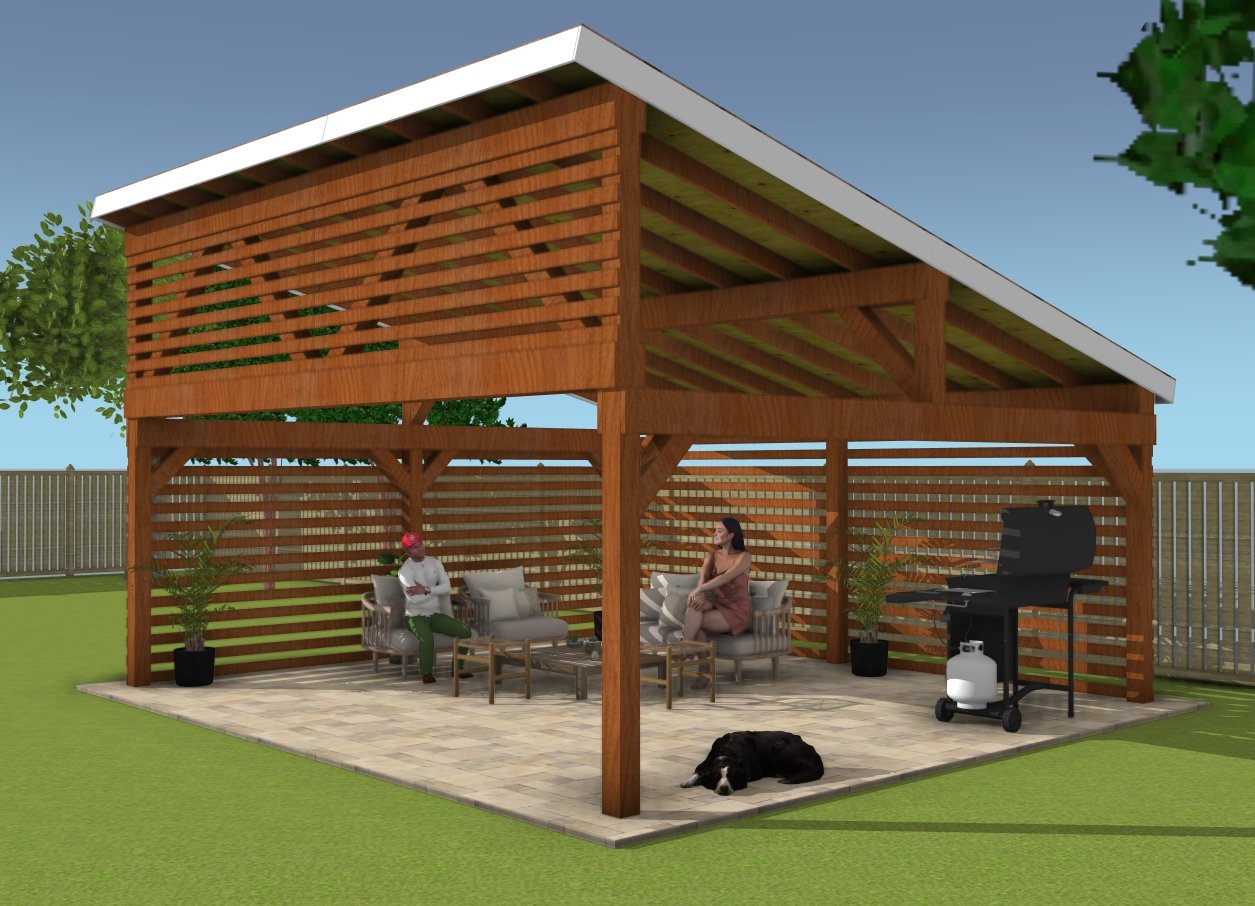
Looking for a stylish and versatile structure for your outdoor space? This 18×20 lean-to pavilion plan features a sleek, modern design that’s perfect for a backyard retreat or a double carport. With its clean lines and spacious layout, it offers a functional yet contemporary look that complements any setting. Whether you’re hosting a gathering under its roof or protecting your vehicles from the elements, this pavilion is built for both aesthetics and practicality. Follow the detailed plans to create a durable, multi-purpose space you’ll enjoy for years.
Building the 18×20 lean-to pavilion will likely take about 1-2 weeks, depending on experience and weather conditions. The cost can range between $2,400 and $4,200, which includes expenses for 6×6 posts, concrete footings, roofing materials, and hardware. Lumber costs will be around $1,500 to $2,500, with concrete at $300 to $500. Roofing materials will cost about $400 to $800, and hardware like screws and post anchors will add another $200 to $400. Check out the Shop, as well, for full list of Premium Plans.
When buying the lumber, you should select the planks with great care, making sure they are straight and without any visible flaws (cracks, knots, twists, decay). Investing in cedar or other weather resistant lumber is a good idea, as it will pay off on the long run. Use a spirit level to plumb and align the components, before inserting the galvanized screws, otherwise the project won’t have a symmetrical look. If you have all the materials and tools required for the project, you could get the job done in about a day.
Projects made from these plans
Pin it for later!
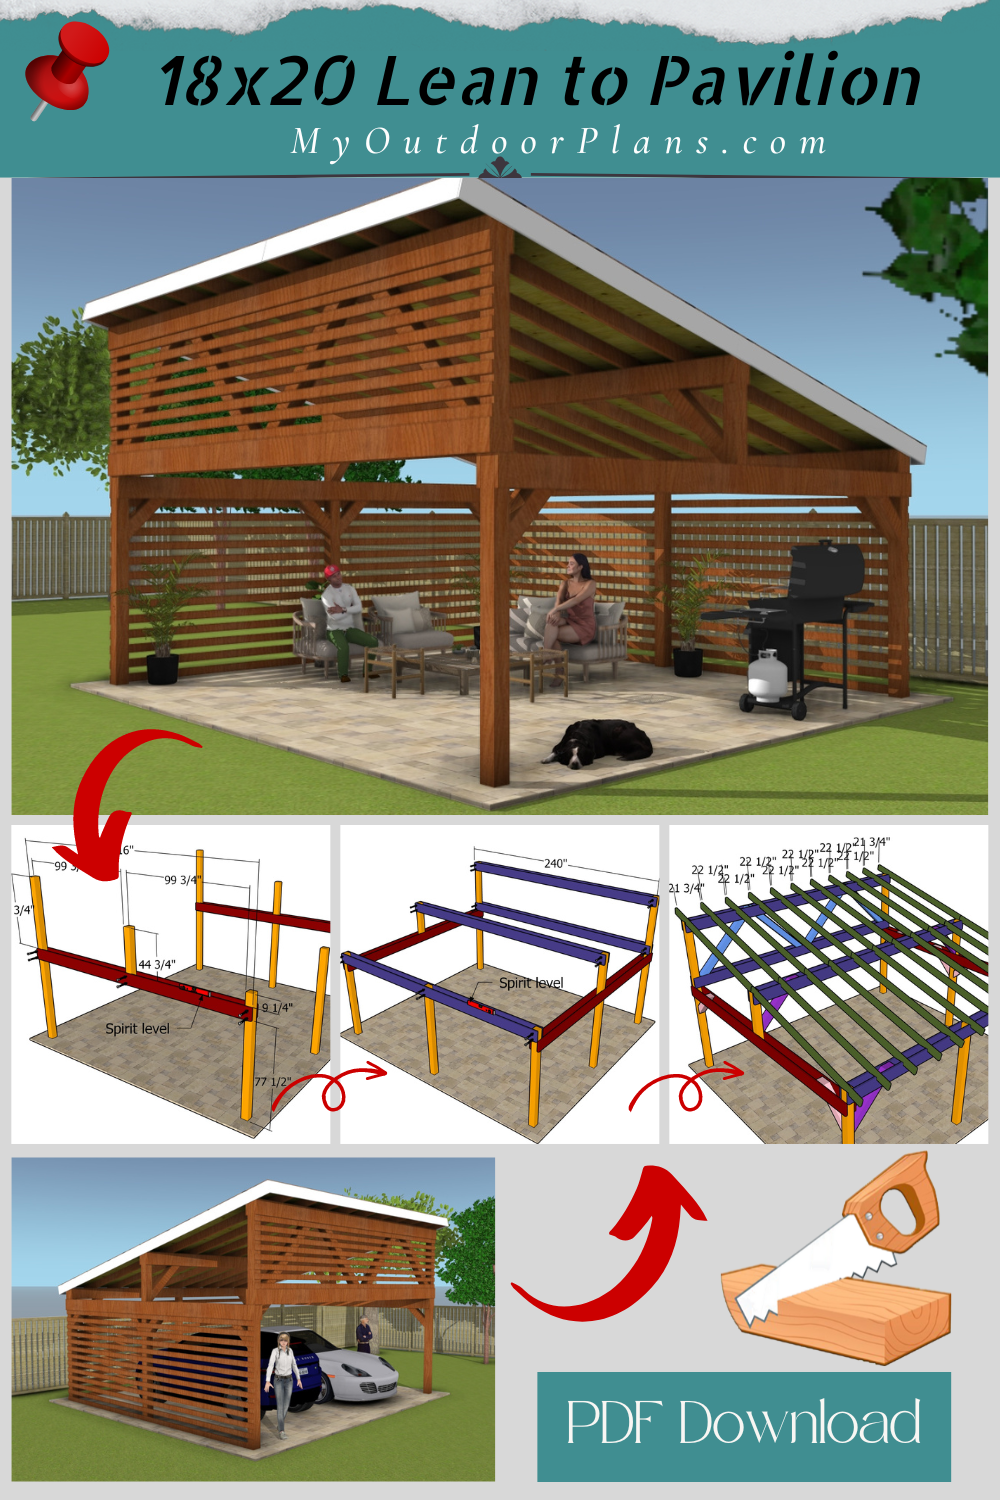
18×20 lean to pavilion plans
18×20 Lean to Pavilion Plans
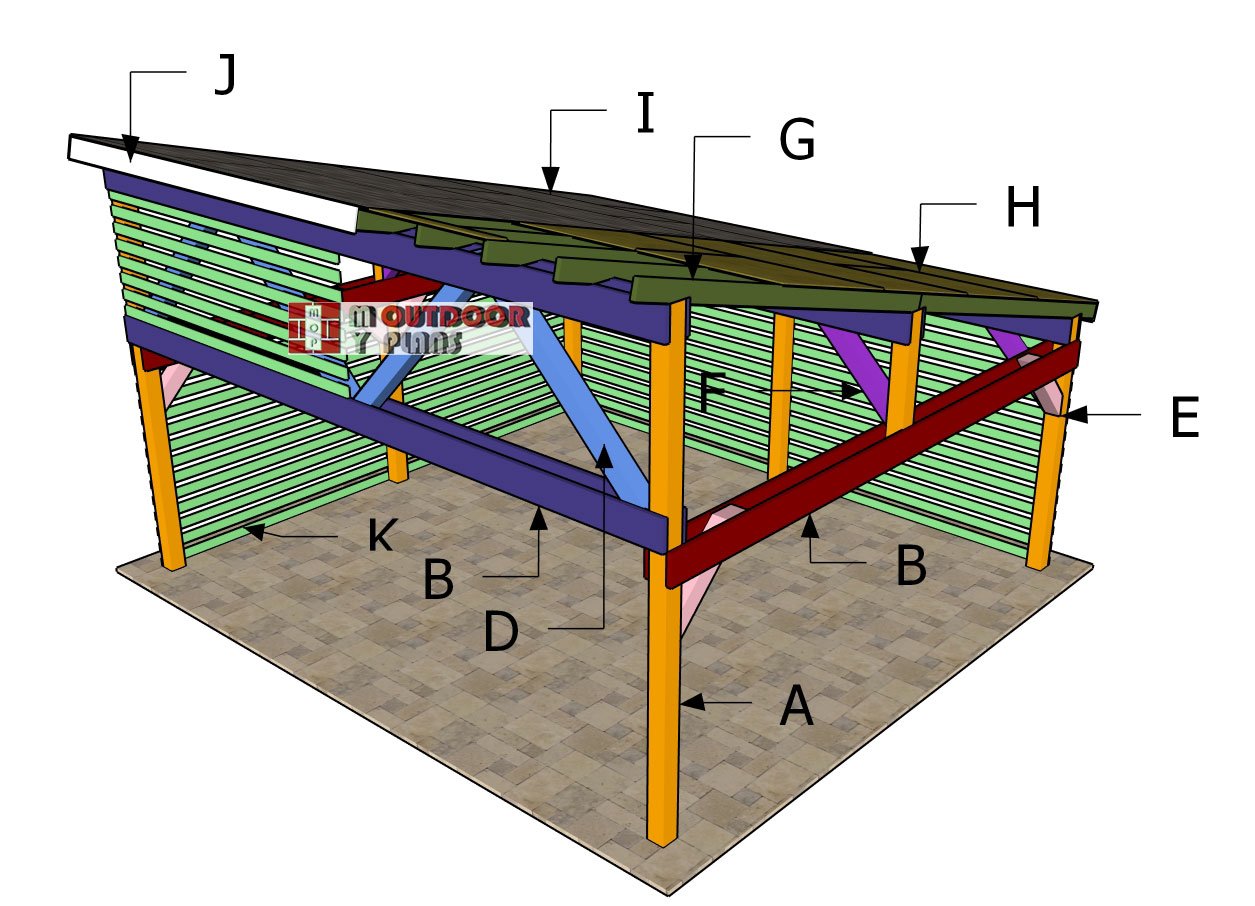
Building-a-18×20-lean-to-pavilion—diy
Materials
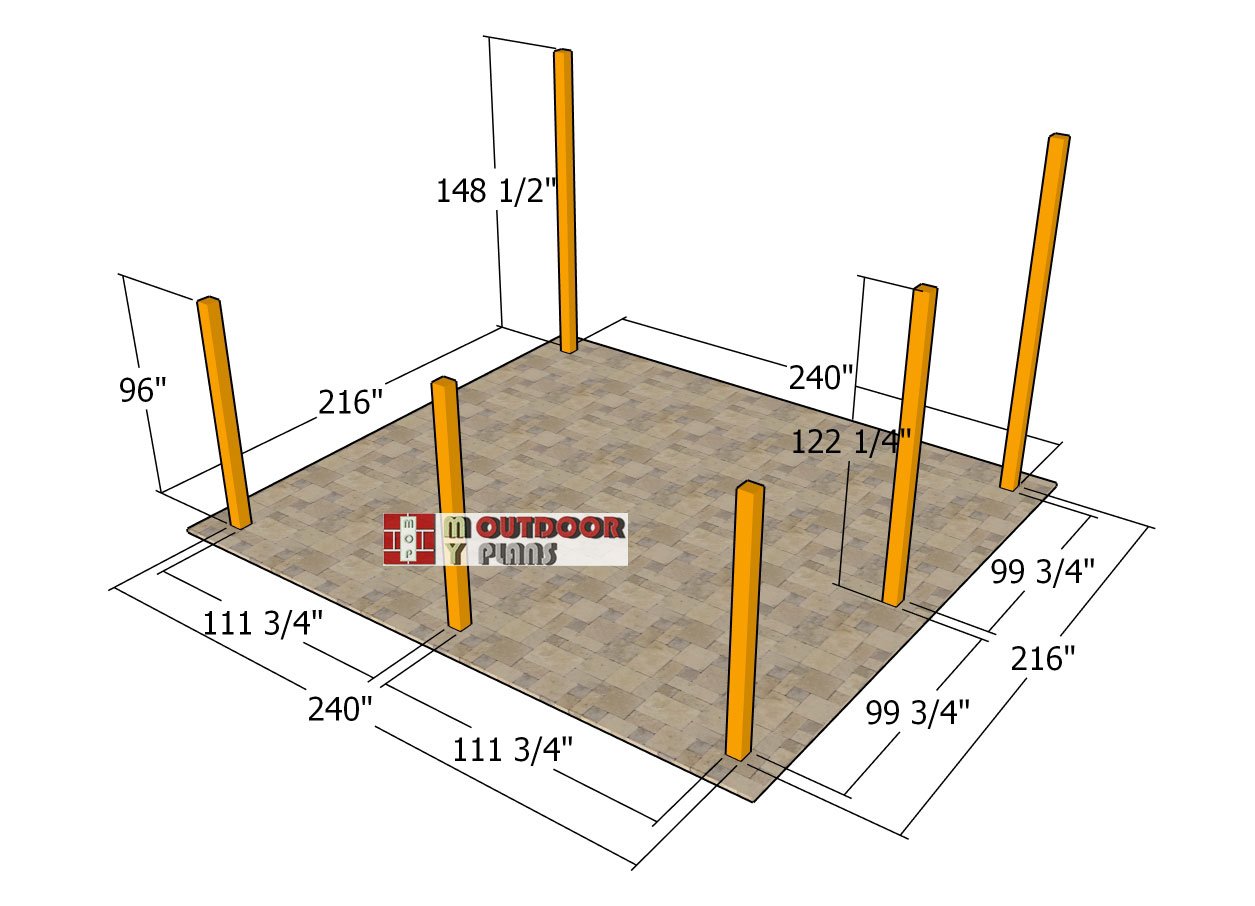
- A – Posts – 6×6 lumber 8′ long – 3 pieces
- A – Posts – 6×6 lumber 148 1/2″ long – 2 pieces
- A – Posts – 6×6 lumber 122 1/4″ long – 1 piece
- A – Posts – 6×6 lumber 44 3/4″ long – 1 piece
- B – Cross Beams – 2×10 lumber 18′ long – 4 pieces
- C – Top Beams – 2×10 lumber 20′ long – 8 pieces
- D – Braces – 6×6 lumber 81″ long – 4 pieces
- E – Braces – 6×6 lumber 37 1/4″ long – 6 pieces
- F – Braces – 6×6 lumber 50 1/4″ long – 4 pieces
- G – Rafters – 2×6 lumber 123″ long – 11 pieces
- G – Rafters – 2×6 lumber 123 1/2″ long – 11 pieces
- H – Roof Sheets – 3/4″ plywood – 4’x8′ – 10 pieces
- H – Roof Sheets – 3/4″ plywood – 4’x4′ – 5 pieces
- H – Roof Sheets – 3/4″ plywood – 6 3/4″x8′ – 2 pieces
- H – Roof Sheets – 3/4″ plywood – 6 3/4″x4′ – 1 piece
- I – Roofing – 600 sq ft tar paper, 600 sq ft asphalt shingles
- J – Trims – 1×8 lumber 8′ long – 2 pieces
- J – Trims – 1×8 lumber 10′ long – 2 pieces
- J – Trims – 1×8 lumber 128 1/4″ long – 2 pieces
- J – Trims – 1×8 lumber 12′ long – 2 pieces
- K – Slats – 1×4 lumber 10′ long – 44 pieces
- K – Trims – 1×4 lumber 108″ long – 36 pieces
Tools
![]() Hammer, Tape measure, Framing square, Level
Hammer, Tape measure, Framing square, Level
![]() Miter saw, Drill machinery, Screwdriver, Sander
Miter saw, Drill machinery, Screwdriver, Sander
![]() Safety Gloves, Safety Glasses, Post hole digger
Safety Gloves, Safety Glasses, Post hole digger
Time
![]() One week
One week
Related
How to build a 18×20 pavilion
Laying-out-the-posts
The first step is to mark the location for the posts. Set up batter boards and string lines to outline where the 6×6 posts will go, following the diagram for accurate spacing. Before you start pouring the footings, make sure to remove any grass or vegetation and level the ground. This prep work ensures a solid foundation for your pavilion.
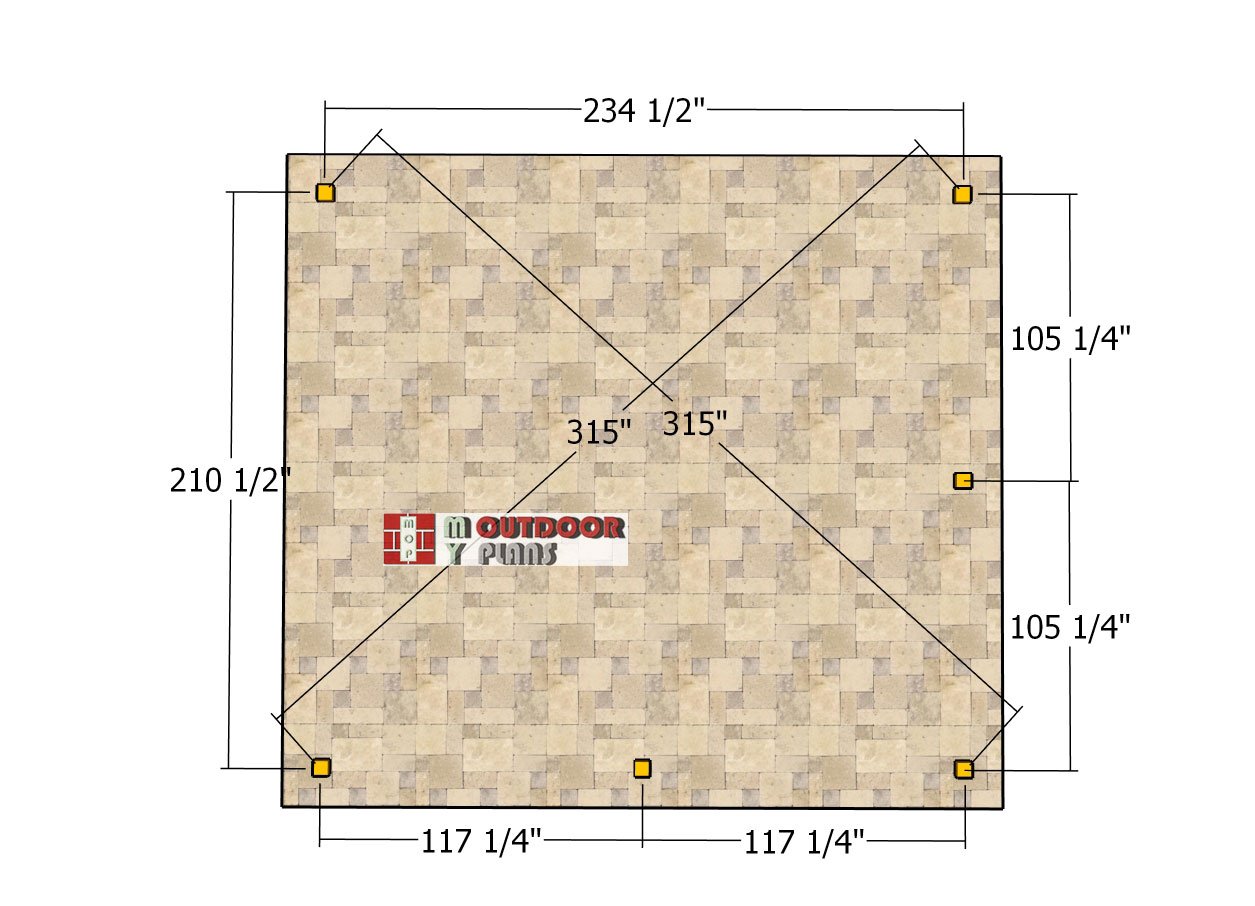
Laying-out—axes
This second layout diagram shows the distance between the axes (center of the posts), which is super useful when marking where the footings will go. It helps ensure everything is aligned properly before you start digging the 12″ wide holes for the footings. Make sure to follow the layout closely to avoid any issues down the line.
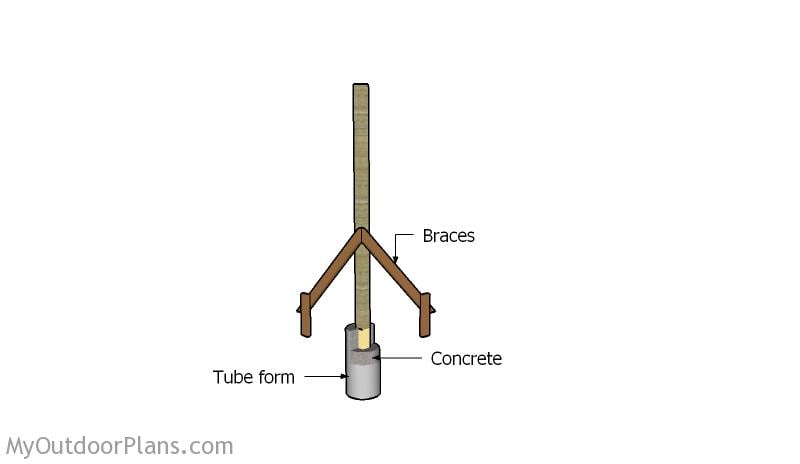
Setting the posts in concrete
Once you’ve marked the spots, dig 3-foot deep holes that are 12 inches wide. Insert concrete tubes into each hole and fill them with concrete. While the concrete is still wet, set your post anchors, making sure they’re aligned properly.
Once the concrete has fully set, attach the posts to the anchors. Use a spirit level to check that the posts are plumb, and temporarily brace them with 2x4s to keep them steady. Secure each post with lag screws to lock them into place.
Building the frame of the pavilion
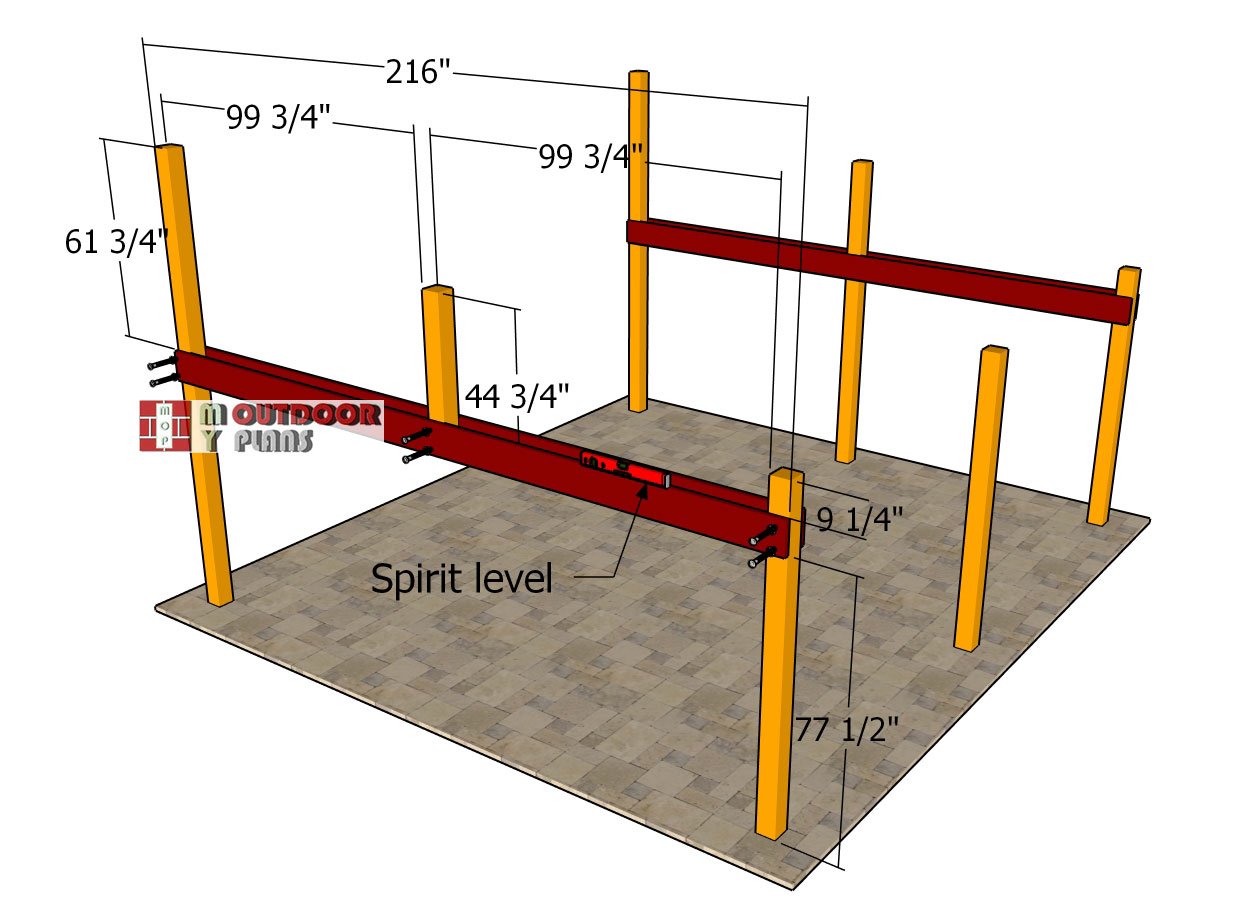
Attaching-the-crossbeams
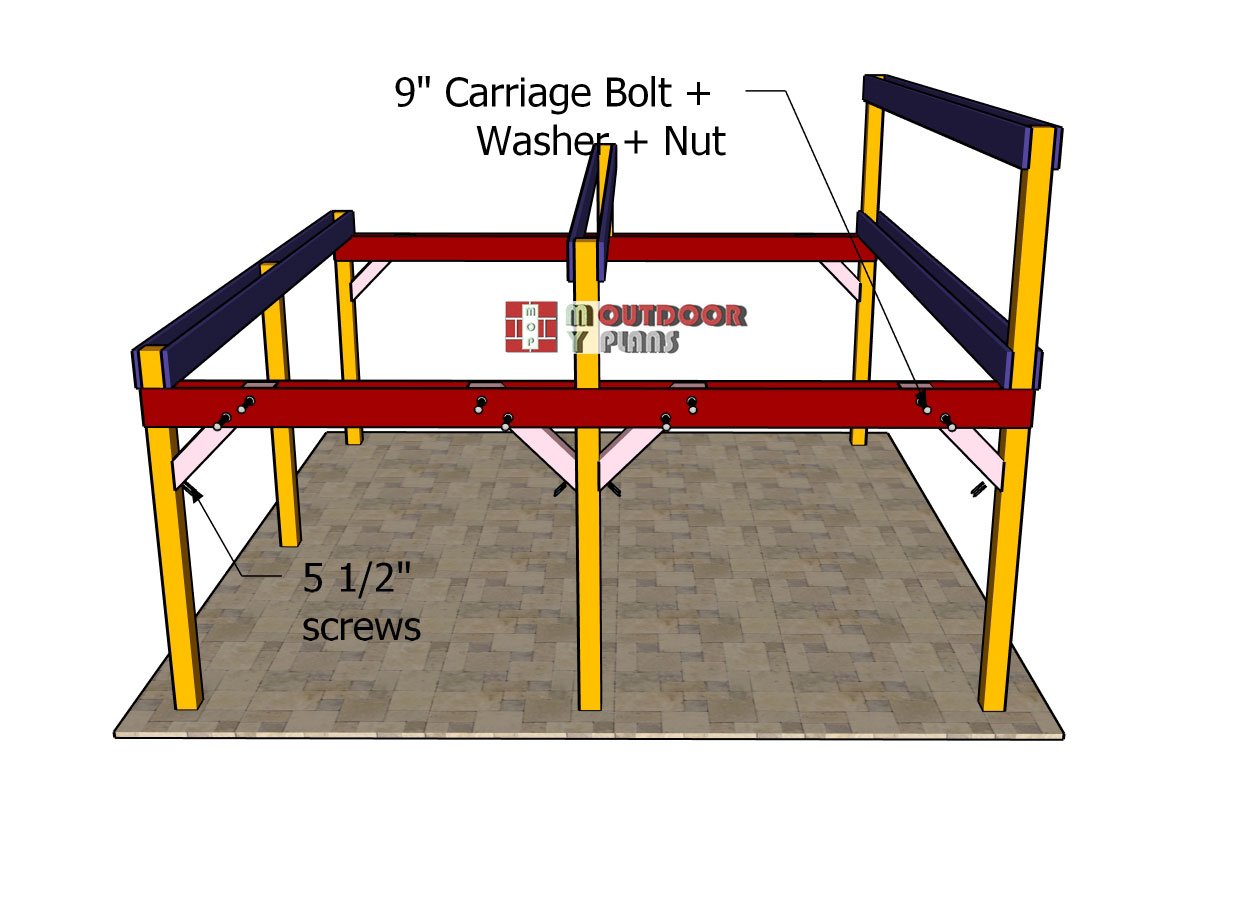
The next step is to attach the 2×10 crossbeams to the structure. Align them as shown in the diagram and use a spirit level to ensure they’re perfectly horizontal. Clamp the beams in place, drill pilot holes through the beams and posts, and secure each joint with two 9″ carriage bolts, washers, and nuts.
For the left side, install a 6×6 support post to hold the middle roof beams. Make sure the post is plumb and secure it with two carriage bolts, ensuring everything stays aligned and stable.
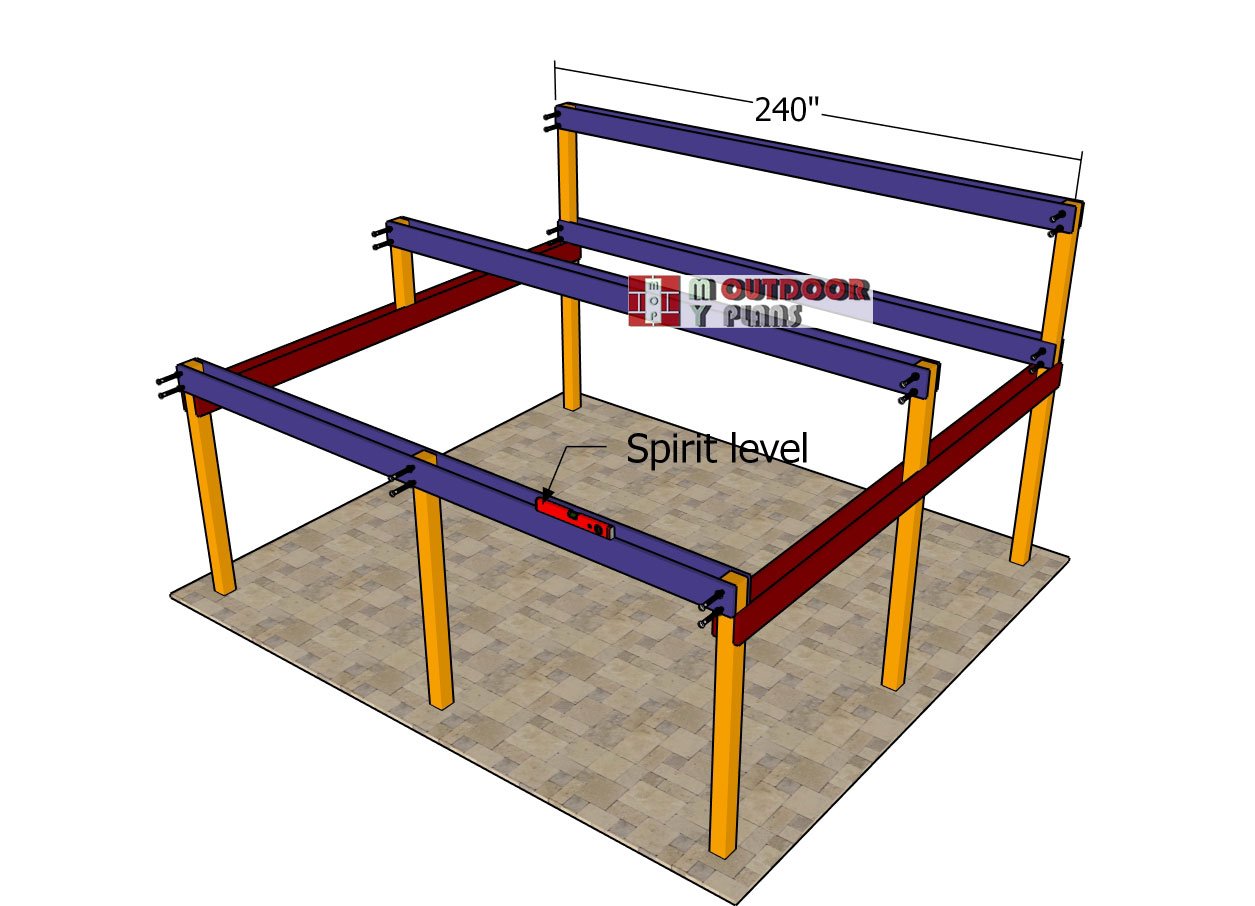
Fitting-the-support-beams
Fit the 2×10 support beams to the top of the posts as indicated in the diagram. Drill pilot holes through both the beams and the posts, allowing you to insert 9″ carriage bolts along with washers and nuts for a secure connection. As you work, use a spirit level to ensure the beams are perfectly horizontal for a stable and level structure.
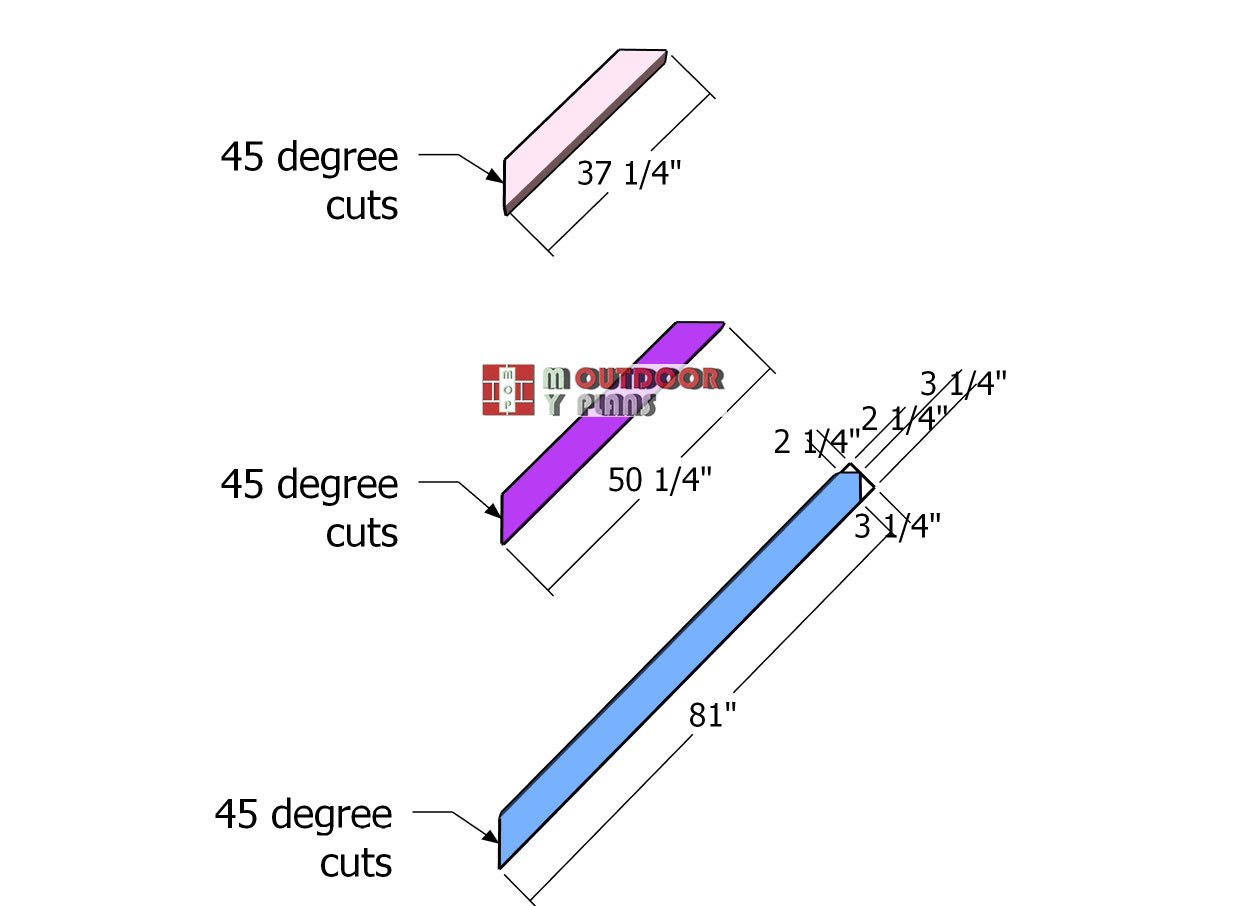
Braces-detail
Now it’s time to cut the braces from 6×6 lumber to reinforce the structure. These braces are essential for adding rigidity to the pavilion, helping it withstand strong winds and even snow loads. The braces play a critical role in the structural stability of the lean-to roof, ensuring the pavilion remains strong and secure over time.
Side-braces
Start by attaching the braces to the sides of the pavilion. Secure the bottom of each brace to the posts using 5 1/2″ screws. For the top of the braces, use 9″ carriage bolts to attach them to the crossbeams, following the same technique as before. This will enhance the structure’s stability and ensure that the pavilion can handle various weather conditions effectively.
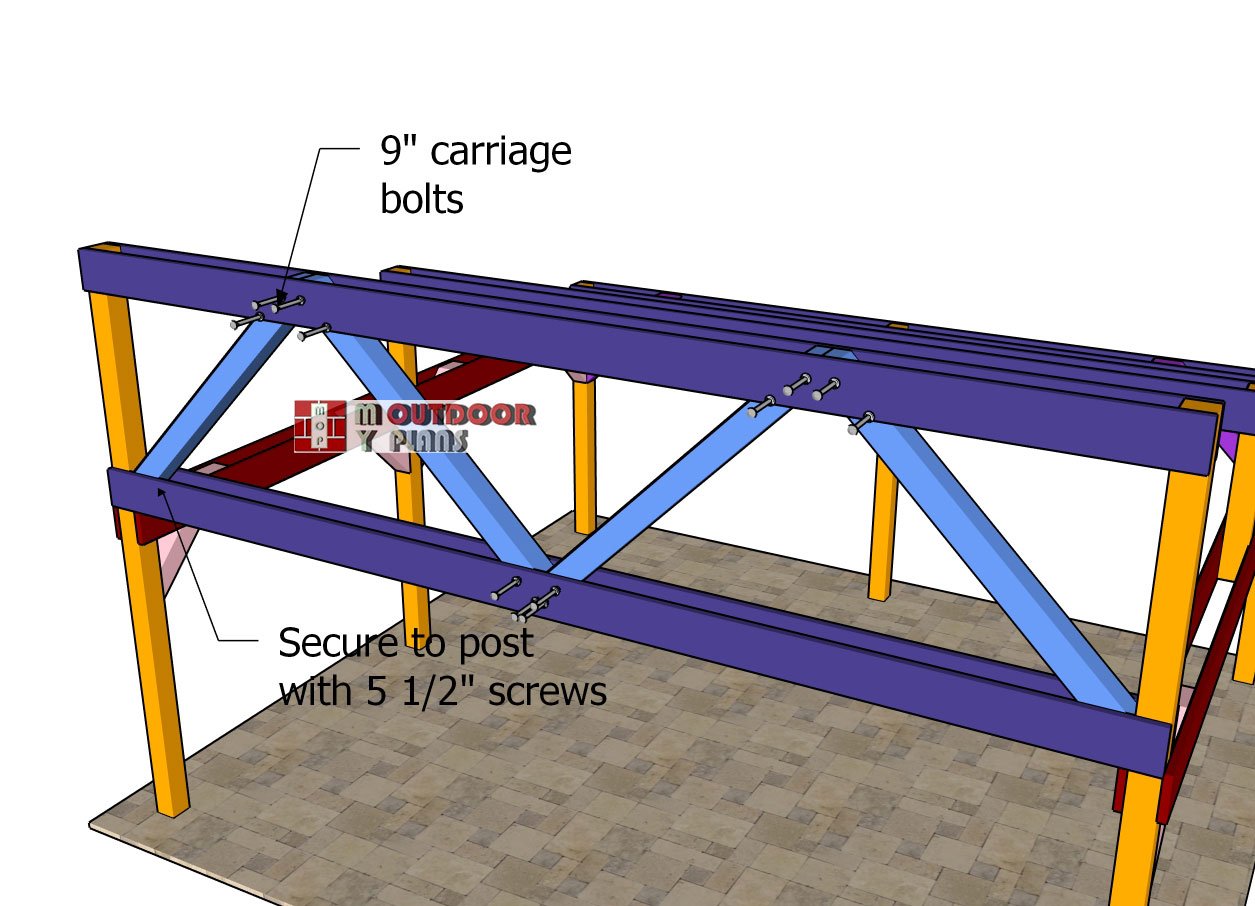
Top-braces
Now we’ll move on to the top braces, which are designed to reinforce the roof support beams. The W pattern helps create a rigid connection between the bottom and top beams, forming a solid base for the rafters. Drill pilot holes through the beams and braces, then insert 9″ carriage bolts to lock everything securely in place. This structure provides additional strength to the roof, ensuring it can handle various weather conditions effectively.
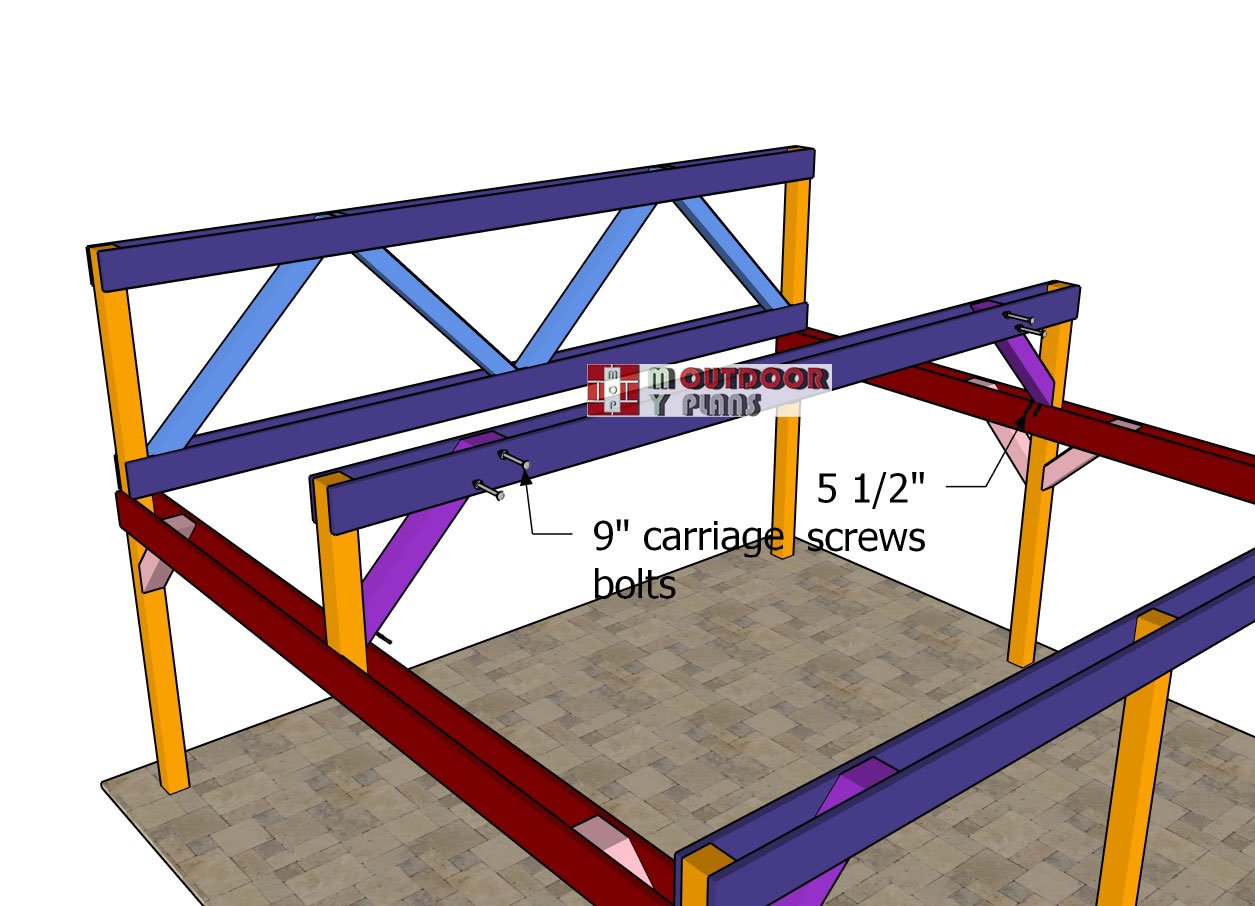
Middle-braces
Last but not least, secure the braces to the middle roof beams. Use 5 1/2″ screws to fasten the lower ends of the braces and 9″ carriage bolts for the upper connections.
Be sure to follow the plans closely for precise placement and alignment of the beams. This step will help create a stable and strong roof structure, ensuring the pavilion is durable and ready for the final stages of construction.
Building the roof
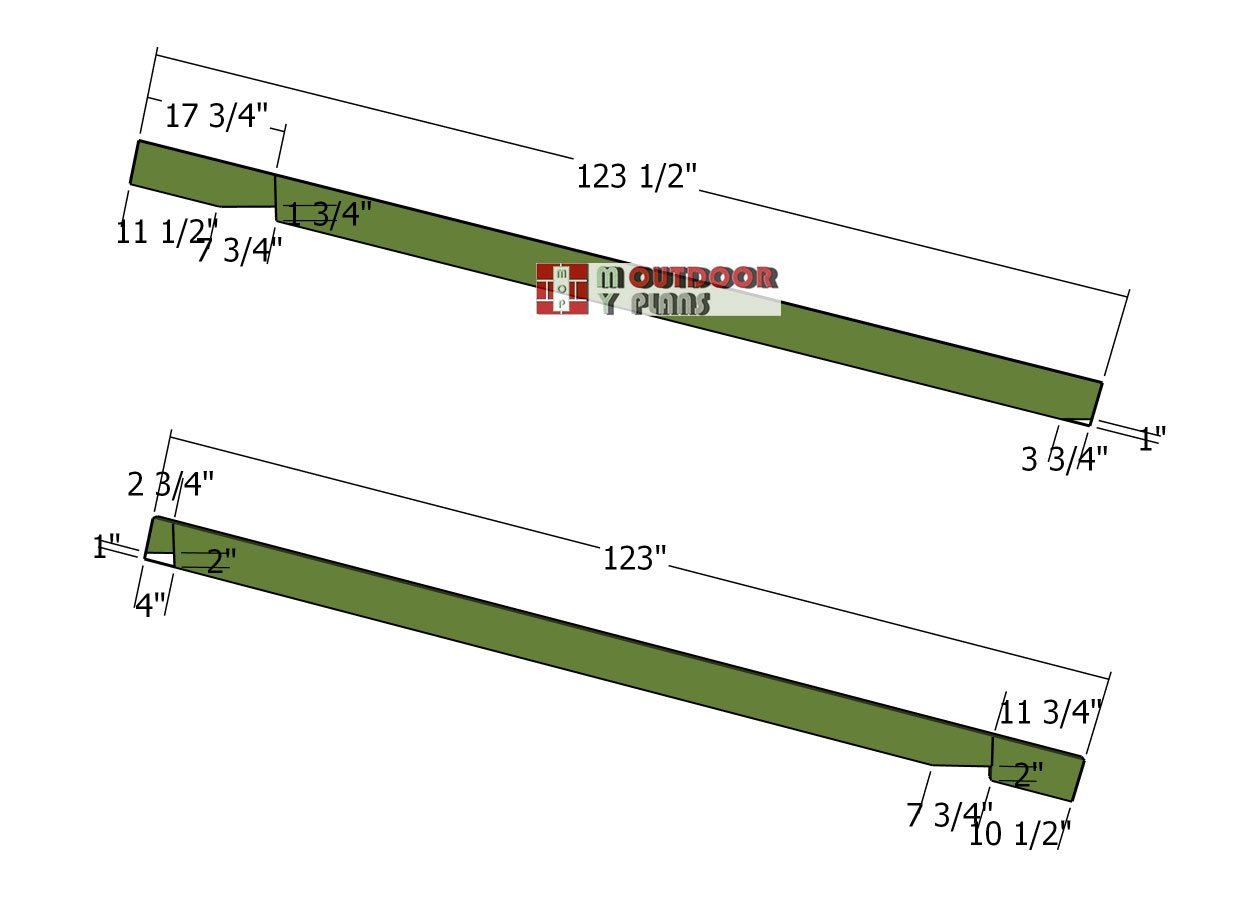
Rafters
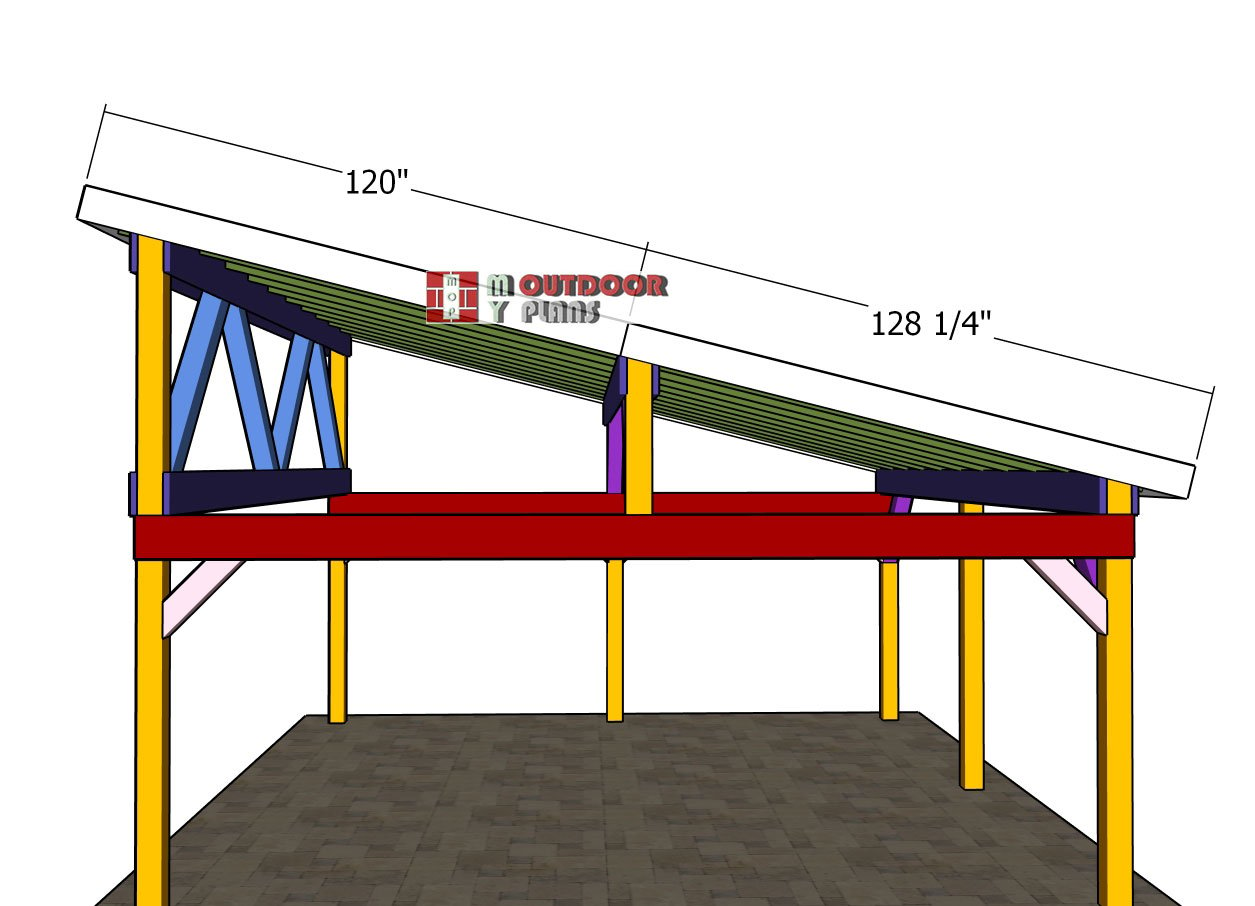
Next, build the rafters for the lean-to roof using 2×6 lumber. Follow the cut lines shown in the diagram and make the necessary notches with a circular saw. Be sure to smooth the edges with sandpaper for a clean finish.
Remember, the bottom rafter will be positioned at the base of the roof structure, offering critical support for the roof. Proper alignment and smooth cuts will ensure the rafters fit perfectly and provide stability to the entire structure.
Attaching-the-rafters
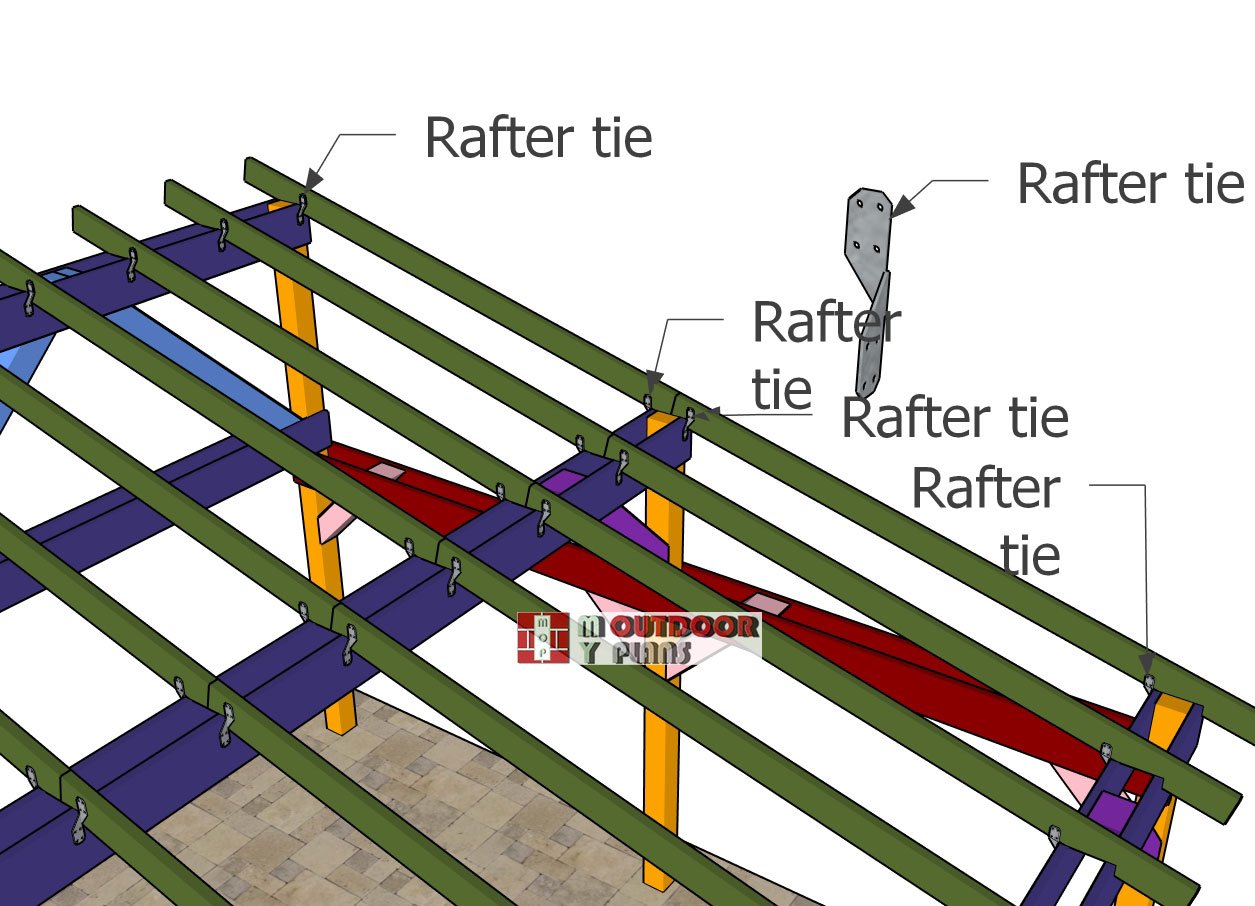
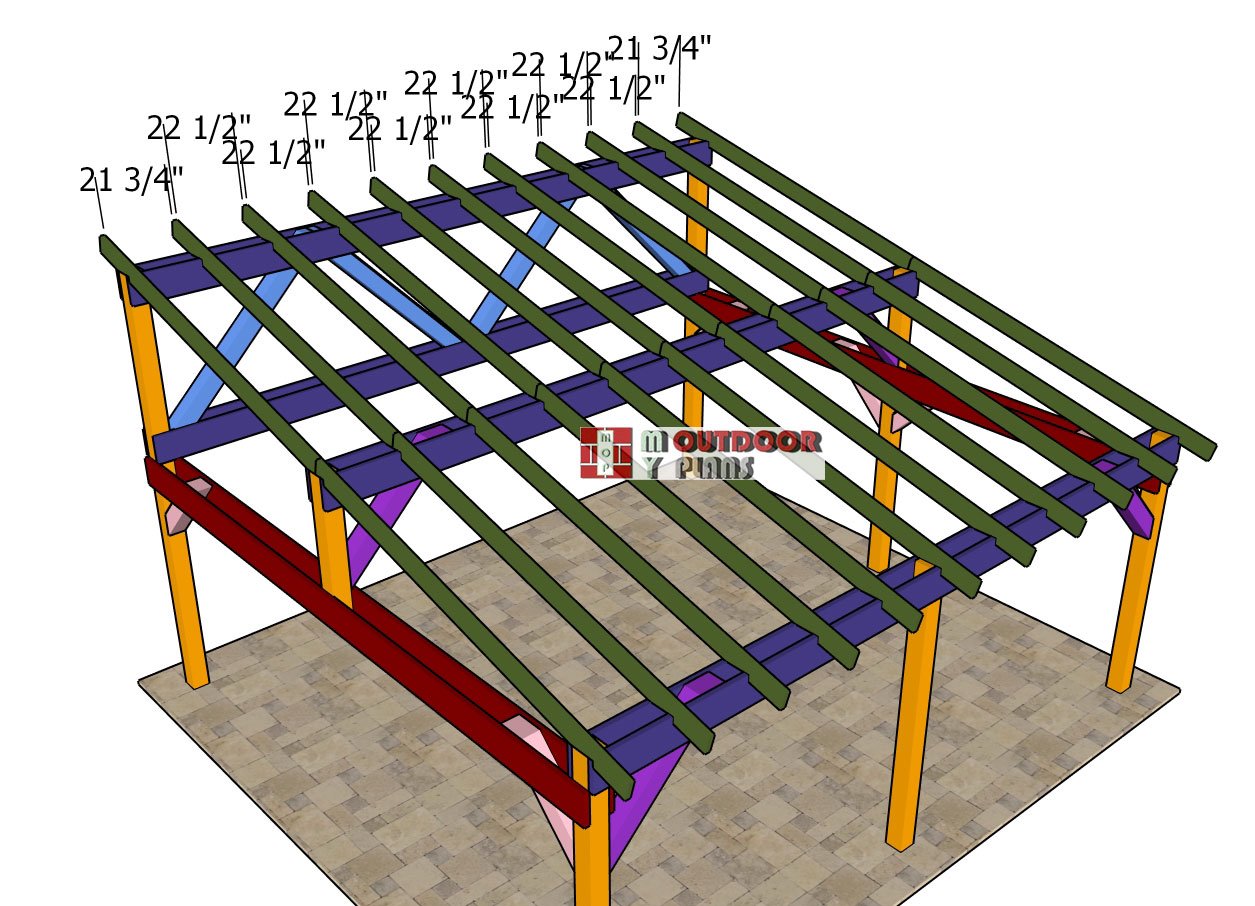
Fitting-the-rafters—ties
Fit the rafters to the top of the pavilion, spacing them 24″ on center. Secure each rafter to the pavilion structure using rafter ties and 1 1/2″ structural screws, following the layout in the diagram.
Ensure that every rafter is attached with rafter ties at both ends to keep the structure sturdy and well-aligned, providing strong support for the roof. Proper spacing and secure fastening will help distribute the roof’s load evenly across the structure.
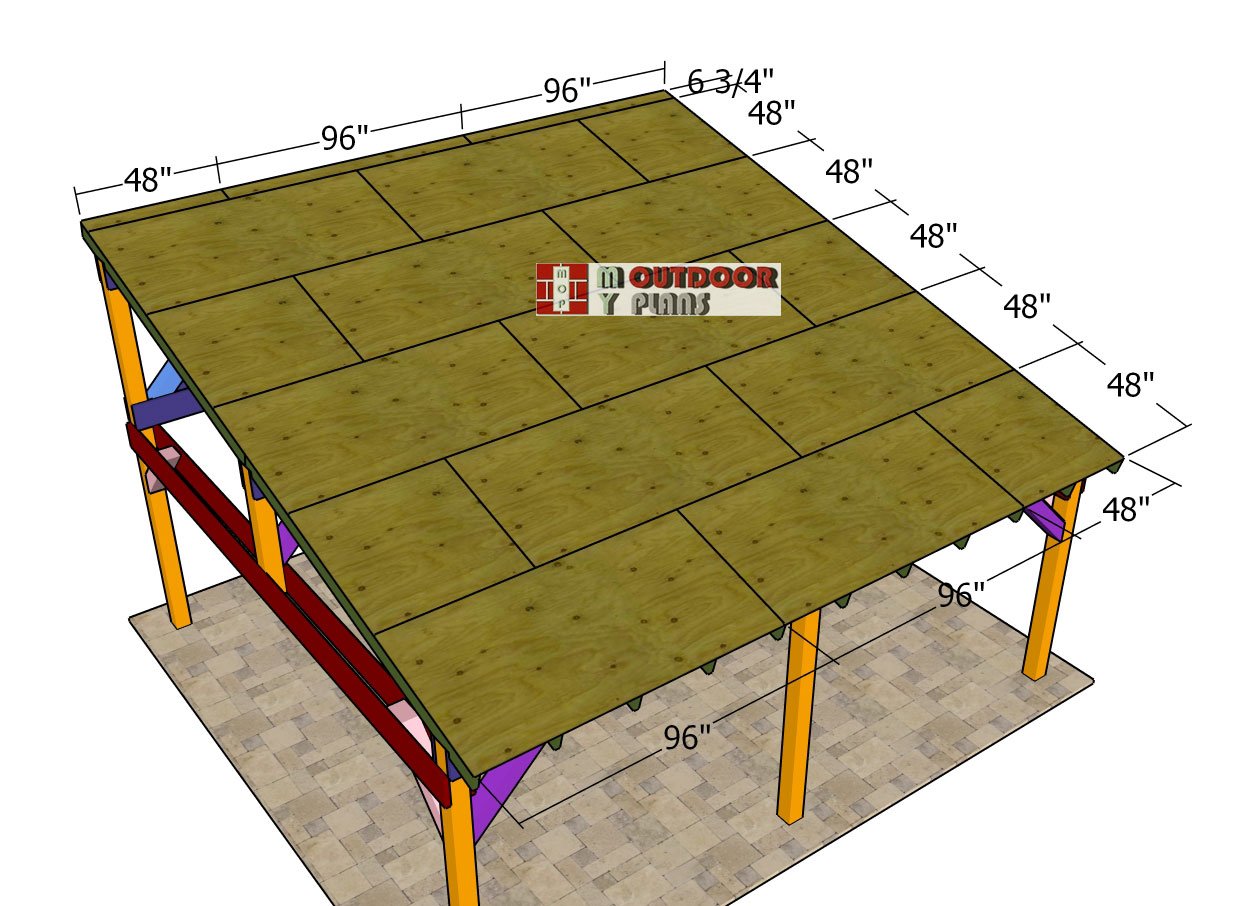
Roof-sheets—18×20-pavilion
Attach the 3/4″ plywood sheets to the roof, beginning at the lower left and working your way toward the ridge line. Ensure there are no gaps between the sheets and fasten them with 2 1/2″ screws, spacing the screws every 8 inches along the rafters.
Make sure the edges of adjacent plywood sheets meet in the middle of the rafters for proper alignment and support. This method will give the roof a solid, stable surface, ready for the next phase of construction..
Fitting-the-front-trims
Fitting-the-side-roof-trims
Next, attach the 1×8 trims to the sides of the pavilion, ensuring the edges are flush. Secure them firmly with 2″ nails. Once the side trims are attached, cut and install the trims for the gable ends of the pavilion.
Again, use 2″ nails to secure these trims. This step will not only give the pavilion a clean, finished appearance but also help protect the edges from weather damage, enhancing both durability and aesthetics.
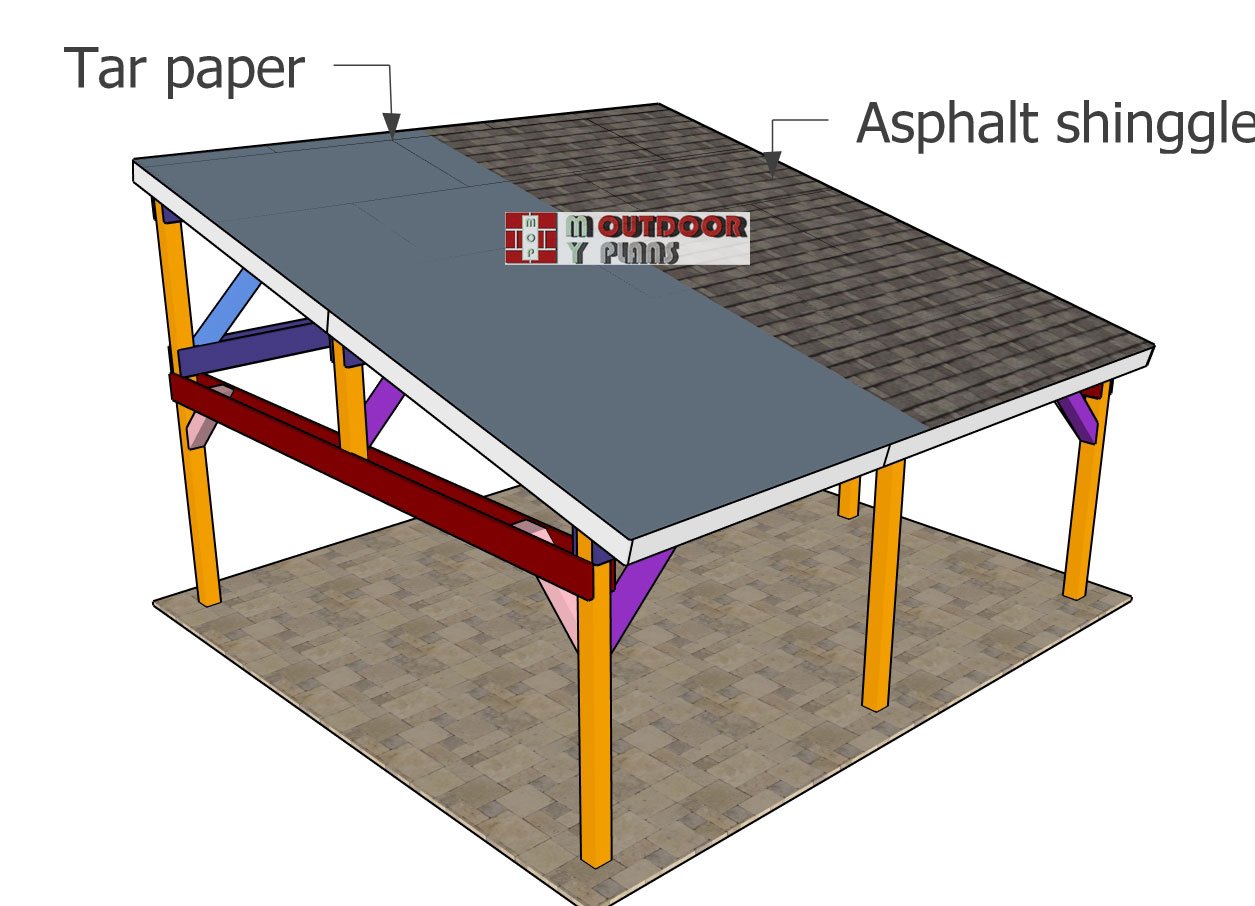
Fitting-the-roofing
To install asphalt shingles on the pavilion roof, start by laying down an asphalt underlayment, ensuring full coverage and proper overlapping. Begin with a starter strip along the lower edge, securing it with roofing nails. Lay the first row of shingles along the eaves, aligning the tabs with the starter strip, and nail them into place. Continue installing the rows, staggering the joints for better stability. Follow the manufacturer’s guidelines for overlap and nail placement to guarantee proper protection and ensure the roof’s longevity.
Finishing touches
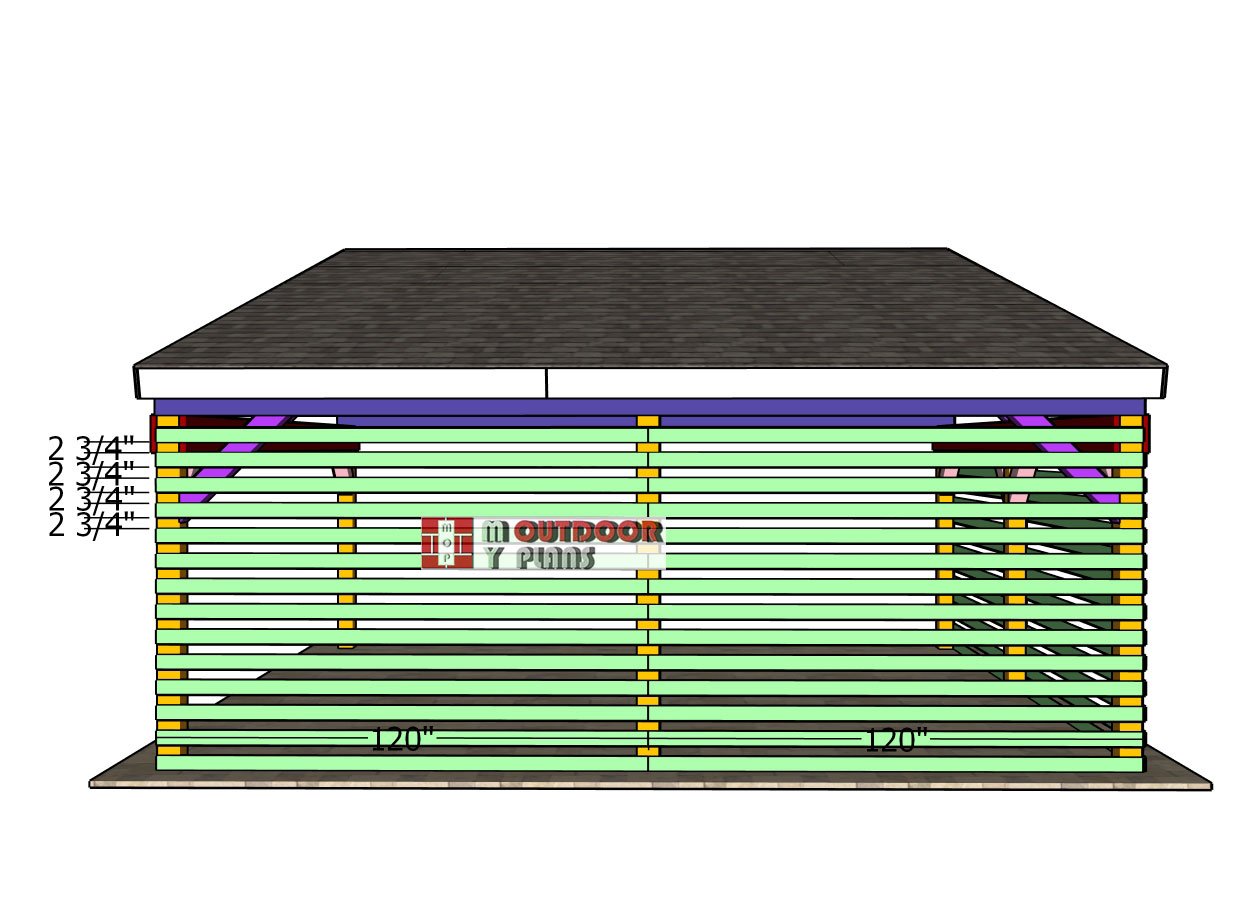
Back-slats
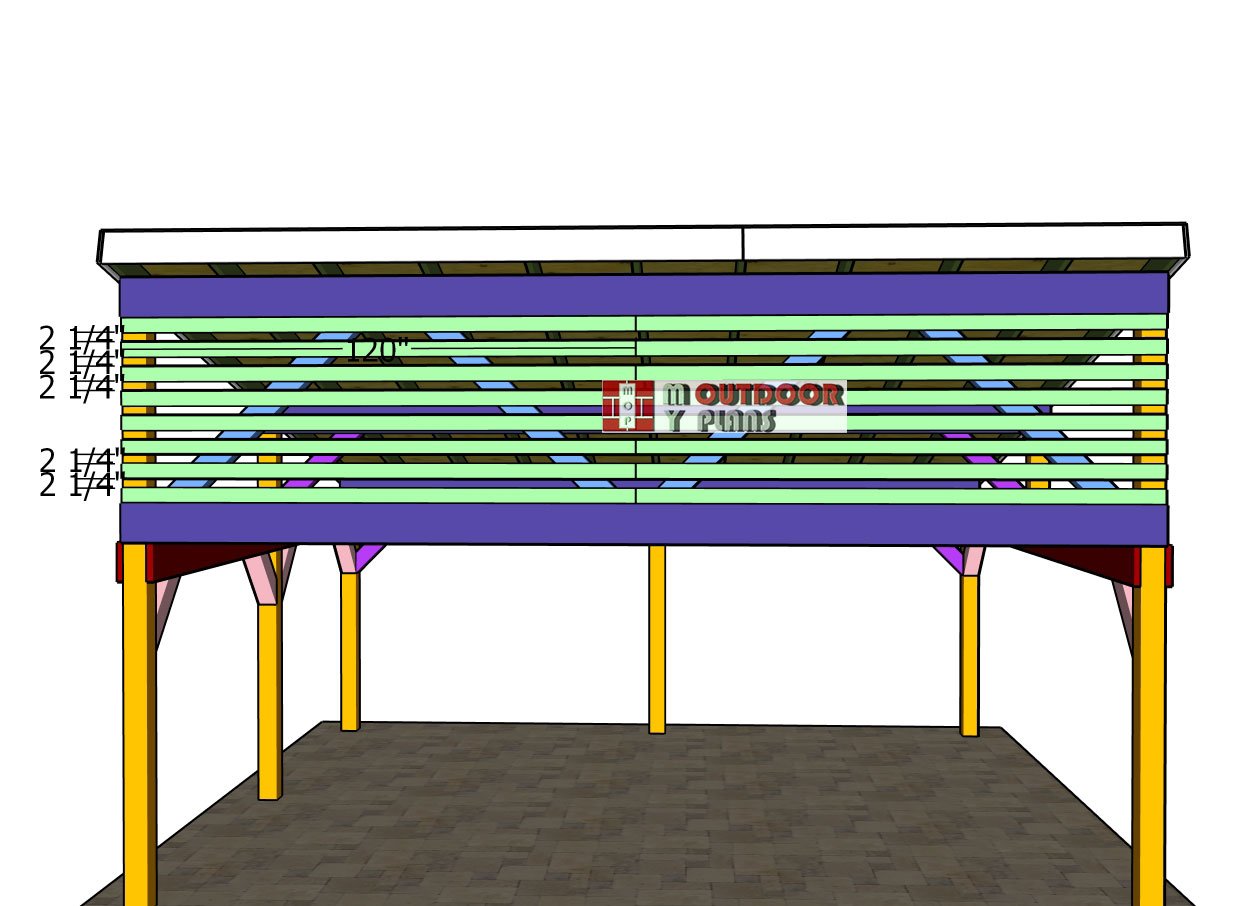
For the finishing touches, attach the 1×4 boards to the back of the pavilion. Use 2 3/4″ spacers between the boards to maintain consistent gaps. Drill pilot holes to prevent splitting, then secure the boards to the posts using 1 5/8″ screws. This will create a clean, evenly spaced design that adds both style and functionality to the pavilion’s structure.
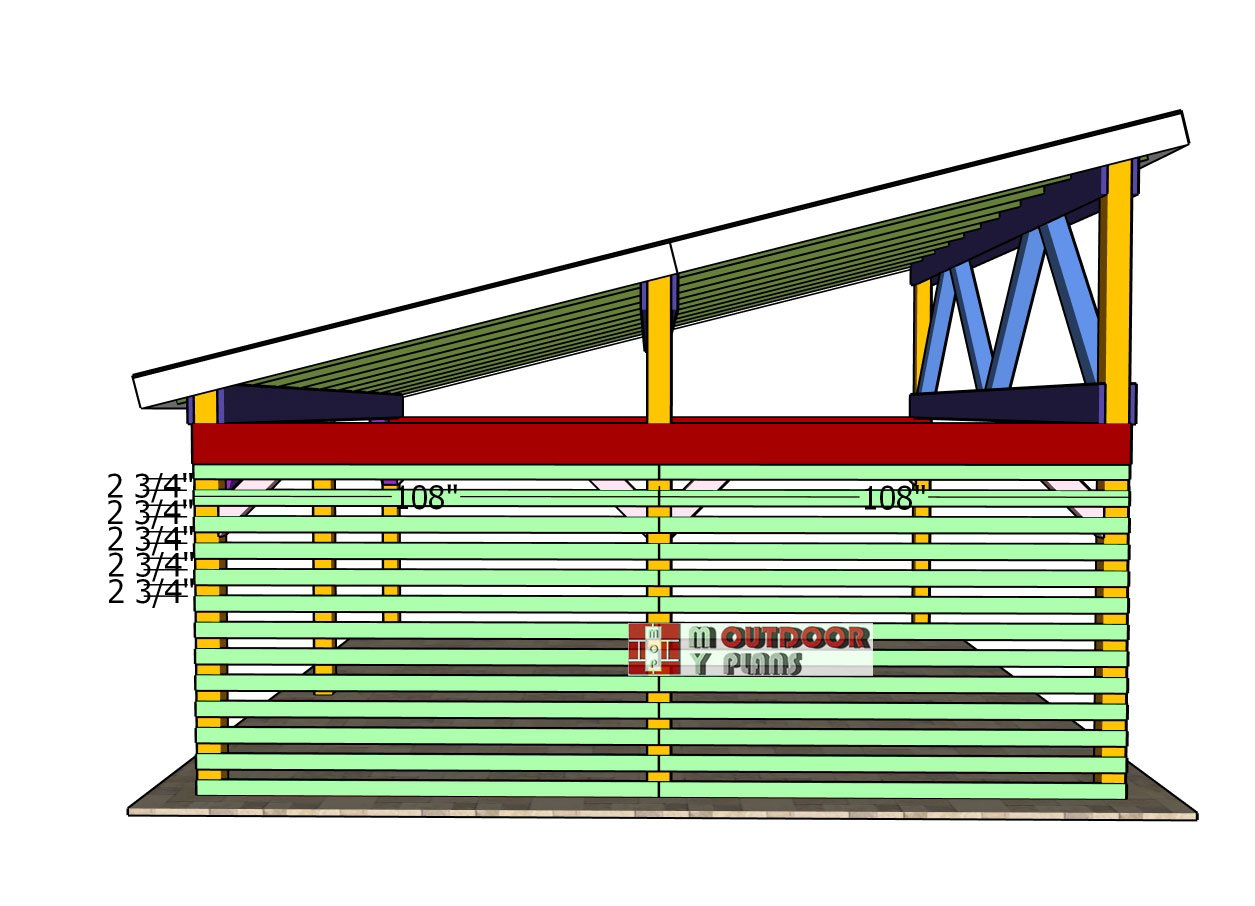
Fitting-the-side-slats
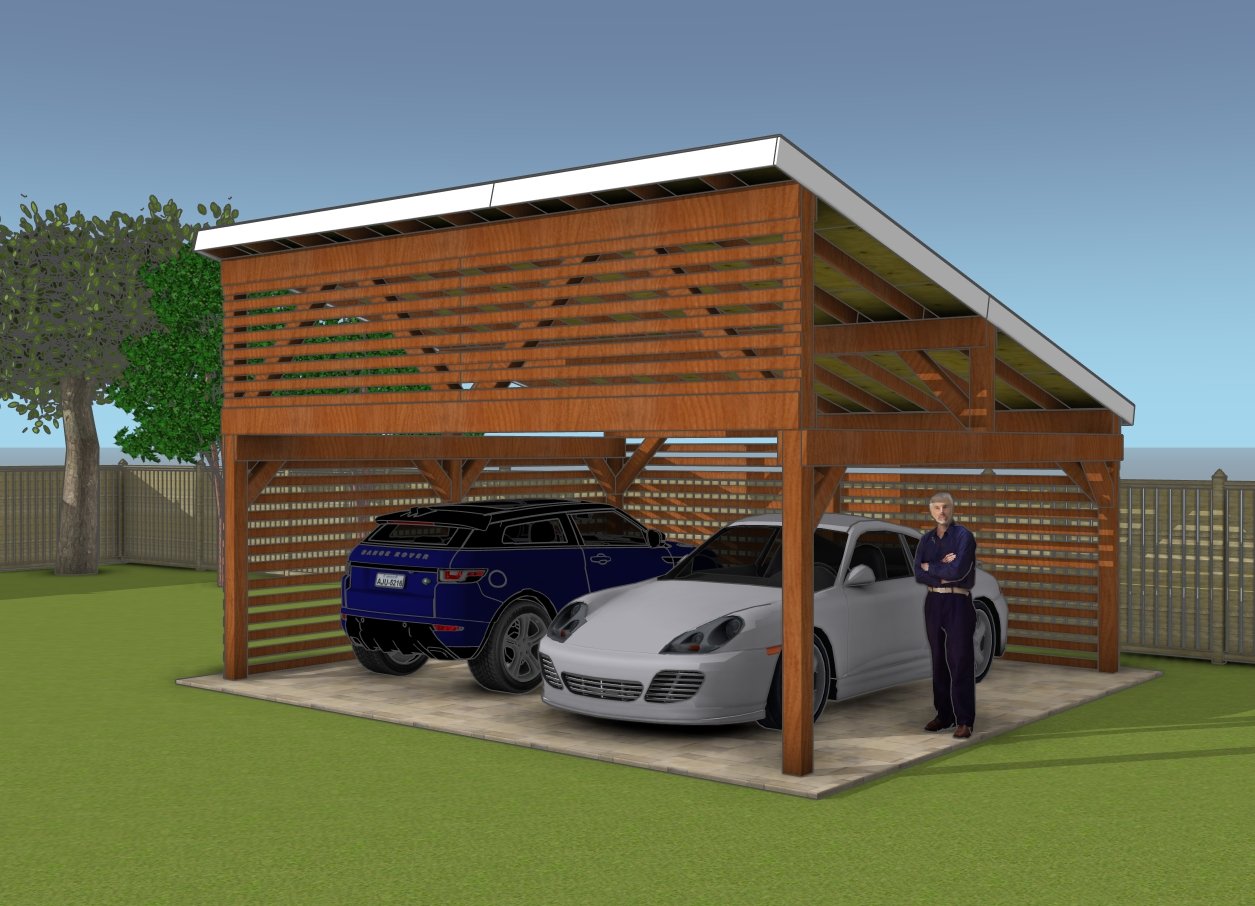
Fit the 1×4 boards to the side of the pavilion using the same method as for the back, maintaining even gaps with spacers and securing them with 1 5/8″ screws. This setup creates privacy screens on the back and one side of the pavilion, while leaving the front and the other side open.
It’s a great design for versatility—whether you want to use it as a carport or a cozy outdoor space for reading, relaxing, or hosting a BBQ. There are plenty of options with this adaptable wooden structure.
Front-trims
You can also attach the 1×4 slats to the top section of the front side to complete the sleek, modern architectural look of the pavilion. This finishing touch adds a stylish, contemporary feel while maintaining openness and airflow. It completes the design, making the pavilion not only functional but also visually appealing for any backyard or carport space.
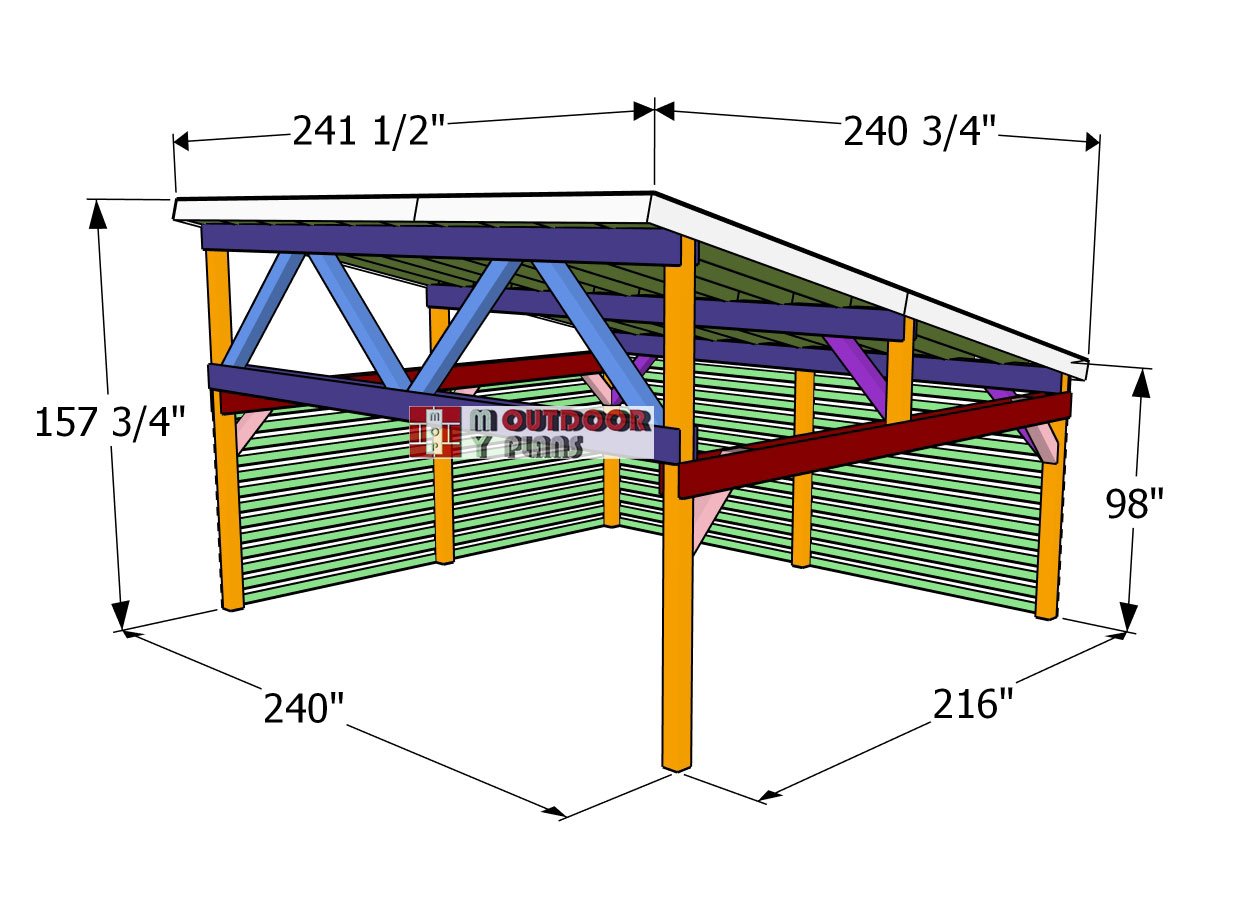
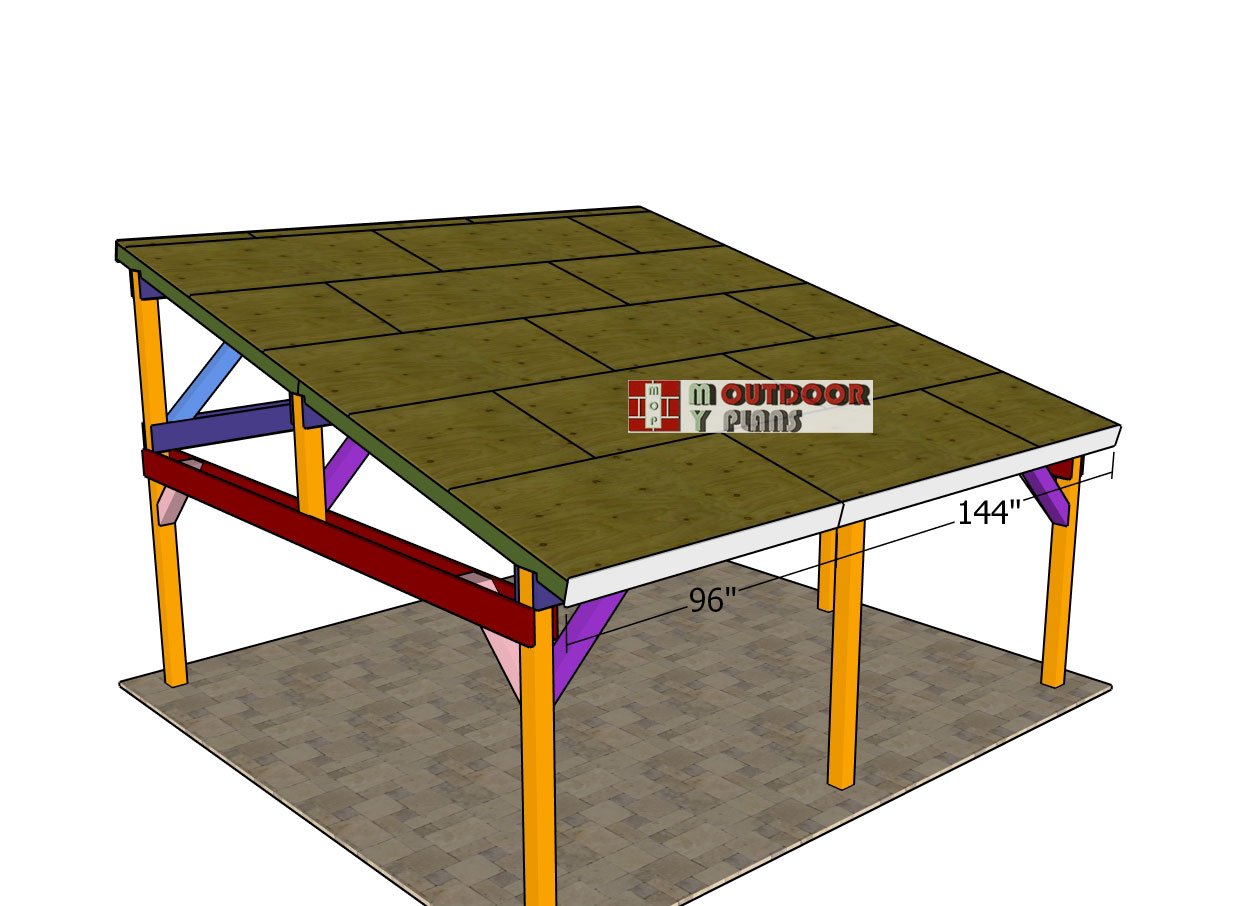
18×20-lean-to-pavilion—dimensions
For the finishing touches, you can really bring your pavilion to life by adding custom features that reflect your style and needs. Consider staining or painting the wood to protect it from the elements while enhancing its appearance. Installing outdoor lighting, string lights, or lanterns can create a warm ambiance for evening gatherings. Add privacy screens or outdoor curtains for a cozy feel, and incorporate built-in benches or planters to complete the space. These final details will make your pavilion not just functional but a personalized extension of your home.
How to build a 2 car lean to carport
18×20 lean to pavilion plans
Imagine yourself building this pavilion, step by step, and seeing it come to life in your backyard. Once complete, you’ll have a versatile space perfect for hosting BBQs, lounging with a good book, or using as a double carport. The pavilion offers year-round functionality, from sunny summer days to winter shelter for your vehicles.
How to build a 18×20 pavilion
What’s more, you can customize it with privacy screens, built-in seating, or even a small outdoor kitchen. Add lighting, curtains, or planters to really make it your own. This project is not just about building—it’s about creating a space that truly enhances your lifestyle.
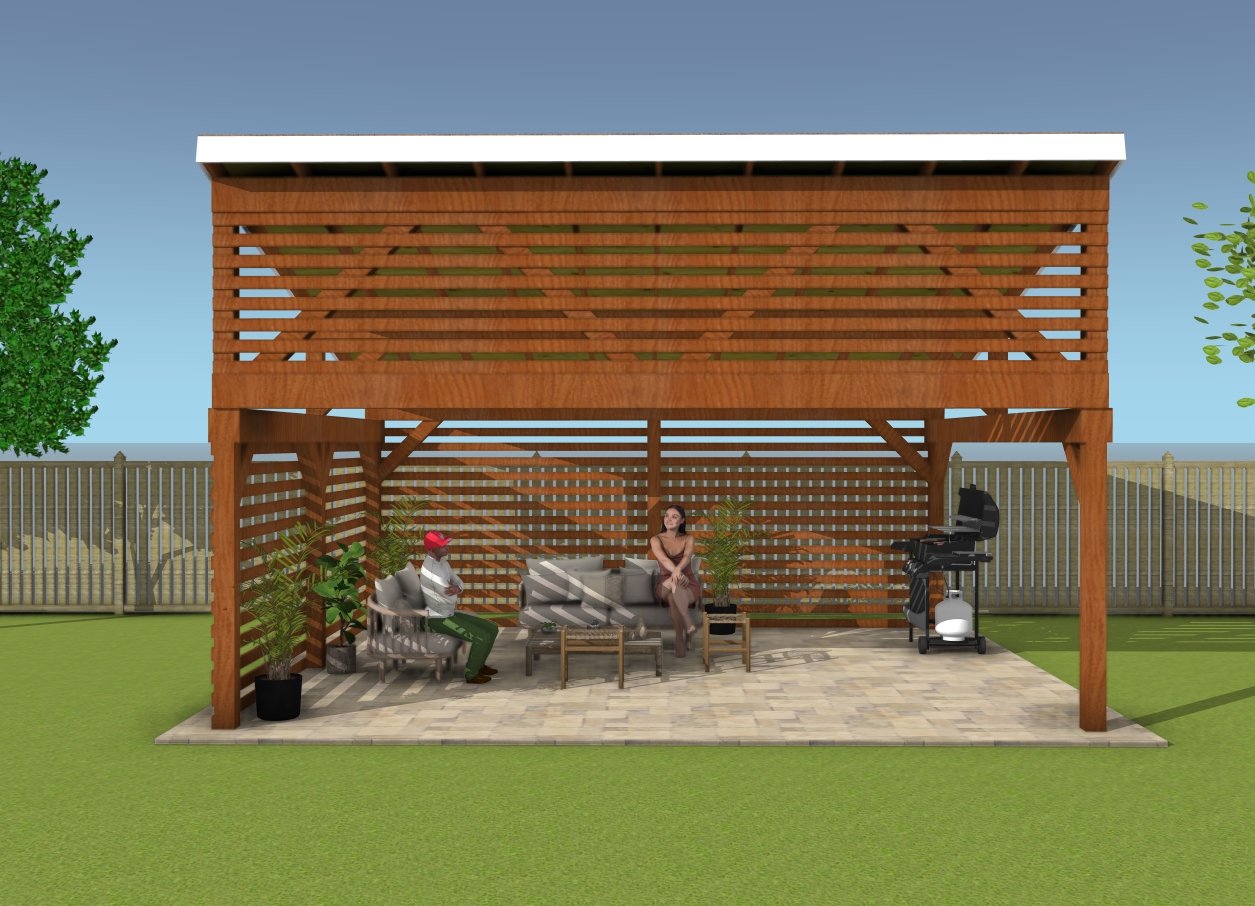
18×20 lean to pavilion – front view
With this 18×20 lean-to pavilion, you’ve created a versatile, stylish space that can serve as a carport or an outdoor gathering area. The combination of functional design and modern aesthetics makes it perfect for any backyard.
Whether you plan to relax, host a BBQ, or protect your vehicles, this pavilion will offer years of enjoyment. Now that the construction is complete, it’s time to furnish and personalize it to make it your own!
Top Tip: Check out the Shop, as well, for full list of Premium Plans. If you want to get PREMIUM PLANS for this project, in a PDF format, please press GET PDF PLANS button bellow. Thank you for the support.

This woodworking project was about 18×20 lean to pavilion plans free. If you want to see more outdoor plans, check out the rest of our step by step projects and follow the instructions to obtain a professional result.