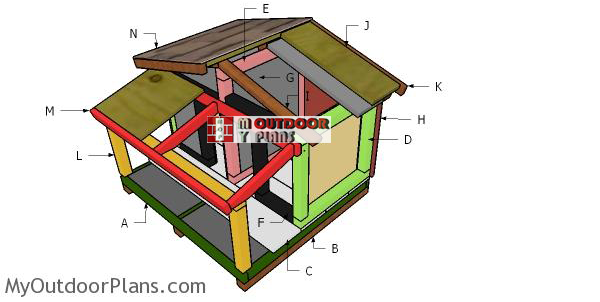
This step by step diy project is about double cat house with insulation plans. After designing the simple insulated cat house, I had the brilliant idea of making a few modifications so it can accommodate two cats. This is built on a sturdy structure that is made from 2x2s and siding sheets. The insulation is made from extruded polystyrene sheets and the interior walls are made from 1/4″ plywood. Take a look over the rest of my woodworking plans, if you want to get more building inspiration.
Building an insulated cat house with a front porch provides your feline friend with a cozy, weatherproof shelter that’s perfect for all seasons. The insulation helps maintain a comfortable temperature inside, while the front porch gives them a little outdoor lounging area to enjoy. Plus, it’s a rewarding DIY project that adds both functionality and charm to your yard!
When buying the lumber, you should select the planks with great care, making sure they are straight and without any visible flaws (cracks, knots, twists, decay). Investing in cedar or other weather resistant lumber is a good idea, as it will pay off on the long run. Use a spirit level to plumb and align the components, before inserting the galvanized screws, otherwise the project won’t have a symmetrical look. If you have all the materials and tools required for the project, you could get the job done in about a day. See all my Premium Plans HERE.
Projects made from these plans
Simple Insulated Cat House Plans
Building-a-double-cat-house-with-insulation
Cut & Shopping Lists
- A – 2 pieces of 1×2 lumber – 30 1/2″ long, 3 pieces – 26″ long FRAME
- B – 3 pieces of 2×2 lumber – 27 1/2″ long SKIDS
- C – 5 pieces of 5/8″ decking boards – 30 1/2″ long FLOOR
- D – 2 pieces of 2×2 lumber – 16 1/2″ long, 2 pieces – 13″ long 2xSIDE WALL
- E – 2 pieces of 2×2 lumber – 16 1/2″ long, 2 pieces – 17″ long SIDE WALL
- F – 6 pieces of 2×2 lumber – 13″ long, 2 pieces – 13″ long, 2 pieces – 8″ long FRONT & BACK WALL
- G – 6 pieces of 1 1/2″ polystyrene sheets – 24″x48″ INSULATION
- H – 2 pieces of 5/8″ T1-11 siding – 16″x16 1/2″ long, 2 pieces – 21″x31 1/2″ long EXTERIOR WALLS
- I – 6 pieces of 1×3 lumber – 18″ long RAFTERS
- I – 2 pieces of 1/4″ plywood – 13″x16″ long, 2 pieces – 14 3/4″x20″ long, 4 pieces – 13″x20 3/4″ long INTERIOR WALLS
- J – 2 pieces of 3/4″ plywood – 18×20 1/4″ long, 1 piece – 11 3/4″x30 1/2″ long ROOF
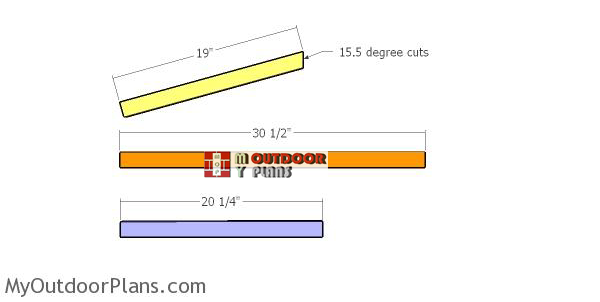
- K – 4 pieces of 1×2 lumber – 19″ long, 2 pieces – 20 1/4″ long, 1 piece – 30 1/2″ long TRIMS
- L – 2 pieces of 2×2 lumber – 11″ long, 1 piece of 1×2 lumber – 30 1/2″ long PORCH
- M – 1 piece of 1×2 lumber – 31 1/2″ long, 3 pieces – 11″ long PORCH ROOF
- N – 12 sq ft of asphalt shingles ROOFING
- 3 pieces of 1×2 lumber – 8′
- 2 pieces of 5/8″ decking boards – 8′
- 6 pieces of 2×2 lumber – 8′
- 2 pieces of 1×3 lumber – 8′
- 1 piece of 5/8″ T1-11 siding – 4’x8′
- 1 pieces of 1/4″ plywood – 4’x4′
- 1 piece of 1/2″ plywood – 4’x4′
- 6 pieces of 1 1/2″ extruded polystyrene foam sheets
- 12 sq ft of asphalt shingles
- 1 1/2″ brad nails, 2 1/2″ screws, 1 5/8″ screws
- wood filler , wood glue, stain/paint
Tools
![]() Hammer, Tape measure, Framing square, Level
Hammer, Tape measure, Framing square, Level
![]() Miter saw, Drill machinery, Screwdriver, Sander
Miter saw, Drill machinery, Screwdriver, Sander
![]() Safety Gloves, Safety Glasses
Safety Gloves, Safety Glasses
Time
![]() One day
One day
Related
It’s that easy to build a cat house – Video!
Building a cat house with insulation
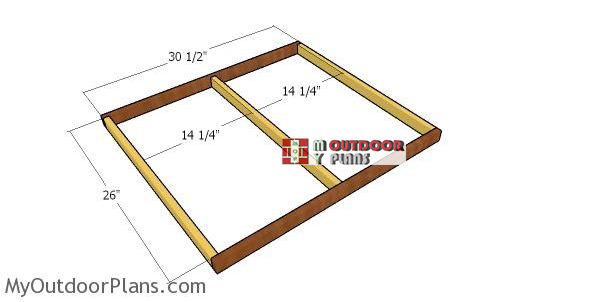
Floor-frame-for-cat-shelter
The first step of the project is to build the frame for the floor. Cut the components from 1×2 lumber, using the information from the diagram. Drill pilot holes through the end components and insert 1 5/8″ screws to assemble the frame together tightly. Check if the corners are square and align the edges flush.

Fitting the insulation to the floor frame
Fit 1 1/2″ polystyrene foam sheets between the frame of the floor, as shown in the diagram. Make sure you fit several layers of the polystyrene, as a better thickness will ensure a better insulation for the floor of the cat house.
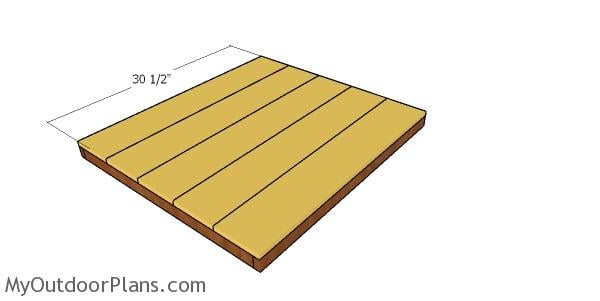
Fitting the floor slats
Next, use 5/8″ decking boards for the floor of the cat house. Cut the boards at 16″ long and then lay them to the frame. Leave no gaps between the slats, drill pilot holes and insert 1 5/8″ screws to lock the boards into place tightly.
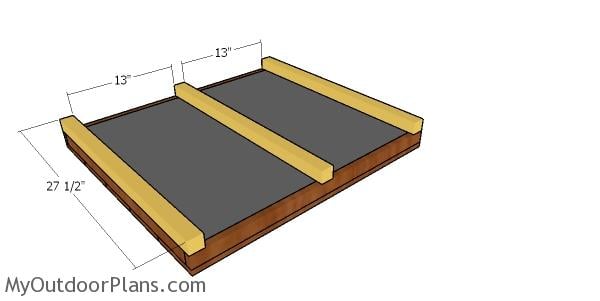
Fitting the skids – double cat house
Fit the 2×2 skids to the floor of the cat house. Drill pilot holes and insert 2 1/2″ screws to lock them into place tightly.
Building the wall frames
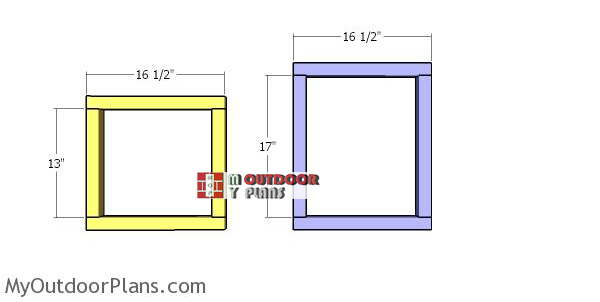
Wall-frames-for-cat-house
Build the side walls for the cat house using 2×2 lumber, as well as the middle wall for the partition. Drill pilot holes through the plates and insert 2 1/2″ screws to lock everything tightly. Add glue to the joints and make sure the corners are square.
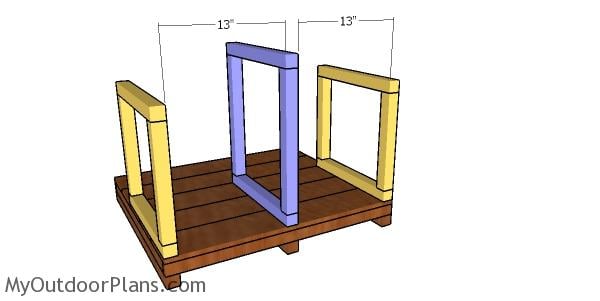
Fitting the side walls to the cat house
Fit the wall frames to the floor of the insulated cat house, as shown in the plans. Drill pilot holes through the bottom plates and insert 2 1/2″ screws into the floor. Plumb the walls with a spirit level for a professional result.
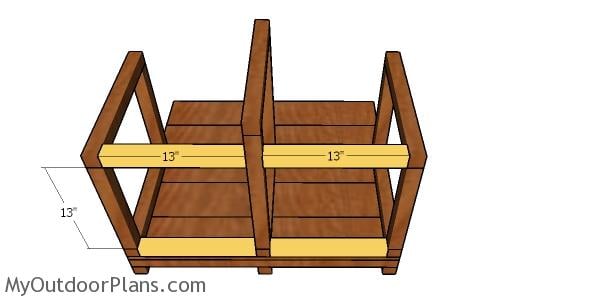
Back wall frame
Next, attach the 2×2 supports for the back wall. Drill pocket holes at both ends of the supports and insert 2 1/2″ screws to lock them into place tightly.
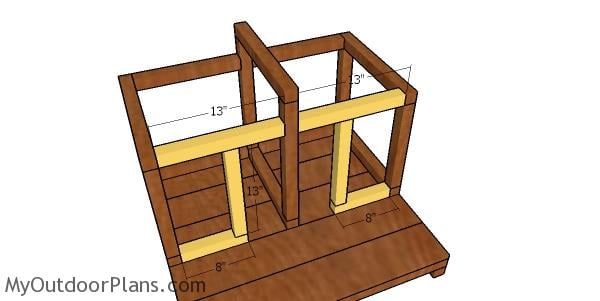
Front frame – double cat house
Frame the front wall for the cat house in the same manner described above. You can adjust the size of the door opening to suit your needs.
Building the roof

Rafters for double cat house
Use 1×3 lumber for the rafters. Use a miter saw to make a 15.5 bevel cut to one end of the rafters.
Fitting the rafters – double cat house
Fit the rafters to the top of the cat house. Align the edges flush, drill pilot holes and insert 2 1/2″ screws to lock them into place tightly.
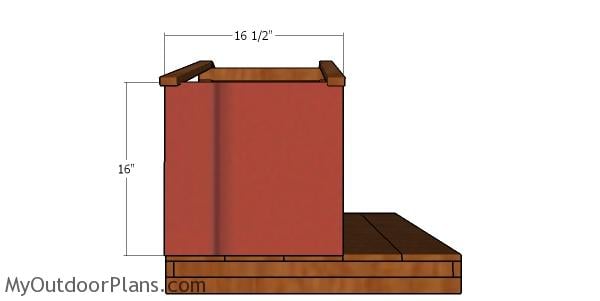
Side siding – cat house
Use 5/8″ T1-11 siding sheets for the exterior walls of the cat house. Cut the sheets at the right dimensions and and then attach the to the sides of the cat house with 2″ nails.
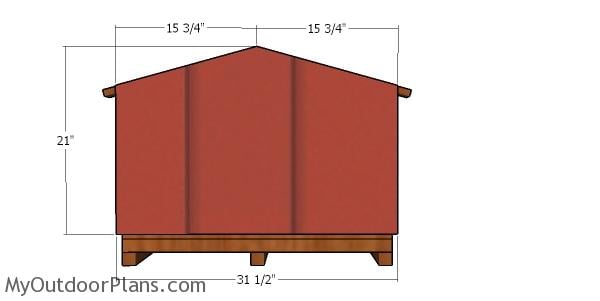
Back wall siding – cat house
Attach the siding sheets to the back of the cat house, as show in the diagram.
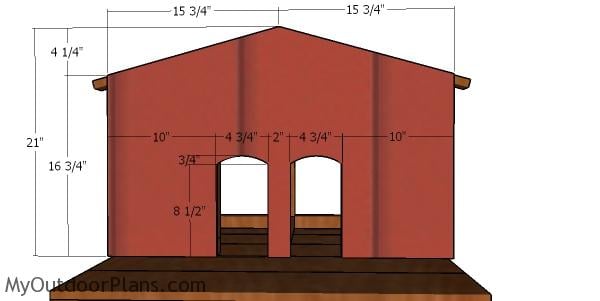
Front wall siding – cat house
Fit the siding sheet to the front of the cat house. Use a jigsaw to cut out the opening for the two houses.
Fitting the interior panels
Insulation for walls
Use 1 1/2″ extruded polystyrene for the wall insulation. Use a saw to cut the panels at the dimensions shown in the diagram.
Fitting the insulation to the walls
Fit the insulation sheets into the wall frames. If you cut them as shown in the diagram, they will fit in properly.
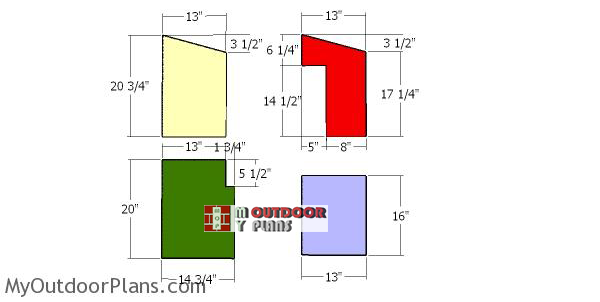
Interior-walls-–-cat-house
You can use 1/4″ plywood or tongue and groove boards for the interior walls. Using the plywood will make the job a lot faster, so I suggest you to choose this route. Mark the cut lines on the plywood sheet and get the job done with a circular saw.
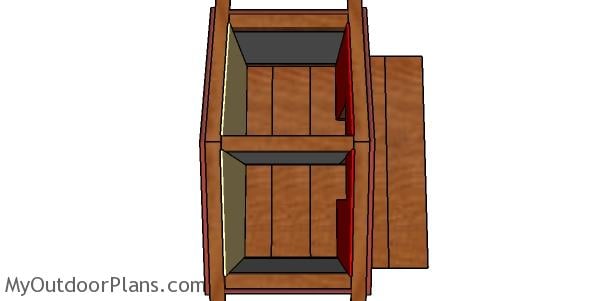
Fitting the front and back interior walls
Fit the panels to the front and back of the cat shelter. Use finish nails to secure the panels to the frame of the structure.

Fitting the interior side walls – cat shelter
Attach the plywood panels to the sides of the cat house.
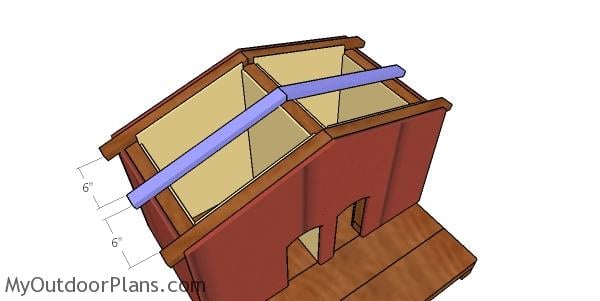
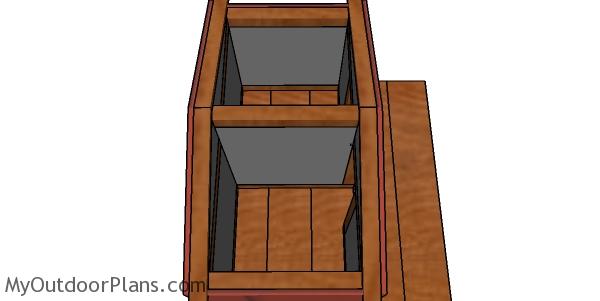
Fitting the middle roof rafters
Fit the middle rafters to the double cat house, drill pilot holes and insert 1 5/8″ screws to lock them into place.

Roof insulation
Fit the insulation sheets between the rafters of the cat house.
Building the front porch
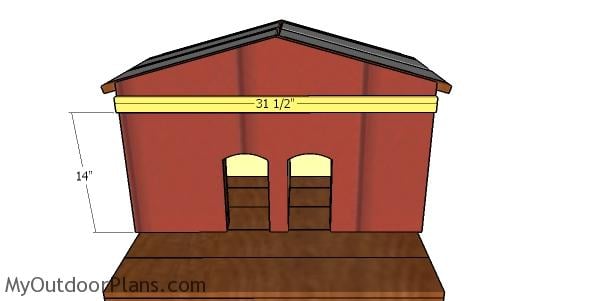
Support for cat house porch
Fit the 1×2 support to the front of the cat house. Use a spirit level to make sure the support is perfectly horizontal. Drill pilot holes through the support and insert 1 5/8″ screws to lock it to the frame of the structure.

Porch supports – cat house
Next, build the front support for the porch. Use 2×2 lumber for the posts and 1×2 lumber for the top plate. Drill pilot holes and insert 2 1/2″ screws to lock everything together and to the porch of the cat shelter.

Cat house porch rafters
Use 1×2 lumber for the porch rafters. Use a miter saw to make the angle cuts to both ends of the supports.
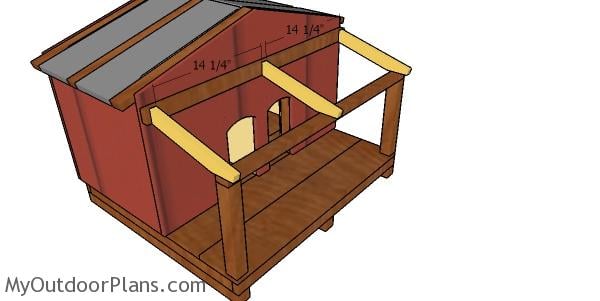
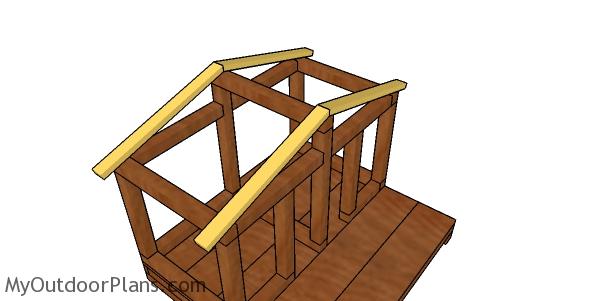
Fitting the rafters to the cat house porch
Fit the rafters to the front of the double cat house. Drill pilot holes and insert 1 5/8″ screws to secure the rafters into place tightly.
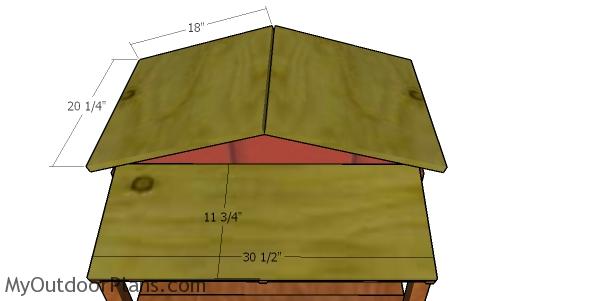
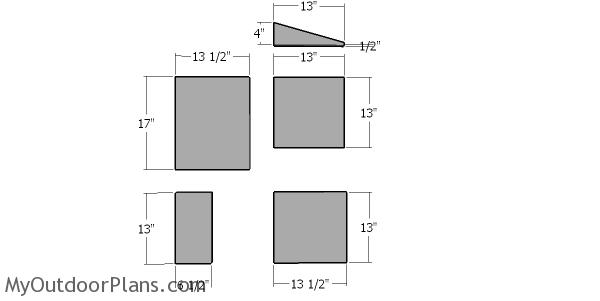
Fitting the roof sheets – double cat house
Use 1/2″ plywood for the roof sheets. Cut the sheets as shown in the diagram. Fit the sheets to the top of the cat house and align the edges perfectly. Drill pilot holes and insert 1 5/8″ screws to lock everything together tightly.
Roof-trims—cat-house
Use 1×2 lumber for the roof trims. Cut the trims as shown in the diagram.
Fit the trims to the top of the cat house. Align the edges flush and leave no gaps between the trims. Drill pilot holes and insert 1 5/8″ screws to secure the trims into place tightly.
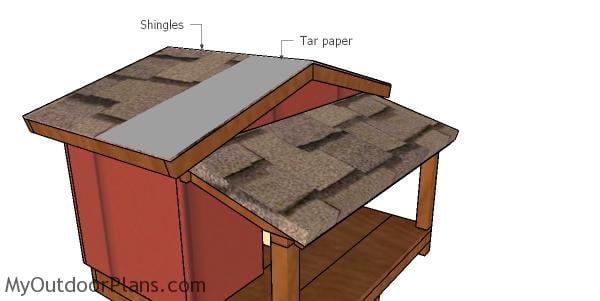
Fitting the roofing
Cover the roof of the cat house with asphalt shingles.
Finishing touches
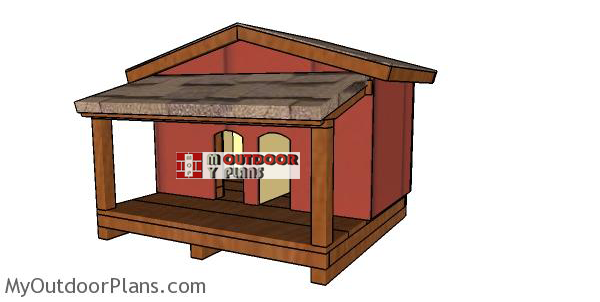
Double-cat-house-with-insulation-plans
Apply a few coats of stain or paint to the exterior of the cat house to protect the components from the elements and to make it look nice and match the style of the rest of your garden.
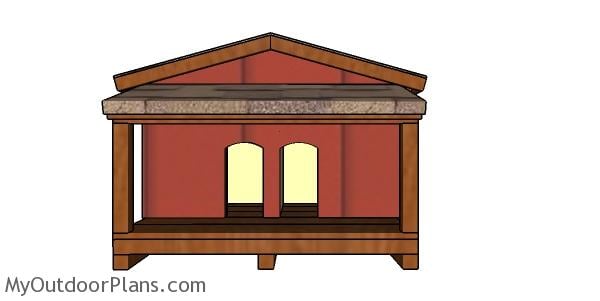
Double cat house with insulation plans – front view
I am sure you favorite furry pets will love their new house, because it features insulated walls and a porch.
Building an insulated cat house with a front porch will cost approximately $125 to $200, depending on the materials you choose. This estimate covers plywood, insulation, 2×2 lumber, paint, hardware, and roofing materials, along with bedding for comfort. If you already have the basic tools, you can easily tackle this DIY project on a budget!
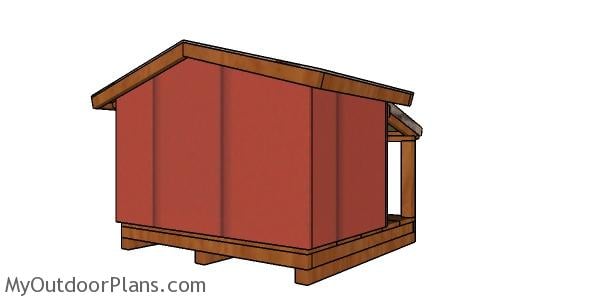
Double cat house with insulation plans – back view
The basic box structure and the gable roof make this insulated cat house easy to build and cost friendly. I have lots of other cat house designs on this blog so make sure you take a look over the rest of them HERE. Moreover, I have more than 1000+ free woodworking plans on this blog which you can see all HERE.
This woodworking project was about double cat house with insulation plans free. If you want to see more outdoor plans, check out the rest of our step by step projects and follow the instructions to obtain a professional result. If you build this cat house let me know and I will be more than glad to highlight your work! You can build and You can inspire others!
3 comments
Thanks! I built a single door cat house with this design and it turned out nicely!
I have feral cats . Feeding about 13 and up. This winter is hard . Below zero at times and needed to have housing. People pitched in and helped temporary shelters but I still worried. So my thought is to have places for as many as I can. Make them myself. So found your site and loved your ideas. Thank you. Now I have to learn how to use my circular saw. Scares me a bit. Anyways thank you for plans and wish us luck. That’s me and kitties Haha. Jude.
Thanks. Good luck with the project. I’m sure you’ll do great 🙂