This step by step diy project is about 5×12 pent shed plans. This shed design is one of my most versatile, as it features double doors on the front and a single door on the side. This storage shed is super compact so it will fit in tight spaced, such a narrow yard. Take a look over the rest of my woodworking plans, if you want to get more building inspiration.
When buying the lumber, you should select the planks with great care, making sure they are straight and without any visible flaws (cracks, knots, twists, decay). Investing in cedar or other weather resistant lumber is a good idea, as it will pay off on the long run. Use a spirit level to plumb and align the components, before inserting the galvanized screws, otherwise the project won’t have a symmetrical look. See all my Premium Plans HERE.
Projects made from these plans
5×12 Lean to Shed Plans

Building-a-5×12-lean-to-shed
Cut & Shopping Lists
- A – 3 pieces of 4×4 lumber – 144″ long SKIDS
- B – 2 pieces of 2×6 lumber – 144″ long, 10 pieces – 57″long FLOOR
- C – 1 piece of 3/4″ plywood – 48″x48″ long, 1 piece – 48″x96″ long, 1 piece – 12″x96″ long, 1 piece – 12″x48″ long FLOORING
- D – 2 pieces of 2×4 lumber – 10 1/2″ long, 4 pieces – 79 1/2″ long, 2 pieces – 76″ long, 1 piece – 53″ long, 1 piece – 60″ long, 2 pieces – 35″ long SIDE WALL
- E – 12 pieces of 2×4 lumber – 79 1/2″ long, 1 piece – 137″ long, 2 pieces – 144″ long BACK WALL
- F – 2 pieces of 2×4 lumber – 53″ long, 1 piece – 60″ long, 5 pieces – 79 1/2″ long SIDE WALL
- G – 2 pieces of 2×4 lumber – 36″ long, 1 piece – 144″ long, 1 piece – 137″ long, 10 pieces – 79 1/2″ long, 1 piece – 144″ long, 1 piece – 137″ long, 2 pieces – 72 1/4″ long, 2 pieces of 2×8 lumber – 75″ long FRONT WALL
- G – 7 pieces of T1-11 siding – 48″x84″ long, 1 piece – 8 3/4″x48″ long, 2 pieces – 12″x84″ long SIDING
- 3 pieces of 4×4 lumber – 12′
- 2 pieces of 2×6 lumber – 12′
- 10 pieces of 2×6 lumber – 6′
- 3 pieces of 3/4″ plywood – 4’x8′
- 42 pieces of 2×4 lumber – 8′
- 5 pieces of 2×4 lumber – 12′
- 2 pieces of 2×8 lumber – 8′
- 9 pieces of T1-11 siding – 4’x8′
- 6d nails, 2 1/2″ screws, 3 1/2″ screws
- wood filler , wood glue, stain/paint
Tools
![]() Hammer, Tape measure, Framing square, Level
Hammer, Tape measure, Framing square, Level
![]() Miter saw, Drill machinery, Screwdriver, Sander
Miter saw, Drill machinery, Screwdriver, Sander
![]() Safety Gloves, Safety Glasses
Safety Gloves, Safety Glasses
Time
Related
- PART 1: 5×12 Lean to Shed Plans
- PART 2: 5×12 Lean to Shed Roof Plans
- PART 3: 5×12 Shed Door Plans
- 5×8 Lean to shed plans
Building a 5×12 lean to shed
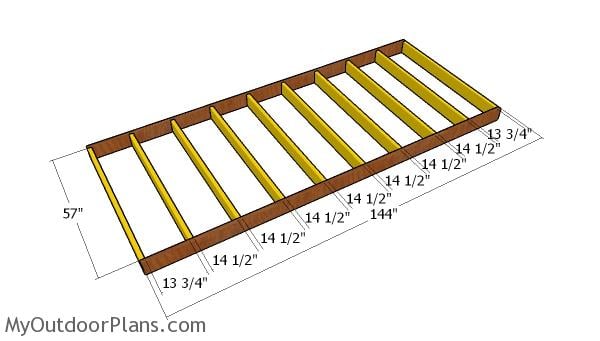
Floor frame
The first step of the project is to build the floor frame. Cut the components at the right dimensions from 2×6 lumber and then lay them on a level surface. Drill pilot holes through the rim joists and then insert 3 1/2″ screws into the perpendicular beams. Place the joists every 16″ on center, as in the diagram. Check if the corners are right angled.
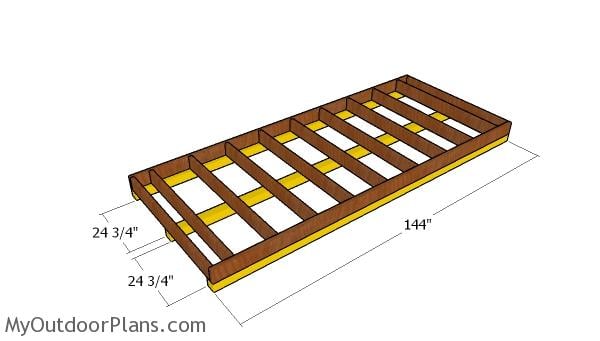
Fitting the skids
Select the location for the shed and make sure you remove the vegetation layer. Level the ground thoroughly and then fit the 4×4 skids under the floor frame. Align the edges and use rafter ties to secure the skids to the frame of the floor. Use a spirit level to make sure the frame is horizontal in all directions. Check out the local building codes before building the shed, so you make sure you comply with the requirements.
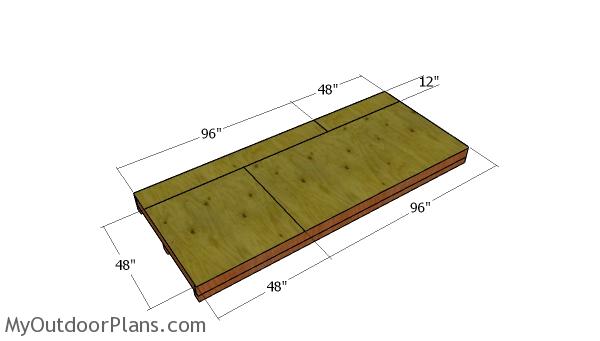
Floor sheets
Fit a piece of 3/4″ plywood to the floor frame. Align the edges flush and insert 1 5/8″ screws, every 8″ along the framing. Leave no gaps between the sheets for a professional result. Follow the pattern shown in the plans, so you add strength to the floor.
Building a 5×8 lean to shed
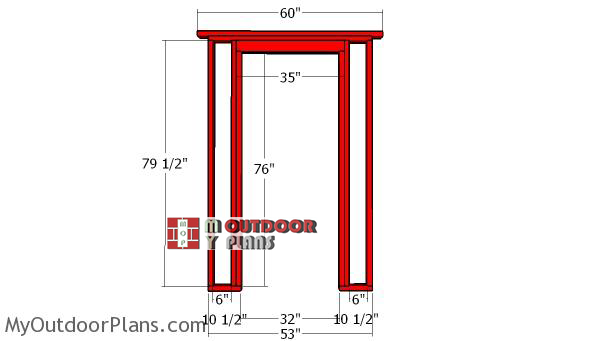
Side-wall-with-door-frame
Next, assemble the front wall frame. Use 2×4 lumber for the front wall frame. Use 2×4 lumber and 1/2″ plywood for the double header. Drill pilot holes through the plates and insert 3 1/2″ screws into the studs. Make sure the corners are square and align the edges flush. You can adjust the size of the door opening to suit your needs. Alternatively, you could use a frame nail gun and 8d nails.
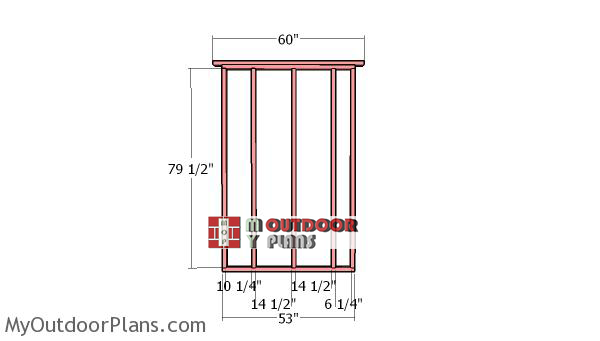
Side-wall-frame
Build the frame for the back wall from 2×4 lumber. Cut the components from 2×4 lumber as show in my free shed plans. Lay the plates and the studs on a level surface. Drill pilot holes through the plates and insert 3 1/2″ screws into the studs. Make sure the corners are square and place the studs every 16″ on center.
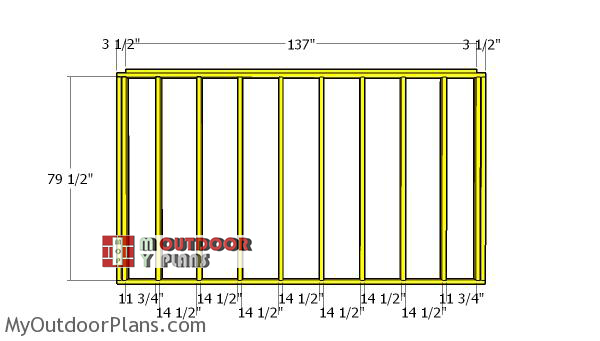
Back-wall-frame
Build the side walls for the shed using the same techniques described above and the information from the diagram. Place the studs every 16″ on center. Check if the corners are square, drill pilot holes and insert 3 1/2″ screws to lock everything together tightly.
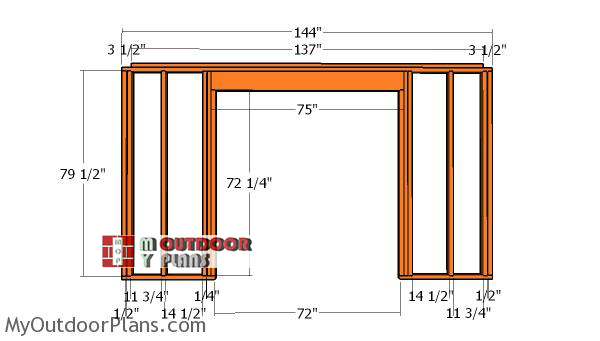
Front-wall-frame
Next, build the front wall with the opening for the double doors. Use 2×4 lumber for the plates and studs. Use 2×8 lumber and 1/2″ plywood for the double header. You can adjust the size of the double doors to suit your needs.
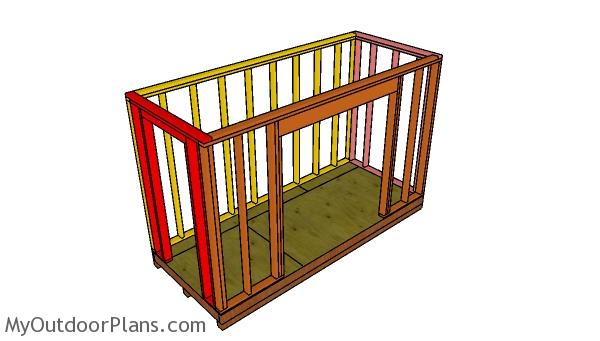
Building the shed frame
Fit the wall frames to the floor of the shed. Align the edges with attention and plumb the walls with a spirit level. Drill pilot holes through the bottom plates and insert 3 1/2″ screws into the floor. Lock the adjacent walls together tightly using 3 1/2″ screws.
Fitting the siding sheets
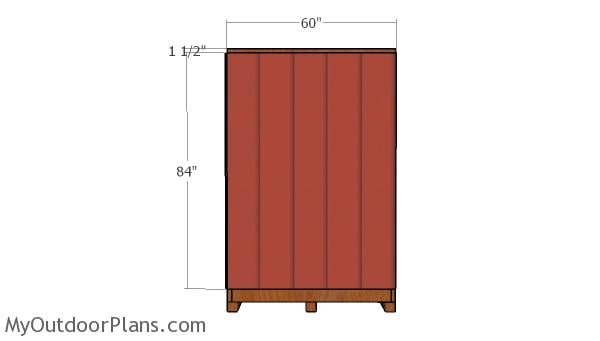
Back wall siding panels
Fit T1-11 siding panels to the back of the shed. Align the sheet to the top plate of the side walls and then insert 2″ nails, every 8″ along the framing.
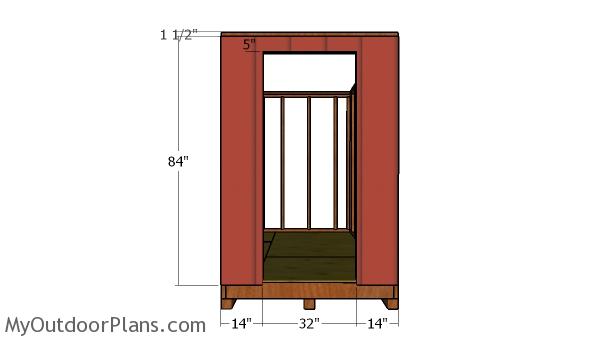
Side wall with door panel
In order to attach the siding sheets to the front of the shed you need to make a few cuts. Mark the cut lines and then get the job done with a circular saw. Insert 2″ nails, every 8″ along the framing. You will use the cutout panel for the door.
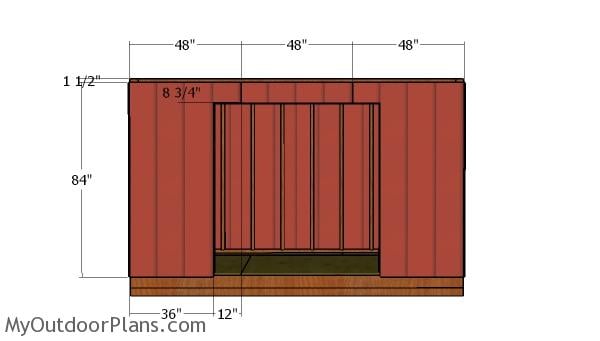
Front wall panels
Fit the siding sheets to the front of the shed. Use a circular saw to make cuts to the sheets so you can fit them around the opening. Insert 4-6d nails, every 8″ along the framing.
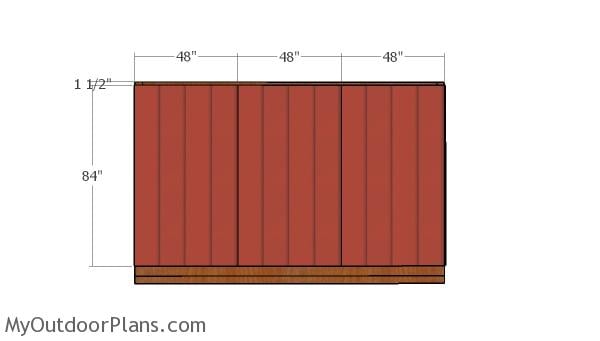
Back wall siding panels
Fit the T1-11 siding panels to the back of the shed. Leave 1 1/2″ from the top edge of the walls to the siding panels. Leave no gaps between the panels and insert 2″ nails, every 8″ along the framing.
Finishing touches
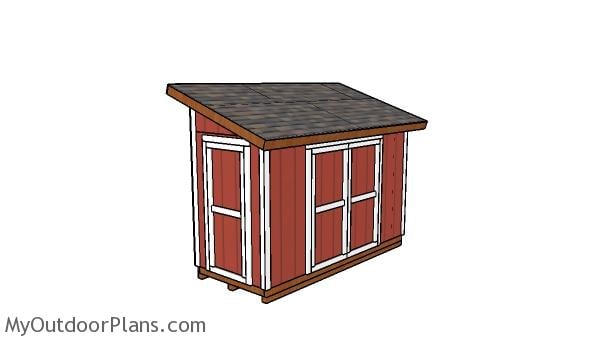
5×12 Lean to Shed Plans
This 5×12 shed has an easy access to the interior, with the single side door and the double front doors.
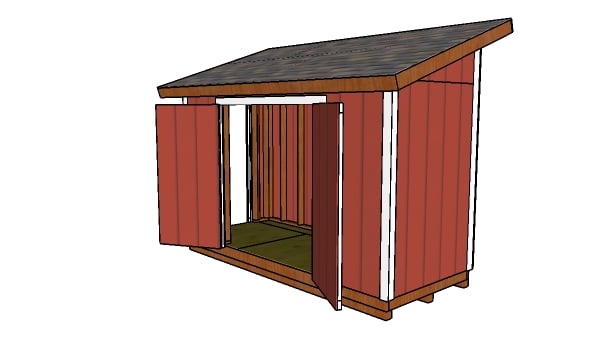
How to build a 5×12 lean to shed
Make sure you take a look over PART 2 and PART 3 of the project, so you learn how to build the lean to roof and how to build the decorative trims. I have lots of other shed projects on the site so I recommend you to browse through all alternatives before starting the building project. See all my shed projects HERE.

5×12 Lean to Shed – dimensions
Building a 5×12 lean-to shed with double front doors and a side door will likely cost you between $1,500 and $2,500, depending on the materials and finishes you go with. The extended length of the shed provides plenty of room for storage, while the double front doors and side door make access a breeze. It’s a compact yet highly functional design that offers flexibility and efficiency without taking up too much space in your yard.

How to build a 5×12 lean to shed
You’re looking at about 3 to 4 weekends to construct your 5×12 lean-to shed with double front doors and a side door. The build is straightforward, but the extra doors will require careful planning and precise installation to ensure everything functions smoothly. By the time you’re done, you’ll have a well-crafted shed that maximizes utility and accessibility.
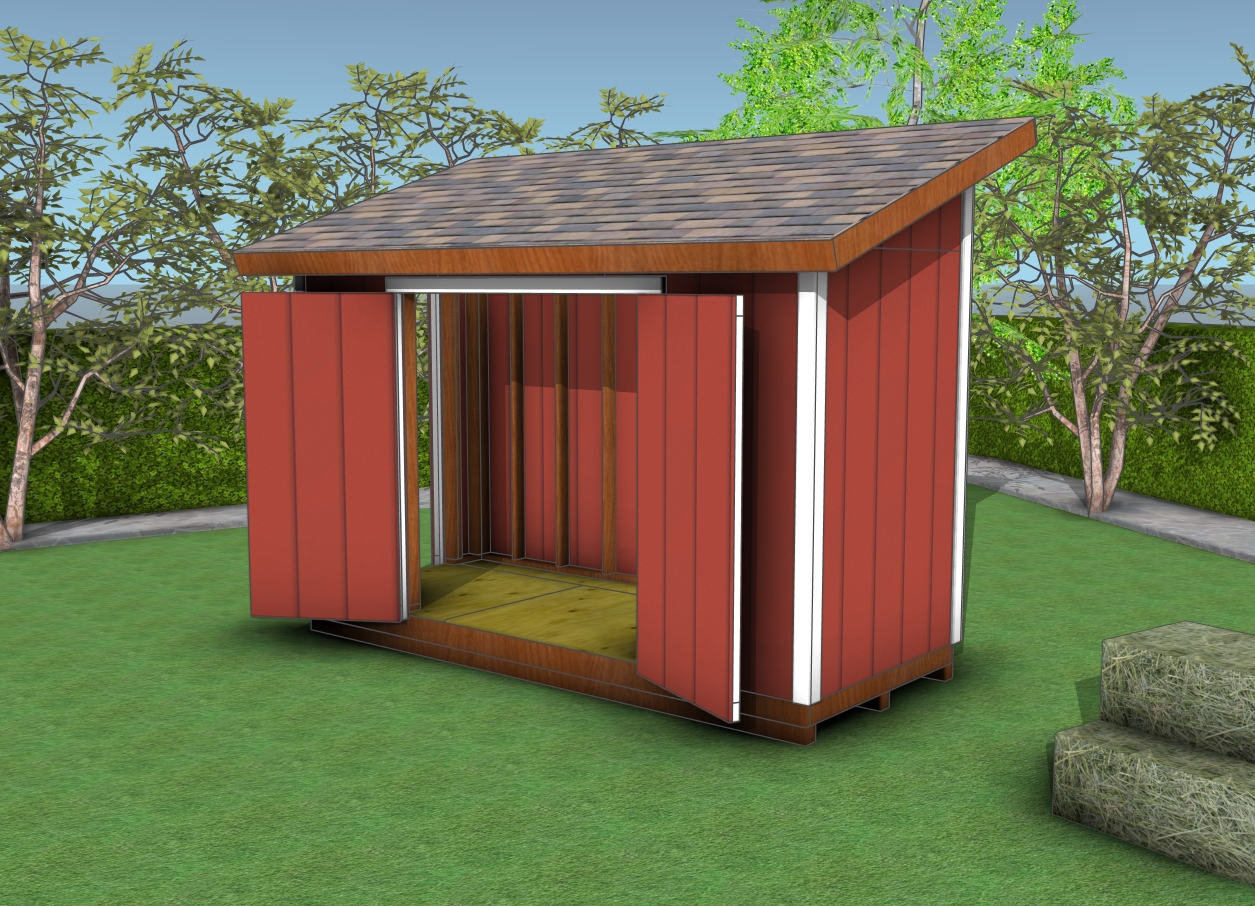
5×12 lean to shed – free plans
As you finish your 5×12 lean-to shed with double front doors and a side door, you’ll have created a versatile storage solution that fits perfectly into your space. The additional side door adds another layer of convenience, making it easy to grab what you need without any hassle. This shed isn’t just about stashing away your stuff – it’s a thoughtfully designed structure that brings both style and practicality to your outdoor setup, ready to serve you well for years to come.
If you want to get PREMIUM PLANS for this project, in a PDF format, please press GET PDF PLANS button bellow. Thank you for the support.
This woodworking project was about 5×12 lean to shed plans free. If you want to see more outdoor plans, check out the rest of our step by step projects and follow the instructions to obtain a professional result.


14 comments
Hi there! I plan to build this shed with the roof flipped so the raised end is over the door. I then plan to attach a covered patio to the shed, ending up with a split roof design. Do you think this is possible with this particular shed? Thanks!
Yes, that is possible and it will look great. It is easy to make the conversion of the doors.
Hi,
Very good plan, thank you.
I want to do this in my garden. I have one question. Do I need to flash where the back wall meets the sides of the shed to stop water ingress?
Any help much appreciated.
Cheers,
Paul.
Do you mean the corners? I’m not sure what you mean
What kind of rafter ties should I use for the base? Could you send a link?
This: https://amzn.to/3csONSp
Am I going to need that many?
3 for each skid, so 9 in total.
sorry last question, overall highest point including floor frame and roof?
10 ft high, including the skids.
Where can I adjust to not go over 9 ft including skids? Can I maybe use 2×4 for the floor frame and make the top back wall about 9 inches shorter? Any suggestions?
I don’t recommend 2x4s for the floor frame, otherwise it will be a playhouse and not a shed. If you make the top wall 1 ft shorter, it will be more like a flat roof. If you don’t have snow you can get by with that. Otherwise. I recommend you to make the walls shorter.
Hello, I bought your premium plans for this lean to shed but don’t understand exactly where the 1/2″ plywood goes on the door frame and walls. Can you please explain? Thanks!
Between the double studs and it is also used for the double headers.