This step by step diy woodworking project is about wooden cooler plans. If you want to learn how to build a wood cooler we recommend you to check out the instructions and diagrams. There are several things that you should know before starting the actual construction project, such as what tools are required or the dimensions of the cooler stand. Therefore, don’t forget to adjust the size and the look of the cooler stand to fit the plastic container.
Invest in the best materials you afford, especially if you want to use the cooler for many years in a row. Therefore, cedar, redwood or pine are great choices, as they come with a beautiful natural finish and are weather-resistant. Take accurate measurements and use proper tools to get the job done. Lock the components together with waterproof glue and galvanized screws.
Projects made from these plans
Cut & Shopping Lists
- A – 4 pieces of 2×2 lumber – 36″ long LEGS
- B – 6 pieces of 2×2 siding – 24″ long, 4 pieces – 13 1/2″ long FRAME
- C – 6 pieces of 1×4 lumber – 13 1/2” long BOOTOM SHELF
- D – 10 pieces of 1×4 lumber – 24″, 10 pieces – 13 1/2 ” long SLATS
- E – 2 pieces of 1×2 lumber – 16 1/2″ long, 2 pieces – 27″ long TRIMS
- F – 7 pieces of 1×4 lumber – 13 1/2″, 2 pieces of 1×3 – 15″, 2 pieces – 25 1/2″ LID
- G – 6 pieces of 1×2 lumber – 10 3/4″, 4 pieces – 6″, 2 pieces – 9″ TRIMS
- H – 6 pieces of 1×4 lumber – 13 1/2” long FLOOR
- cooler box
- 100 pieces of 2 1/2″ screws
- 100 pieces of 1 1/4″ screws
- 2″ brad nails
- wood glue, stain/paint
- wood filler
Tools
![]() Hammer, Tape measure, Framing square, Level
Hammer, Tape measure, Framing square, Level
![]() Miter saw, Drill machinery, Screwdriver, Sander
Miter saw, Drill machinery, Screwdriver, Sander
Time
Related
Building a wooden cooler
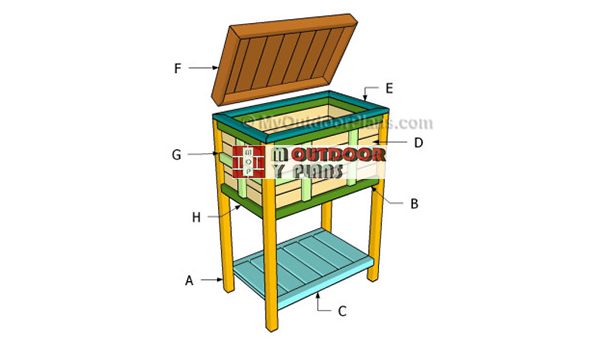
Building-a-wooden-cooler
Top Tip: Building a nice wooden cooler is a complex project, but the end result will most certainly enhance the look of your backyard. Nevertheless, the most important aspect of the project is to take accurate measurements and to adjust the size of the cooler to suit your needs.
Wooden Cooler Plans
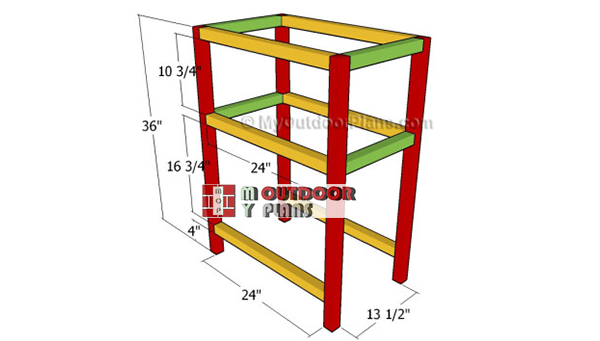
Building-the-frame-of-the-cooler
The first step of the project is to make the frame of the wooden cooler. As you can easily notice in the image, we recommend you to make the components out of 2×2 lumber. Drill pilot holes at both ends of the horizontal supports and insert 2 1/2″ screws into the legs.
Top Tip: Plumb the wooden legs with a spirit level and check if the corners are right-angled, before locking the component together. Always align the components at both ends before driving the galvanized screws in.
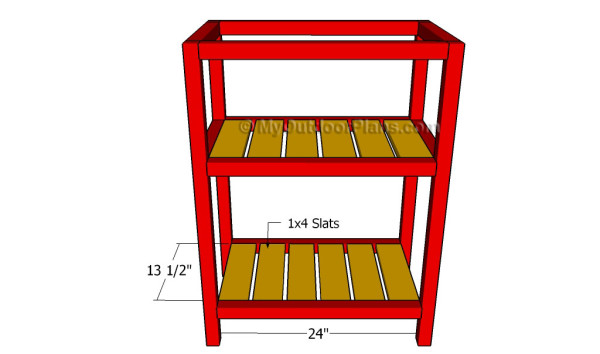
Fitting the shelves
Continue the woodworking project by fitting the slats to the bottom shelf and to the floor of the wooden cooler. Cut the 1×4 slats at the right dimension and lock them to frame with pocket holes and 1 1/4″ screws.
It is essential to place the slats equally-spaced before driving the screws into the framing. Place a piece of 1/2″ plywood between the slats to create consistent gaps. Add waterproof glue to the joints, in order to lock them tightly. Work with attention if you want to get the job done in a professional manner.
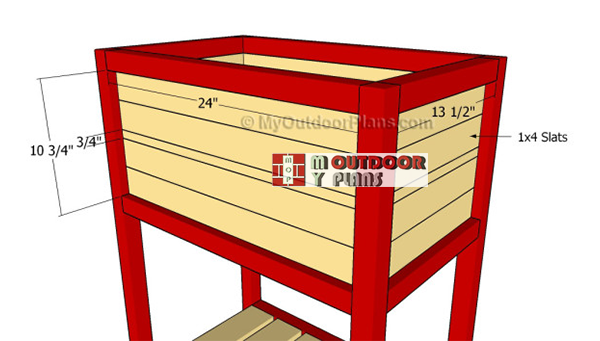
Fitting-the-slats-to-the-cooler
The next step of the woodworking project is to attach the 1×4 slats to the four sides of the cooler. As you can easily notice in the plans, you have to adjust the width of one slat on each side, otherwise it won’t fit into place.
Top Tip: Drill pocket holes at both ends of the slats and lock them to the legs with 1 1/4″ galvanized screws. Add waterproof glue to the joints, as to get a rigid structure.
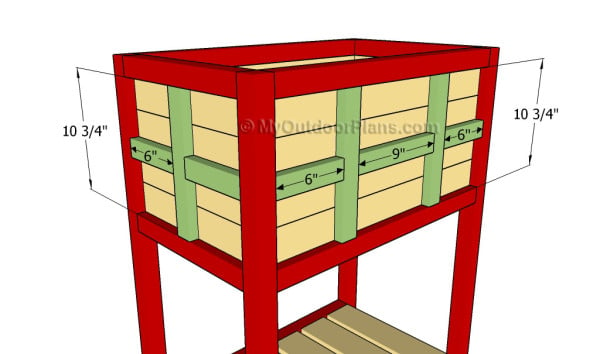
Attaching the trims on the sides
If you want to enhance the look of the wooden cooler, we recommend you to attach 1×2 trims to the exterior of the project. Cut the components to the right size and lock them into place with 1 1/4″ finishing nails and waterproof glue.
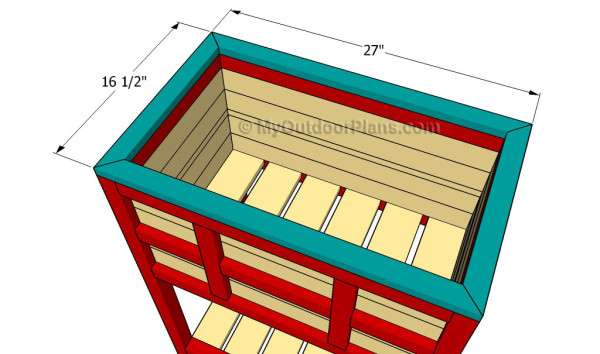
Attaching the trims
Don’t forget to add nice trims to the top of the cooler before attaching the lid into place. Cut both ends of the 1×2 trims at 45 degrees as to get the job done in a professional manner.
Align the trims at both ends before locking them to the frame with 1 1/4″ finishing nails and waterproof glue. Moreover, you could also smooth the visible edges with sandpaper or with a router. Close the gaps with wood putty if necessary.
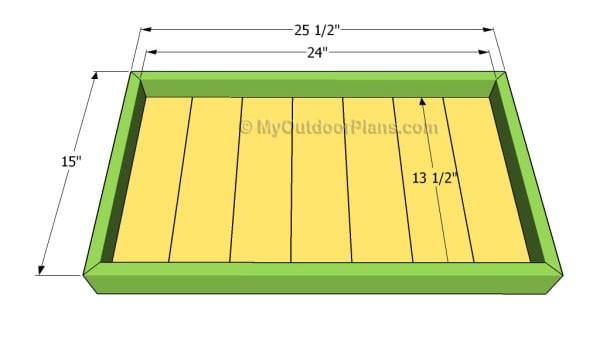
Building the lid
One of the last steps of the project is to build the lid and to secure it to the wooden cooler. As you can notice in the image, we recommend you to use 1×4 slats and 1×3 trims.
Don’t forget that it is essential to adjust the size of the lid according to the dimensions of the cooler lid, otherwise it won’t fit into place easily. Don’t leave gaps between the slats and secure all the components tightly. Add glue to the joints and insert 2″ finishing nails through the trims into the slats.
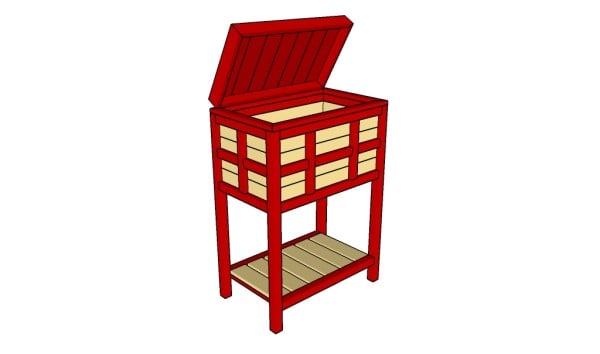
Wooden cooler plans
After installing the top lid to the cooler, we recommend you to take care of the finishing details. Therefore, you should make sure all the components are locked together easily.
Top Tip: Don’t forget to take a look over the rest of the projects, if you want to learn more about how to build projects for your garden. There are lots of projects that you could choose from so pay attention to the our plans.
This woodworking project was about wooden cooler plans. If you want to see more outdoor plans, we recommend you to check out the rest of our step by step projects.


2 comments
love it. nice project
Thank you!