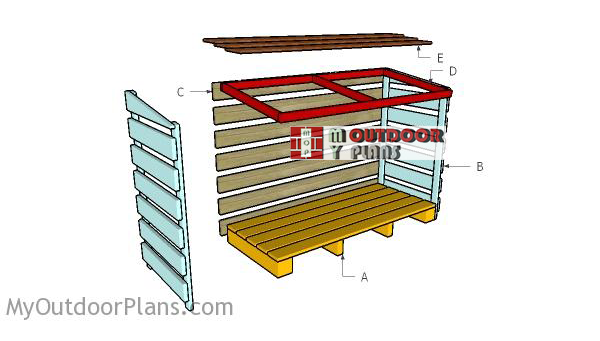
This step by step diy woodworking project is about log shed plans. The project features instructions for building a small firewood shed. The log store has a nice design and a front oriented slope, so it can match the style of any property. You can use pallet or scrap wood to get the job done in a professional manner. Work with attention and make adjustments to the design and overall dimensions if you want to get the job done in a professional manner.
When buying the lumber, you should select the planks with great care, making sure they are straight and without any visible flaws (cracks, knots, twists, decay). Investing in cedar or other weather resistant lumber is a good idea, as it will pay off on the long run. Use a spirit level to plumb and align the components, before inserting the galvanized screws, otherwise the project won’t have a symmetrical look. If you have all the materials and tools required for the project, you could get the job done in about a day. See all my Premium Plans HERE.
Projects made from these plans
It’s that simple to build a log store!
Log Shed Plans
Building-a-log-store
Cut & Shopping Lists
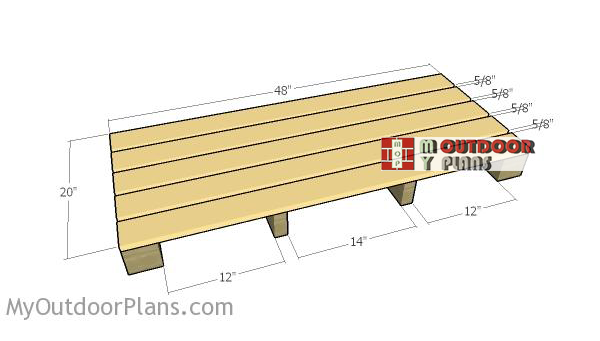
- A – 2 pieces of 2×4 lumber – 20″ long, 2 pieces of 4×4 lumber – 20″ long, 5 pieces of 1×4 lumber – 48″ long FLOOR
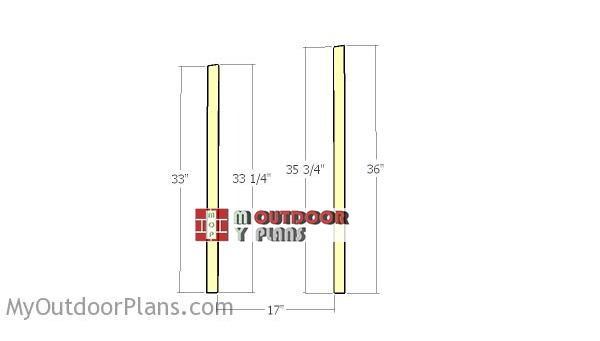
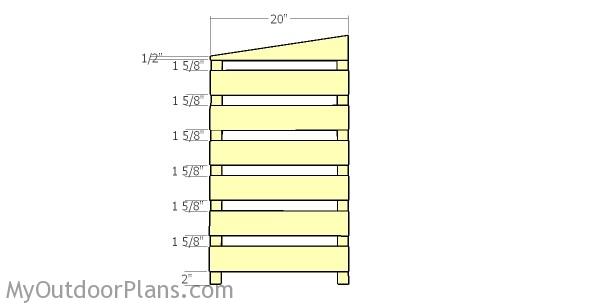
- B – 1 piece of 1×2 lumber – 36″ long, 1 piece – 33 1/4″ long, 7 pieces of 1×4 lumber – 20″ long 2xSIDE
- C – 7 pieces of 1×4 lumber – 51″ long BACK
- D – 3 pieces of 1×2 lumber – 20 1/2″ long, 2 pieces – 48″ long RAFTERS
- E – 5 pieces of 1×6 lumber – 53″ long ROOFING
- 1 piece of 4×4 lumber – 4′
- 1 piece of 2×4 lumber – 4′
- 2 pieces of 1×4 lumber – 8′
- 9 pieces of 1×4 lumber – 6′
- 5 pieces of 1×2 lumber – 6′
- 5 pieces of 1×6 lumber – 6′
- 2 1/2″ screws, 1 5/8″ screws
- 1 1/4″ screws
- wood filler, wood stain
Tools
![]() Hammer, Tape measure, Framing square, Level
Hammer, Tape measure, Framing square, Level
![]() Miter saw, Drill machinery, Screwdriver, Sander
Miter saw, Drill machinery, Screwdriver, Sander
Time
![]() One day
One day
How to build a log shed
Building-the-floor-for-the-shed
The first step of the project is to build the floor of the log shed. Lay two pieces of 4×4 lumber and two pieces of 2×4 lumber and a level surface, spacing them as shown in the plans. You can use 1x4s or 2x4s for the floor of the shed.
Building-the-vertical-posts
Next, you need to assemble the sides of the firewood shed. As you can notice in the diagram, you need to use 1x2s for the vertical supports. Make angle cuts to the top of the supports and lay them on a level surface.
Attaching the side slats
Attach 1×4 slats to the vertical supports, as shown in the diagram. Make an angle cut to the top slat, as shown in the plans. Smooth the cut edges with sandpaper. Drill pilot holes at both ends of the slats and secure them to the supports using 1 1/4″ screws. Make sure you place the slats as equally-spaced as possible. Cut a piece of wood and place it between the slats to create even gaps.
Attaching the sides
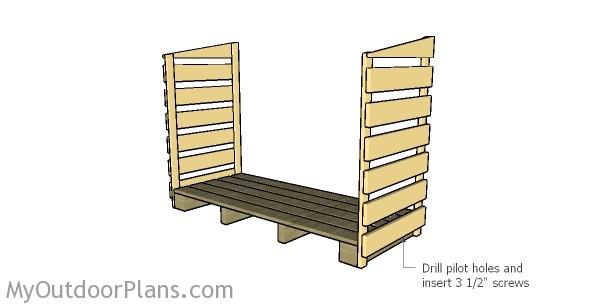
After assembling the sides, you should secure them to the floor of the shed. Make sure the sides are plumb and secure them to the floor using 3 1/2″ screws, after drilling pilot holes.
Attaching the back slats
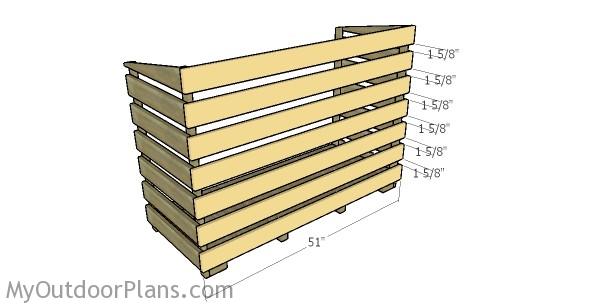
Next, you should attach the 1×4 slats to the back of the shed. Align the slats at both edges and secure them to the sides using 1 1/4″ screws. Place the slats equally-spaced and smooth the edges with sandpaper.
Building-the-rafters
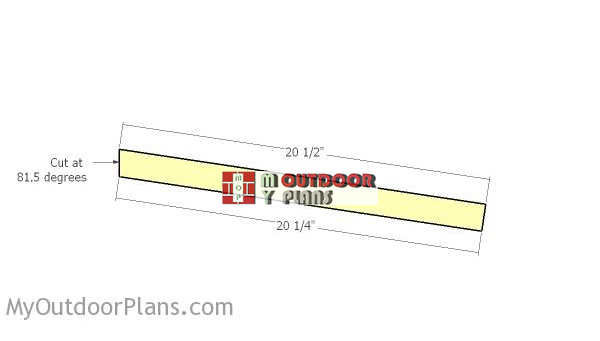
Build the rafters from 1×2 lumber. Cut one end of the rafters at 81.5 degrees.
Assembling the rafters
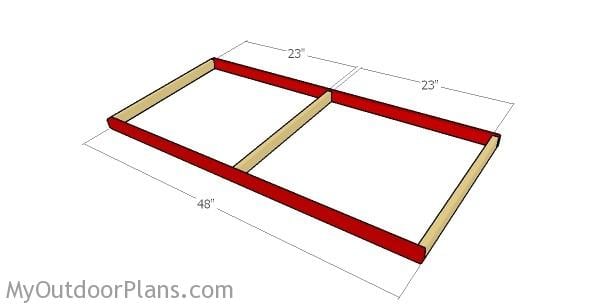
Assemble the roof structure by attaching the rim components. Drill pilot holes through the rim rafters and insert 1 1/4″ screws into the regular rafters. Make sure the corners are right-angled.
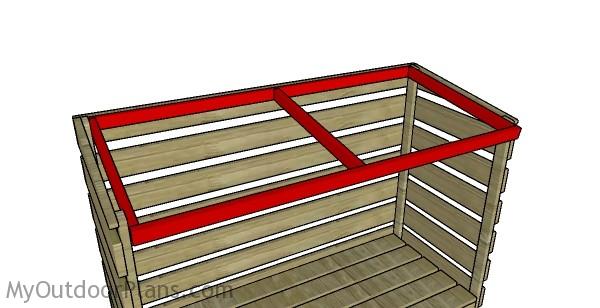
Fitting the rafters
Fit the structure of the roof to the top of the shed. Align the edges with attention and secure the rafters to the frame of the shed. Drill pilot holes through the rafters and insert 1 1/4″ screws into the structure.
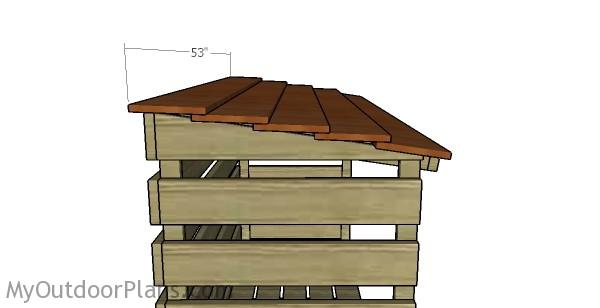
Attaching the roofing slats
One of the last steps of the project is to attach the top slats to the log shed. Cut the weather-resistant slats at the right dimensions and secure them to the rafters using galvanized screws or nails. Center the slats before inserting the screws, to get a symmetrical look. Make sure the slats overlap at least 1″.
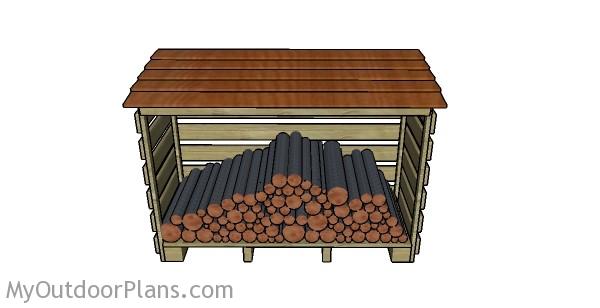
Build a log store
After assembling the shed, you can try it out and store a few logs to see how it looks.
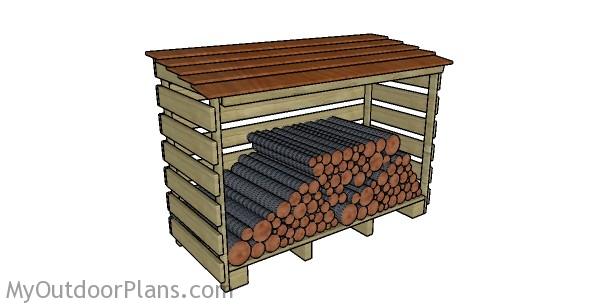
Log Store Plans
Fill the holes and dents with wood putty and let it dry out for several hours. Use 120-200 grit sandpaper to smooth the surface. Remember that you can adjust the dimensions for the log store to suit your needs.
Top Tip: If you want to enhance the look of the project and to protect the components from decay, we recommend you to capply paint or stain.
This woodworking project was about log shed plans. If you want to see more outdoor plans, we recommend you to check out the rest of our step by step projects. LIKE us on Facebook and Google + to be the first that gets out latest projects and to hep us keep adding free woodworking plans for you.


6 comments
Are the SketchUp (*.skp) files available for this (assuming it was created in SketchUp)?
Ta,
No, the SketchUp files are not available for download.
Couple of comments re the dimensions given.
The base dimensions – it doesn’t work having 5 4”x1” base planks and leave a 5/8” gap between over a 20” width.
The back slats should be 52” to cover the across the back.
Base 48’ plus 2 x 1” side posts and 2 x 1” thick side battens.
That’s not true. The dimensions are flawless. In your computations you don’t use the actual size of lumber. A 1×4 slat is actually 3/4″x3 1/2″ and the 1×2 is 3/4″x1 1/2″ See this table for more info: http://myoutdoorplans.com/imperial-to-metric-conversion/
As someone new to woodworking, I find the instructions very confusing, yet I love this design. For example:
1. Under Materials, are the materials listed in items A – E **in addition** to the materials listed afterwards, or do the materials in items A – E show how to make use of the materials listed afterwards? If so, maybe reverse the lists.
2. How do I interpret the materials listed after A – E? e.g., Does ” 9 pieces of 1×4 lumber – 6′ ” mean I need 9 pieces of 1 x 4 lumber, each of which is 6 feet long? If so, that’s 54 feet of lumber?
3. The first step says I can use “1x4s or 2x4s for the floor the shed,” but wouldn’t that decision affect the list of materials provided at the start? In other words, do the materials listed at the start assume 1x4s or 2x4s?
4. etc.
A-E is cut list. The other list is the Shopping list. The shopping lists takes into account the materials used in the cut list. If you alter the materials used, you need to make adjustmnets accordingly.