This step by step project is about garage shelving plans. Anyone with basic woodworking skills can get the job done easily, as this project doesn’t require an extensive expertise in the carpentry field. The best part of these plans is that you could adjust the size of the shelving, while using the same techniques described in the project. If you want to build heavy-duty shelves, you should use 2×4 lumber in a good condition.
There are a few aspects you have to take into account, if you want to get a professional result. Select the materials with great care, making sue the lumber is in a good condition (straight, without cracks, holes, chips). Use a good circular or miter saw to adjust the size of the lumber as well as to cut the plywood sheets. Pre-drill the lumber before inserting the galvanized screws, to prevent the wood from splitting. See all my Premium Plans HERE.
Projects made from these plans
Cut & Shopping Lists
- A – 4 pieces of 2×4 lumber – 72” long LEGS
- B – 8 pieces of 2×4 lumber -96” long, 12 pieces – 21” long FRAMES
- C – 4 pieces of 3/4” plywood – 2×8′ SHELVES
- D – 1 piece of 1×4 lumber – 72” long BRACE
- 14 pieces of 2×4 lumber – 8′
- 1 piece of 1×4 lumber – 8′
- 2 pieces of 3/4″ plywood – 4’x8′
- 100 pieces of 2 1/2″ screws
- 2″ brad nails
- wood glue, stain/paint
- wood filler
Tools
![]() Hammer, Tape measure, Framing square
Hammer, Tape measure, Framing square
![]() Miter saw, Drill machinery, Screwdriver, Sander
Miter saw, Drill machinery, Screwdriver, Sander
Time
Related
Buidling 2×4 garage shelves
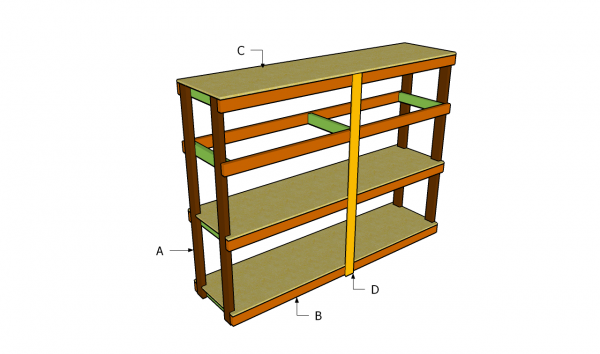
Building garage shelving
If you want to add lots of storage space to your garage, you should consider building wooden shelving. As you will see in the project, building garage shelving is a straight forward project, especially if you use proper plans and techniques.
Garage Shelving Plans
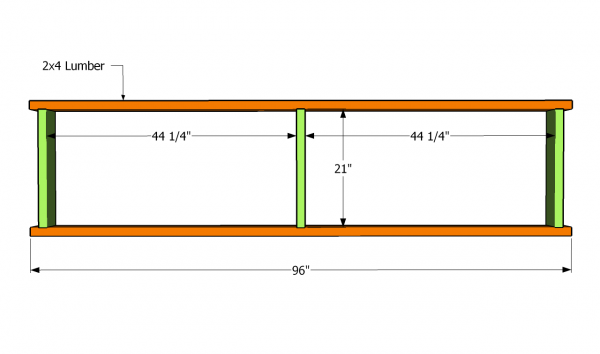
Building the frame of the shelves
The first step of the project is to build the frames of the garage shelving. As you can easily notice in the image, you just need to work on a level surface and to check if the corners are square, using a carpentry square.
Drill pilot hols trough the long components, before locking everything together with 2 1/2” wood screws. Build for frames, if you want to build garage shelving as in the plans. Otherwise you could adjust its size, according to your needs.
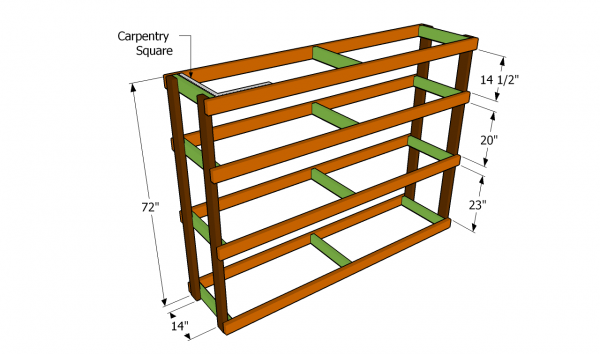
Building the garage shelving
The next step of this woodworking project is to attach the legs to the legs. In order to get the job done properly, we recommend you to drill pilot holes trough the side components of the framing and drive in 2 1/2” screws into the wooden legs.
Top Tip: Use a spirit level to check if the shelves are level, before clamping them into place. Ask a friend to hold the components into place, when driving in the screws.
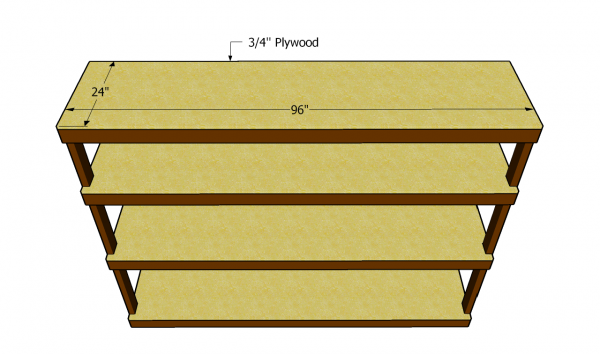
Installing the plywood shelves
Continue by installing the actual shelves into place. From our own experience, we assert that you could use either 3/4” plywood or 2×4 slats to build the shelves. If you are choosing to use plywood or MDF, you should cut out small notches on both sides of the sheets, to fit around the legs. Secure the plywood into place with 2” wood screws.
Top Tip: If you choose to install slats, yous should drill pilot holes and secure them into place with 2 1/2”wood screws.
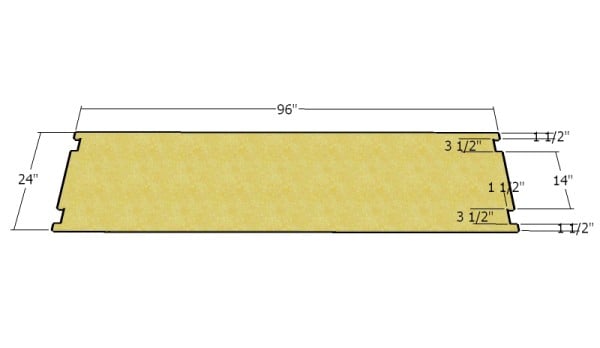
Shelves
Make notches to the shelves, so they can fit around the legs.
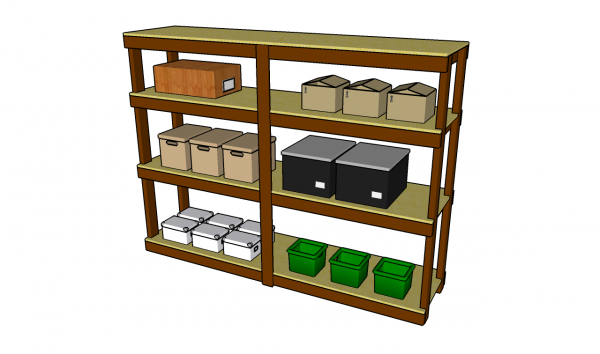
Garage shelving plans
Last but not least, you should take care of the finishing touches. Therefore, you should provide extra support to the wooden rack by installing a piece of 1×4 lumber to the front face of the shelving. Make sure the corners are square.
Top Tip: Fill the holes with wood putty and sand the surface with medium-grit sandpaper. Protect the wood from decay by applying several coats of stain or paint.
This article was about garage shelving plans. If you want to see more outdoor plans, we recommend you to check out the rest of our projects.


