This step by step diy project is about 8×10 shed plans. I have designed this shed so you can store lots of items in a proper manner. The frame of the shed is sturdy and there is an easy access inside using the double front doors. Take a look over the rest of my woodworking plans, if you want to get more building inspiration. Roof pitch is 3:12.
When buying the lumber, you should select the planks with great care, making sure they are straight and without any visible flaws (cracks, knots, twists, decay). Investing in cedar or other weather resistant lumber is a good idea, as it will pay off on the long run. Use a spirit level to plumb and align the components, before inserting the galvanized screws, otherwise the project won’t have a symmetrical look. See all my Premium Plans HERE.
Projects made from these plans
8×10 Lean to Shed Plans
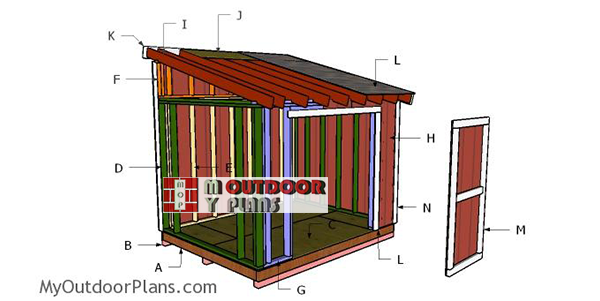
Building-a-8×10-lean-to-shed
Cut & Shopping Lists
- A – 3 pieces of 4×4 lumber – 120″ long SKIDS
- B – 2 pieces of 2×6 lumber – 168″ long, 9 pieces – 93″ long FLOOR FRAME
- C – 2 pieces of 3/4″ plywood – 48″x96″ long, 2 pieces – 24″x48″ long FLOOR
- D – 2 pieces of 2×4 lumber – 96″ long, 1 piece – 89″ long, 9 pieces – 80″ long 2xSIDE WALL
- E – 2 pieces of 2×4 lumber – 113″ long, 1 piece – 120″ long, 9 pieces – 80″ long BACK WALL
- F – 2 pieces of 2×4 lumber – 120″ long, 11 pieces – 20″ long BACK WALL
- G – 2 pieces of 2×4 lumber – 20 1/2″ long, 1 piece – 120″ long, 1 piece – 113″ long, 6 pieces – 80″ long, 2 pieces – 74 1/2″ long, 2 pieces of 2×6 lumber – 75″ long FRONT WALL
- H – 2 pieces of T1-11 siding – 48″x84 1/2″ long, 1 piece – 48″x10 7 1/2″ long, 1 piece – 24″x107 1/2″ long, 1 piece – 8 3/4″x24″ long SIDING
- 3 pieces of 4×4 lumber – 10′
- 2 pieces of 2×6 lumber – 10′
- 11 pieces of 2×6 lumber – 8′
- 3 pieces of 3/4″ plywood – 4’x8′
- 7 pieces of 2×4 lumber – 10′
- 45 pieces of 2×4 lumber – 8′
- 3 pieces of T1-11 siding – 4’x10′
- 2 piece of T1-11 siding – 4’x8′
- 1 5/8″ screws
- 6d nails, 2 1/2″ screws, 3 1/2″ screws
- wood filler , wood glue, stain/paint
Tools
![]() Hammer, Tape measure, Framing square, Level
Hammer, Tape measure, Framing square, Level
![]() Miter saw, Drill machinery, Screwdriver, Sander
Miter saw, Drill machinery, Screwdriver, Sander
![]() Safety Gloves, Safety Glasses
Safety Gloves, Safety Glasses
Time
Related
- PART 1: 8×10 Lean to Shed Plans
- PART 2: 8×10 Lean to Shed Roof Plans
- PART 3: 8×10 Lean to Shed Door Plans
How to build a 8×10 lean to shed
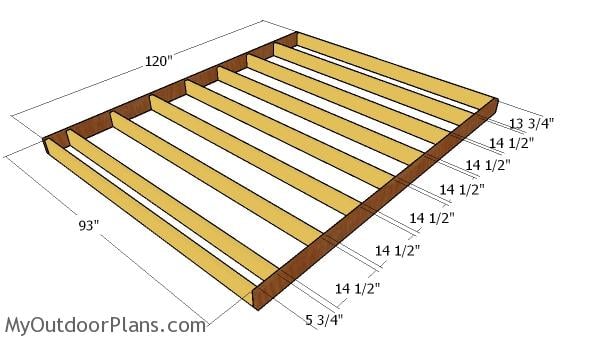
Floor frame
The first step of the project is to build the floor frame. Cut the components from 2×6 lumber, as shown in the diagram. Place the joists every 16″ on center, for a professional result. Check if the corners are are square, drill pilot holes through the rim joists and insert 3 1/2″ screws.
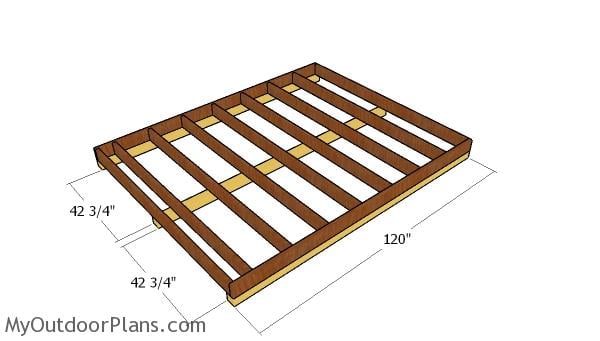
Fitting the skids
Select the location for the shed and level the surface thoroughly. Remove the vegetation layer and make sure you comply with the local building codes. Fit the skids on the location. Place the floor frame and then use rafter ties to lock the skids to the frame. Align the edges with attention for a professional result.
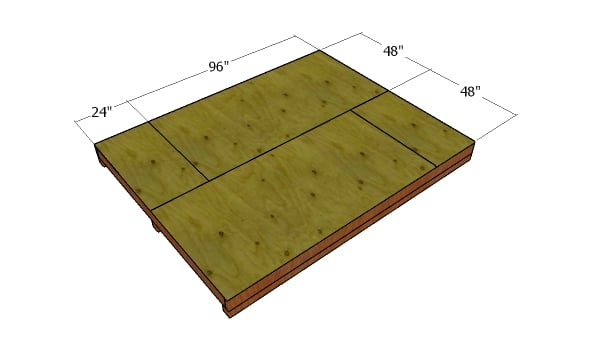
Floor sheets
Fit the 3/4″ plywood sheets to the floor frame and align the edges with attention. Insert 1 5/8″ screws every 8″ along the joists. Leave no gaps between the sheets for a professional result.
Building the shed wall frames
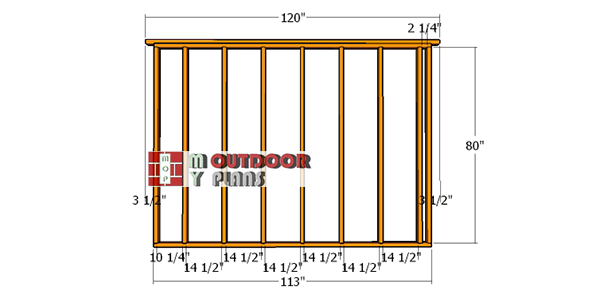
Back-wall-frame
Build the back walls of the shed from 2×4 lumber. Drill pilot holes through the plates and insert 3 1/2″ screws into the studs. Align the edges and make sure the corners are square. Alternatively, you could use framing nails and a framing gun.
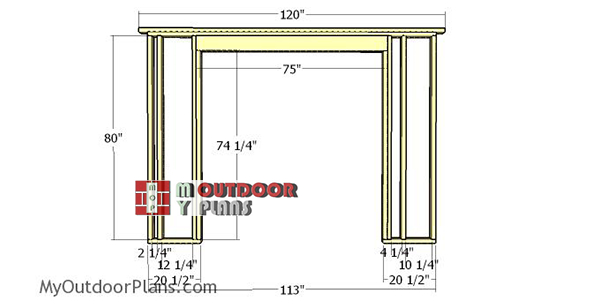
Front-wall-frame—8×10-lean-to-shed
Continue the project by assembling the front wall frame. Use 2×4 lumber for the front wall frame. Use 2×6 lumber and 1/2″ plywood for the double header. Drill pilot holes through the plates and insert 3 1/2″ screws into the studs. Make sure the corners are square and align the edges flush. You can adjust the size of the door opening to suit your needs.
The studs holding the double header need to be cut at 74 1/2″ (ignore the dimension shown in the diagram).

Side-wall-frames
Build the back wall for the shed using the same techniques described above and the information from the diagram.
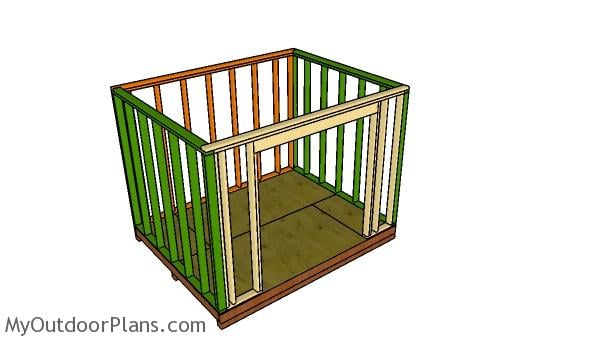
Assembling the wall frame
Fit the wall frames to the floor of the shed. Align the edges with attention and plumb the walls with a spirit level. Drill pilot holes through the bottom plates and insert 3 1/2″ screws into the floor. Lock the adjacent walls together tightly using 3 1/2″ screws.
Assembling the shed framing
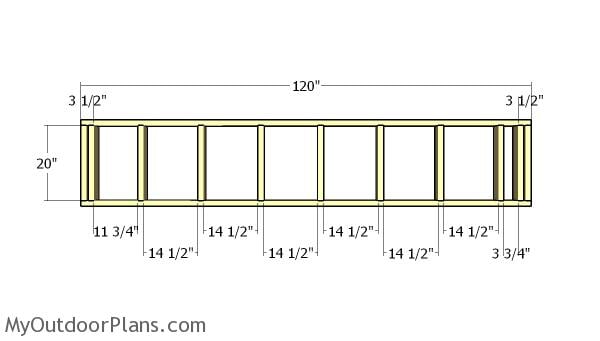
Top back wall frame
Use 2×4 lumber for the top back wall frame. Cut the components at the right dimensions and then lay them on a level surface. Drill pilot holes through the plates and insert 3 1/2″ screws into the studs.
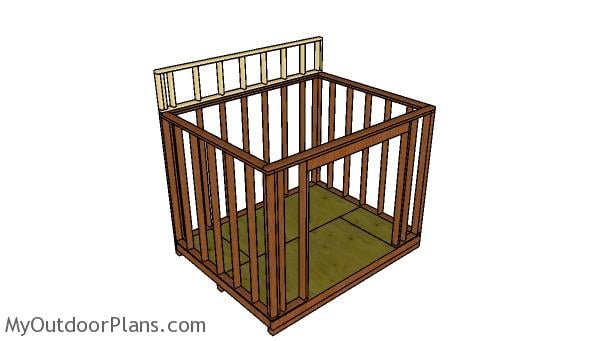
Fitting the to back wall
Place the wall to the top of the shed frame. Align the edges with attention, drill pilot holes and insert 3 1/2″ screws to lock them into place tightly.
Fitting the siding sheets
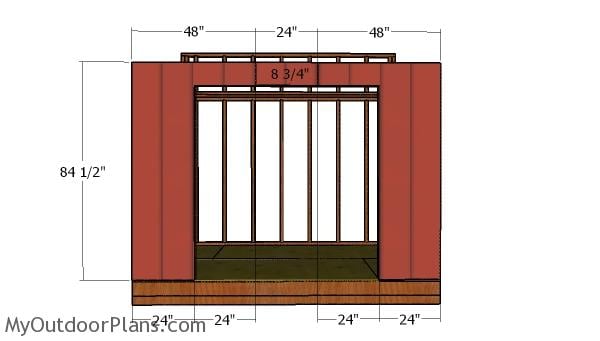
Front wall siding sheets
Fit the sheets to the front of the shed. As you can see in the diagram, you need to make the cuts so you create the door opening.
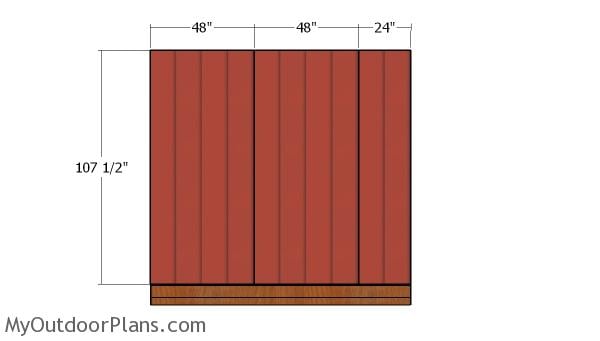
Back wall siding sheets
Fit the T1-11 siding panels to the back of the shed. Align the edges with attention and leave no gaps between the sheets. Insert 6-8d nails every 8″ along the framing.
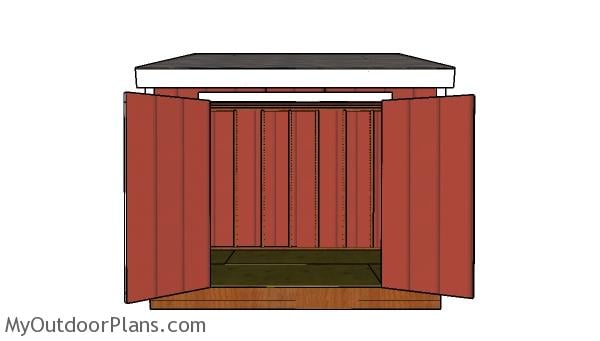
8×10 lean to shed plans – front view
Make sure you check out PART 2 of the shed, where I show you how to build the lean to roof.
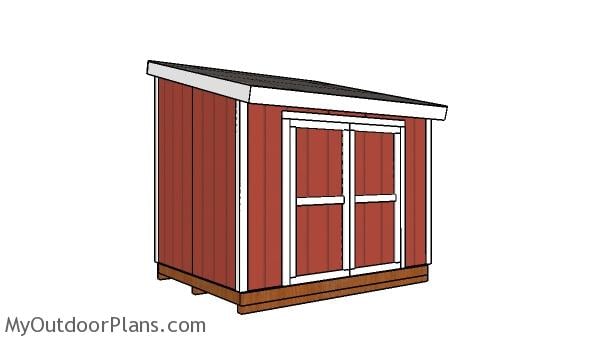
8×10 lean to shed plans
Take a look over PART 2 and PART 3 of the project, so you learn how to build the double doors and the roof. I have lots of other shed projects on the site so I recommend you to browse through all alternatives before starting the building project. See all my shed projects HERE.

8×10 lean to shed – dimensions
Building an 8×10 lean-to shed with double front doors will likely cost you between $1,000 and $2,000, depending on the materials and finishes you choose. The lean-to design is both simple and cost-effective, while the double front doors add convenience and easy access. This investment gives you a compact yet functional shed that’s perfect for storing tools, garden supplies, or outdoor equipment.

8×10 lean to shed – free plans
You can expect to spend about 1 to 2 weekends constructing your 8×10 lean-to shed with double front doors. The straightforward design of the lean-to structure makes it a relatively quick build, even if you’re working on it solo. With careful planning and consistent effort, you’ll have a sturdy, practical shed up and ready to use in no time.
If you want to get this plan as a PDF file, with 1 full Cut and 1 full Shopping list. please take a look over the GET PDF PLANS button bellow.
This woodworking project was about 8×10 lean to shed plans free. If you want to see more outdoor plans, check out the rest of our step by step projects and follow the instructions to obtain a professional result.


10 comments
Any issues or concerns if I choose to put the door on the high side of the roof instead of the low side?
No, that will work perfectly. That is why all my plans are modular, so you can change door location easily.
Instead of using 4×4 skids, could you just have the floor frame sit on these concret deck blocks (https://www.lowes.com/pd/Common-7-in-x-11-in-x-11-in-Actual-7-125-in-x-10-375-in-x-10-375-in-Concrete-Deck-Block/50113084)
Thinking about 12 blocks (4 across the 10′ long section and 3 deep across the 8′ section).
Chris, I see you didn’t get a reply by Ovidiu. I am considering the same approach. Did you go ahead and use the frame on block? If so, your assessment? Thanks.
Hello. I am currently building this project. SO Far I really like the plans and good use of this size. However, I don’t quite see why the 2x4s for header dimensions are 74.25 cuts. 2×6 header is 5.5in depth. 5.5 + 74.25 = 79.75. my front wall is up and I now see there is a .25in gap between. Header and top wall plate. Nails/screws can bring it closer…but it seems to me the cuts should have been 74.5 for the 2*4s. I added .25in oak shims to make it a tight sandwich…. Thanks. Will post photos when finished.
Sorry about that, you’re right. The studs holding the header need to be 74 1/2″ long. Looking forward to seeing your shed.
Hello. Do you know what the roof pitch is. I think it may be 3/12, but I wanted to know if you took that into calculations for design for asphalt shingles. Thank you.
Yes, it’s a 3:12
I am making up my materials list to build this shed and I noticed that the lettered section of the material list calls for 14 foot boards in more than one spot. Section F in particular has me a bit confused. Is this an error or am I missing something? Thanks!
Thank you for the heads up. I have updated the list.