This step by step diy project is about 16×24 gable shed plans. I have designed this 16×24 storage shed, so you can finally have that workshop you have always dreamed about. In addition, you have a super easy access to the shed, due to the double doors. Make adjustments to the plans so the shed suits your needs. Take a look over the rest of my woodworking plans, if you want to get more building inspiration. Remember that you need to select the site for the shed with attention and that you have to comply with a few legal regulations.
When buying the lumber, you should select the planks with great care, making sure they are straight and without any visible flaws (cracks, knots, twists, decay). Investing in cedar or other weather resistant lumber is a good idea, as it will pay off on the long run. Use a spirit level to plumb and align the components, before inserting the galvanized screws, otherwise the project won’t have a symmetrical look. If you have all the materials and tools required for the project, you could get the job done in about a day. See all my Premium Plans HERE.
Projects made from these plans
16×24 Shed Plans

Building-a-16×24-shed-gable-roof
Cut & Shopping Lists
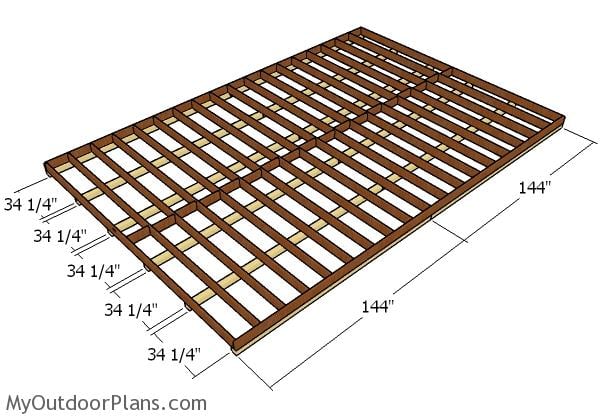
- A – 12 pieces of 4×4 lumber – 144″ long SKIDS
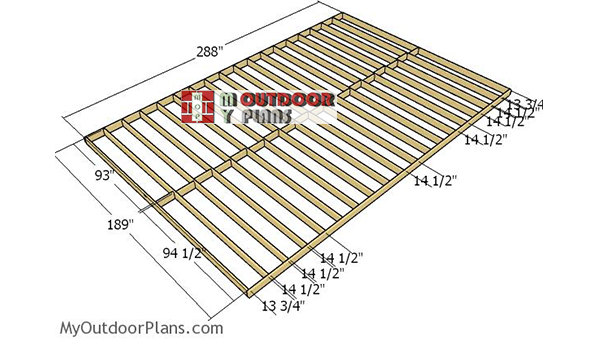
- B – 2 pieces of 2×6 lumber – 288″ long, 19 pieces – 189″ long, 2 pieces – 13 3/4″ long, 16 pieces – 14 1/2″ long FLOOR FRAME
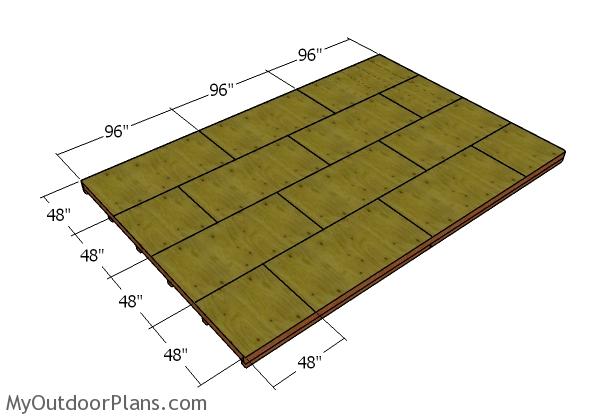
- C – 10 pieces of 3/4″ plywood – 48″x96″ long, 4 pieces – 48″x48″ long FLOOR
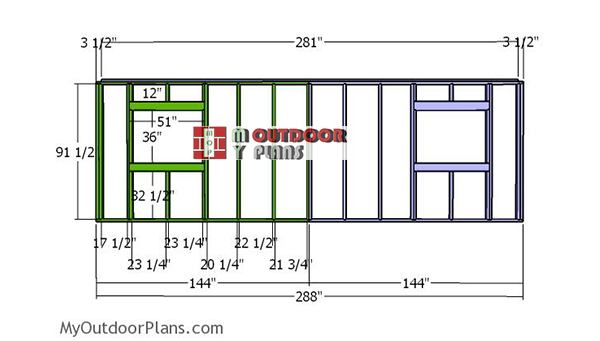
- D – 2 pieces of 2×4 lumber – 144″ long, 1 piece – 185″ long, 2 pieces – 56 1/2″ long, 8 pieces – 91 1/2″ long, 2 pieces – 86″ long, 2 pieces of 2×6 lumber – 75″ long SIDE WALL
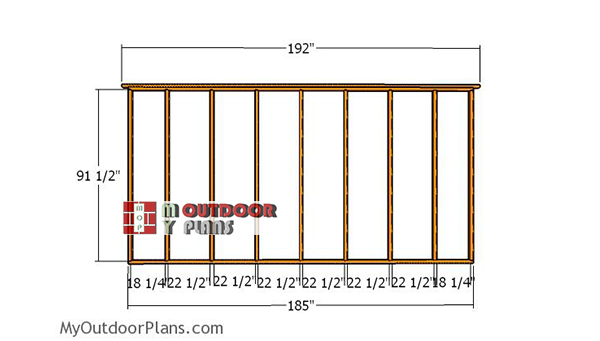
- E – 2 pieces of 2×4 lumber – 185″ long, 1 piece – 192″ long, 9 pieces – 91 1/2″ long BACK WALL
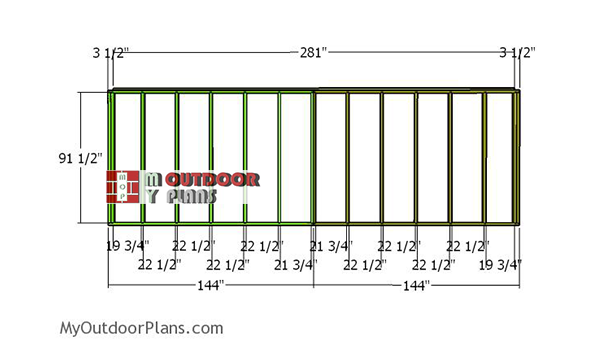
- F – 2 piece of 2×4 lumber -144″ long, 1 piece – 281″ long, 16 pieces – 91 1/2″ long SIDE WALL
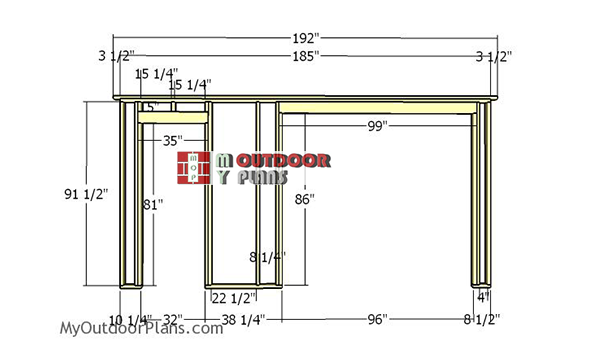
- G – 1 piece of 2×4 lumber – 185″ long, 1 piece – 192″ long, 1 piece – 10 1/4″ long, 22 1/2″ long, 1 piece – 8 1/2″ long, 7 pieces – 91 1/2″ long, 2 pieces – 81″ long, 3 pieces – 5″ long, 2 pieces – 86″ long, 2 pieces of 2×6 lumber – 35″ long, 2 pieces – 99″ long FRONT WALL
- H – 20 pieces of T1-11 5/8″ siding – 48″x96″ long SIDING
- 12 pieces of 4×4 lumber – 12′
- 2 pieces of 2×6 lumber – 24′
- 21 pieces of 2×6 lumber – 16′
- 12 pieces of 3/4″ plywood – 48″x96″
- 2 pieces of 2×4 lumber – 24′
- 8 pieces of 2×4 lumber – 12′
- 6 pieces of 2×4 lumber – 16′
- 56 pieces of 2×4 lumber – 8′
- 6 pieces of 2×6 lumber – 8′
- 7 pieces of 2×6 lumber – 10′
- 20 pieces of T1-11 5/8″ siding – 4’x8′
- 2 1/2″ screws, 3 1/2″ screws, 1 5/8″ screws
- 4d nails, 16d nails
- wood filler , wood glue, stain/paint
Tools
![]() Hammer, Tape measure, Framing square, Level
Hammer, Tape measure, Framing square, Level
![]() Miter saw, Drill machinery, Screwdriver, Sander
Miter saw, Drill machinery, Screwdriver, Sander
Time
Related
- PART 1: 16×24 Gable Shed Plans
- PART 2: 16×24 Gable Shed Plans
- PART 3: Double Shed Doors Plans
How to build a 16×24 shed floor and wall frames
Building-the-floor-frame-16×24-shed
The first step of the project is to build the floor frame for the 16×24 shed. Cut the joists from 2×6 lumber at the right dimensions. Align the edges flush, drill pilot holes through the rim joists and insert 3 1/2″ screws into the perpendicular components. Place the joists every 16″ on center. Fit 2×6 blockings between the joists, as show in the diagram, for a professional result.
Fitting the skids
Select the right location for the large gable shed and then level it Compact a layer of gravel and then lay the 4×4 skids. Fit the floor frame to the skids and align the edges flush. Use rafter ties to secure the frame to the skids. Leave no gaps between the components for a professional result.
Fitting the floor sheets
Fit the 3/4″ plywood sheets to the floor frame. Align the edges flush and leave no gaps between the components. Drill pilot holes through the sheets and insert 1 5/8″ screws, every 8″, so you lock them into place tightly.
Building-the-front-wall-frame
The next step of the project is to build the wall frames for the shed. Start with the front wall, which has a large opening for the double doors and an opening for the single door. You can adjust the size of the small door opening, according to the size of the pre-hung door you are going to use.
Drill the pilot holes through the plates and insert 3 1/2″ screws into the studs. Make sure the corners are square. Build the double header from 2×6 lumber and fit a piece of 1/2″ plywood between the beams. Insert 2 1/2″ screws and add glue so you can assemble the double headers.
Back-wall-frame
Next, you have to assemble the back wall for the 16×24 shed. Cut the components from 2×4 lumber and 3 1/2″ screws. Place the studs every 24″, so you can get a professional result. Center the double top plate and lock it into place with 3 1/2″ screws.
Side-wall-frame
Build the plain side wall from 2×4 lumber. as you can easily notice in the plans, you need to build the wall from two sections. In this manner, you can lift the walls easily and install them into place.
Side-wall-with-windows
Build the side door with windows from 2×4 lumber. Use 2×6 lumber for the double headers. Make two wall sections and then lock them together, once you have installed them into place. You can adjust the size of the windows, so you get enough light inside the shed for your needs.
Assembling the shed frame
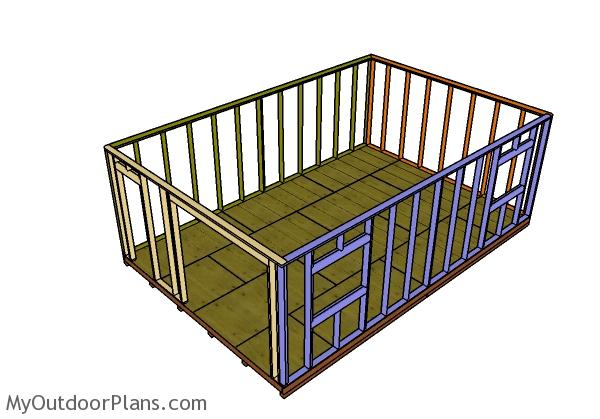
Fit the wall frames to the floor of the shed. Align the edges flush and plumb them with a spirit level. Make sure the corners are square and lock them together tightly with 2 1/2″ screws. Drill pilot holes through the bottom plates and insert 3 1/2″ screws into the floor.
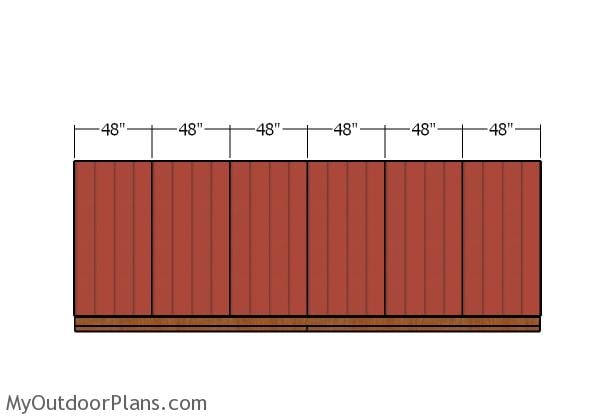
Side wall – Siding
Fit the T1-11 siding sheets to the sides of the 16×24 shed. Align the sheet to the wall frame and lock it into place with 6-8d nails. Leave no gaps between the sheets and lock to the framing, every 6-8d nails.
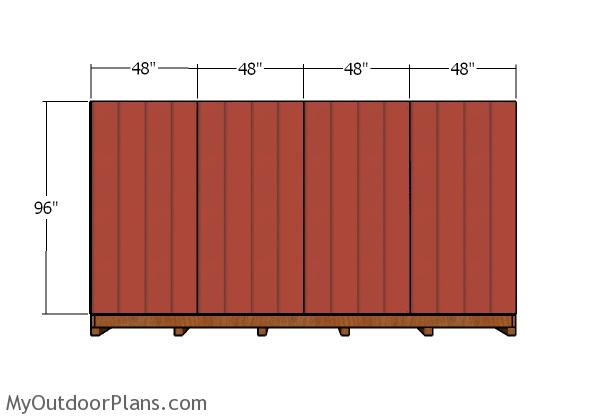
Back wall – Siding
Fit the siding sheets to the back of the shed, as well. Align the sheets and leave no gaps between them. Use the same techniques described above.
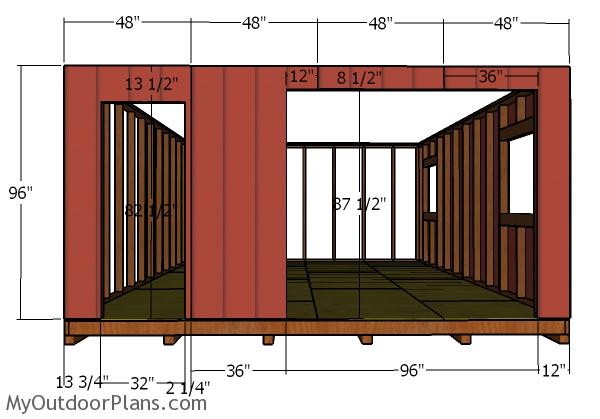
Front wall – Siding
Cut the siding sheets so they can fit around the door openings. Attach the sheets to the framing and lock them into place with 6-8d nails.
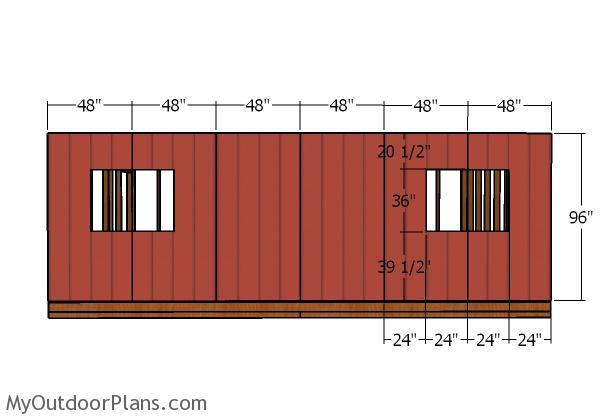
Side wall with windows – Siding
Fit the siding sheets to the side wall with windows. Make the cuts so you clear the window openings.
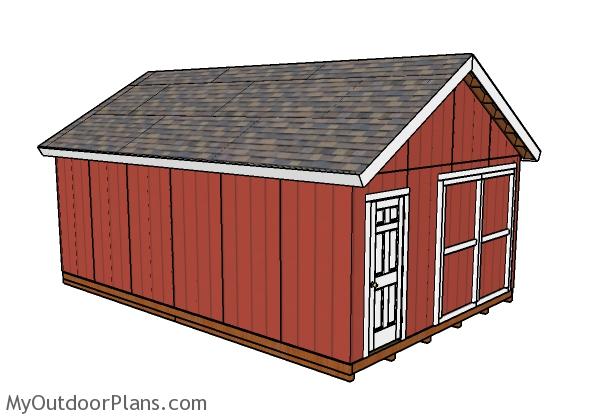
16×24 Shed Plans
This is a complex shed project, due to its size. However, if you follow my instructions and pay attention to the local codes, you should get the job done in a professional manner. Don’t forget to take a look over PART 2 and PART 3 to learn how to build the roof for the shed, as well as how to frame the double front doors.
If you want to download the full plans as a single PDF file (1 single Cut list, 1 single Shopping list) see the GET PDF PLANS button bellow.
This woodworking project was about 16×24 gable shed plans free. If you want to see more outdoor plans, check out the rest of our step by step projects and follow the instructions to obtain a professional result.


33 comments
How many “man hours?”
If it’s 1 human doing this in less than 24 hours, I want to meet and shake their hand.
This is not a negative comment. I plan to build this over time with some ‘skilled help.’
Thanks for your dedication to helping others.
Thanks for the feedback, George. Considering the complexity and the size of the shed, I definitely referred the time for a team of experienced carpenters. Also, the time estimate was just for PART 1 of the project (doesn’t include framing the roof and installing the windows, doors and trims). If you are going to build it by yourself with the help of a friend, it could take more than one day, for sure.
good to know. your plans are still my plans! i just need to plan accordingly. thanks again.
Good luck! Let me know how the project goes!
Can this unit be built with a Gambrel roof style? If so, do you have plans for that?
Yes. Here: http://myoutdoorplans.com/shed/16×24-gambrel-shed-plans/
How much more/less complex would this be to set up as a “Run In” (read: floorless) type shed?
That would mean only two (2) real skids. The front and back walls would have to be supported by timbers of similar type to the walls’ skids.
Any chance of plans like this?
I have plans for something like that. However, it has a lean to roof. Plans here: http://myoutdoorplans.com/shed/tractor-shed-plans/
HI,
Do you offer plans for the 16×24 with a Hip Roof? Trying to match the roof of my house.
Best,
Patrick
No, I don’t have plans for that.
What do you suggest covering the outside of the joists with as they are exposed and not pressure treated?
This: https://amzn.to/2ZdFxOU
Thank you. Will be uploading some photos when finished, going on a month of building by myself (only working on weekends and after work sometimes) so far so good.
Good afternoon,
I am a little confused by the materials list posted and need some clarification. Is it safe to believe that the actual materials list is the one posted after the A through H list? and A through H is just a detailed list on what size to cut the lumber to? Sorry for the inconvenience and thank you for your time and attention to this matter.
That is correct. A, B, C… etc is cut list, while the other list is the materials list that you actually need to buy.
I am trying to print this out in a PDF, is there a link I am missing to do that. I looked at the premium plans and didn’t see it.
Thanks
Please read the FAQs: https://myoutdoorplans.com/faq/
I am so sorry for the inconvenience once more. Do you know roughly how many boxes of Screws and nails it takes for the entire project? (based on the links you provided) Also, how many tubs of wood filler, bottles of wood glue, stain/paint, etc.? I am getting ready to try to find out the cost of the project and I need to know what to take into consideration, specially since some of the proposed items on Amazon do not offer prime, and so I can also look at my local hardware store for alternatives.) Thank you once again for your time.
I don’t have an exact quantity for those miscellaneous items, generally you buy those as you build.
I hope these are my last questions/comments. I was doing the math for the 4×4 skids and I believe I will need 12 4×4 skids and not 10 as described in the materials list, is that correct? Also, can you please elaborate a little bit more regarding the cutting and application of the 1/2″ plywood? Again, sorry for the constant questions, I just want to make sure I’ve got everything prior to starting this project.
Yes, that’s true.
Hi there. Great plans!
I would like to make the walls stronger, and insulate them. I will also be installing shelves on the inside that may carry heavy loads.
I was thinking to make the studs 16″ oc. Would I have to make the roof trusses match this (ie, 16″ oc too)?
Thanks in advance.
If you do the studs every 16 oc, you can place the rafters every 24 oc, but the best would be to go 16 oc, as well.
Thanks, Ovidu, for the quick response. One other quick question: The plans call for 24′ lengths of 2×4’s for the side walls. I can’t get lumber in that length. Can I go with 10′ lengths, and use 2 of them with a 4′ piece in the middle?
Same thing for the 24′ 2×6’s for the floor. I can get the 16′ lengths for the joists, but the rim joists can’t get longer than that. Can I join 2 12′ rim joists with one of those metal sheets used for making trusses?
I don’t recommend that for the floor. You can check at lowes and menards. They have 2x6s at 24 ft long. For the walls you can use two sections of 12 ft each. But make sure the double top plate falls over the joint.
For “Time,” it says, “A Day”…as in built? In a day?
A little over optimistic 🙂 Just kidding. It was an error. New estimate is one week, just for Part 1 of the shed.
Can you use the trusses off the 16×16 for the 16×24 I like the bird mouth and the over hang on the 16×16 plans but I want to build the 16×24
Hi, regarding the number of 4×4 skids, I’ve seen 6 skids on your site, 5 on another and 4 on a third. Is 6 rows of skids on a 16×24 overkill?
Thanks,
Donald
You can go by with 4 skids.
Hi:
Is it necessary to use the skids if the 2×6 floor is made from treated lumber?
Thanks,
W.
Yes
This may be a simple question, maybe not. If I want the interior of the finished shed to be closer to 12′ in height (excluding roof and eaves) how does the cut list and shopping list change? Window and door placement is fine, and I’m assuming another 10 sheets of plywood to raise the roof approximately 4′.