This step by step diy woodworking project is about free outdoor bench plans. This articles features a basic bench with a beautiful design, that requires a small investment and basic tools. Select the right plans for your needs before starting the project. Generally speaking, it is a better idea to build several of these benches, as you will most certainly need several when hanging out with the loved ones.
The free woodworking plans come with step by step 3D diagrams, instructions, a full cut and shopping list and it is print friendly. As well, the plans are PDF download, so you can take the printed plans with you in the workshop. See all my outdoor furniture plans on my blog.
Make sure you invest in high quality materials, such as pressure-treated lumber, cedar, pine or redwood. Take accurate measurements and use a professional saw to get the job done. Always align the components at both ends before drilling the pilot holes and inserting the galvanized screws, in order to prevent the wood from splitting. Use waterproof glue to reinforce the joints. See all my Premium Plans HERE.
Projects made from these plans
Building an outdoor bench
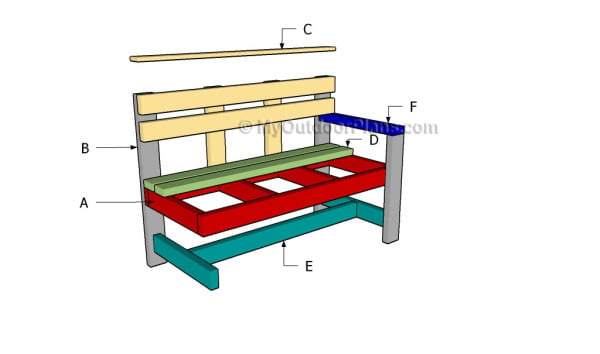
Building an outdoor bench
Cut + Shopping Lists
- A – 2 pieces of 2×4 lumber – 48″ long, 4 pieces – 18″ long FRAME
- B – 2 pieces of 2×4 lumber – 24″ long, 2 pieces – 34″ long LEGS
- C – 3 pieces of 2×4 lumber – 48″ long, 2 pieces of 2×4 lumber – 21″ long, 1 piece of 1×4 lumber – 48″ long BACKREST
- D – 5 piece of 2×4 lumber – 48″ long SEAT
- E – 2 pieces of 2×4 lumber – 21″ long, 1 piece – 43″ long STRETCHER
- F – 2 pieces of 2×4 lumber – 22 1/2″ long ARMRESTS
- 10 pieces of 2×4 lumber – 8′
- 1 piece of 1×4 lumber – 4′
- 100 pieces of 2 1/2″ screws
- 2″ brad nails
- wood glue, stain/paint
- wood filler
Tools
![]() Hammer, Tape measure, Framing square, Level
Hammer, Tape measure, Framing square, Level
![]() Miter saw, Drill machinery, Screwdriver, Sander
Miter saw, Drill machinery, Screwdriver, Sander
Time
Related
Step 1: Outdoor bench frame plans
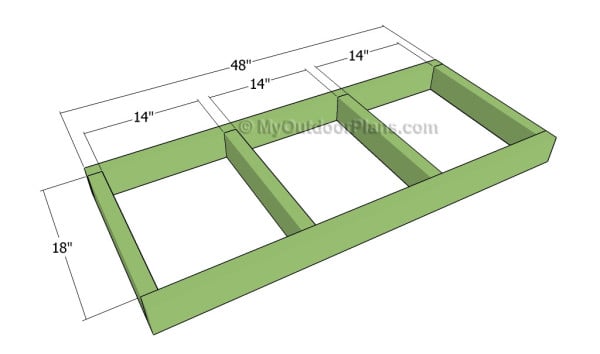
Building the bench frame
The first step of the woodworking project is to build the frame of the outdoor bench. In order to get a professional manner, we recommend you to build the components out of 2×4 lumber.
Drill pilot holes at both ends of the short components and insert 2 1/2″ screws into the perpendicular components. Leave no gaps between the components and add glue to enhance the bond of the components.
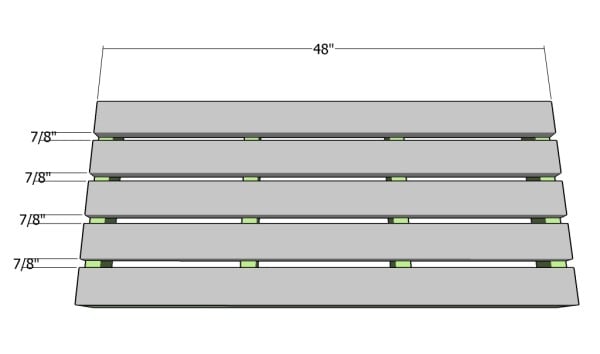
Fitting the seat slats
Continue the project by attaching the 2×4 slats to the seat frame. Place the slats equally-spaced and drill pilot holes before securing them to the frame by using 2 1/2″ screws. Add glue to the joints and smooth the exposed edges.
Step 2: Fitting the legs
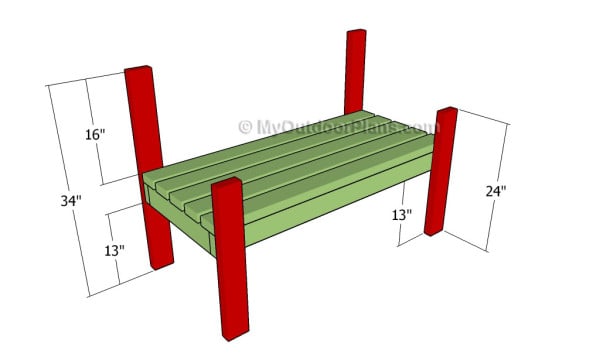
Attaching the legs
The next step of the woodworking project is to attach the 2×4 legs to the seat frame. Cut the components at the right size and smooth the edges with sandpaper. Afterwards, use a spirit level to make sure the seat is horizontal.
Drill pilot holes through the legs and insert galvanized screws into the seat frame. Check if the corners are square and leave no gaps between the legs and the frame of the bench.
Step 3: Fitting the backrest
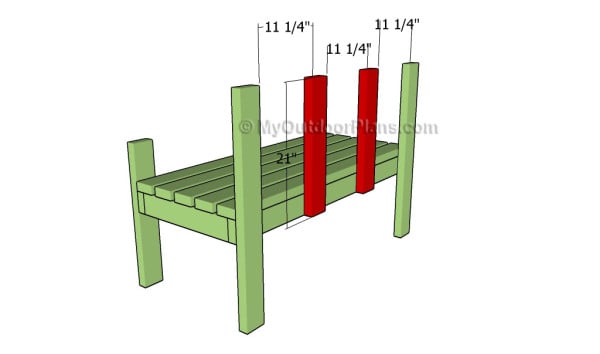
Fitting the back supports
Next, attach the 2×4 supports to the back of the bench, as shown in the diagram. Place the supports equally-spaced and secure them to the frame using 2 1/2″ screws, after drilling pilot holes.
Top Tip: Plumb the supports with a spirit level and add glue to the joints.
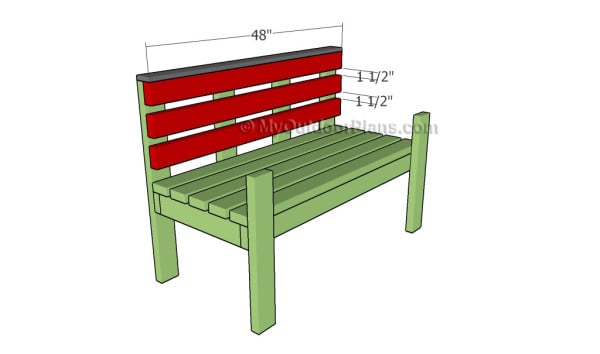
Attaching the backrest
After that, attach the 2×4 slats to the back supports of the bench. Place the slats equally-spaced and drill pilot holes before securing them to the supports using 2 1/2″ screws. Add glue to the joints and attach a 1×4 trim to the top of the backrest. Leave no gaps between the components and smooth the exposed edges.
Step 4: Attaching the armrests
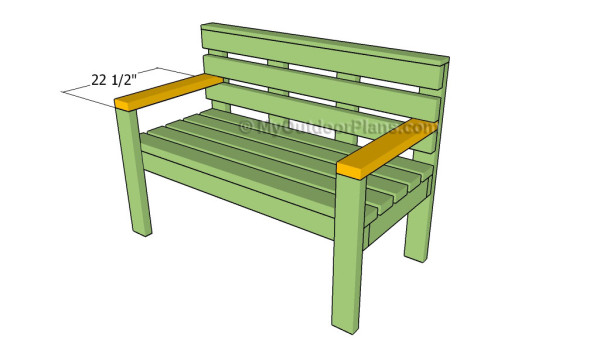
Fitting the armrests
Attach the 2×4 armrests to the wooden bench, as described in the diagram. Smooth the cut edges with sandpaper and fit them into place. Drill pilot holes at the top of the front legs and secure them to armrests. Add glue to the joints and check if the screws are square.
Step 5: Building the stretcher
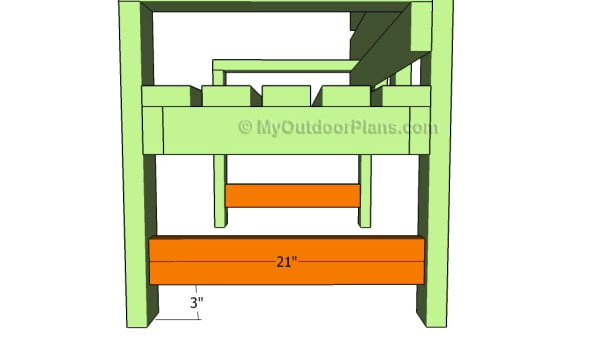
Fitting the bottom braces
In order to add strength and support to the outdoor bench, we recommend you to fit 2×4 braces to the sides of the structure. Drill pocket holes at both ends of the braces and secure them to the legs using 2 1/2″ screws. Make sure the corners are square.

Fitting the stretcher
One of the last steps of the outdoor project is to attach the 2×4 stretcher between the sides of the bench. Drill pilot holes at both ends of the stretcher and secure them to the side braces using 2 1/2″ screws. Add waterproof glue to the joints and remove the excess using a damp cloth.
Step 6: Finishing touches
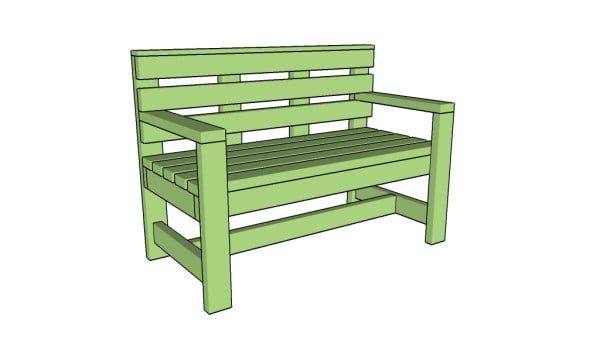
Free outdoor bench plans
After assembling the wooden bench we recommend you to check if the components are locked together properly. Insert the galvanized screws properly, making sure they are at the same level with the wooden surface.
Top Tip: Don’t forget to take a cover the components with paint, if you want to enhance the look of the bench and to make it stand out. Use glue to lock the components into place.
This woodworking project was about free outdoor bench plans. If you want to see more outdoor plans, we recommend you to check out the rest of our step by step projects.


20 comments
This design looks great, but i had a few issues with the dimensions that were given and some of the materials. For example, on the very first building step, it says to use 4 2x4x18 boards along the 2x4x48 board, spaced 14 inches apart, but that’s not possible. It all adds up to 50″ in length, and does not fit on the board. I had the same issue with the second step and spacing the boards 7/8″ apart, it doesn’t fit on the board. And for my problem with the materials, you say to use 2″ brad nails in the materials list, but nowhere in the construction phase do you ever say to use them, which confuses me.
It is possible because the 2×4 boards are actually 1 1/2″ x 3 1/2″. The 2″ brad nails are an alternative to the screws, if you don’t like the head of the screws. I recommend the screws over the nails, though. The plans are flawless, I have already looked over them. Good luck.
Thanks for posting – built in a few hours and my family really enjoys the bench. Had no issues the design – as you mentioned, 2x4s are actually 1.5×3.5 so the measurements are correct.
That’s awesome. Congrats for the project and I would love to see a few pics. You can send them at: http://myoutdoorplans.com/contact/
Hello, I want to try to make a bench like this. I really have no experience. Would you happen to have an estimate on how much it is on materials for the bench? Also if I’m able to go to home Depot and ask for all measurements?
This project should cost about 60-70 dollars. I have updated the list so you can get the materials needed at your local store.
Olá
Seria bom que as medidas fossem em
milímetros
Obrigado
built the bench from an old project platform for a hot tub all pressure treated the back was from a bed headboard that i built used all the material i had come out great used 1x 6 for bench seat
bonjour,pourquoi ,je ne suis pas autoriser à faire des copies,d’avance je vous en remerçie.
Read the FAQs and you will see how to print the plans. Look in the menu.
Rear legs are 34 ins. Height off the ground is 13 ins for bottom of main frame. 16 ins of legs remaining above top of seat. This means 5 ins for main frame and seat slats. Therefore, aren’t the slats 4 x 1 and not 4 x 2 which will not fit into the 5 ins shown on plan.
The plans are accurate. 1×4 is in actual dimensions 3/4″x3 1/2″ and 2x4s are 1 1/2″x3 1/2″ screws. Here: https://myoutdoorplans.com/imperial-to-metric-conversion/
Morning to your sir.I did built one of the
bench I live in south Africa and I ajusted the dimensions a bit I used wood that I had and my wife and kids love my bench
Made the bench as housewarming gift to my daughter. She loves it and it was very easy to make. I actually used pocket screws to attach.
Hey I am confused on how much stain I would need for this bench. Would you happen to have an estimate on how much stain I would need per bench?
One can is enough
and also, for screws, what diameter is recommended or does it not matter?
It doesn’t matter
Meaning one gallon per bench?
No, the smaller cans. 25 oz