This step by step woodworking project is about blue bird house plans. If you are looking for a simple project for your kids, building a wooden birdhouse is probably the best choice, as the materials required for the job are cheap and this is a great opportunity to pass down some basic carpentry techniques. In addition, if you love the bluebirds and want to keep them in your garden for a longer time, this article is just what you need. These birds have many predators, such as cats, snakes or cowbirds, therefore you have to place the birdhouse at about 8′ above the ground.
In order to have access to the nest, we recommend you to install a front face door. Therefore, insert 2” nails trough the top side walls of the birdhouse and removable nails at the bottom. Moreover, the latch nails should be inserted with your fingers, to be able to remove them whenever you want to clean the birdhouse and not with a hammer. If you want to make sure the bluebird will come back, we recommend you to clean them after the young birds have left. In addition, repair the wooden boxes every February, to prepare them your guests.
Projects made from these plans
Cut & Shopping Lists
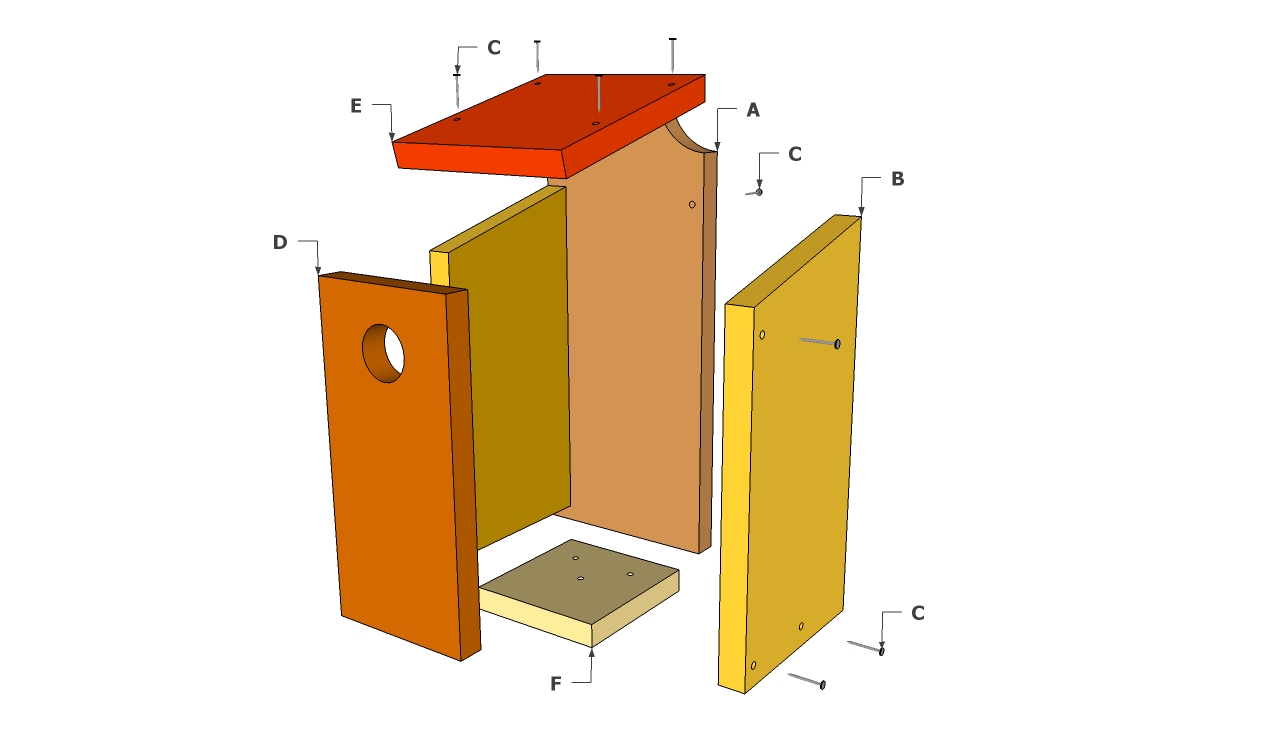
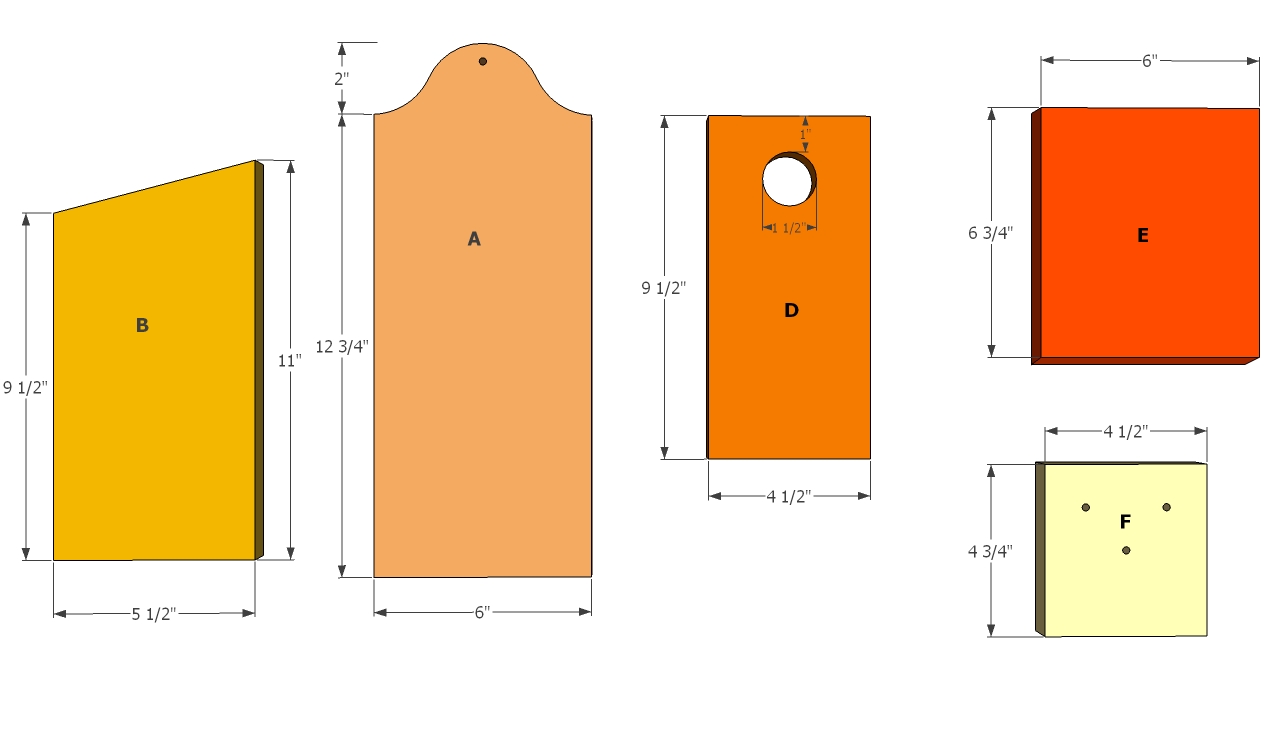
- A – 1 pieces of 1×6 lumber 15” long BACK SUPPORT
- B – 2 pieces of 1×6 lumber 5 1/2” x 11” SIDES
- C – 20 pieces of 1 1/2” wire nails NAILS
- D – 1 pieces of 1×6 lumber 4 1/2” x 9 1/2” FRONT
- E – 1 pieces of 1×6 lumber 6” x 6 3/4” ROOF
- F – 1 piece of 1×6 lumber 4 1/2” x 4 3/4” BOTTOM
- recommended materials
Tools
![]() Hammer, Tape measure, Framing square
Hammer, Tape measure, Framing square
![]() Miter saw, Drill machinery, Sander
Miter saw, Drill machinery, Sander
![]() Safety Gloves, Safety Glasses
Safety Gloves, Safety Glasses
Time
![]() One day
One day
Bluebird house components

Blue bird house plans
Bluebirds usually begin nesting in March, the incubation period being about 14 days. Usually, the young birds learn to fly within 11 days after hatching. Taking into consideration these aspects, a well-built birdhouse would help the birds to grow properly. Even if you don’t have a good grasp about bluebirds, in this article we show you use all it takes to build a durable birdhouse.
Top Tip: Buy quality dried lumber that isn’t treated with toxic substances, otherwise the bluebirds won’t move in. Make sure you smooth the cut edges with a sand block, to avoid potential injuries in the sharp edges.
Blue bird house plans

Blue bird house plans free
As you can see in the image, before assembling the components together, you have to cut them from 1×6 lumber. Make sure you draw the cut lines with a pencil and a framing square and perform the cuts with with a circular saw. Beside the wooden elements, you also need to use 1 1/2 nails and latex paint (it would be easier to wash).
Attach the birdhouse to a pole or use eye screws and a piece of chain to hang it in a tree.

Attaching the sides of the birdhouse
The first step of the assembly process is to attach the sides of the birdhouse to the back. As you can see in the image, you have to drill several pilot holes and to drive in 1 1/2” nails. Align the components properly, making sure the walls are plumb.
Top Tip: In you want to enhance the bond between the wooden elements, we recommend you to apply a good glue along their edges.

Attaching the sides of the bird house
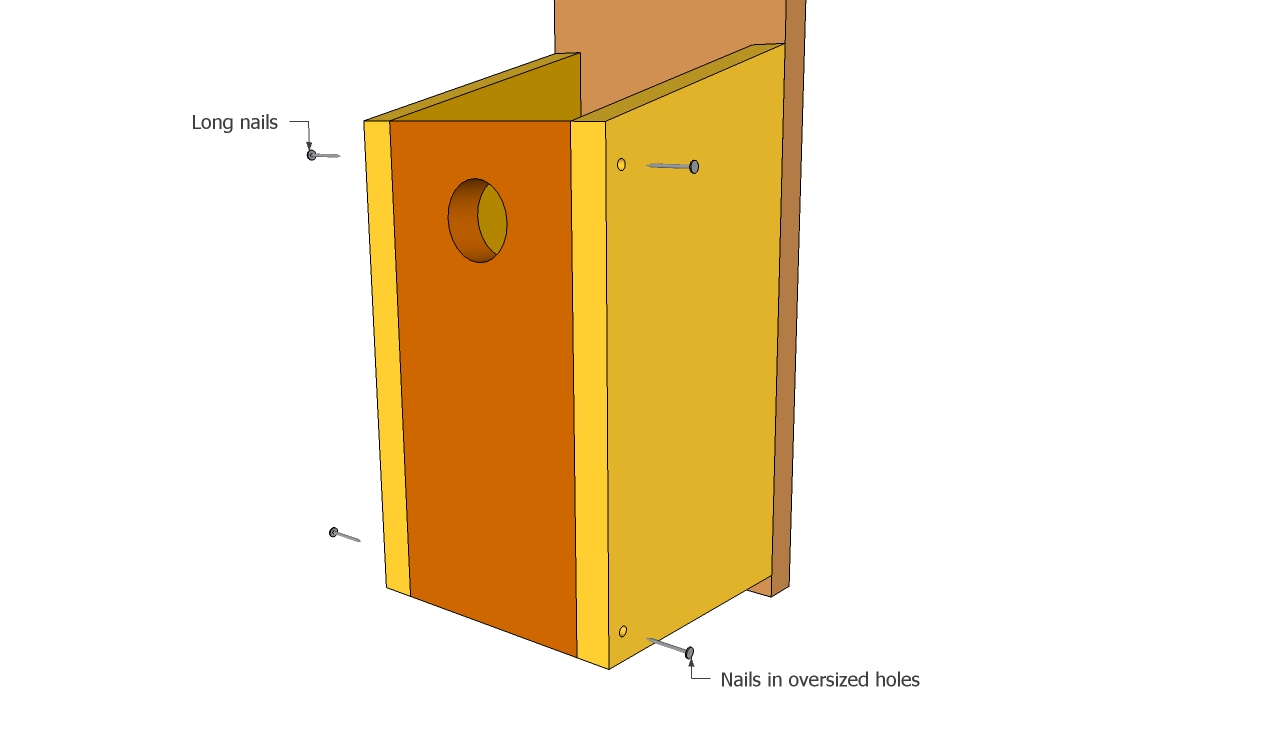
Afterwards, you have to attach the front of the bluebird house, as in the image. It is important to drill a 1 1/2” hole, in order to keep the cowbirds away. Insert long nails trough the top of the side walls in the front end.
Top Tip: Drill oversize holes at the bottom of the side walls and insert 1 1/2” nails. In this manner, you can swing the front of the birdhouse and clean it thoroughly.

Birdhouse bottom plans
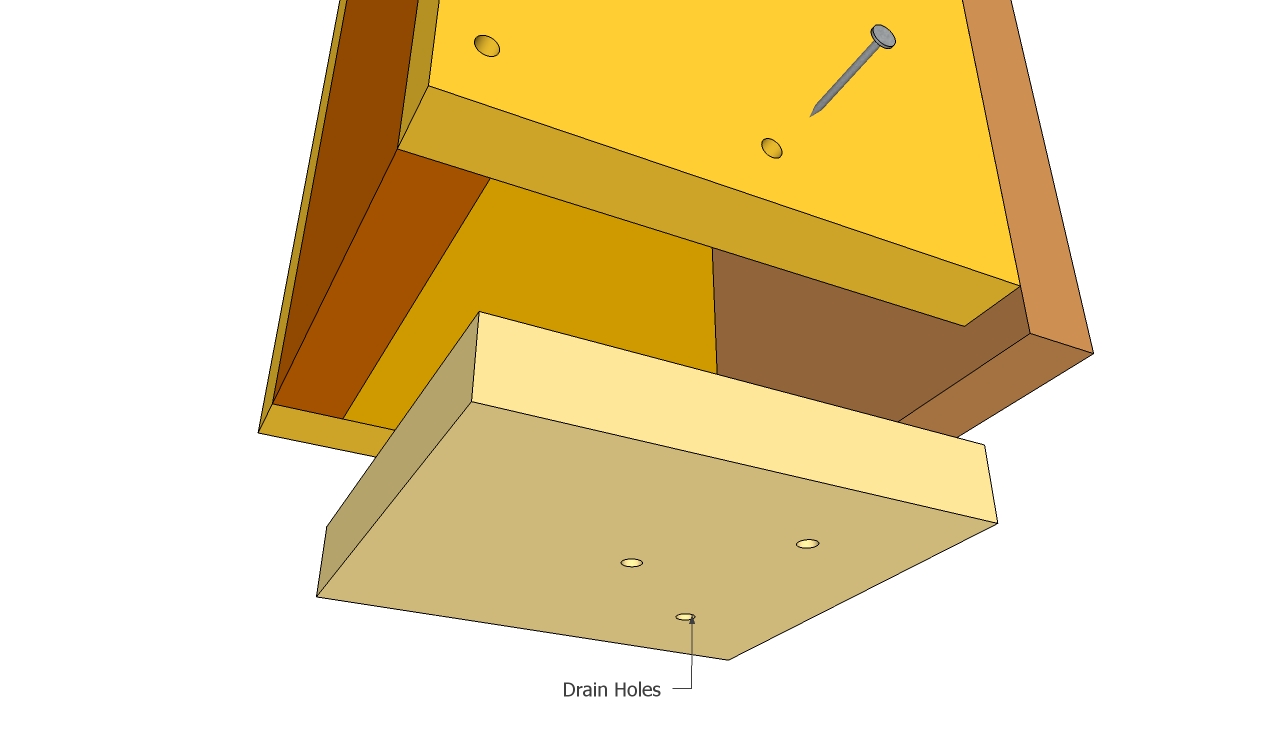
Continue the project by installing the bottom of the blue bird house. Cut the component from a piece of 1×6 lumber using a circular saw. Sand the edges and secure it into place with two nails. Work with great care and good judgement, in order to obtain a professional result.
Top Tip: As you can see in the free plans, you should drill a couple of 1/8” drain holes, using a drill machinery.

Installing the roof of the bird house
Lastly, attach the top of the blue bird house plans and secure it with several screws. Don’t forget to pre-drill holes before inserting the nails, otherwise the wood might split. In addition, we recommend you to miter cut the back end of the roof at 15º.
If you don’t adjust the angle of the back edge, the water would drip in the birdhouse. Therefore, make sure you take into account this aspect before installing the bird house into place.

Bluebird house plans
Fill the cracks and the holes with wood putty and leave the compound to harden for several hours. Afterwards, sand the wooden surface and the edges with medium-grit sandpaper.
Top Tip: In order to protect the birdhouse from water damage and wood decay, we recommend you to apply several coats of latex paint (green, white, brown).
This woodworking project is about blue bird house plans. If you want to see more outdoor plans, check out the rest of our step by step projects and follow the instructions to obtain a professional result.
