This step by step diy project is about homemade deer feeder plans. Building a deer feeder can be done in several ways, so make sure you check out the related projects on this site. You can get the job done in just one weekend, as the project requires basic skills and materials. Align the components at both ends and create rigid joints, by inserting galvanzied screws.
There are many designs and shapes you could choose from, but this project is ideal if you want to feed deers and other wild animals. This woodworking project features a wide tray, where you could place seeds, corn or even hay. Work with attention and adjust the size and the designs of the feeder, as to suit your needs and budget. Cover the structure with wooden boards or metal sheets, to protect the deer food from water damage. See all my Premium Plans HERE.
Projects made from these plans
Homemade Deer Feeder Plans
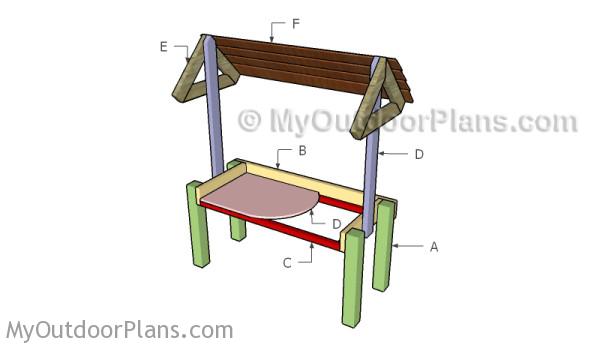
Building a deer stand
Cut & Shopping Lists
- A – 4 pieces of 4×4 lumber – 52″ long POSTS
- B – 2 pieces of 2×6 lumber – 57″ long, 2 pieces – 22 1/2″ long FRAME
- C – 2 pieces of 2×2 lumber – 19 1/2″ long, 2 pieces – 47″ long CLEAT
- D – 1 pieces of 3/4″ plywood – 22 1/2″x47″ long PANEL
- D – 2 pieces of 2×4 lumber – 48″ long STAKES
- E – 2 pieces of 2×4 lumber – 20″ long, 1 piece – 23 1/4″ long 2xRAFTER
- F – 10 pieces of 1×6 lumber – 60″ long ROOFING
- 2 pieces of 4×4 lumber – 10 ft
- 2 pieces of 2×6 lumber – 8 ft
- 1 piece of 2×2 lumber – 8 ft
- 2 pieces of 2×4 lumber – 8 ft
- 5 pieces of 1×6 lumber – 10 ft
- 1 piece of 3/4″ plywood – 2’x4′
- 1 1/4″ screws
- 1 5/8″ screws
- 2 1/2″ screws
- filler, stain
- glue
Tools
![]() Hammer, Tape measure, Framing square, Level
Hammer, Tape measure, Framing square, Level
![]() Miter saw, Drill machinery, Screwdriver, Sander
Miter saw, Drill machinery, Screwdriver, Sander
![]() Safety Gloves, Safety Glasses
Safety Gloves, Safety Glasses
Time
![]() One day
One day
How to build a deer feeder
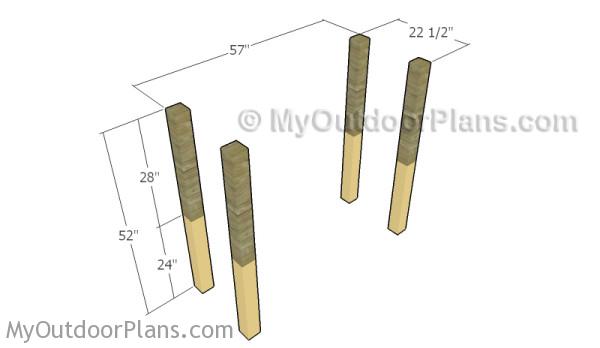
Fitting the legs
First of all, you need to build the legs for the deer feeder. If you want a permanent construction, you should dig 2′ holes and fit the 4×4 pressure-treated legs. Use a spirit level to make sure the legs are plumb. Use gravel and dirt to lock the posts into place tightly.
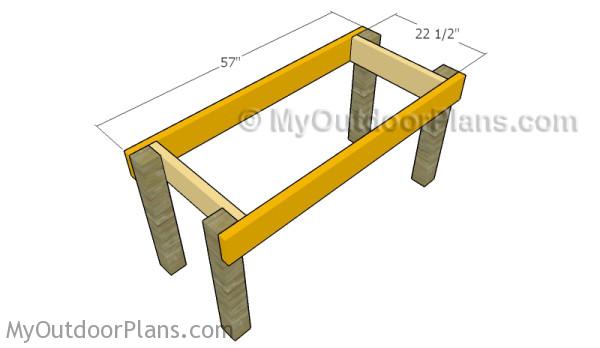
Building the frame
Next, build the frame for the deer feeder using 2×6 lumber. Drill pilot holes and insert 2 1/2″ screws to lock the components together tightly. Use a square to make sure the corners are right-angled. Use a spirit level to check if the frame is perfectly level. Align the edges with attention before inserting the screws.
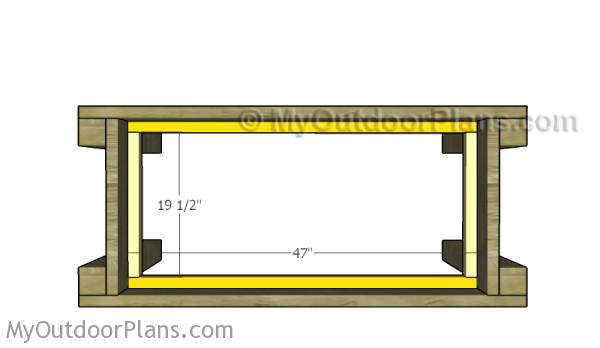
Fitting the cleats
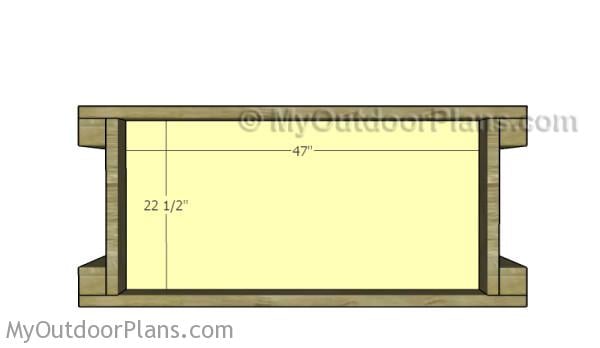
Attach 2×2 cleats to the inside of the frame, as shown in the plans. Drill pilot holes through the cleats and insert 2 1/2″ screws into the frame.
Fitting the panel
Continue the project by fitting the 3/4″ plywood panel to the cleats. Use 1 1/4″ screws to secure the panel to the cleats, after drilling pilot holes.
Building the roof
Fitting the stakes
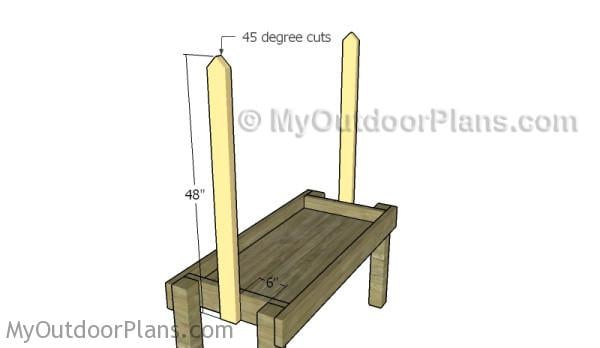
Next, you need to build the 2×4 stakes for the deer feeder. Cut the top of the slats at 45 degree, as shown in the diagram. Center the stakes to the sides of the frame, drill pilot holes and secure them with 2 1/2″ screws. Plumb the stakes with a spirit level, to prevent the wood from splitting. If you worry about the stability of the structure, you can add several diagonal braces to support the stake.
Building the rafters
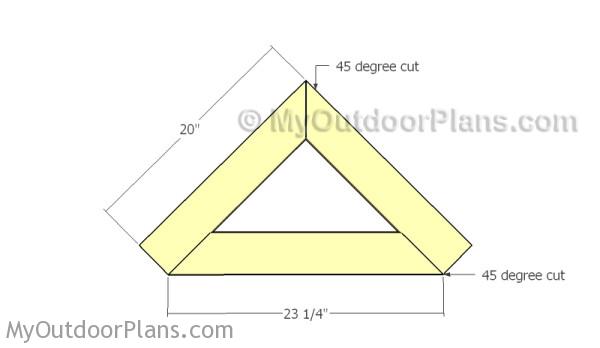
Continue the project by assembling the rafters for the deer feeder. Cut the components from 2×4 lumber, using the information from the diagram. Drill pilot holes and insert 2 1/2″ screws to lock the rafters together tightly.
Fitting the rafters
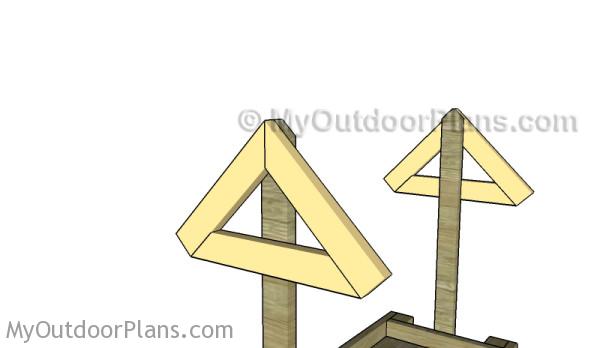
Fit the rafters to the stakes, drill pilot holes and insert 2 1/2″ screws.
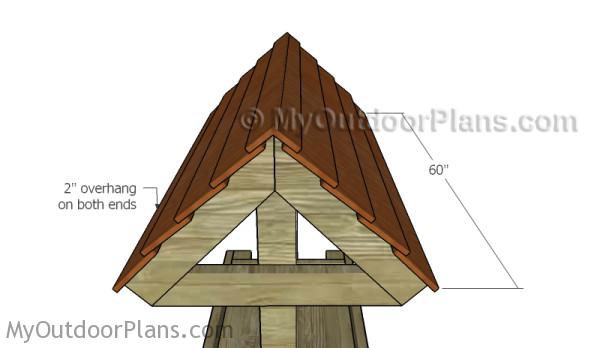
Fitting the roofing slats
Last but not least, you should fit 1×6 cedar slats to the roofing, as shown in the diagram. Use galvanized nails to secure the slats to the rafters and make sure they overlap at least 1″. Alternatively, you can use corrugated metal sheets.
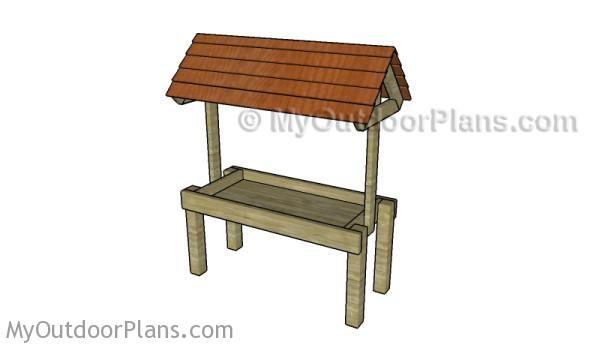
Homemade Deer Feeder Plans
Fill the holes and dents with wood putty and let it dry out for several hours. Use 120-200 grit sandpaper to smooth the surface. Remember that you can adjust the dimensions for the deer feeder to suit your needs.

Deer feeder – free plans
Top Tip: If you want to enhance the look of the project and to protect the components from decay, we recommend you to apply paint or stain.
This woodworking project was about homemade deer feeder plans. If you want to see more outdoor plans, we recommend you to check out the rest of our step by step projects. LIKE us on Facebook and Google + to be the first that gets out latest projects and to hep us keep adding free woodworking plans for you.

3 comments
Thank you for the great plans. The only thing that I noticed is that the stakes were not in the material list. Thanks!
Great plans! What I find confusing is the material list. I don’t have a lot of lumber sitting around, therefore, if you need 4 pieces of 4 x 4, why not lay it out so I know what I need to buy when I go to the store? I other words, for this project you need
2 x 4 x 8’s…………. The cut measurements are clearly listed in the diagrams.
Thankyou.