This step by step diy project is about diy 4×8 chicken coop plans. I have designed this chicken coop with run so you can add it to your backyard and harvest fresh eggs every day. In addition, this wood chicken coop has a nice design so you can integrate it easily with the rest of the constructions on your property. Take a look over the rest of my woodworking plans, if you want to get more building inspiration.
When buying the lumber, you should select the planks with great care, making sure they are straight and without any visible flaws (cracks, knots, twists, decay). Investing in cedar or other weather resistant lumber is a good idea, as it will pay off on the long run. Use a spirit level to plumb and align the components, before inserting the galvanized screws, otherwise the project won’t have a symmetrical look. If you have all the materials and tools required for the project, you could get the job done in about a day. See all my Premium Plans HERE.
Projects made from these plans
Building a Chicken Coop with Run Plans
Building-a-4×8-chicken-coop
Cut & Shopping Lists
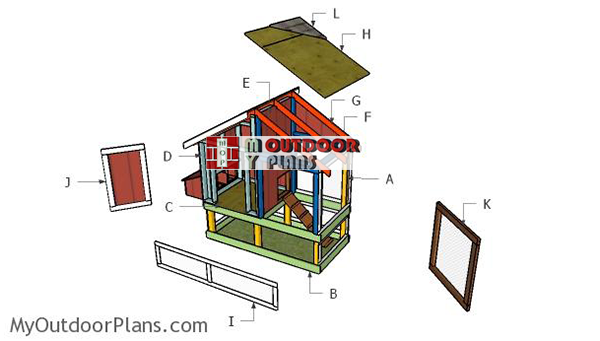
- A – 4 pieces of 4×4 lumber – 30″ long, 2 pieces – 77 1/4″ long POSTS
- B – 4 pieces of 2×6 lumber – 96″ long, 7 pieces – 45″long FRAMES
- C – 1 piece of 3/4″ plywood – 48″x48″ long FLOOR
- D – 1 piece of 2×4 lumber – 48″ long, 2 pieces – 10″ long, 4 pieces – 45″ long FRONT WALL
- D – 2 pieces of 2×4 lumber – 48″ long, 3 pieces – 45″ long BACK WALL
- D – 2 pieces of 2×4 lumber – 41″ long, 3 pieces – 45″ long SIDE WALL
- D – 2 pieces of 2×4 lumber – 41″ long, 2 pieces – 45″ long, 1 piece – 27 1/2″ long, 1 piece – 38″ long SIDE WALL
- D – 2 pieces of 2×4 lumber – 48″ long, 3 pieces – 22 3/4″ long TOP WALL
- E – 1 piece of T1-11 – 48″x74 1/2″ long, 1 piece – 48″x52 1/4″ long SIDING
- F – 2 pieces of 2×4 lumber – 74 1/2″ long, 2 pieces – 41″ long, 2 pieces – 43 3/4″ long, 4 pieces – 44 1/2″ long RUN
- I – 4 pieces of 1×3 lumber – 94 1/2″ long, 10 pieces – 14″ long, 4 pieces – 45″ long, 4 pieces – 42 1/4″ long, 2 pieces – 48 3/4″ long RUN
- 4 pieces of 4×4 lumber – 8′
- 8 pieces of 2×6 lumber – 8′
- 19 pieces of 2×4 lumber – 12′
- 1 pieces of 3/4″ plywood – 48″x48″
- 2 pieces of T1-11 – 48″x96″
- 11 piece of 1×3 lumbe – 96″
- 8d nails, 2 1/2″ screws, 1 1/4″ brad nails
- wood filler , wood glue, stain/paint
- chicken wire
Tools
![]() Hammer, Tape measure, Framing square, Level
Hammer, Tape measure, Framing square, Level
![]() Miter saw, Drill machinery, Screwdriver, Sander
Miter saw, Drill machinery, Screwdriver, Sander
![]() Safety Gloves, Safety Glasses
Safety Gloves, Safety Glasses
Time
Related
- PART 1: 4×8 Chicken Coop Plans
- PART 2: 4×8 Chicken Coop Roof Plans
- PART 3: Chicken Nesting Box Plans
- 4×8 Barn Chicken Coop plans
- 4×8 Chicken Coop plans
4×8 Chicken Coop Plans
Fitting-the-posts
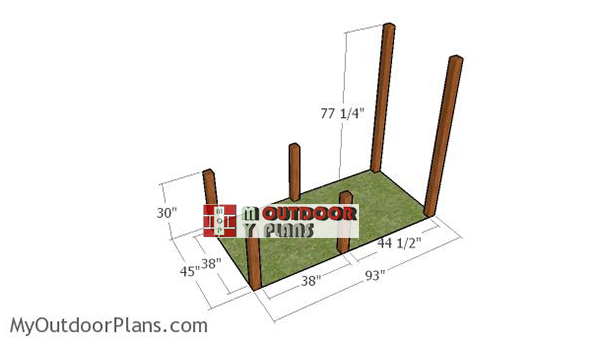
The first step of the project is to build the frame for the chicken coop. Therefore, you need to cut the 4×4 posts at the dimensions shown in the diagram. If you want to build a permanent construction, then you could dig 2′ deep holes and set the posts in concrete. Plumb the posts with a spirit level and make sure you use temporarily braces so the concrete can dry out properly.
Attaching the bottom frame
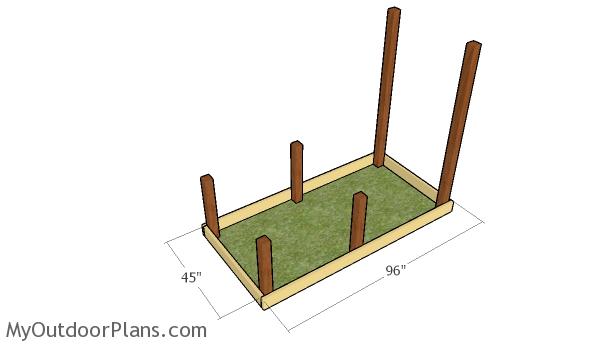
Build the bottom frame from 2×6 beams. Cut he components at the right dimensions and lock them together with 2 1/2″ screws. Drill pilot holes before inserting the screws, to prevent the wood from splitting.
Fitting-the-top-floor-frame
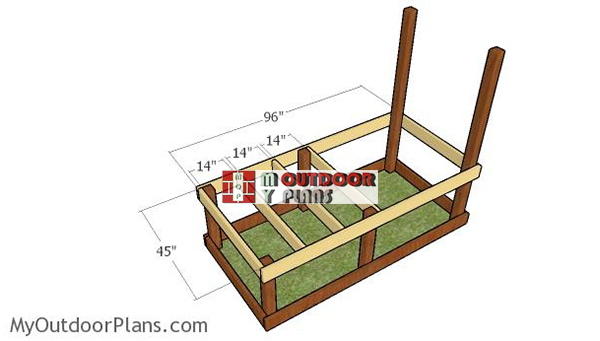
Next, you need to frame the floor frame using 2x6s. Cut the joists at the right dimensions and secure them into place tightly. Drill pilot holes through the joists, align the edges with attention and insert 2 1/2″ screws to lock everything in a professional manner.
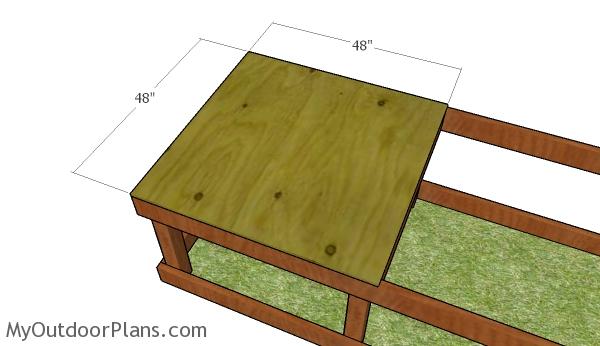
Attaching the floor
Attach a piece of 3/4″ plywood to the floor frame of the chicken coop. Align the edges with attention, drill pilot holes and insert 1 1/4″ screws to lock it into place tightly. Inserting the screws every 8″ is a good start.
Building the wall frames
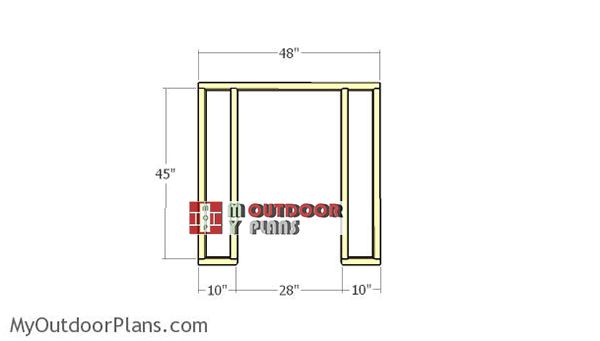
Front-wall-frame
Build the front wall from 2x4s. Drill pilot holes through the plates and insert 2 1/2″ screws into the studs. Make sure the corners are square and align the edges with attention. Leave no gaps between the components for a professional result.
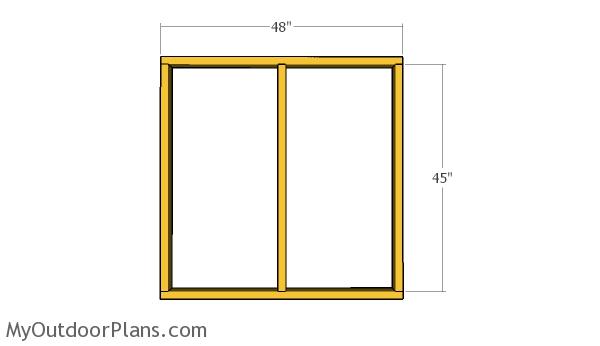
Back wall
Build the back wall for the chicken coop in the same manner described above.
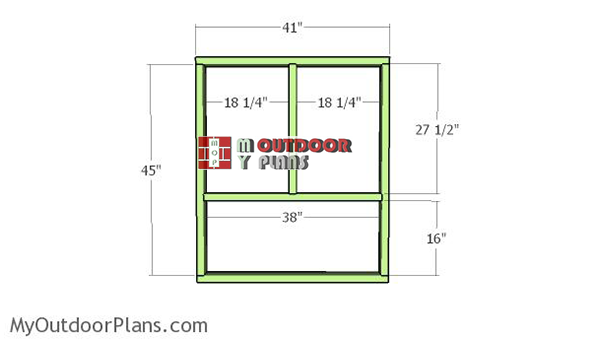
Side-wall-frame
Continue the project by assembling the side wall that will hold the nests. Make sure you follow the diagrams for a neat result.
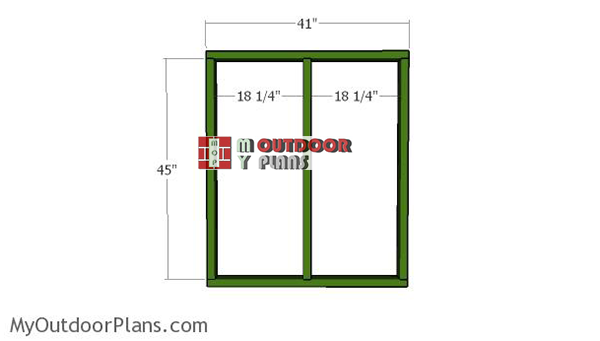
Side-wall-frame-#2
Next, assemble the other side wall using the same techniques described above.
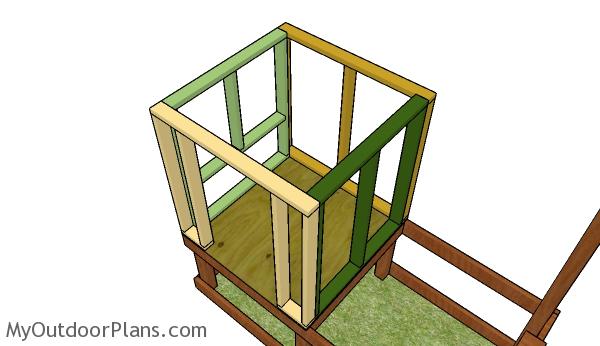
Assembling the chicken coop
Fit the four wall frames to the floor. Align the edges with attention, drill pilot holes through the bottom plates and insert 2 1/2″ screws to lock them into place tightly. In addition, use a spirit level to make sure the walls are perfectly plumb. Drill pilot holes and insert 2 1/2″ screws to lock the adjacent walls together tightly.
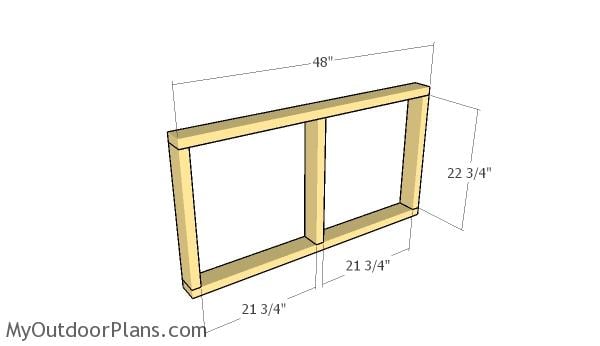
Building the top frame
Build the top wall frame that will support the rafters from 2×4 lumber. Drill pilot holes through the plates and insert 2 1/2″ screws into the studs. Make sure the edges are flush and check if the corners are square before inserting the screws.
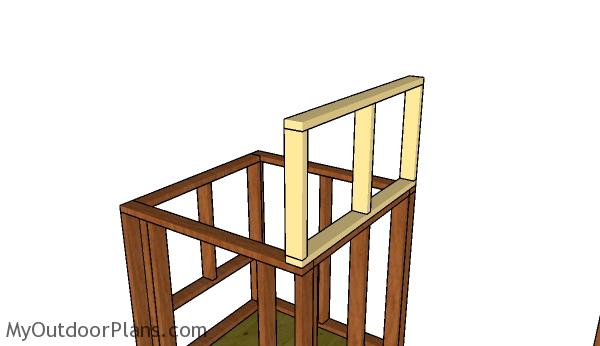
Fitting the top frame
Fit the top fame to the chicken coop, drill pilot holes through the bottom plate and insert 2 1/2″ screws into the wall. Use a spirit level to make sure the top wall is perfectly plumb. Align the edges with attention for a professional result.
Fitting the siding sheets
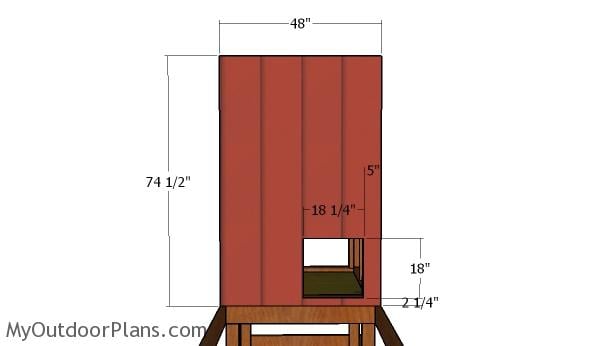
Partition
Attach a piece of T1-11 siding to the chicken coop, making sure you cut out the door opening with a jigsaw. Drill a starting hole and then get the job done with a jigsaw. Smooth the edges with attention using sandpaper.
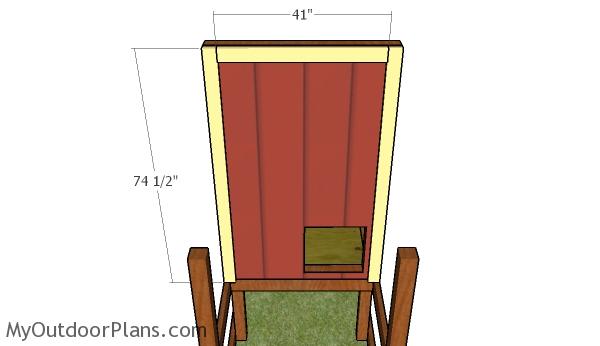
Fitting the frame to the partition
Fit 2×4 trims to the chicken coop, as shown in the diagram. Align the edges with attention, drill pilot holes and insert 2 1/2″ screws to lock the components to the frame of the chicken coop.
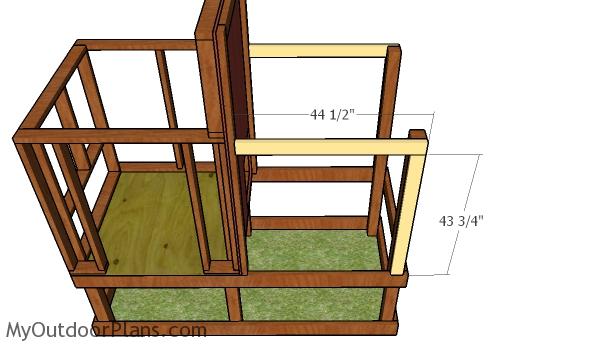
Fitting the front and back frames to the run
Continue the project by framing the run for the chicken coop. Cut the 2×4 components and lock them into place with 2 1/2″ screws. Drill pilot holes to prevent the wood from splitting. Leave no gaps between the components and make sure the corners are square for a professional result.
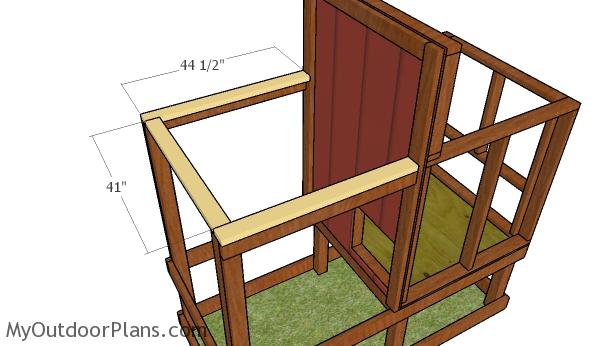
Fitting the top plates
Fit 2×4 plates to the top of the frame. Align the edges with attention, drill pilot holes and insert 2 1/2″ screws to lock them to the wall frames tightly.
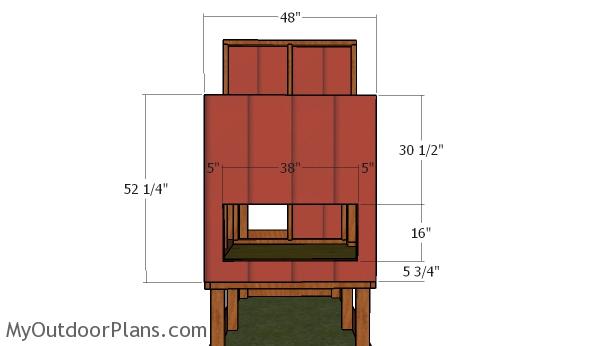
Installing the nest wall
Continue the project by fitting the panel to the side wall of the coop. As you can notice in the diagram, you need to cut out the opening for the nest boxes. Mark the cut lines on the panel, drill a starting holes and get the job done with a jigsaw.
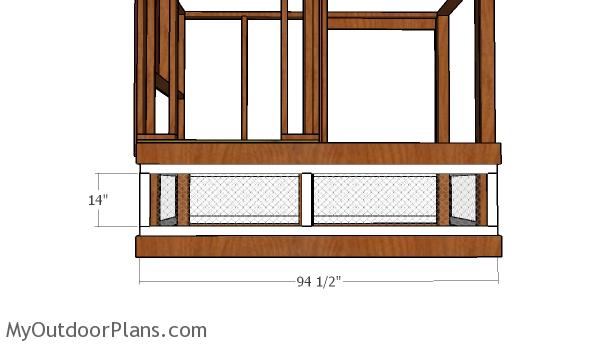
Chicken run front and back frames
Continue the project by fitting the chicken wire to the base of the coop. Use staples to stretch the wire properly and then secure it into place with 1×3 trims. Use 1 1/4″ nails or screws to secure the trims into place tightly.
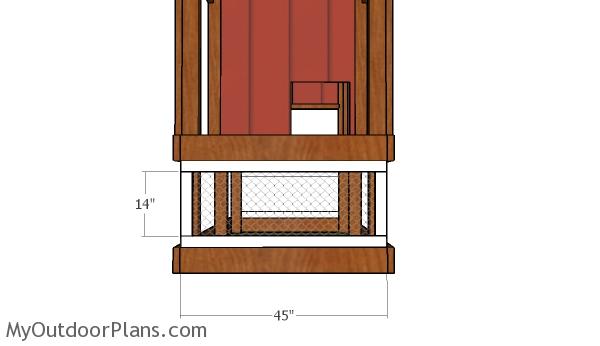
Chicken run side frames
Fit the chicken wire to the sides of the chicken coop, using the same techniques as described above.
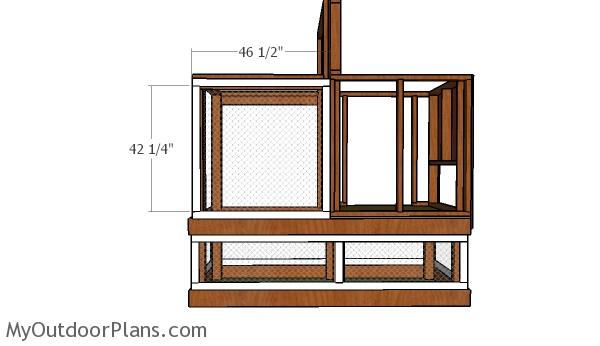
Back wire frame
Next, attach the 1×3 trims to secure the trims to the back of the chicken run.
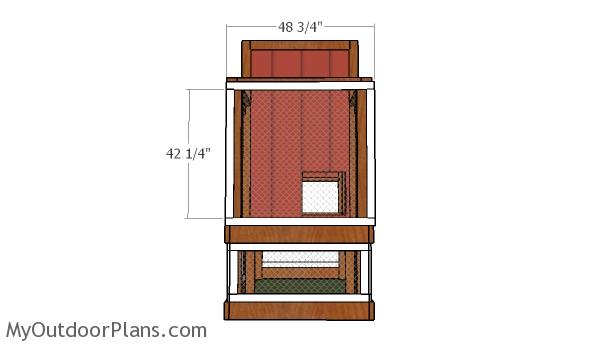
Fitting the side wire frame
Attach the chicken wire to the open side of the chicken coop.
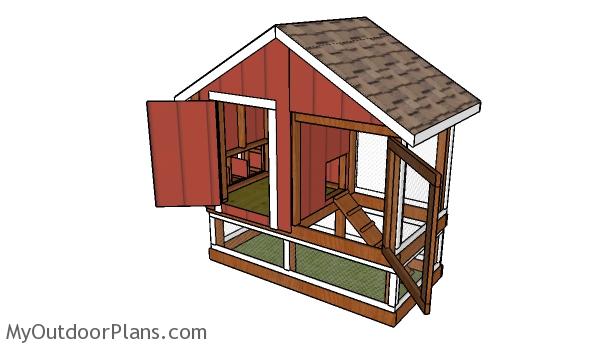
Make sure you check out the rest of the project so you learn how to build the roof and how to assemble the nest boxes.
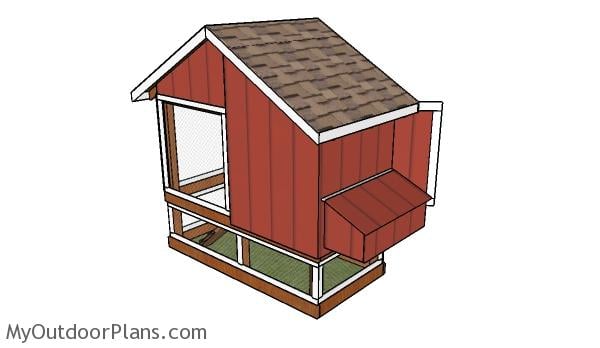
I have lots of other chicken coop projects on the site so I recommend you to browse through all alternatives before starting the building project.

4×8 Chicken Coop Plans – dimensions
Building a 4×8 chicken coop with an underneath run will likely set you back between $500 and $1,000, depending on the materials and extras you decide to include. With the extra space, you’ll need a bit more lumber and wire mesh, but it’s still a budget-friendly project. It’s a worthwhile investment that gives your chickens plenty of room to roam while keeping them safe and secure.

How to build a 4×8 chicken coop
You can expect to spend about 2 to 3 weekends building a 4×8 chicken coop with an underneath run. The larger size and added features mean a bit more time on construction, but it’s still a manageable project that you can tackle at your own pace. By the end, you’ll have a well-built, spacious coop that’s perfect for keeping your chickens happy and healthy.

4×8 free chicken coop plans
If you want to get this project as a PDF file, with 1 full cut list and 1 full shopping list, check out the GET PDF PLANS button bellow.
This woodworking project was about 4×8 chicken coop free. If you want to see more outdoor plans, check out the rest of our step by step projects and follow the instructions to obtain a professional result.


