Finding proper outdoor bench plans is a complex process, taking into account there are so many plans, materials and designs to choose from. If you are looking for a simple woodworking project, that can be done by any do-it-yourself-er and that doesn’t require a significant amount of money, a wooden bench without a back support is an ideal choice. In this article we show you step by step how to build the wooden components and what screws to use in order to assemble them together tightly.
A simple garden bench will enhance the look of your yard, if you come with an appropriate design and select the materials in a professional manner. Taking into account you will place the bench outside, you have to buy lumber designed for outdoor use, such as: cedar, redwood, pine or pressure treated lumber. In addition, you will need tools common to any household to build the components: a drill machinery and several drill bits, a miter saw, a tape measure and safety equipment.
Projects made from these plans
Cut & Shopping Lists
- A – 6 pieces of 2×4 lumber 15” long, WOODEN LEGS
- B – 6 pieces of 1×3 lumber 16 1/2” long, LEG SUPPORTS
- C – 6 pieces of 3.5” bolts (leg supports), 12 pieces of 5” bolts (seat supports) LAG SCREWS
- D – 1 pieces of 2×4 lumber 50” long STRETCHER
- E – 6 pieces of 2×4 lumber 24 1/2” long SEAT SUPPORTS
- F – 6 pieces of 2×4 lumber 58” long SEAT SLATS
- G – 36 pieces of 3” galvanized wood screws SCREWS
- 25 pieces of 2 1/2″ screws
- 3 1/2″ carriage bolts
- 100 pieces of 1 1/4″ screws
- 2″ brad nails
- glue, stain
Tools
![]() Hammer, Tape measure, Framing square
Hammer, Tape measure, Framing square
![]() Miter saw, Drill machinery, Screwdriver, Sander
Miter saw, Drill machinery, Screwdriver, Sander
![]() Safety Gloves, Safety Glasses
Safety Gloves, Safety Glasses
Time
![]() One day
One day
Related
Simple Bench Plans
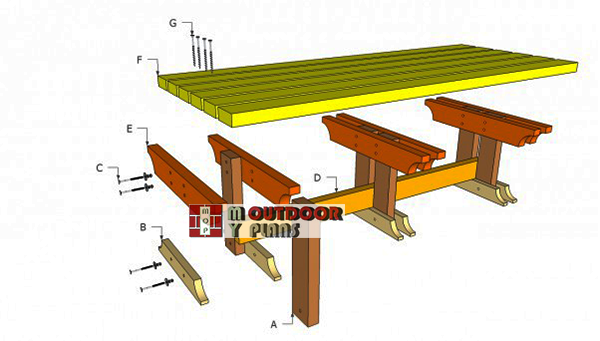
Outdoor-bench-plans
Building an outdoor bench is one of those straight forward projects that could change dramatically the look of your backyard, especially if you choose a simple design and a traditional shape. A wooden bench without a back support is a easy to build woodworking project, even if you don’t have a solid expertise in the field.
Top Tip: In order to obtain a professional result and a beautiful appearance, buy quality lumber, designed for outdoor use. Therefore, you should consider purchasing redwood, cedar, pine or even pressure-treated lumber, ensuring they match with the rest of the garden furniture and with the design of your house.
Outdoor Bench Plans

Bench-legs-plans
First of all, you have to build the wooden legs of the bench, as well as the base supports. Make sure the slats are in a good condition, looking for knots, cracks or other flaws. Afterwards, use a framing square and a pencil to draw the cut line, before adjusting the size of the lumber with a miter saw.
Drill pilot holes trough the components, before inserting carriage bolts, ensuring the holes are symmetrical.
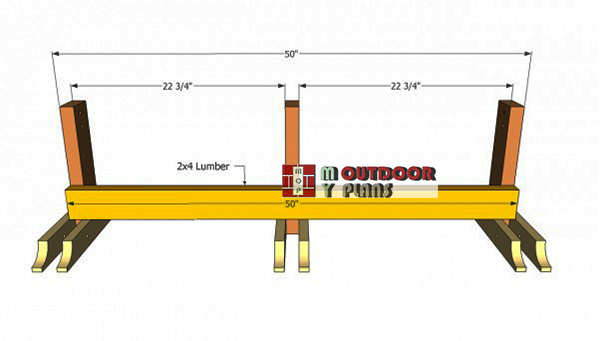
Installing-the-legs-supports
After you build the three legs and attach the base supports, you should lock them together with a 2×4 stretcher (50” long). In order to attach the component into place, you should toe-nail it with several 3” screws.
Top Tip: Work with good judgement, making sure you plumb the legs before driving in the screws. In addition, the three legs should be equally spaced, otherwise the bench won’t have a neat look.
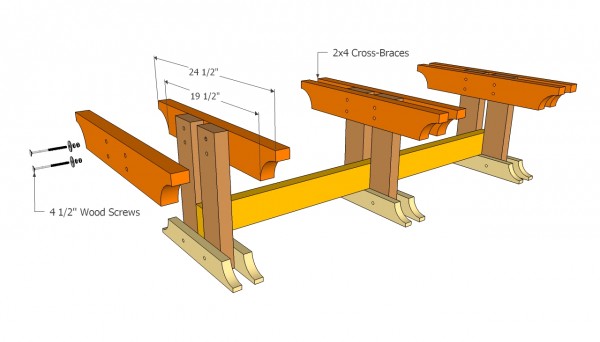
Crossbraces plans
The next step of the project is to install the seat supports, made from 2×4 lumber. Use a spirit level before inserting the screws, to make sure seat will be level. Don’t forget to place the bench on a horizontal surface.
Top Tip: You could adjust the size of the supports (the width of the diy bench), to fit your needs and tastes. In addition, cut the ends of the supports with a jigsaw, to make them decorative.
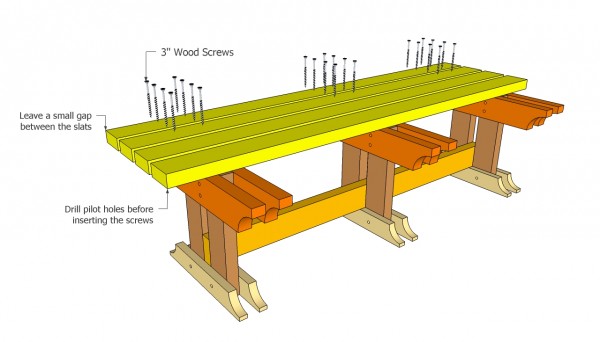
Installing the top of the bench
Place the 2×4 slats on top of the supports and drive in 3” screws, after drilling pilot holes (to prevent the wood from splitting). Align the wooden boards at both ends before inserting the galvanized screws, in order to obtain a neat look.
Top Tip: Use a spacer between the slats (a nail or a piece of wood), to make sure they are equally spaced. Leave at least 1/2” from the edges of the slats, to prevent the wood from splitting.
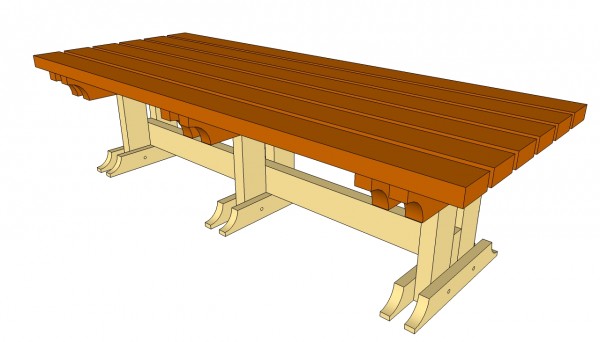
Outdoor Bench Plans Free
Lastly, fill the screw holes and the cracks with wood putty and leave it for several hours to harden. Next, sand the wooden surface with 120-grit sandpaper along the wood grain and clean the components thoroughly.
Top Tip: In order to protect the bench from decay and water damage, apply several coats of paint or varnish. Pay attention to the finish, as it has to harmonize with the rest of the furniture.
This woodworking project is about outdoor bench plans free. If you need more outdoor plans, we recommend you to check out the rest of our step by step projects.


2 comments
Lots of great plans here. I am wanting to build your simple bench plan (picnic table) for my patio. I plan to stain and poly it as it will be outside full time. What wood do you recommend other than cedar, white oak, or any of the rare species that will break the bank? Ideally I would like to avoid treated pine due to it shrinking, splintering, and toxic chemicals. Thanks!
Pine with stain and spar urethane will work great.