With the main frame of the pavilion complete, it’s time to move on to the next crucial steps: building the gable roof and installing the privacy panels. The 6:12 gable roof pitch not only enhances the structure’s appearance but also provides excellent drainage and durability against the elements. In this section, we will guide you through cutting and installing the 2×8 rafters, securing the ridge beams, and adding the roof sheathing to create a strong and weather-resistant roof.
Once the roof is in place, we will focus on the privacy panels, which add both functionality and style to the pavilion. These panels provide protection from wind and create a more enclosed space for added comfort and security. Whether you prefer classic wood slats, lattice panels, or decorative designs, this step will help customize the pavilion to fit your needs. Let’s get started on transforming this structure into a fully functional and inviting outdoor space.
When buying the lumber, you should select the planks with great care, making sure they are straight and without any visible flaws (cracks, knots, twists, decay). Investing in cedar or other weather resistant lumber is a good idea, as it will pay off on the long run. Use a spirit level to plumb and align the components, before inserting the galvanized screws, otherwise the project won’t have a symmetrical look. If you have all the materials and tools required for the project, you could get the job done in about a day.
Projects made from these plans
24×24 Double Carport Plans – Part 2
Building-a-24×24-double-carport
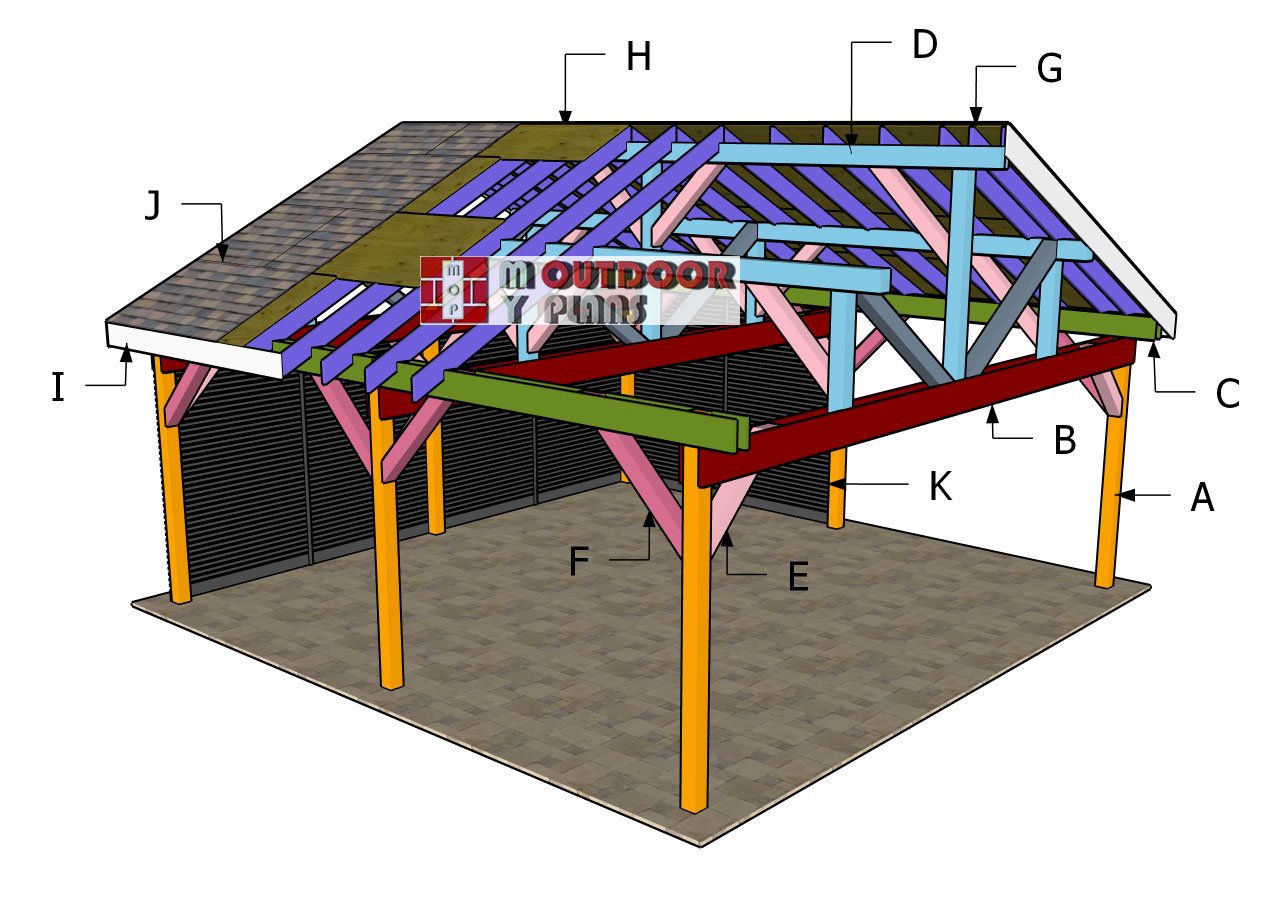
Cut & Shopping Lists
- F – 6×6 lumber – 83 1/4″ WEBS – 6 pieces
- G – 2×8 lumber – 178“ RAFTERS – 32 pieces
- H – 3/4″ plywood – 4’x8′ ROOF SHEETS – 16 pieces
- H – 3/4″ plywood – 2’x4′ ROOF SHEETS – 4 pieces
- H – 3/4″ plywood – 4’x4′ ROOF SHEETS – 2 pieces
- H – 3/4″ plywood – 4″x6′ ROOF SHEETS – 2 pieces
- H – 3/4″ plywood – 30 1/4″x8′ ROOF SHEETS – 4 pieces
- H – 3/4″ plywood – 30 1/4″x4′ ROOF SHEETS – 2 pieces
- H – 3/4″ plywood – 30 1/4″x6′ ROOF SHEETS – 2 pieces
- I – 1×10 lumber – 180″ TRIMS – 4 pieces
- I – 1×10 lumber – 10 ft TRIMS – 2 pieces
- I – 1×10 lumber – 16 ft TRIMS – 2 pieces
- J – tar paper, asphalt shingles ROOFING – 900 sq ft
- K – 1×6 lumber – 12 ft WALL SLATS – 3 pieces
- K – 1×2 lumber – 12 ft WALL SLATS – 116 pieces
- K – 1×2 lumber – 99 1/2″ WALL SUPPORTS – 2 pieces
- K – 1×2 lumber – 110 3/4″ WALL SUPPORTS – 1 piece
Tools
![]() Hammer, Tape measure, Framing square, Level
Hammer, Tape measure, Framing square, Level
![]() Miter saw, Drill machinery, Screwdriver, Sander
Miter saw, Drill machinery, Screwdriver, Sander
![]() Post hole digger, Concrete mixer
Post hole digger, Concrete mixer
![]() Safety Gloves, Safety Glasses
Safety Gloves, Safety Glasses
Time
![]() One week
One week
Related
- 18×20 Pavilion Plans
- PART 1: 24×24 pavilion plans
- PART 2: 24×24 gable roof plans
STEP 4: Building the gable roof
Ridge-beams-braces
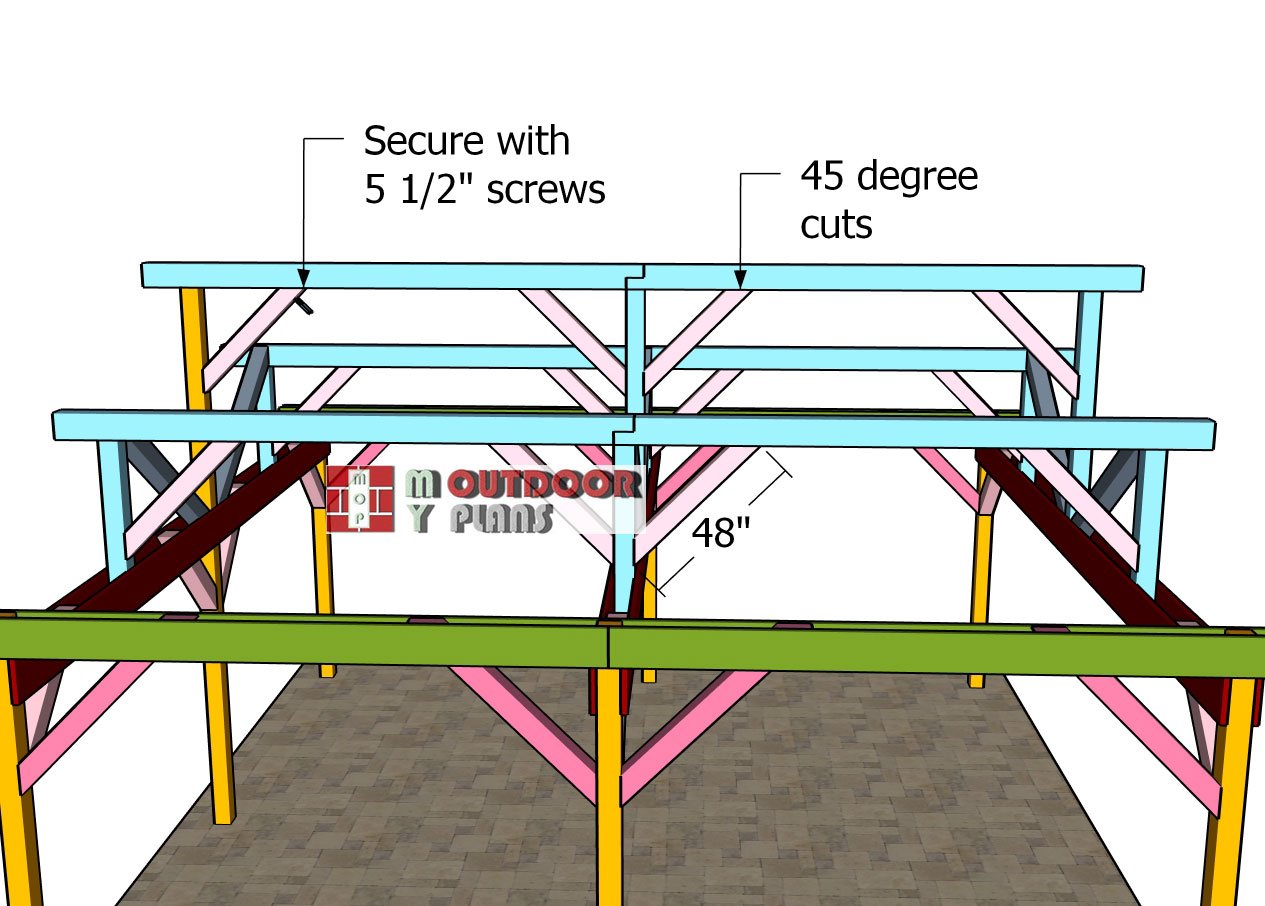
Reinforce the ridge beams with diagonal braces to enhance stability and prevent lateral movement. Cut the braces from sturdy lumber, ensuring they are properly sized to fit between the ridge beam and the supporting posts. Make precise 45-degree cuts at both ends of each brace so they fit snugly against the beams and supports, creating a strong and professional-looking connection. Position the braces at an angle between the ridge beams and the supports, ensuring they are evenly spaced for a symmetrical and balanced structure. Temporarily hold the braces in place with clamps while checking for proper alignment.
Make adjustments as needed to ensure a tight and secure fit before fastening them permanently. Secure each brace using 5 1/2-inch structural screws, driving them firmly into the ridge beam and the support posts. Use at least two screws per joint to ensure a strong connection that resists movement and shifting over time. This reinforcement will help distribute the load evenly and provide additional strength to the roof structure.
Attaching-the-webs
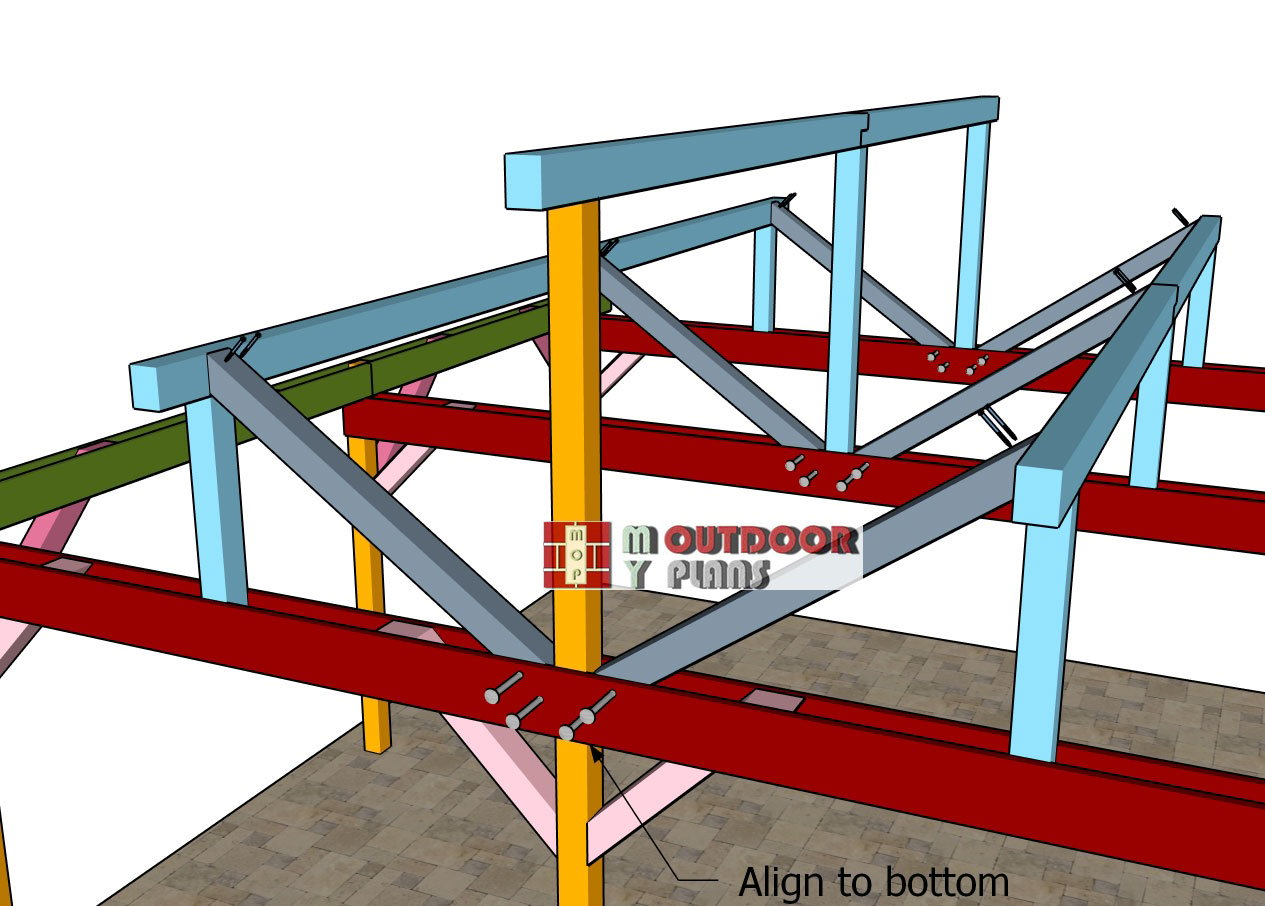
For the webs, use 6×6 lumber to reinforce the roof structure by connecting the base of the middle ridge beam supports to the top of the side ridge beam supports. These braces help distribute the roof load more effectively by shifting the weight from a single point to three points along the crossbeams. This design improves overall stability and prevents excessive stress on any single support.
Make 35-degree cuts at both ends of each brace to allow for a snug and secure connection. These angled cuts ensure proper contact with the supports, increasing the effectiveness of the bracing system. Once the webs are cut, position them in place and temporarily clamp them to the supports. Check for proper alignment and make any necessary adjustments before securing them permanently.
Drill pilot holes through both the crossbeams and the webs to prevent splitting and ensure a precise fit. Insert 9-inch carriage bolts through each hole, making sure they pass completely through both pieces. Secure them with washers and nuts, then tighten them firmly to lock everything together. These bolts will provide a strong mechanical connection, preventing movement over time. Next, drill pilot holes through the top of the web braces where they meet the side ridge beams. Secure these connections using 5 1/2-inch structural screws, driving them in tightly to ensure a firm hold. These screws will help stabilize the webs, preventing any shifting under load while keeping the overall framework rigid.
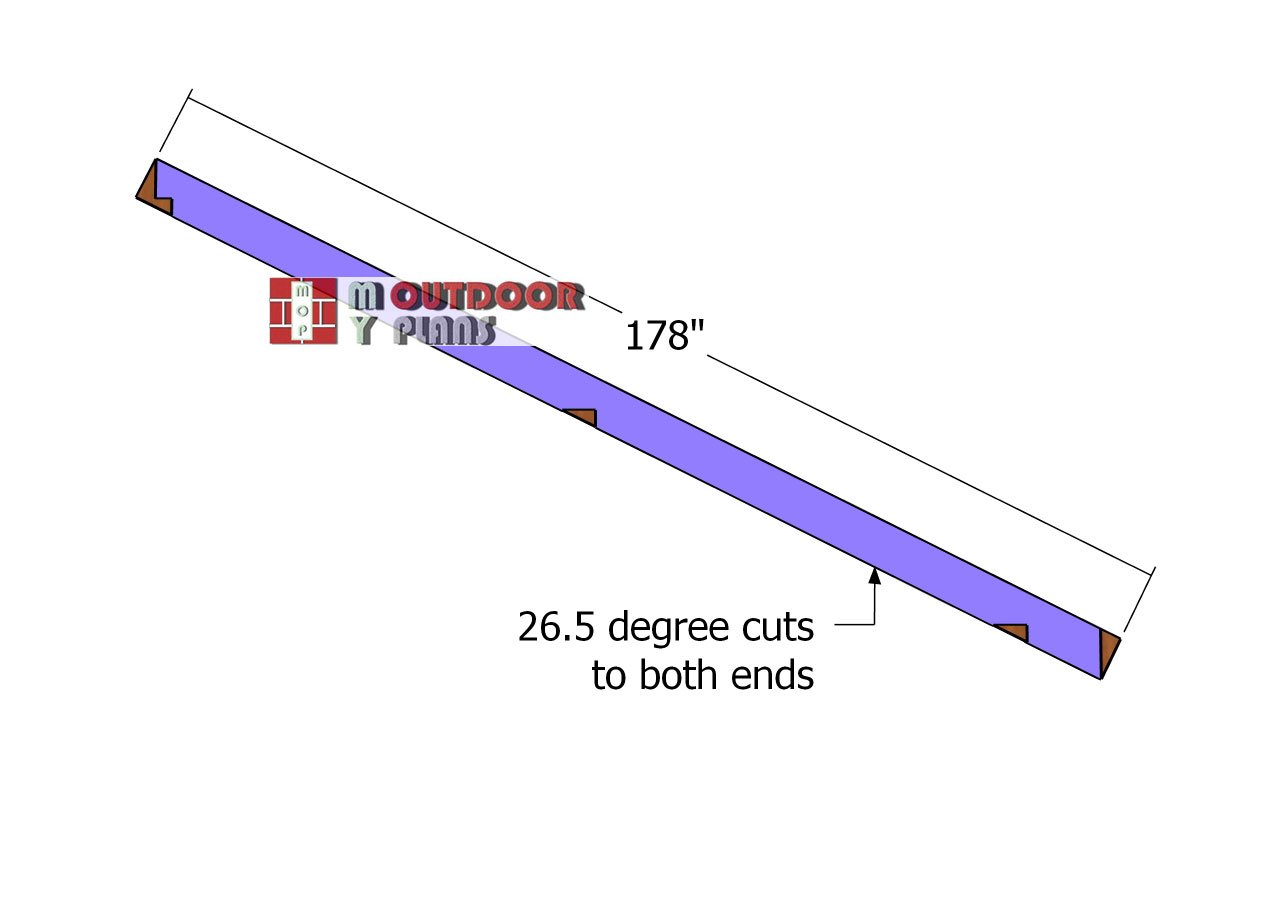
Rafters
Cut the rafters for the 24×24 pavilion from 2×8 lumber, ensuring each piece is accurately measured for a precise fit. Make 26.5-degree angle cuts at both ends of the rafters, as this will allow them to sit flush against the ridge beams and the crossbeams. Consistency is key, so double-check measurements before making any cuts to ensure all rafters are uniform in length and angle.
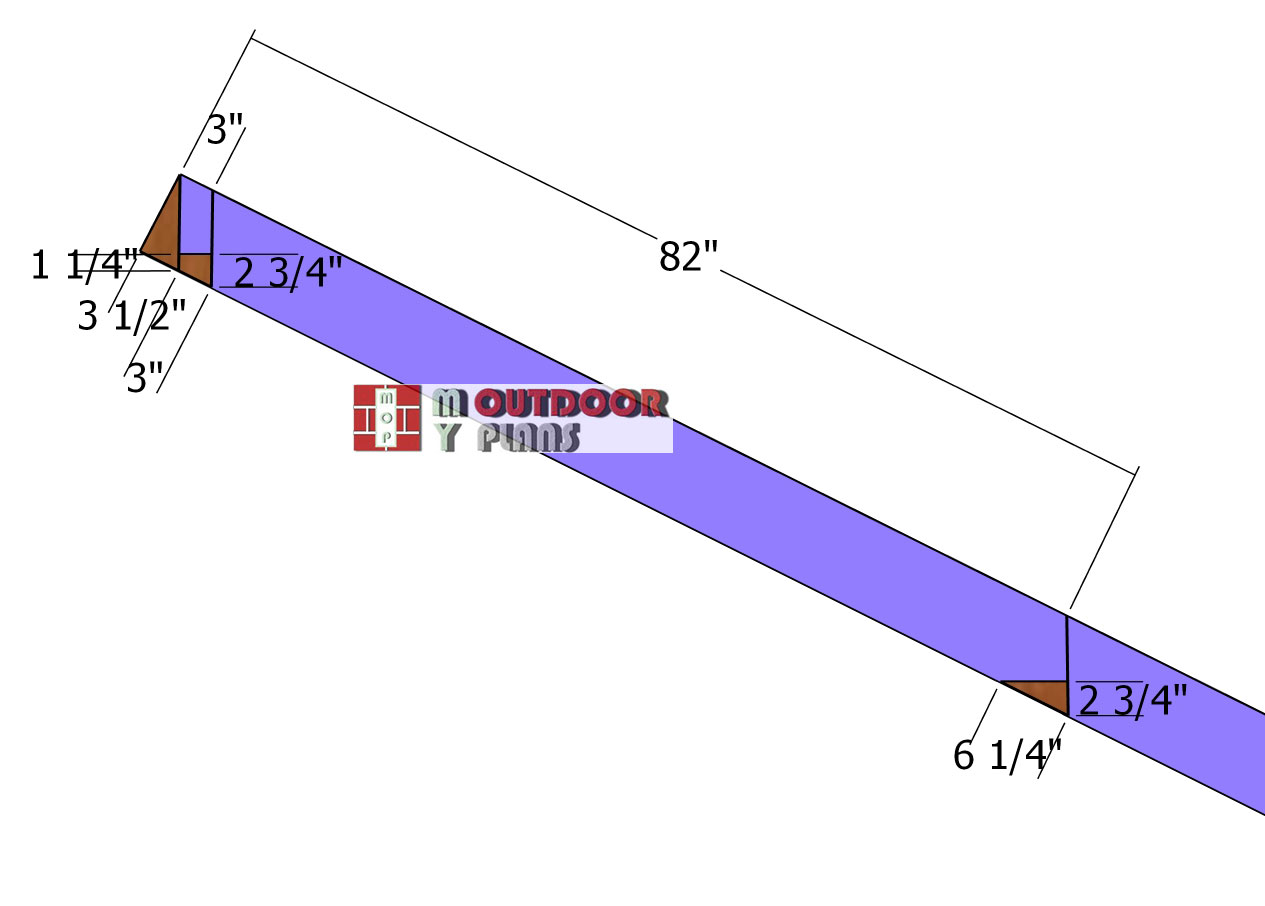
Top-cuts
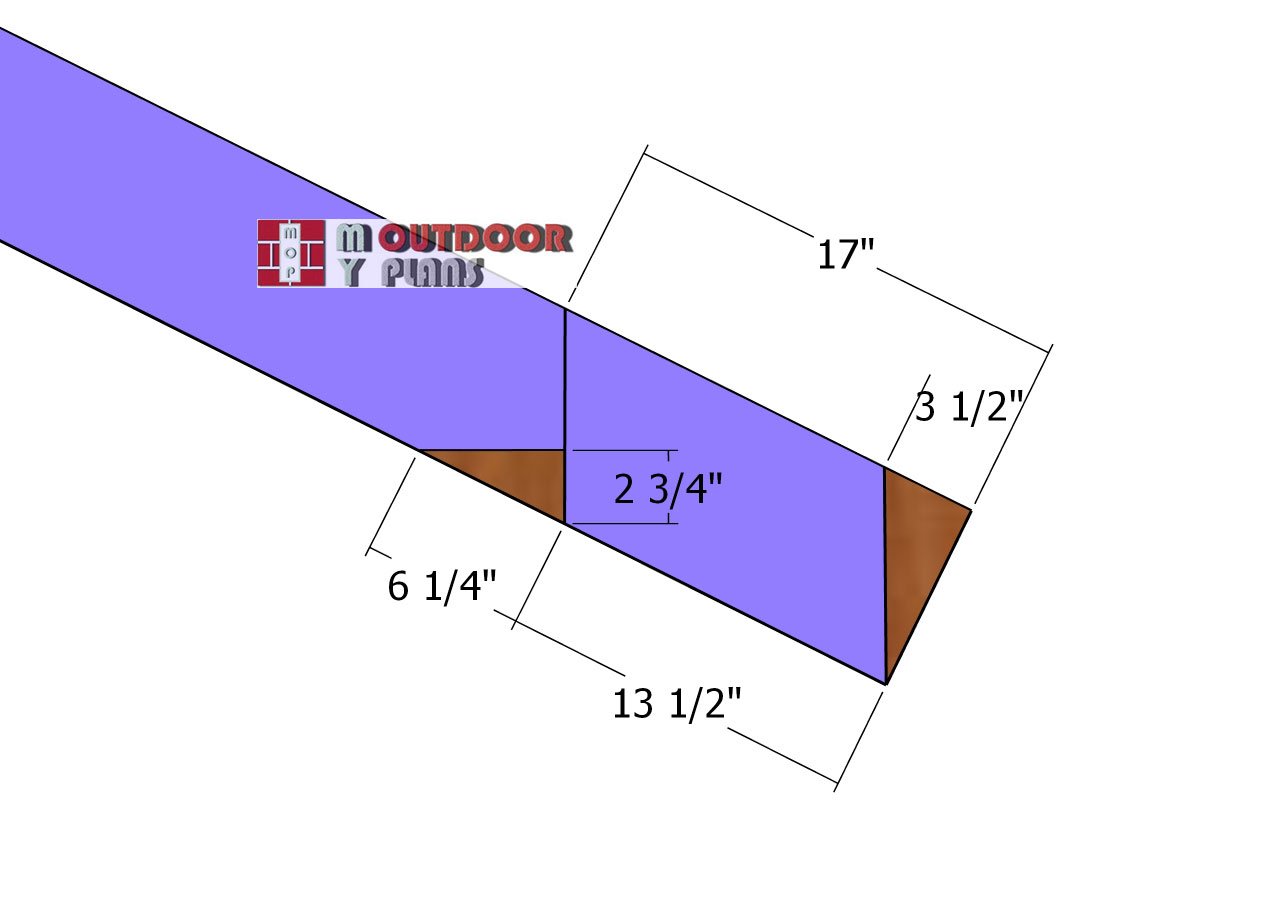
Bottom-birdsmouth-cuts
Proceed with marking the birdsmouth cuts, which will allow the rafters to rest securely on the crossbeams. Use a framing square to mark the cut lines as shown in the diagrams, ensuring proper depth and alignment for a snug fit. Birdsmouth cuts help distribute the load evenly and prevent the rafters from sliding out of place under the weight of the roof. Once the cut lines are marked, use a circular saw to carefully remove the excess material. For the final adjustments, use a handsaw or chisel if needed to refine the cuts and ensure a tight, secure fit on the crossbeams.
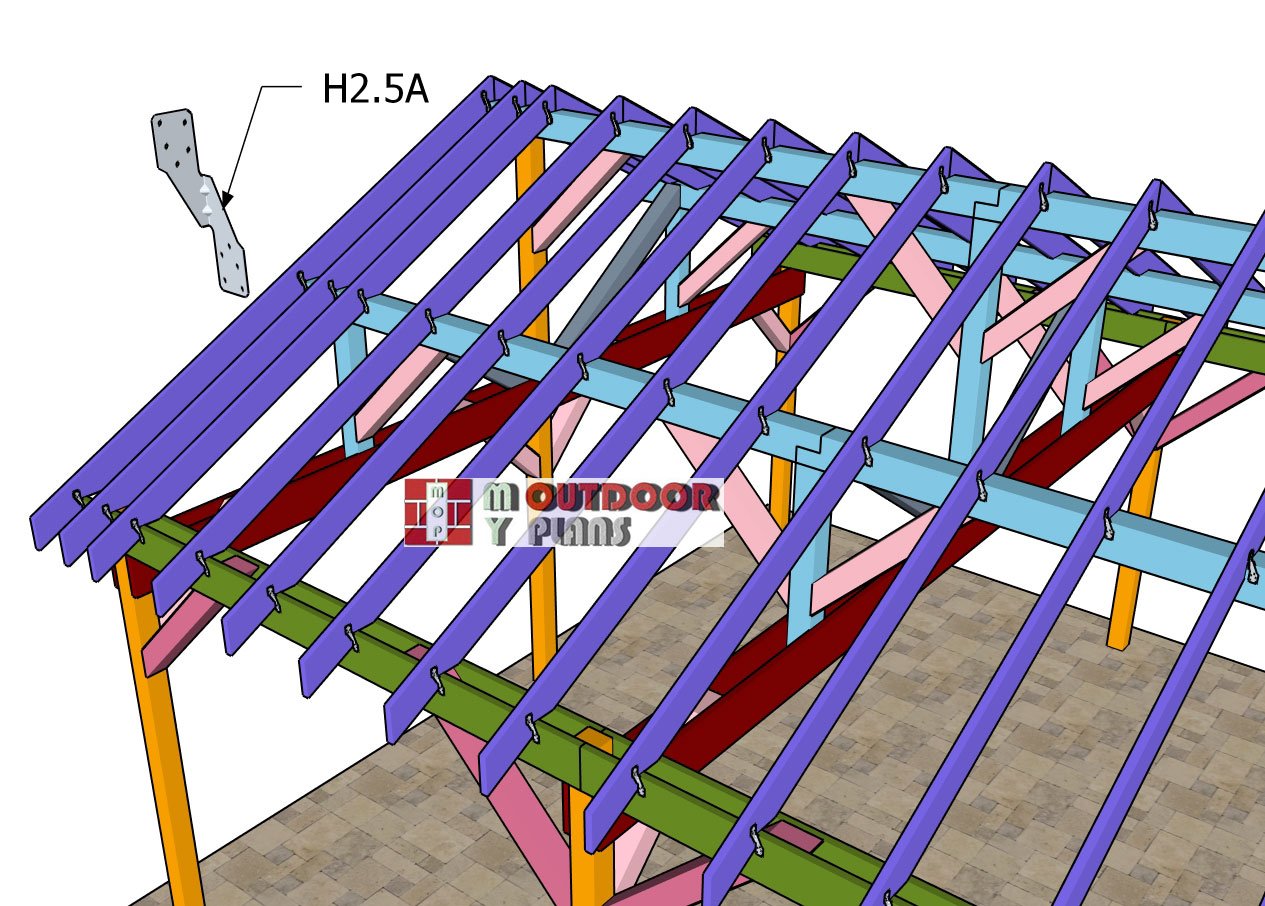
Fitting-the-roof-rafters
Attach the 2×8 rafters to the top of the gable pavilion, ensuring they are spaced every 24 inches on center for proper load distribution. Refer to the diagram for precise placement, as the numbers indicate the exact distances between the rafters. Position each rafter carefully to maintain consistency and alignment across the roof structure. Use rafter ties to secure the rafters to the ridge beams, ensuring a strong connection that can withstand wind and roof loads. Position the ties at each joint where the rafter meets the ridge beam, making sure they are flush against both surfaces.
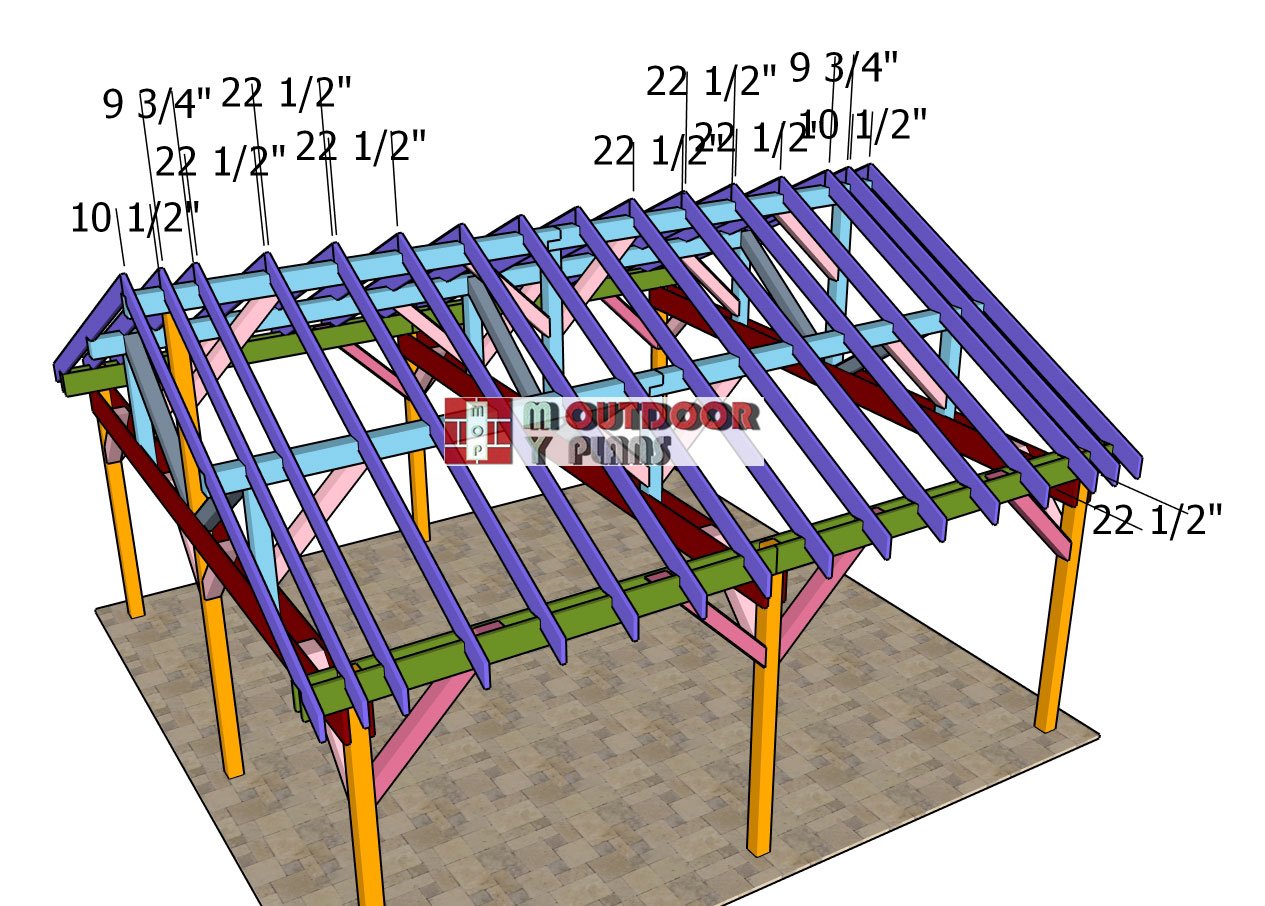
Fitting-the-rafters—spacing
This will help prevent movement and provide additional stability. Fasten each rafter tie using 1 1/2-inch structural screws, driving them securely into both the ridge beam and the rafter. Make sure all fasteners are tightened properly to avoid any shifting over time. Repeat the process for all rafters, double-checking spacing and alignment as you progress. Once all rafters are installed, inspect the entire roof structure to ensure everything is level and securely fastened. If necessary, make minor adjustments to keep the roof plane even before proceeding with the next steps of the pavilion build. A properly installed rafter system will provide the necessary support for the roof sheathing and finishing materials.
STEP 5: Fitting the roofing
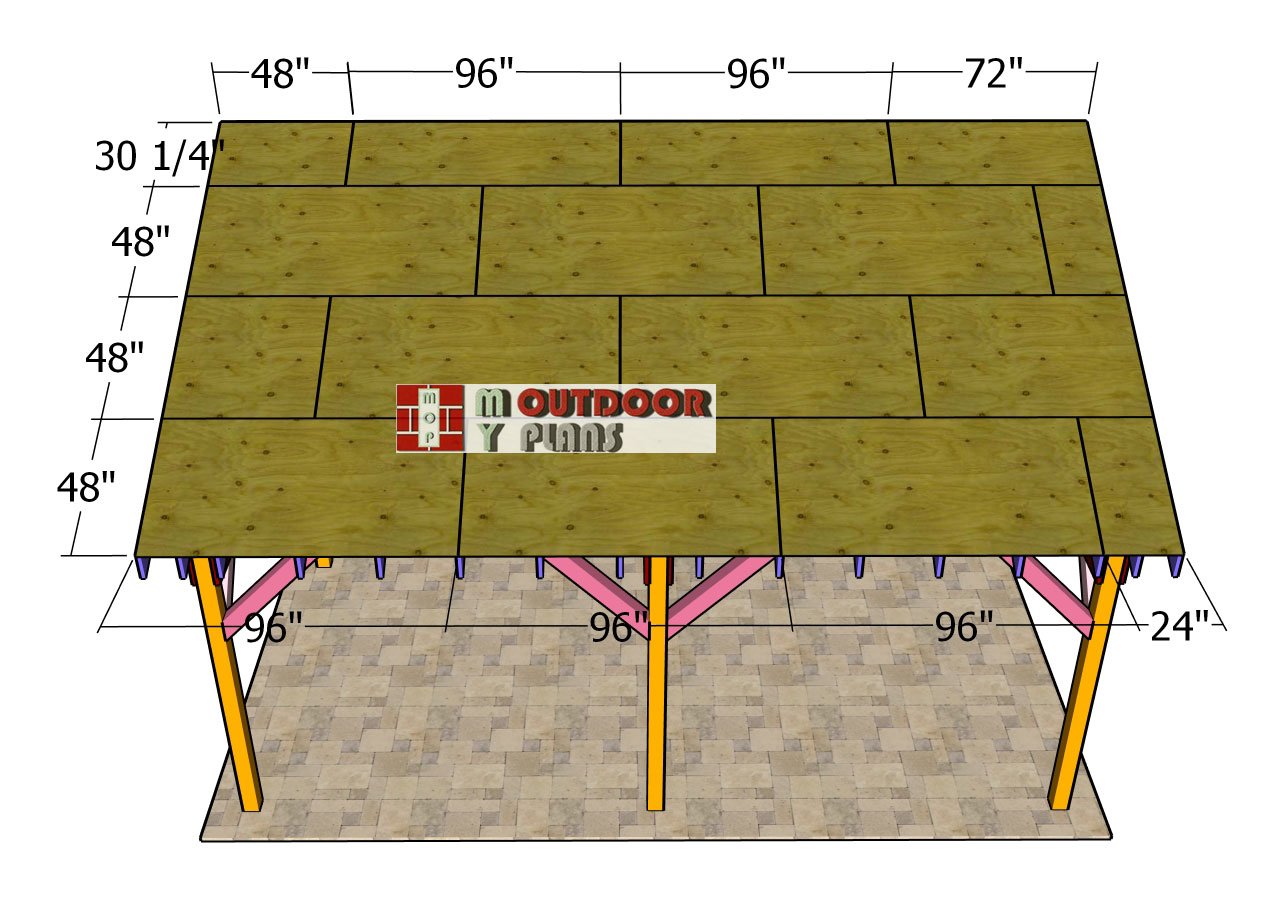
Roof-sheets
Install the 3/4″ plywood sheets to create a sturdy and durable roof deck. Carefully position each sheet over the rafters, aligning the edges for a clean and seamless finish. Leave a small gap between the sheets to allow for natural expansion and prevent any warping or buckling over time. Secure the plywood to the rafters using 1 5/8″ exterior-grade screws, spacing the screws every 8-10 inches along each rafter. This will ensure the sheets are tightly fastened, providing a strong base for the roofing material. With this solid foundation, your roof will be built to withstand the elements and stand the test of time.

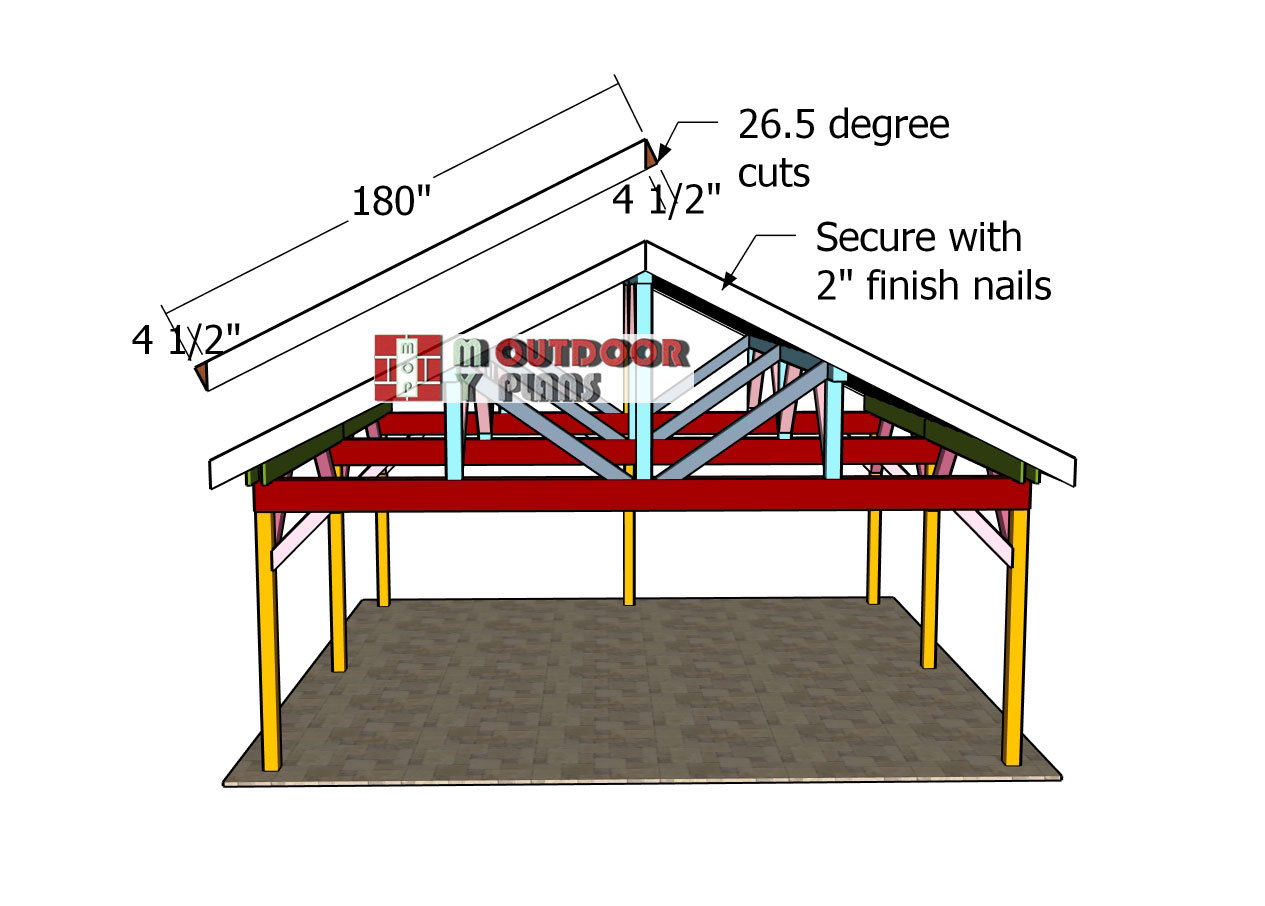
Side-roof-trims
Attach 1×10 trim boards to the sides of your DIY garden pavilion, aligning the edges flush with the plywood roof decking for a sleek, polished appearance. Secure each trim board using 2″ nails, driving them into the end of every rafter for a firm and reliable hold. These trim boards not only enhance the overall look of the pavilion but also protect the edges of the roof decking, ensuring durability and a refined finish.
Gable-end-trims
Install the trim boards to the front and back of the gazebo, ensuring the edges are perfectly aligned and flush for a seamless appearance. Secure the trims with 2″ nails, driving them firmly into place. Make sure there are no gaps between the trim boards for a clean and professional finish.
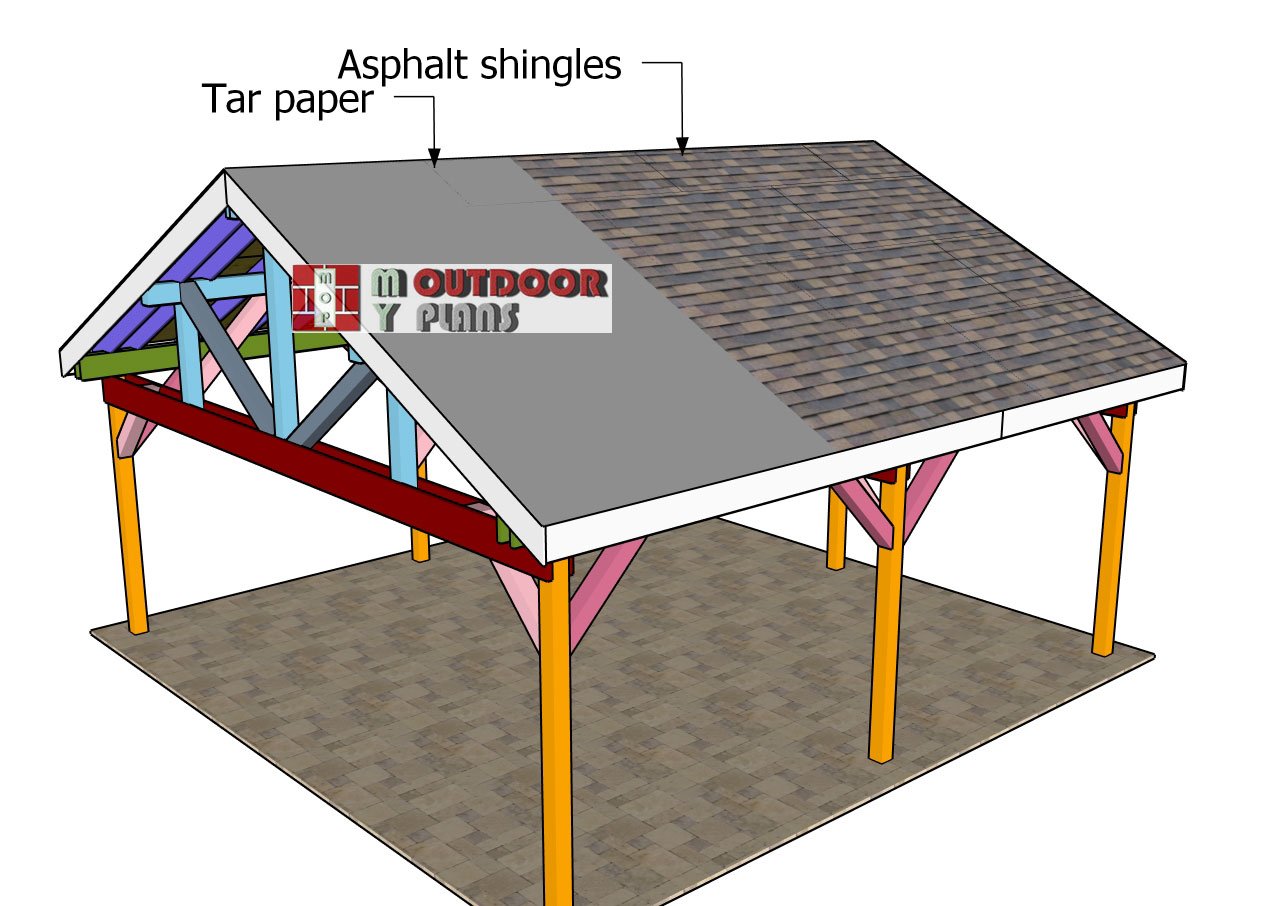
Fitting-the-roofing
Installing asphalt shingles on your 24×24 gable carport requires careful preparation and proper layering to ensure a durable, weather-resistant roof. Begin by installing the drip edge along the eaves, securing it with roofing nails every 8 to 10 inches. This metal flashing prevents water from seeping under the roof sheathing and protects the edges from rot. Next, roll out the roofing underlayment over the plywood decking, starting at the bottom and working your way up, overlapping each row by at least 4 inches. For added protection, use a self-adhering ice and water shield along the eaves and valleys, if applicable, to prevent leaks caused by wind-driven rain or ice dams. Finally, install the drip edge along the gable ends, overlapping it over the underlayment to keep water from running underneath.
Once the underlayment is secured, begin laying the asphalt shingles starting at the bottom edge of the roof. Install the starter strip shingles along the eaves, ensuring they slightly overhang the drip edge to direct water into the gutters. Next, place the first row of shingles on top of the starter strip, following the manufacturer’s recommended nailing pattern and overlapping each course to create a water-shedding system. Continue working your way up, staggering the seams between rows to prevent leaks. If your carport includes a ridge vent, leave space for it at the peak while installing shingles. Trim shingles as needed to fit around vents or any protrusions, sealing them with roofing cement for extra protection. The final step is installing the ridge cap shingles to complete the roof.
STEP 6: Fitting the privacy panels
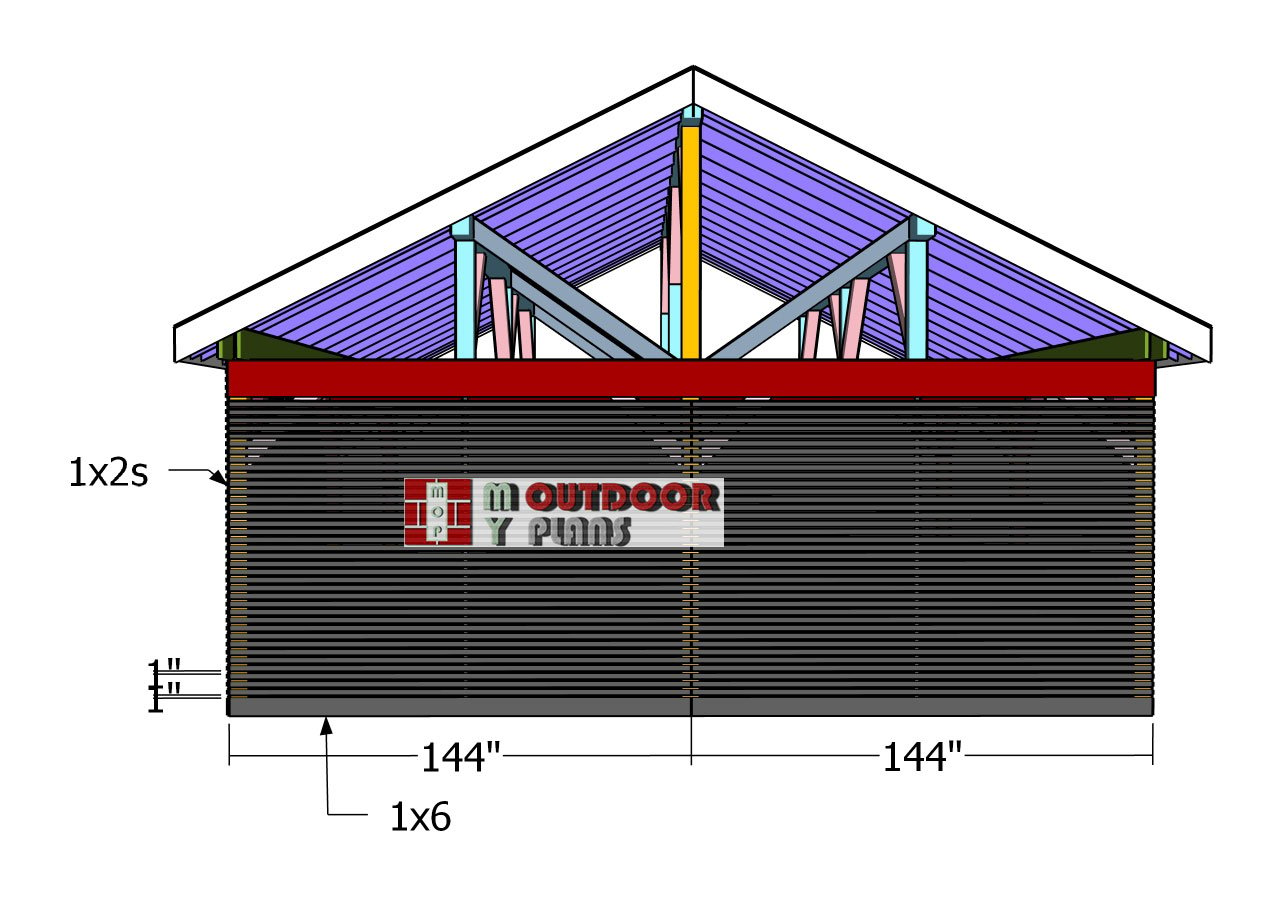
Back-slats
If you’d like to add privacy or extra shade to your pavilion, installing 1×2 slats along the back and one side is a simple yet effective solution. To ensure a uniform and professional look, space the slats evenly using a 1-inch spacer to maintain consistent gaps. Before securing them, drill pilot holes at each end of the slats to prevent splitting, then attach them to the posts using 1 5/8-inch screws.
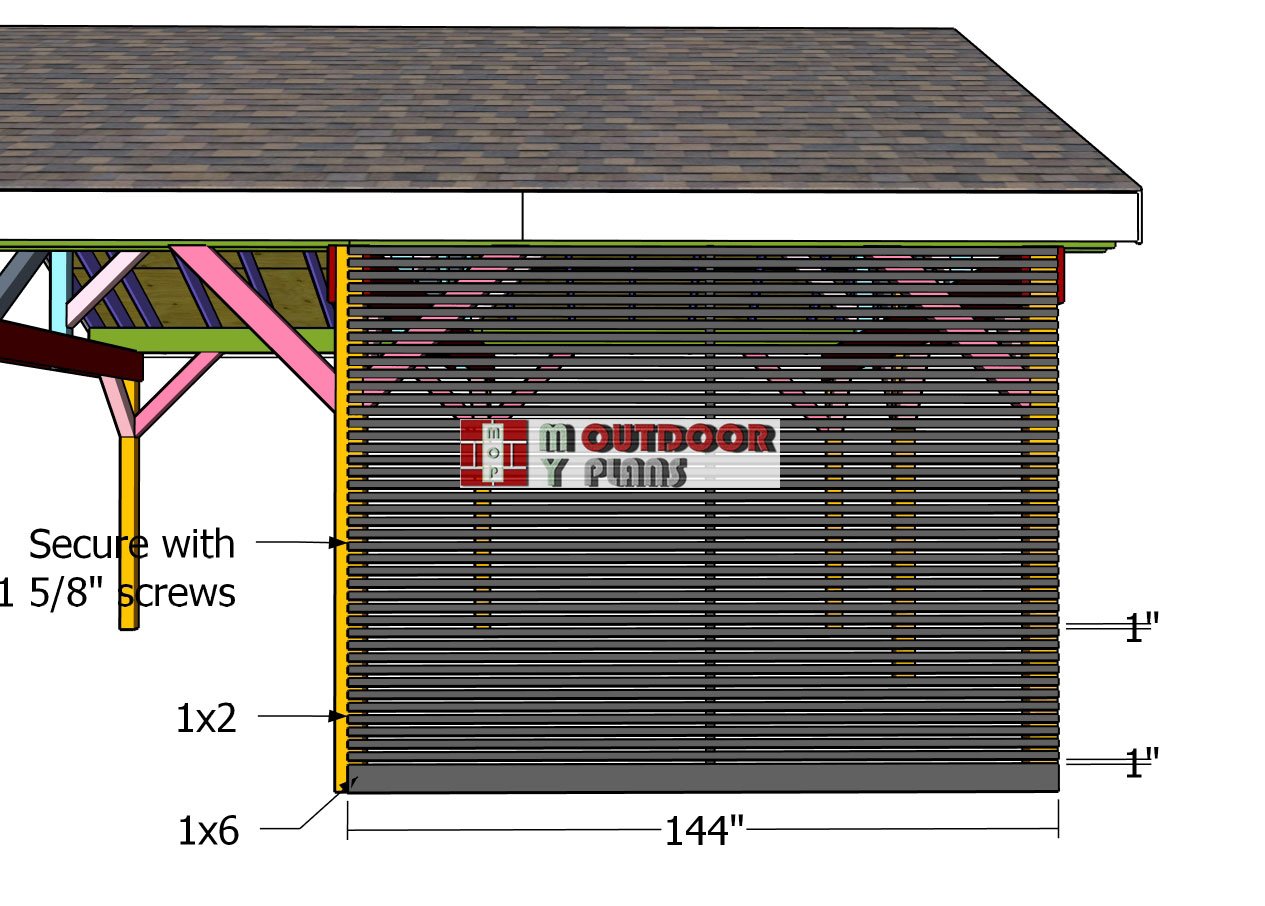
Side-panels
This method provides a clean, modern aesthetic while allowing for airflow and filtered light. For added durability, install a 1×6 board along the bottom of the panel to protect the 1×2 slats from moisture and potential warping over time.
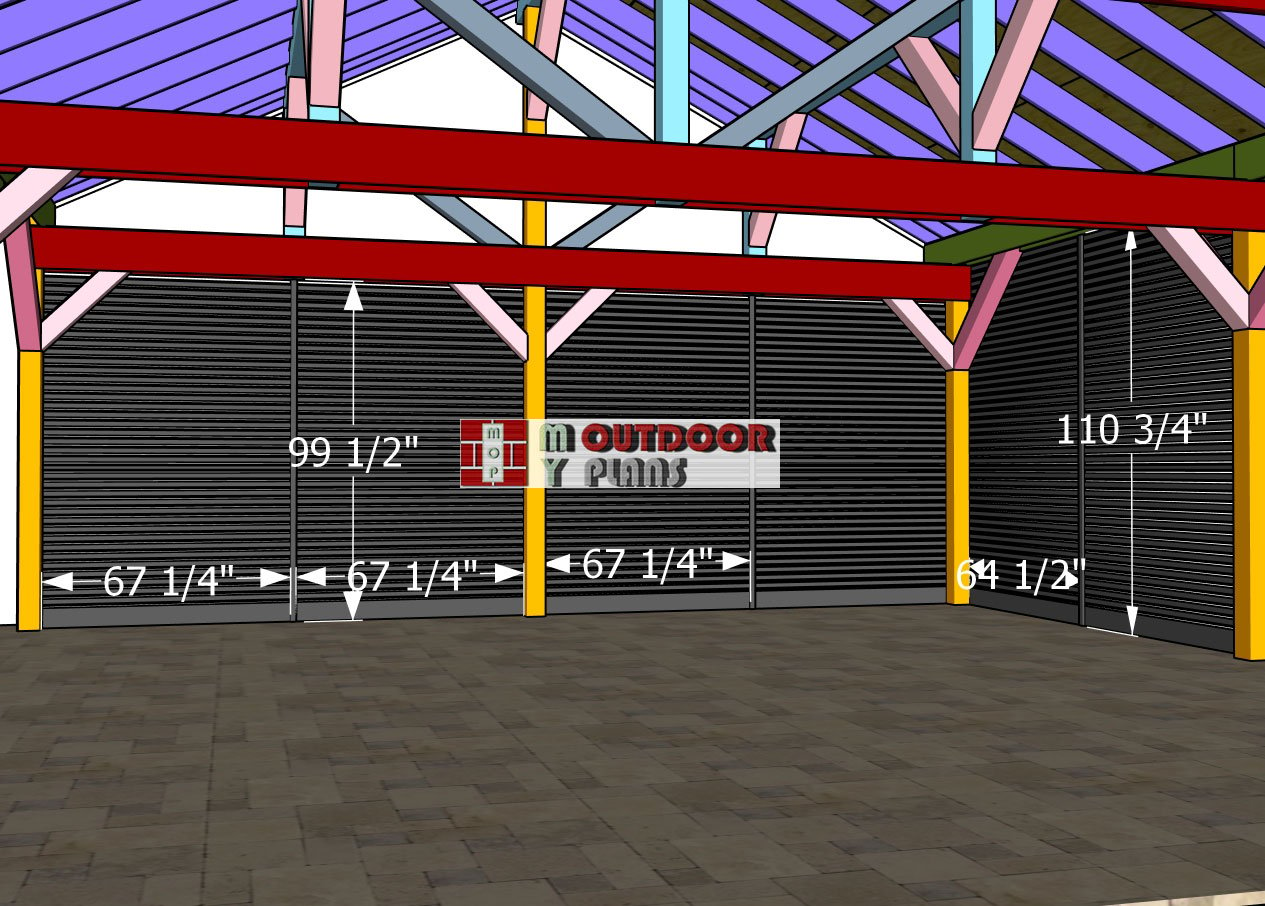
Side-panels-supports
This base board acts as a barrier, reducing exposure to ground-level humidity and prolonging the lifespan of the structure. If desired, you can stain or seal the slats to further enhance weather resistance and match the pavilion’s overall design.
STEP 7: Finishing touches
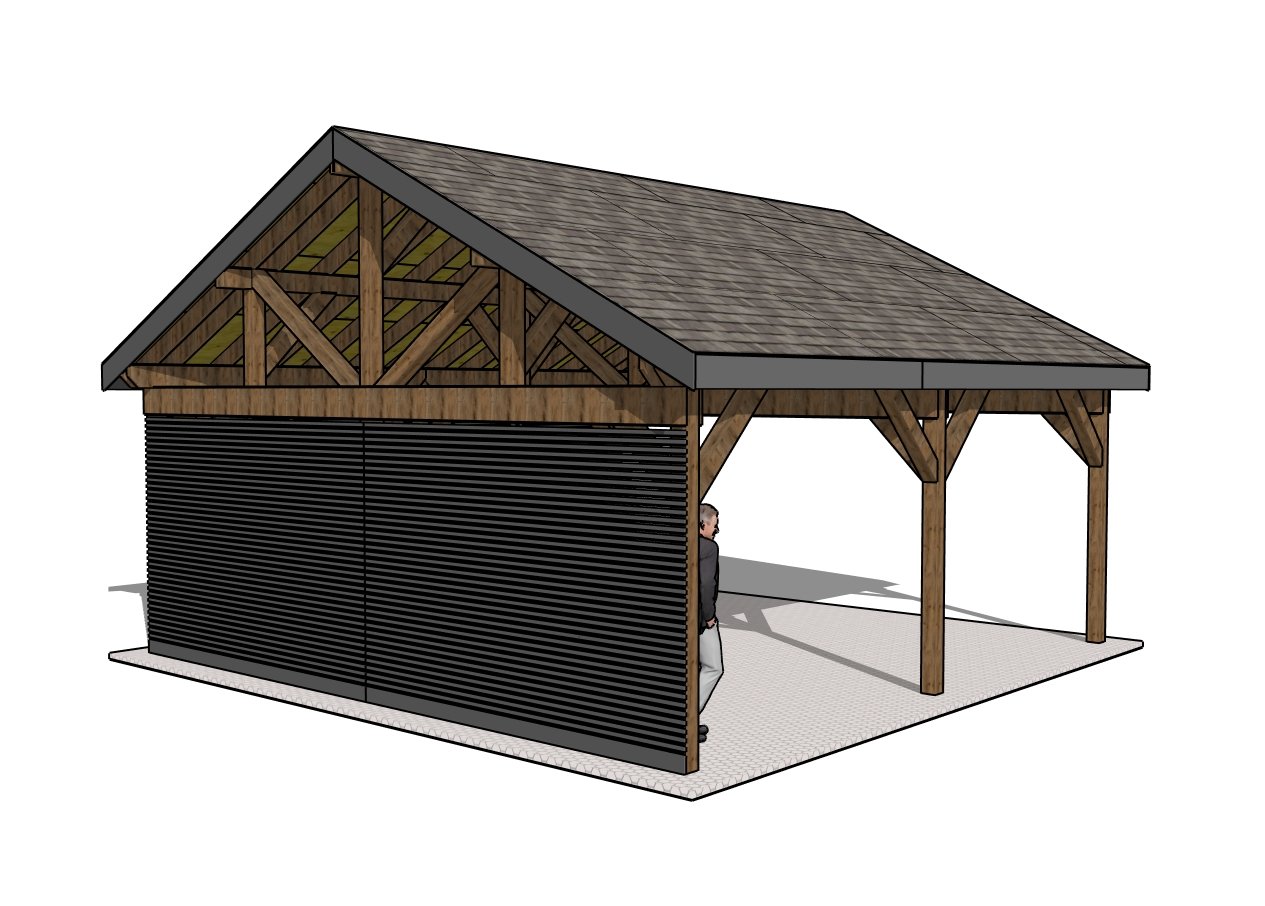
24×24 gable carport – back view
To complete the pavilion or carport, apply a high-quality wood finish to protect the structure from the elements. Use an exterior-grade stain or sealant to enhance the natural beauty of the wood while providing resistance to moisture, UV rays, and pests. If you prefer a painted finish, use a primer followed by a weather-resistant paint to ensure long-lasting protection. Reapply the finish every few years to maintain the durability and appearance of the wood.
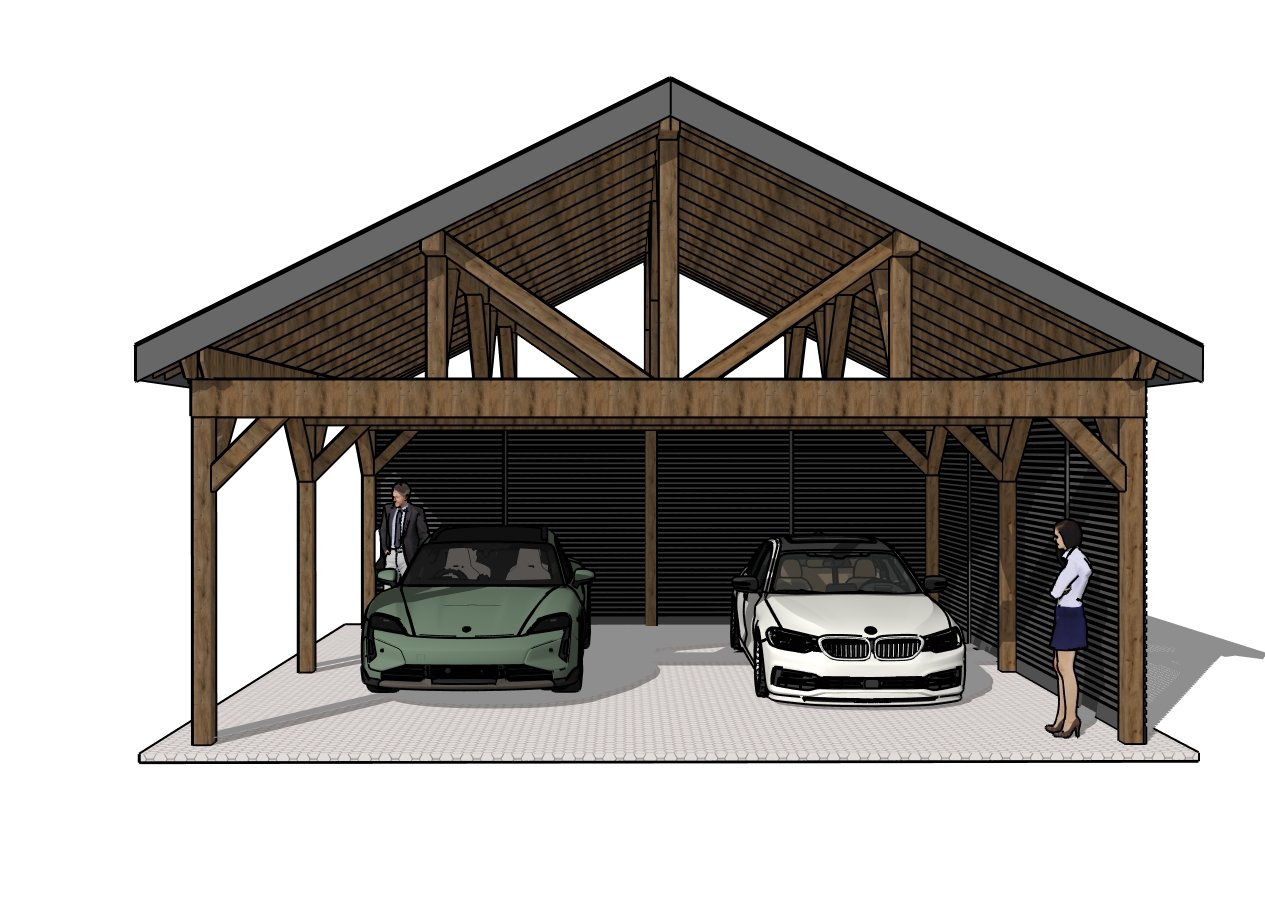
24×24 gable carport – front view
For added functionality, consider incorporating gutters and downspouts to direct rainwater away from the posts and foundation, preventing water damage over time. You can also install lighting fixtures along the beams to create a well-lit space for evening use. If using the structure as a carport, adding a gravel or concrete pad underneath will improve drainage and keep the area clean. For a pavilion, consider adding built-in seating or a storage area for outdoor essentials.
Check out PART 1 of the project, so you learn how to build the base for the carport.
This woodworking project was about modern double car carport plans. If you want to see more outdoor plans, we recommend you to check out the rest of our step by step projects.

- EXPLORE MORE IDEAS FOR -
 |
 |
 |
 |