This step by step diy project is about carport with storage plans. I have designed this carport so that you can park one car easily into place. Moreover, I have attached a 6×12 storage unit to the carport, so you can store tires and other items and to protect them from the elements. Read the local codes and make modifications to comply with the requirements, if necessarily. Take a look over the rest of my woodworking plans, if you want to get more building inspiration.
When buying the lumber, you should select the planks with great care, making sure they are straight and without any visible flaws (cracks, knots, twists, decay). Investing in cedar or other weather resistant lumber is a good idea, as it will pay off on the long run. Use a spirit level to plumb and align the components, before inserting the galvanized screws, otherwise the project won’t have a symmetrical look. If you have all the materials and tools required for the project, you could get the job done in about a day. See all my Premium Plans HERE.
Carport with Storage Plans
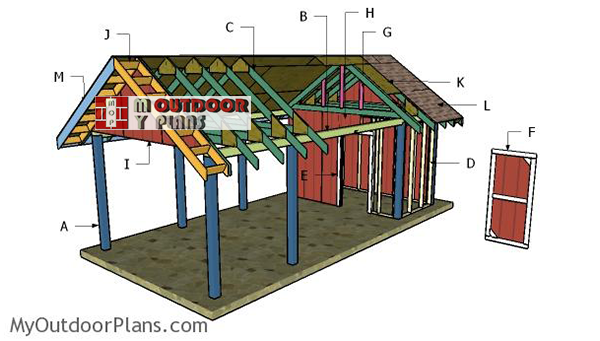
Building-a-carport-with-gable-roof
Cut + Shopping Lists
- A – 10 pieces of 6×6 lumber – 11′ long POSTS
- B – 2 pieces of 6×6 lumber – 306 1/2″ long RAILS
- D – 2 pieces of 2×4 lumber – 61″ long, 4 pieces – 87″ long 2xSIDE WALL
- D – 1 piece of 2×4 lumber – 133″ long, 7 pieces – 92 1/2″ long, 2 pieces – 75″ long, 4 pieces – 12″ long, 2 pieces – 39″ long, 1 piece – 67 1/4″ long, 1 piece – 29 3/4″ long FRONT WALL
- D – 2 pieces of 2×4 lumber – 133″ long, 7 pieces – 92 1/2″ long BACK WALL
- E – 9 pieces of T1-11 5/8″ siding – 48″x96″ long SIDING
- 10 pieces of 6×6 lumber – 12′
- 2 pieces of 6×6 lumber – 26′
- 4 pieces of 2×4 lumber – 12′
- 29 pieces of 2×4 lumber – 8′
- 1 piece of 2×6 lumber – 8′
- 9 pieces of T1-11 5/8″ siding – 4’x8′
- 2 1/2″ screws, 3 1/2″ screws, 1 5/8″ screws
- 4d nails
- wood filler , wood glue, stain/paint
- post anchors (optional)
- beam to post connectors
- structural screws for connectors
- strong tie T
Tools
![]() Hammer, Tape measure, Framing square, Level
Hammer, Tape measure, Framing square, Level
![]() Miter saw, Drill machinery, Screwdriver, Sander
Miter saw, Drill machinery, Screwdriver, Sander
![]() Safety Gloves, Safety Glasses
Safety Gloves, Safety Glasses
Time
Related
- PART 1: Carport with storage plans
- PART 2: Carport with storage roof plans
Building a single car carport with storage
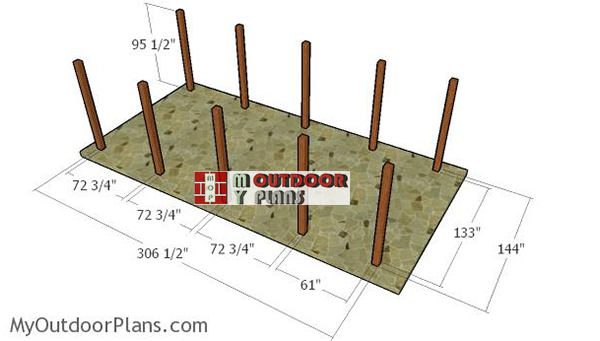
Fitting-the-posts
The first step of the project is to lay out the posts for the carport with storage. Use batten boards and string to determine the location for the posts. Make sure the diagonals are equal and apply the 3-4-5 rule to the four corners to check if they are right-angled.
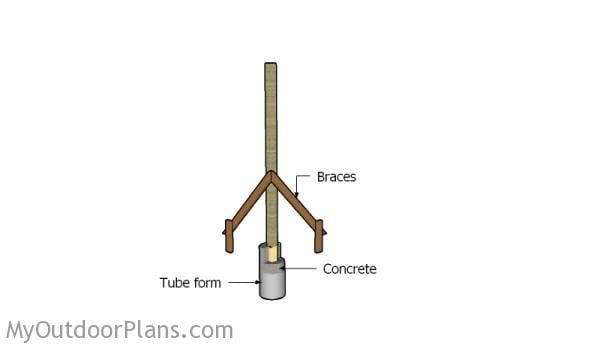
Setting the posts in concrete
Dig 3′ deep holes into the ground and then pour a 2″ layer of gravel, so you level the bottom. Compact the gravel thoroughly, before fitting the 6×6 posts into place. Next, you need to plumb them with a spirit level and use temporarily braces, so you lock it into place. Fill the holes with concrete and let it set up for a few days. In addition, make sure the posts are 95 1/2″ above the ground.
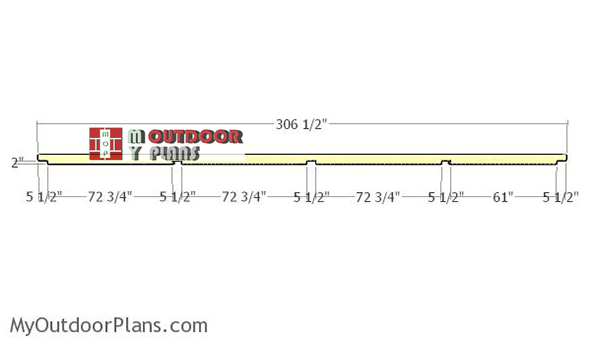
Building-the-top-rails
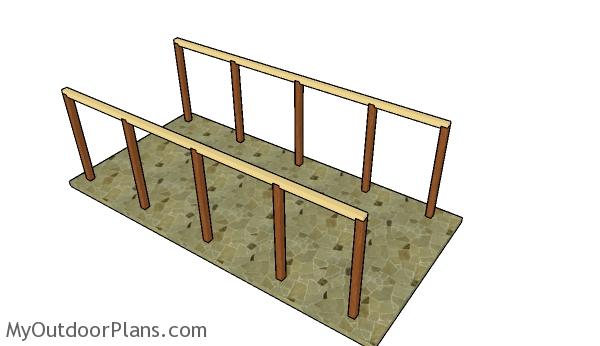
Use 6×6 lumber for the top rails, as well. Mark the cut lines on the rails and then make the notches with a circular saw. Make parallel cuts inside the marked areas 2″ deep and then remove the excess materials with a chisel. Smooth the recess with a sandpaper.
Fitting-the-top-plates
Fit the rails to the top of the posts and secure them into place with 5 1/2″ screws, after drilling pilot holes. Leave no gaps between the components and make sure the corners are square.
Building the storage area
Building-the-side-wall-frames
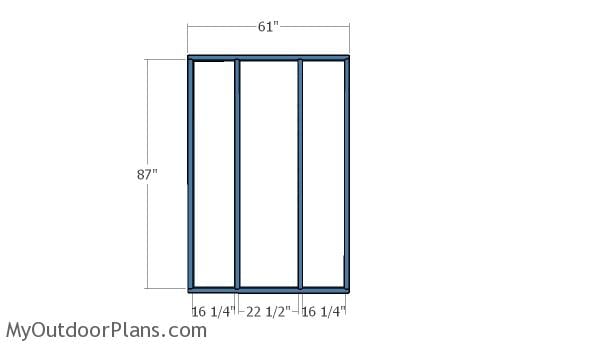
Build the frames for the sides of the shed unit. Cut the components from 2×4 lumber and then lock them together tightly. Drill pilot holes through the plates and insert 2 1/2″ screws into the studs. Make sure the corners are square and align the edges flush.
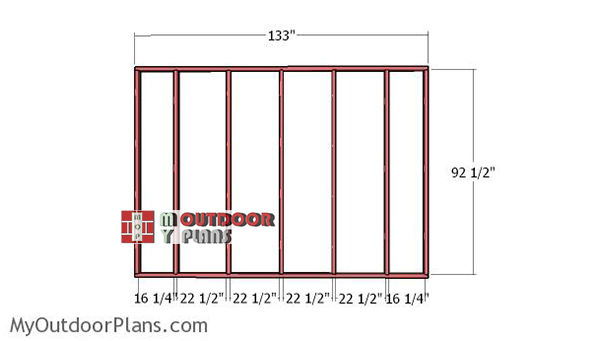
Building-the-back-wall-frame
Assemble the back wall in the same manner described above.
Building-the-front-wall-frame
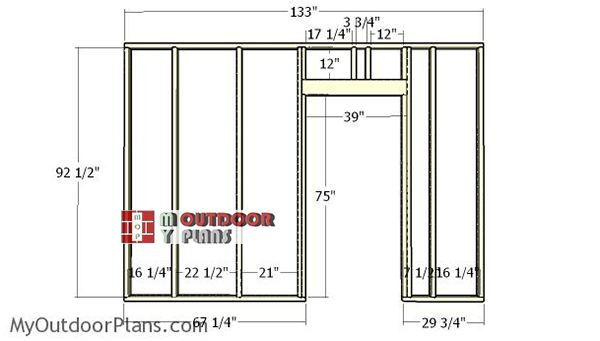
Assemble the front wall for the storage unit, using the information from the diagram. As you can easily notice in the plans, you need to frame the door opening. Use 2×6 lumber for the double header.
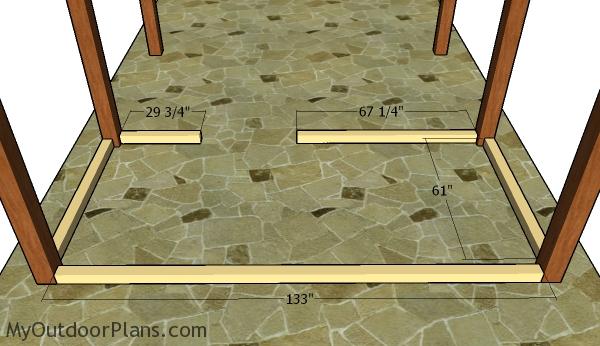
Fitting-the-bottom-plates-for-the-storage-unit
Lay 4×4 plates over the bottom of the
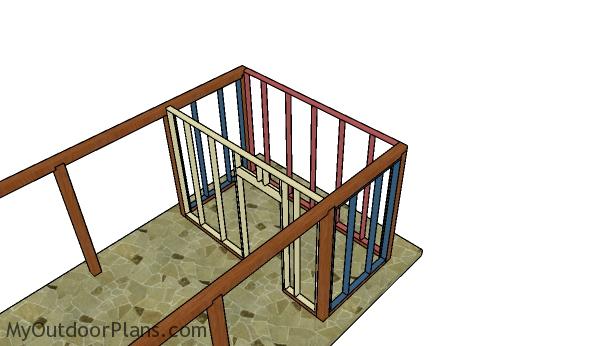
Fitting-the-walls-of-the-storage-unit
Fit the walls frames into place align align the flush into place. Drill pilot holes through the plates and through the end posts and insert 2 1/2″ screws to lock them into place tightly.
Fitting the siding sheets
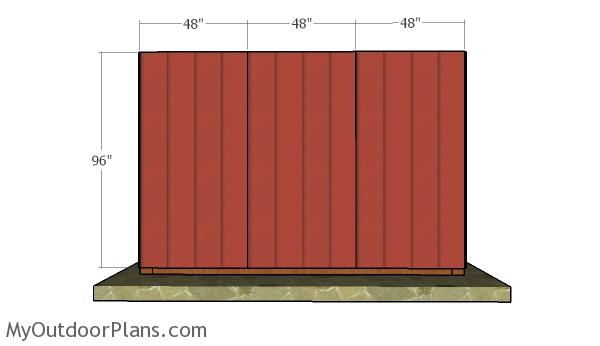
Fitting-the-back-wall
Attach 5/8″ T1-11 siding panels to the back of the storage unit. Align the edges flush and then secure them into place with 4d nails. Insert the nails every 8″ along the framing.
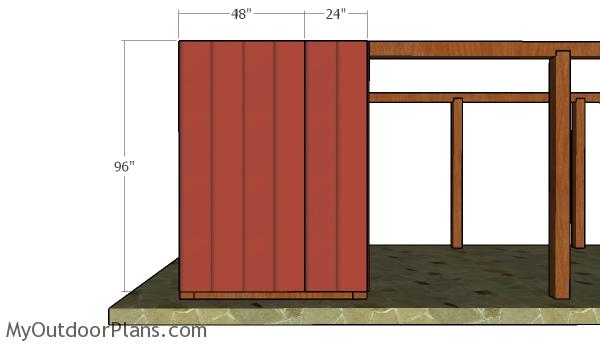
Fitting-the-side-walls
Attach the siding panels to the sides of the shed, as well. Leave no gaps between the sheets for a neat result.
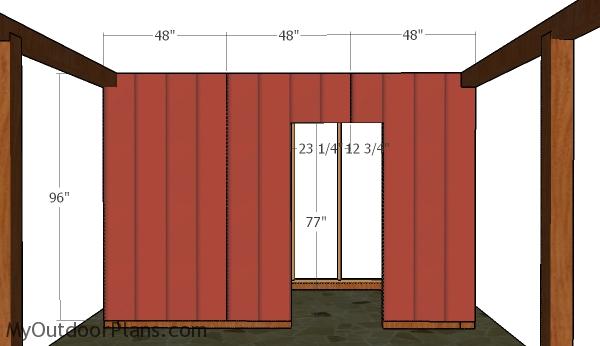
Attaching-the-front-wall
Fit the panels to the front wall of the storage unit, as well. As you can easily notice in the diagram, you need to cut out a door opening.
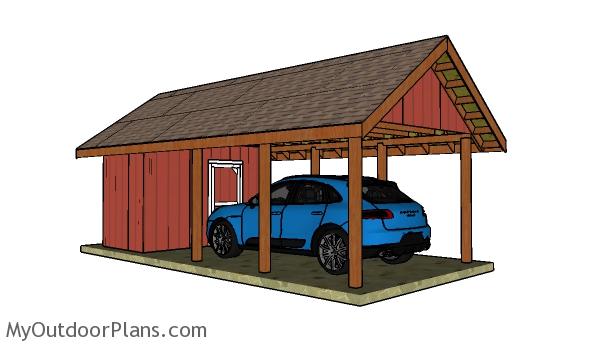
Carport-with-storage-plans
Make sure you check out PART 2 of the carport with storage shed plans, so you learn how to build the roof and to take care of the finishing touches,

This is a simple project you should be able to build in a few days without much effort. This single car carport has a nice 6×12 storage unit attached, so you can store tires and other car parts. Check out PART 2 of the project to learn more on how to build the roof for the carport.

How to build carport with storage
Building a single-car carport with a storage area will likely cost you between $2,000 and $4,000, depending on the materials and design features you choose. Combining a carport with a storage area adds both practicality and convenience, giving you a protected space for your vehicle and extra room for tools, outdoor equipment, or other items. This investment creates a multi-functional structure that efficiently uses space while providing essential coverage and storage.

How to build a carport with storage
You can expect to spend about 2 to 4 weekends constructing your single-car carport with a storage area. The project involves framing the carport, building the storage section, and ensuring both areas are weatherproof and secure. With careful planning and steady work, you’ll have a solid and versatile structure completed in a manageable timeframe.

How to build a single car carport with storage
As you finish your single-car carport with a storage area, you’ll have added a highly practical and versatile asset to your property. The carport provides reliable protection for your vehicle, shielding it from the elements, while the attached storage area keeps your tools and equipment neatly organized and easily accessible. This project isn’t just about creating a carport – it’s about building a dual-purpose structure that enhances your home’s functionality and adds value to your outdoor space.
If you want to download this plan as a PDF file with 1 full cut list and 1 full shopping list, please take a look over the GET PDF PLANS button bellow.
This woodworking project was about carport with storage plans free. If you want to see more outdoor plans, check out the rest of our step by step projects and follow the instructions to obtain a professional result.


7 comments
What is the cost to build this yourself? and what would the cost be to have someone build it?
Thank you
You have a materials list to compute the cost of the materials. If you hire someone to build it, it will probably charge the cost of the materials.
Just what I was looking for. Thanks for sharing your knowledge with us.
Good luck. Looking forward to seeing your projects!
What’s the outside width dimensions including the overhangs/eves? Need this info to see if it would sit along side a manufactured home on a 40′ wide lot. Thanks
15’x29′
Hello great plan just what I was looking for but would like to build this with a 12×16 foot enclosed shop instead of a 12×6 foot storage area, any suggestions, thanks . also what is the actual roof pitch?