This step by step diy woodworking project is about outdoor bar plans. Building an outdoor wooden bar using is easy, if the right materials and tools are used. From our experience, you should always adjust the size and the design of the bar, as to fit your needs and tastes. Use quality materials, making sure they are weather-resistant (cedar, redwood, pine), especially if you are going to place the bar in your garden.
Always drill pilot holes before inserting screws or nails, to prevent the wood from splitting. In addition, if you want to hide the joints, you should take into account using a pocket holes system. On the other hand, you could also round the exposed edges of the bar with a router and a 3/4” bit. In this manner, you can add character to the wooden bar. Sand the wooden surface with 120-grit before applying the stain or paint coats. See all my Premium Plans HERE.
Projects made from these plans
Cut & Shopping Lists
- A – 4 pieces of 2×4 lumber – 40” long, 4 pieces of 2×6 lumber – 40” long LEGS
- B – 4 pieces of 2×4 lumber – 15” long, 4 pieces of 2×4 lumber – 48” long FRAMES
- C – 17 pieces of 1×4 lumber – 38” long SIDE SLATS
- D – 13 pieces of 1×4 lumber – 18” long BOTTOM
- E – 5 pieces of 1×2 lumber – 18″ long, 8 pieces of 1×4 – 23 1/4” long SHELVES
- F – 2 pieces of 2×4 – 24″, 2 pieces – 54″, 6 pieces – 51″ COUNTERTOP
- G – 4 pieces of 1×4 lumber – 33 3/4″, 1 piece of 2×4 lumber – 15″ WALL
- 12 pieces of 2×4 lumber – 8′
- 2 pieces of 2×6 lumber – 8′
- 15 pieces of 1×4 lumber – 8′
- 1 piece of 1×2 lumber – 8′
- 100 pieces of 2 1/2″ screws
- 100 pieces of 1 1/4″ screws
- glue, stain
Tools
![]() Hammer, Tape measure, Framing square
Hammer, Tape measure, Framing square
![]() Miter saw, Drill machinery, Screwdriver, Sander
Miter saw, Drill machinery, Screwdriver, Sander
![]() Safety Gloves, Safety Glasses
Safety Gloves, Safety Glasses
Time
Related
Building an outdoor bar
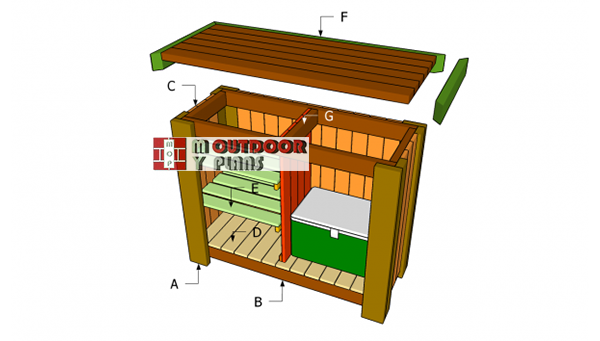
Building-an-outdoor-bar
Top Tip: Building an outdoor bar doesn’t have to be a complex or expensive woodworking project. On the contrary, any person with basic woodworking skills can get the job done in just a few hours, if the right materials and tools are used.
Outdoor Bar Plans

Building-the-frames-for-the-bar
The first step of the project is to build the frames (this project requires two identical frames) for the outdoor bar. In order to get a professional result, you need to drill pilot holes trough the long components, before driving the 2 1/2” wood screws into the perpendicular elements. Alternatively, you can drill pocket holes at both ends of the 15″ long components.
Top Tip: Use a carpentry square to check if the corners are right-angled. Make sure the components are properly aligned at both ends. Add waterproof glue to the joints, so you enhance the bond of the components.
Attaching-the-legs
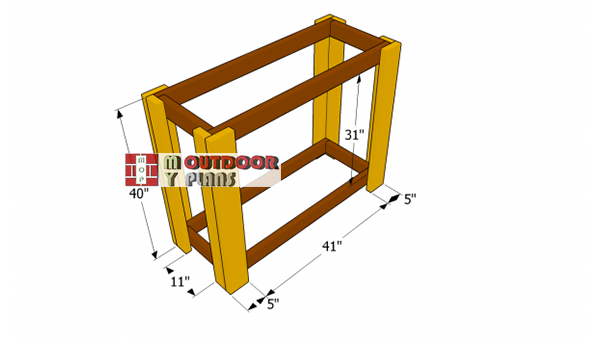
The next step of the woodworking project is to install the corner legs. As you can easily notice in the image, you need to attach one 2×4 slats and one 2×6 slat on each corner of the wooden bar. Adjust the 2×6 boards to 5″ width, using a table saw. Smooth the edges with sandpaper before attaching the legs to the frames.
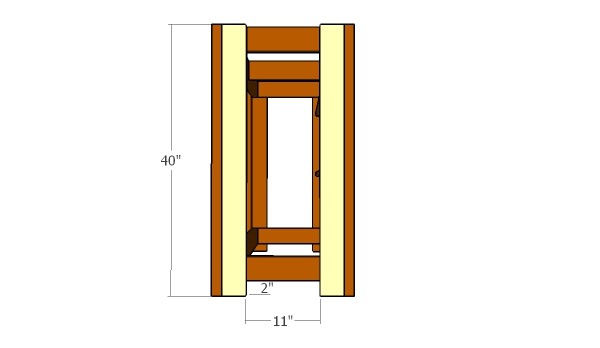
Side Legs
Top Tip: Drill pilot several holes trough the frame, before driving the 2 1/2” wood screws. Leave about 2” between the ground and the bottom frame. Align all the components with attention, before locking them together.
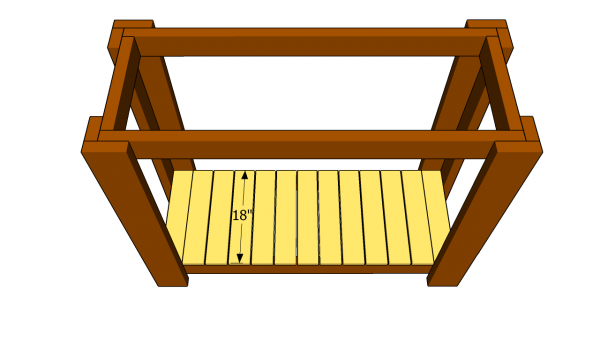
Fitting the floor slats
Continue the project by installing the floor of the bar. As you can see in the image, you need to use 1×4 slats. Drill pilot holes at both ends of the slats before driving 1 1/4” galvanized screws into the framing.
Top Tip: We strongly recommend you to drill pilot holes at both ends of the slats and countersink the head of the screws. Leave about 1/4” between the slats, in order to get a symmetrical look.
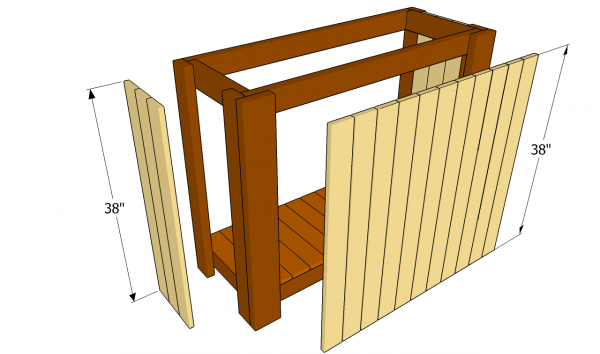
Attaching the cladding
Attaching the side cladding is a straight forward job, if you follow our instructions and work with attention. Use 1×4 slats, making sure you place them every 1/4”. Check if the slats are flush with the top frame, before driving 1 1/4” galvanized screws into the framing.
Top Tip: If you countersink the head of the screws, you can easily fill them later with wood filler and get a neat appearance. Place a small piece of wood between the slats, in order to get consistent gaps.
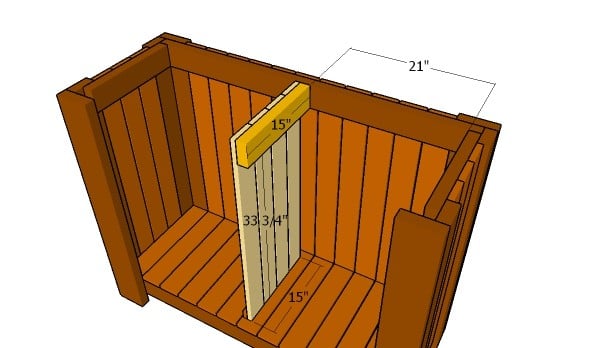
Fitting the partition wall
Fit the 2×4 support to the top frame of the bar. Drill pocket holes at both ends and secure it into place using 2 1/2″ screws. Add glue to the joints and make sure the corners are square. Fit the 1×4 slats to build the partition. Drill pilot holes and insert 1 1/4″ screws to lock the slats to the top support. Use a piece of 1×2 lumber, as bottom support.
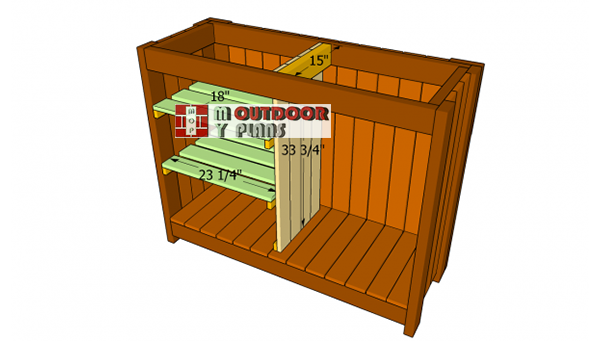
Building-the-shelves
If you want to organize the bar efficiently, you should take into account building several shelves, as in the image. While in the left compartment, you could build storage shelves for glasses and other small items, in the right size there is enough room to place a cooler box.
Top Tip: Use a spirit level to check if the shelves are horizontal and if the splitting panel is plumb. You could adjust the size and the height of the shelves as to fit your needs.
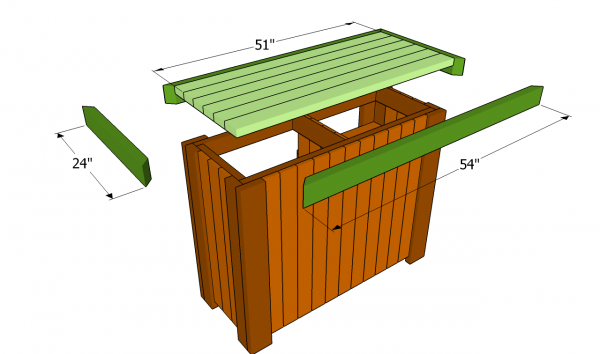
Installing the countertop
Building the countertop of the outdoor bar is a straight forward job. As you can see in the image, you need to build a frame out of 2×4 lumber. Cut both ends of the trims at 45º and lock them together with 2 1/2” finishing nails.
Fit 2×4 or 1×4 slats between the frame. There shouldn’t be any kinds of gaps between the slats, so make sure you align them properly, before securing them into place. Drive nails trough the trims or dill pocket holes at both ends of the slats and insert screws.
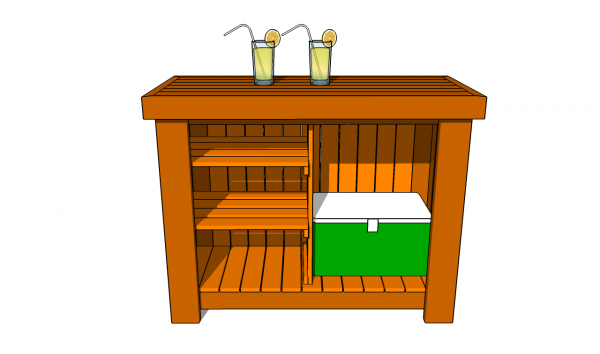
Back view of the bar
You can see in the image the back of the outdoor bar and how you can use the space efficiently. You can even attach two doors to the back of the bar.
Top Tip: You could round the exterior edges of the trims with a router and a 3/4” bit.
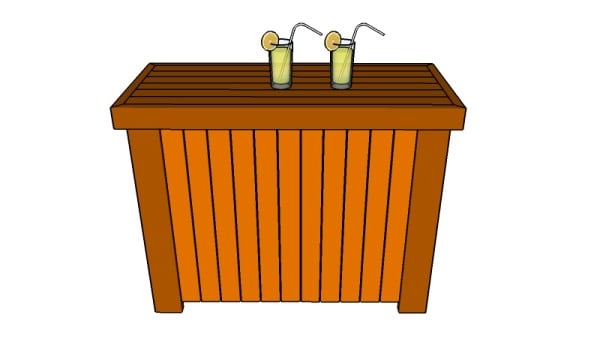
Outdoor bar plans
The bar seen from another angle. This is a simple woodworking project that can be built in one weekend, including the painting process. If you are all about rustic charm and you want to keep the costs down, you need to pay attention to these wood bar plans.
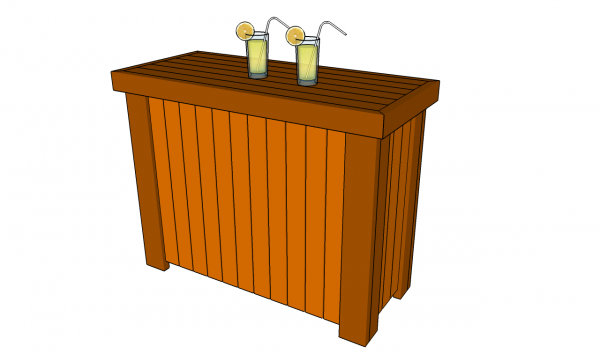
Outdoor bar plans
Last but not least, you should take care of the finishing touches. In order to build a bar with a neat appearance, we recommend you to fill the holes and the cracks with wood filler. Let the compound to dry out before sanding the surface, along the wood grain.
Top Tip: Cover the wooden components with several coats of stain or paint, to protect them from wood decay. Check out my porch swing plans and my double chair with table plans, we well.
This project was about outdoor bar plans. If you want to see more outdoor plans, I recommend you to check out the rest of the projects. Don’t forget to share our projects with your friends, by using the social media widgets. SHARE our projects and follow us on the social networks to help us keep adding free woodworking plans. LIKE us on Facebook to be the first that gets our latest updates and submit pictures with your DIY projects.


6 comments
Great resource for DIY
i love the look of this project! quick question…why must you cut the 2×6’s down to 5 inches? thanks!
For design considerations. The side legs are made from 2×4 lumber which is 3 1/2″ wide. Add the thickness of the 2×6 front legs and toy will have 5″. Therefore, the front legs need to be 5″ as well. You can overlook that is you aren’t that focused on design though.
this is what am looking for to build for my nephews 40th birthday gift
Great look. Do you have plans to create doors that could be attached to the back of the bar
Where can I find (buy) a printable copy? I checked Gumroad and it’s not there.