This step by step project is about 4×4 shed roof plans. After building the frame of the small storage shed, we recommend you to continue the backyard project by attaching the rafters and the front door to the structure. Work with attention and adjust the slope of the roof to suit your needs and budget. Don’t forget to check out the rest of the shed projects featured on our site, if you want to consider other shapes or shed designs.
There are several aspects that any person should take into account before starting the woodworking project. First of all, you need to use weather-resistant lumber, such as cedar, pine or redwood. Drill pocket holes at both ends of the components, if you want to lock them together tightly. In addition, add wood glue to the joints and check if the corners are right-angled. Plan everything from the very beginning, if you want to get a professional result. See all my Premium Plans HERE.
Projects made from these plans
4×4 Shed Roof Plans
Building-a-small-garden-shed
Cut & Shopping Lists
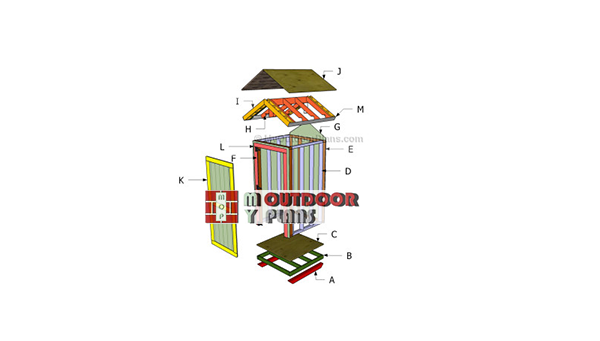
- H – 8 pieces of 2×4 lumber – 34 1/4″ long, 2 pieces – 9 3/4″ long, 1 piece of 2×6 lumber – 48″ long RAFTERS
- I – 4 pieces of 2×4 lumber – 35 1/4″ long, 10 pieces of 2×4 lumber – 2 1/2″ long OVERHANGS
- J – 2 piece of 3/4″ plywood – 35 1/4″x60″ long ROOFING’
- K – 2 piece of 2×4 lumber – 36″ long, 2 pieces – 72″ long, 1 piece – 29″ long, 1 piece of 5/8″ – 36″x79″long DOOR
- L – 2 piece of 2×4 lumber – 79″ long, 1 piece – 43″ long JAMBS
- M – 2 pieces of 1×4 lumber – 60″ long TRIMS
Tools
![]() Hammer, Tape measure, Framing square
Hammer, Tape measure, Framing square
![]() Miter saw, Drill machinery, Screwdriver, Sander
Miter saw, Drill machinery, Screwdriver, Sander
Time
![]() One day
One day
Related
- Part 1: Small storage shed plans
- Part 2: 4×4 shed roof plans
Building a shed roof

Installing the top ridge
The first step of the second part of the project is to install the top ridge to the structure of the shed. In order to get the job done in a professional manner, we recommend you to build the supports out of 2×4 lumber and the top ridge out of 2×6 lumber.
Cut the components at the right size and secure them to the top plates. Use a spirit level to plumb the supports and to make sure the top ridge is perfectly horizontal.
Building-the-rafters
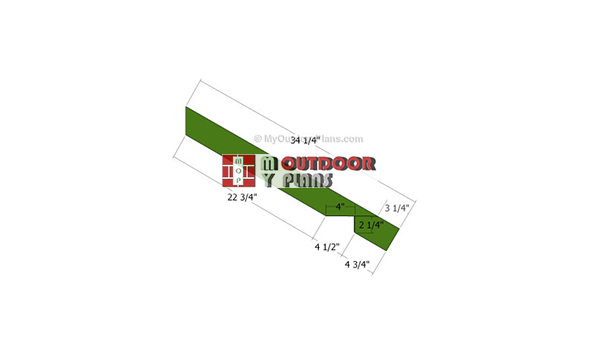
Next, you need to build the rafters for the small shed roof. As you can easily see in the diagram, we recommend you to mark the cut lines on the 2×4 slats and to get the job done with a circular saw. Smooth the cut edges with sandpaper and remove the residues with a vacuum.
One end of the rafters at 60 degrees, by using a good miter saw. Make notches in the rafter, as in the diagram.

Fitting the rafters
The next step of the project is to fit the wooden rafters to the top ridge and to the top plates of the shed. Install the rafters into place, making sure they are equally-spaced and leave no gaps between the components. Drill pilot holes through the rafters and secure them to the top ridge and to the plates, by inserting 2 1/2″ galvanized screws.
Align the components with attention, checking if the edges are flush.

Building the overhangs
If you want to add character to your shed project and to protect the front and back walls from water damage, you need to build overhangs. Build the rafters for the overhangs out of 2×4 lumber, by cutting one end at 60 degrees. In addition, cut the blockings out of 2×4 lumber, adjusting their size to fit your needs.
Drill pilot holes through the rafters and insert 2 1/2″ screws into the blockings. Make sure the edges are flush.

Installing the overhang
After assembling the overhangs, we recommend you to attach them to the front and to back faces of the 4×4 shed. Drill pilot holes through the rafters and insert 3 1/2″ screws into the structure of the roof. It is essential to leave no gaps between the components and to make sure the edges are flush.
Repeat the process for the opposite side of the shed, using the same techniques described above.

Fitting the roofing sheets
The next step of the outdoor woodworking project is to attach the plywood sheets to the roofing structure. Cut the roofing sheets out of 3/4″ plywood and lay them to the rafters, as described in the diagram. Make sure the edges are flush.
Drill pilot holes through the plywood sheets and insert 1 1/4″ nails/screws into the rafters. Leave no gaps between the components.

Fitting the rafter trims
If you want to make your shed stand out and give it a neat appearance, you should fit 1/4″ trims to the ends of the rafters. Cut the trims at the right size and secure them to the rafters by using 1 1/4″ nails. Add glue to the joints in order to get a professional result.
In addition, attach 1/4″ plywood soffit to the shed roof, in order to hide the rafters. Secure the soffit into place with finishing nails.

Attaching the roofing
In order to get the job done in a professional manner, we recommend you to cover the roofing sheets with tar paper. Install the tar paper starting with the bottom of the roof and make sure the strips overlap for at least 2″. In addition, fit a 12” strip over the top ridge.
Install the shingles starting with the left- bottom of the roof, after fitting the starting course. See more about fitting the shingles here. Use roofing tacks to secure the shingles into place.
Door frame
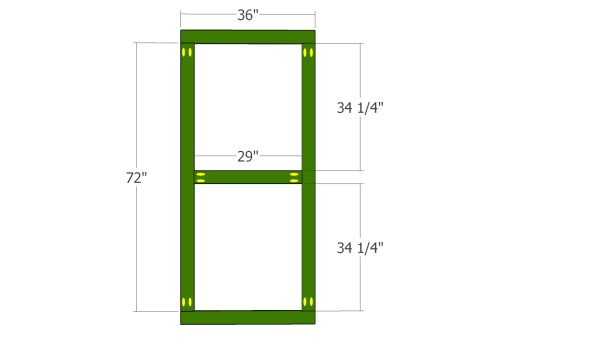
Building the garden sheds door is a straight forward process. Build the frame out of 2×4 lumber, following the instructions in the diagram. Make sure you secure the frame components together, by using pocket holes and screws.
Drill pocket holes at both ends of the vertical and middle components. Lay everything on a level surface and align the edges flush. Insert 2 1/2″ screws to assemble the door frame.
Building-the-shed-doors
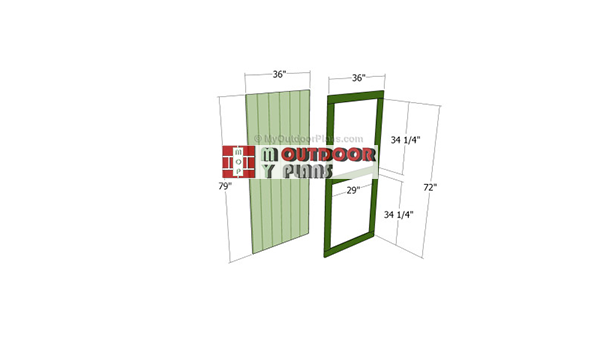
Use the siding panel that you have cut it out in the previous steps, to assemble the door. Make sure the edges are flush and insert 1 5/8″ screws through the frame into the panel. Add glue to the joints.

Fitting the door
Build the door jambs out of 1×4 lumber, making sure you cut the components at the right size. Attach the door jambs around the door, checking if the edges are perfectly flush. Leave no gaps between the components and insert 2″ finishing nails into the studs.
Secure the hinges to the door and fit it inside the opening. Next, lock the hinges to the door jambs by using galvanized screws. Install a door latch to close it properly overnight.

Small storage shed plans
Last but not least, you should take care of the finishing touches. Therefore, fill the holes with wood putty and let the compound to dry out for several hours. Smooth the surface with medium-grit sandpaper along the wood grain.
Top Tip: Apply several coats of stain or paint to enhance the look of the 4×4 shed and to protect the components from decay. Check out the rest of the projects to see how to build the frame of the 4×4 shed.
This project was about 4×4 shed roof plans. If you want to see more outdoor plans, we recommend you to check out the rest of the projects. LIKE us on Facebook to the the first that gets our latest projects and send us pictures with your woodworking projects.

EXPLORE MORE IDEAS FOR:
 |
 |
 |
 |
2 comments
I cut my first rafter at 60* and it’s not even close after cutting out the birdsmouth with the given measurements.
I dont’t think you made the right cuts to to the rafters. I’ve looked over the plans and the diagrams are correct. Cutting one end of the rafters at 60 degrees means that you need to make an actual 30 degree cut to the rafters.