This step by step woodworking project is about planter with trellis plans. Building a simple trellis planter is a great way to grow climbing flowers, especially if you are an amateur gardener. Buy quality lumber, such as cedar or redwood, if you want to build a durable planter that doesn’t require significant maintenance for many years in a row. In addition, growing flowers or vegetables in containers is convenient, as you have total control and it only requires a small space.
In order to work as a professional, you should pay attention to the following aspects. Use a carpentry square, to make sure all the corners are right-angled. In addition, you need to drill pilot holes before inserting the wood screws in the lumber, to prevent the slats from splitting. Join the components together with pocket holes and glue or by drilling pilot holes, countersinking their head and inserting 1 1/4” screws. See all my Premium Plans HERE.
Projects made from these plans
Cut & Shopping Lists
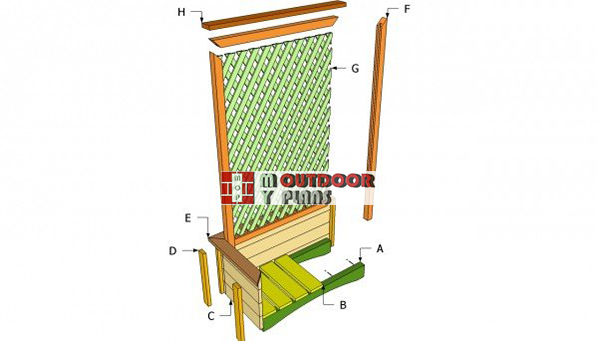
- A – 2 pieces of 2×4 lumber 28 1/2” long LEGS
- B – 7 pieces of 1×4 lumber 13 1/2” long FLOORING
- C – 8 pieces of 1×4 lumber 30” long, 8 pieces of 1×4 lumber 13 1/2” long SLATS
- D – 8 pieces of 1×3 lumber 14” long CORNER TRIMS
- E – 2 pieces of 1×4 lumber 18 1/2” long, 2 pieces of 1×4 lumber 33 1/2” long CORNER TRIMS
- F – 2 pieces of 2×2 lumber 51 1/2”, 1 piece of 2×2 25 1/2”, 1 piece of 2×2 28 1/2”’ TRELLIS FRAME
- G – 1 panel of lattice 40×26” LATTICE
- H – 1 piece of 1×4 lumber 30 1/2” TRELLIS TRIM
- 50 pieces of 2 1/2″ screws
- 50 pieces of 1 1/4″ screws
- 2″ brad nails
- wood glue, stain/paint
- wood filler
Tools
![]() Hammer, Tape measure, Framing square, Level
Hammer, Tape measure, Framing square, Level
![]() Miter saw, Drill machinery, Screwdriver, Sander
Miter saw, Drill machinery, Screwdriver, Sander
Time
![]() One day
One day
Related
Trellis Planter Plans
Trellis-planter-plans
Building a planter with trellis is a great project is you are an amateur gardener. A nice planter would enhance the look of your garden, but if you add trellis it will make it the focus point of your patio or deck. Moreover, you could grow climbing plants and use it as a privacy screen or to hide certain items.
Top Tip: Choosing quality lumber over cheap materials would make the planter water-resistant. In this manner, you could focus more on gardening and less on maintaining the planter in a good condition.
Planter with trellis plans

Building-the-planter-box
The first step of the project is to build the planter box, using 1×3 tongue and groove slats. As you can see in the free plans, you should use a carpentry square to make sure the corners are square, before driving in the 2” wood screws.
Cut the wooden components at the right size and align them properly at both ends. Drill pilot holes, to prevent the wood from splitting. Leave about 1/4” from the edges, from the same considerations.

Installing the cleats of the planter
The next step of the project is to build the legs of the planter and to attach them to the side walls, as in the image. In order to save time and materials, we have design this components to have a dual purpose: cleats for the flooring slats and legs.
Use 2×4 lumber to build the legs, cutting the arched shape with a jigsaw. Drill pilot holes and drive in 2” screws from the inside of the planter into the 1×4 slats. Level the cleats with a hand level, before inserting the screws.

Installing the floor of the planter
Afterwards, install the flooring slats and secure them at both ends with 2” wood screws. Leave about 1/2” between the slats, to drain the water properly. Countersink the head of the screws using the appropriate bit, before inserting the nails.
Top Tip: Work with good judgement and with great care, if you want to obtain a professional result. You don’t need to place the slats equally spaced, but try to fit them as symmetrically as possible.

Installing the corner trims
Continue the woodworking project by cutting the corner trims and installing them into place. Use 1×3 lumber to build the components, as in the image. As you could easily notice in the image, the width of one of the adjacent trims has to be adjusted with 3/4”. In this manner, the trims will have the same width on all sides of the planter, making it more pleasant.
Top Tip: Drive in several 1 1/4” finish nails trough the trims, in order to secure them into place.
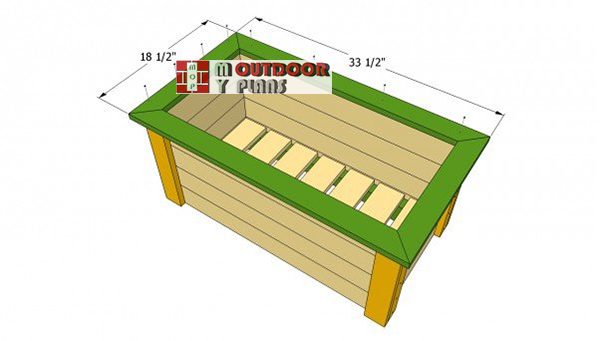
Installing-the-top-trims
In order to get the job done in a professional manner, you should also build the top trims from 1×4 lumber and lock them into place with 1 1/4” finish nails. As you could see in the image, you should cut the ends of the trims at 45º, to fit together easily.
Drill pocket holes at both ends of the trims and lock them together with 1 1/4” screws and glue. Center the top trim, before inserting the 1 1/4” nails.
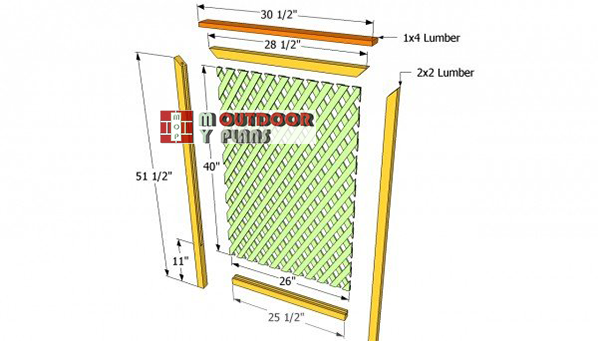
Building-the-planter-trellis
On the other hand, you also have to build the trellis. In order to get the job done as a professional, you have to build the frame of the panel from 2×2 lumber and fit a piece of lattice. Cut out a small channel in the 2×2 lumber, using a table saw. In addition, cut the ends of the side and top components at 45º.
Top Tip: Fit the lattice inside the frame and lock the components together with 2” screws. Pre-drill the frame, in order to avoid the wood from splitting.

Securing the trellis to planter
Fit the trellis inside the planter and lock it with several screws or carriage bolts. On one hand, you could drill pilot holes trough the legs of the trellis and trough the back of the planter, before fitting two 2 1/2” carriage bolts on both sides.
You could also drill pilot holes from the outside of the planter in the legs, to prevent to wood from splitting. Next, insert several 2” screws from the outside in the legs of the trellis.

Planter with trellis plans
After building the planter with trellis, you have to take care of the finishing touches. Therefore, fill the holes with a good wood filler and let the compound to dry out properly for several hours. Smooth the whole wooden surface with 120-grit sandpaper, along the wood grain.
Top Tip: Protect the lumber from rot, by applying several coats of wood stain or of paint. Fit a plastic planter inside the trellis planter.
This woodworking project was about planter with trellis plans. If you want to see more outdoor plans, we recommend you to check out the rest of our step by step projects. Follow the step by step instructions to obtain a professional result.
EXPLORE MORE IDEAS FOR:
 |
 |
 |
 |
2 comments
Question: Do the legs of the planter have to be cut at an arched shape? You don’t see them, so what is the purpose of cutting them at an arch?
To have less contact with the ground and therefore be protected from moisture. You can skip this step, if you want.