This step by step article is about outdoor pizza oven plans, pointing out the main bricklaying techniques and materials required for this project. Generally speaking, building a brick oven is a complex process, as it involves many steps and it requires proper planning, coordination and attention to details. Nevertheless, you can get the job done by yourself and save a significant amount of money, if you follow the instructions and pay attention to our tips. All you have to do is to use quality materials and to practice the bricklaying techniques before starting the actual project.
In order to obtain a professional result, we recommend you to glue the bricks together using a mix of clay and fine sand (6:4 ratio). If you use a cement-based mortar, it won’t resist to the high temperatures developed in the brick dome. Therefore, you should replace this mortar with a traditional compound, made of sand and clay. On the other hand, you need to plumb the courses of concrete blocks and bricks, by using a spirit level, in order to obtain a professional result.
Projects made from these plans
Cut & Shopping Lists
- reinforcing net – REBARS
- 35 concrete blocks – 8x8x16” – CONCRETE BLOCKS
- cement, sand, gravel – CONCRETE
- 150 fire bricks 4 1/2x9x3” – BRICKS
- fire clay and fine sand – CLAY MORTAR
- 2×6 lumber and 4×4 posts – FORM
- insulated pizza oven
- fire bricks
- refractory cement
- pizza peel with wooden handle
- ceramic pizza stone
- temperature gauge
Tools
![]() Hammer, Tape measure, Framing square, Level
Hammer, Tape measure, Framing square, Level
![]() Miter saw, Drill machinery, Screwdriver, Sander
Miter saw, Drill machinery, Screwdriver, Sander
Time
![]() Two Weekends
Two Weekends
It’s that simple to build a 16×24 pole barn!
Outdoor pizza oven plans
Outdoor-pizza-oven-foundation-plans
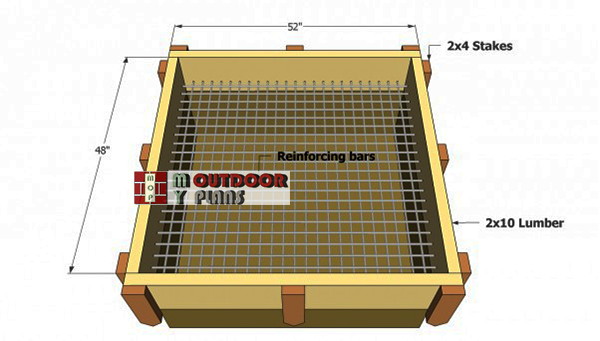
First of all, you have to build a sturdy foundation for the outdoor pizza oven. Therefore, you should select a level surface and excavate about 10” in the ground. Next, build a basic form from 2×10 lumber and install it into place with 2×4 takes. Use a spirit level to make sure the form is perfectly level.
Install a reinforcing net in the form, making sure you place it on several 5” spacers. Secure the form with 3” screws, to remove the form easily.

Pouring a concrete foundation
Mix a small quantity of concrete (2 parts cement, 3 parts sand, 4 parts gravel and water) in a power mixer or in a wheelbarrow. After you fill the form with concrete, you should level the foundation with a straight edge, moving it along the sides of the form.
Top Tip: Vibrate the concrete with a vibrator or hit the form with a hammer. In this manner you will remove the pockets of air that might damage the foundation, over time.

Building the base of the pizza oven
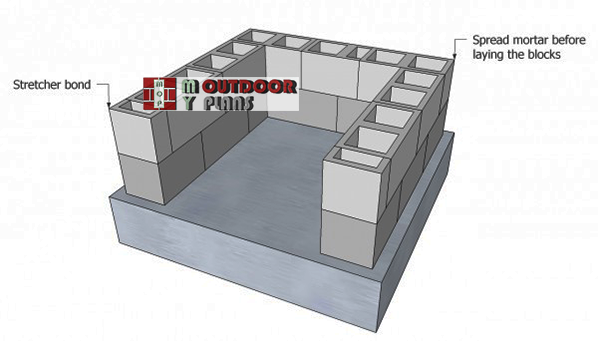
Let the concrete to dry out for at least 72 hours, before laying the concrete blocks. Place a block at the beginning of the course and another one at the end. Tie a string to their exterior and lay the rest of the concrete blocks.
Top Tip: Mix a small quantity of mortar in a bucket, using the following recipe: 3 parts of cement with 5 parts of fine sand. The mortar should have the consistency of cream.
Laying-out-the-concrete-blocks
Continue laying the concrete blocks in the same manner described above (use the stretcher bond). Use safety gloves when spreading the mortar, as the cement-based compound might damage your skin. Remove the excess material before it hardens, in order to obtain a neat look.
Top Tip: Plumb the blocks with a spirit level and adjust their position if necessary. In addition, make sure the courses are level, by tapping them gently with a mallet.
Countertop-form—pizza-oven
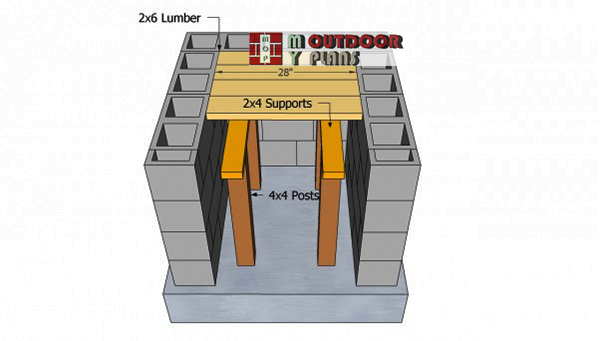
After laying four block courses, build the form for the concrete counter-top. Therefore, use 2×6 slats and 4×4 posts to build a basic form. Work with attention and good judgement, making sure you don’t leave gaps between the slats.
Use a spirit level to check if the surface of the form is horizontal. Moreover, do not secure the components together with screws or nails, otherwise it would be difficult to remove the form.

Concrete countertop plans
After you install the rest of the form into place, you should place a reinforcing net on several 2” spacers. Work with great attention, ensuring the sides of the form are perfectly horizontal. Prepare a small quantity of concrete (2 parts cement, 3 parts sand, 4 parts gravel and water) and pour it in the form.
Use a straight edge to level the concrete, by moving it along the edges of the form. Hit the sides of the form with a hammer, to remove the air pockets.
Outdoor Brick Oven Plans

Oven flooring plans
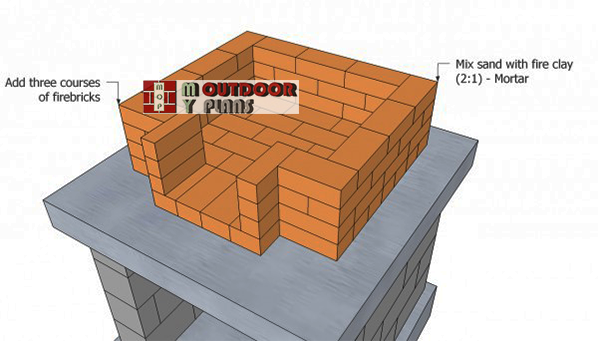
Let the concrete counter-top to dry out for at least 72 hours, before building the brick oven. The first step is to lay the fire bricks and build the cooking floor. Therefore, use the pattern that can be seen in the image to obtain a proper result.
Mix a small quantity of mortar (4 parts fine sand with 6 parts fire clay) to glue the bricks together. Don’t use a cement-based mortar, as it won’t resist to the temperatures developed inside the oven.
Building-the-lower-brick-walls—pizza-oven
Next, build the walls of the brick oven by laying fire bricks along the edges of the cooking floor. As you should notice in our free plans, you have to lay the fire brick in the stretcher bond, using a clay mortar (4 parts fine sand, 6 parts fire clay).
Top Tip: Use a spirit level to plumb the walls of the brick pizza oven, in order to obtain a professional result. Lay three courses of fire bricks, making sure they are level.
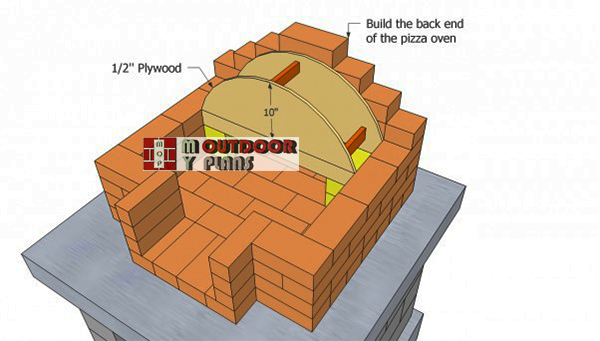
Arch-template
Continue the project by laying a few more bricks on the back wall of the pizza oven, before building the arched top. In order to obtain a professional result, we recommend you to build an arched template from 1/2” plywood. Place the template on a few bricks, to lock it into place.
Top Tip: You can adjust the height of the arch, according to your needs ,but you have to make sure it harmonize with the rest of the pizza oven.

Building the top arch
Lay the fire bricks, one by one, and glue them together with a mix of sand and fire clay (4:6 ratio). Work with great care and good judgement, ensuring the bricks are aligned at both ends.
Apply the fire clay mortar between the bricks and remove the excess material with a wet sponge. If you let the compound to dry out, you won’t be able to remove it and to get a neat appearance. Don’t remove the template before the mortar dries out.
Brick-wall-plans
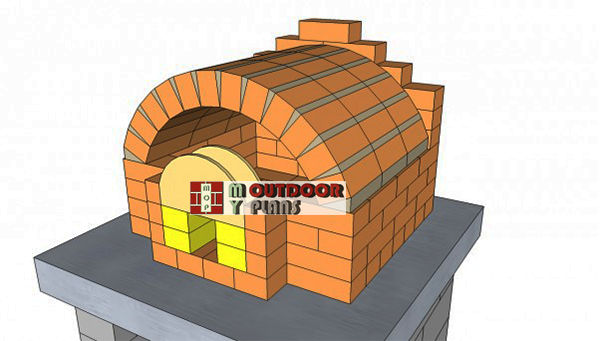
Continue the project by building the rest of the arched top, in the same manner described above. As you can notice in the image, the arched top is made of three rows, therefore this should be a straight forward process.
Top Tip: After building the top of the brick oven, you should build the top of the entrance. Pay attention to this step, if you want to get the job done like a pro.

Opening arch plans
Place the bricks on top of the small template and fill the gap till the arched top with small pieces of fire bricks. Fill the small gaps with a mix of sand and fire clay, as a cement-based mortar won’t resist to the high temperatures developed inside the brick oven.
Top Tip: Every time you lay an extra brick, you need to use a spirit level, to make sure they are plumb and level. Adjust the size of the bricks with a wet saw, every time is necessary.

Chimney plans
Next, you need to build the base of the chimney and leave a hole to leave the smoke out of the dome. Work with great care, making sure you leave enough space to leave the smoke out. Taking into account that the base has to support the weight of the chimney, you should reinforce it properly.
Top Tip: If you consider this a complex task, you could build a rectangular base, which is much easier to build.

Brick chimney plans
The chimney of the outdoor pizza oven is an essential component, therefore you should tackle this step with great care. On one hand, you could install a stainless steel chimney, while on the other hand you could build a brick chimney.
Top Tip: If you want to save money and materials, lay the bricks on shiner. You don’t have to build a large chimney, as we don’t speak of a professional pizza oven.

Outdoor pizza oven plans free
Last but not least, after you have build the brick oven in your backyard, you could increase its thermal efficiency by applying an insulating layer. Nevertheless, if you like the traditional look of the bricks, you could leave it in this state, making sure you protecting it from rain and snow.
Top Tip: Cement render the walls of the base and cover the foundation and the counter-top with stone or ceramic tile. Use one of these thermometers to control the heat inside the over, so you don’t end up burning your pizza.
This backyard project is about outdoor pizza oven plans free. If you need more outdoor plans, we recommend you to check out the rest of our step by step projects. SHARE our projects and follow us on the social networks to help us keep adding free woodworking plans. LIKE us on Facebook to be the first that gets our latest updates and submit pictures with your DIY projects.
EXPLORE MORE IDEAS FOR:
 |
 |
 |
 |
59 comments
Brillient work and an excelent plan
So realizing that materials costs will vary widely depending on where you purchase, still I’m curious how much you spent. Thanks!
Total cost for my project was under 500 dollars, but I did all the work by myself and used quality materials.
Just wanted to say thank you, I’ll ask my husband to help me build one.
You’re welcome! Good luck with the project and make sure you show me how it came out once it’s done.
Can the chimney be placed at the top of the oven or is it necessary to position on the lower portion at the opening ?
No. The hot air and smoke must come out through the front.
great plans we are in the middle of our project and it looking good. we have added a rocket stove to the oven for heat. we thought it might be more efficient, but with the option to burn wood in it as well. we will let you know how it works
Looking forward to seeing how it comes out with your modifications.
These plans look great. I started yesterday but the foundation only goes 10″ into the ground. I live in Massachusetts so the frost line is at least 30″. Apparently I have to go down 30-36″ so I have to modify the foundation from the plans.
Hi Julian Great plans Thank you. I finished this successfully a couple of weeks ago .After a week of curing the oven I had my first fire last week and reached up to around 550 degrees.Pizza’s were very successful however I’m am seeing cracks on tbe mortar also the heat is burning through the top of the back wall. I intend on rendering the oven now.can you recommend the process I should follow for this to be successful please
Cheers
Steve
You should cover it with insulation wool and then lock it into place with some chicken wire. Last but not least, apply the pizza oven render gradually until you cover the whole surface. I’d love the see how your project comes out, so don’t hesitate to send a few pics.
Are you aware of similar plans that could accommodate a large pan so that one could cook larger quantities of bread as well as pans holding a turkey or a small pig or lamb?
Unfortunately, I don’t have plans for that size.
Hello, I just subscribed.
First of all thank you sir for helping me build my own brick oven ^^.
Can I have the SketchUp file ?
You can’t have that. Looking forwards to seeing your project.
Hello, great plans. I have a question about that thermometer. It only has a 4″ shaft, so how would that work with thick walls? Given that they are thicker than that?
Tks
Rocke
If it’s too short, you can mount it to a steel door for the pizza oven.
Can I build the foundation out of 4×4’s and have the concrete counter top sit on that? Will it have enough support instead of having to do cinderblocks?
Thank you
Thomas
I wouldn’t use 4x4s for the base. I still recommend ciderblocks as the concrete countertop is very heavy, as well as the brick oven.
Thanks for the reply. Do you know the dimensions of the brick oven itself?
About 37″x44″, but keep in mind that the size of the bricks differs, as well as of the gaps between them.
Hello, very exited. I have poured the foundation, and will start the block work next weekend. I am planning the rest of it now and have 3 questions
1) I want to make the oven one brick length deeper, can I assume that the door in the plan will still be the right size? I believe in the plan its 12″ wide and 16″ + high.
2) The bricks I have access to are 2 1/2 x 4 x 9. Is 2 1/2 thick enough for the base? Your plan calls for 3″ thick bricks. I was thinking of putting a 2″ layer of sand on top of the concrete slab to prevent it from over heating the concrete.
3) For the insulation layer on top, I was planning on putting a 2″+ inch layer of vermiculite concrete directly on the firebricks. Without the insulation wood. Would this work well?
Since I can only work weekends on this, I doubt I’ll be making pizza’s until june. Given that I’ve never laid a brick in my life either. A little worried about that.
How do I submit photos?
Thank you!!
1. If you make the oven deeper, I don’t see how would that impact the door size.
2. 2 1/2″ thick bricks are good, as well. If you put the sand layer, remember you need to make some sort of a perimeter frame for it.
3. That’s good enough. Insulation wool is more efficient, but the vermiculite concrete has been used successfully for thousands of years.
4. You can send pics using this form: http://myoutdoorplans.com/contact/
Good luck!
Re. door size. I was just concerned about airflow. I heard door size was important in that respect, too little or too much air.
re. sand, yes I plan on building a 2″ concrete perimeter on the slab so I can compress the sand.
Did the base this weekend. Made it 8-10″ thick with re-bar, on a good base of gravel. I hope that’s deep enough. These ovens are heavy. Just started and my back is done. Doesn’t bode well for the rest of the work.
Thanks for your help.
I think it will work, an extra brick of depth won’t make that much of a difference in terms of air flow. 8-10″ of concrete with re-bars is very good. A break is welcomed, as you also need to let the concrete cure for a few days. Just in time to get back in shape. Keep me updated on the progress.
Sorry one last question 🙂
This is in regards to putting firebricks directly on top of the concrete pad. So instead of putting the 2 1/2 thick firebricks straight onto the concrete, can I put a layer of insulation down first and mortar the bricks on top of that? I’m just worried about the concrete getting too hot and cracking.
Thanks
Yes, you can do that. Just make sure the insulation bed is level.
Sorry 2 more questions. I’m laying brick down tomorrow but need to clarify a few things.
I’ve been told to dry stack the floor of the oven for an assortment of reasons. I was then told not to. Your plan says to use the mortar. Any strong opinions?
Some forums have people pontificating that a ceramic fiber board should be used between the bottom bricks and concrete. Your plans doesn’t’ mention that. I don’t have any, its expensive. Was going to use some ceramic wool insulation, but decided to use use another layer of firebrick, so extra thick floor. Would this work well, and protect the concrete?
Thanks
When I built my own oven, I used a mix of fire clay and fine sand between the bricks to fill the gaps. 7 years later, the floor is in perfect condition. I used a mix of sand and glass pieces, under the floor bricks. Again, it worked perfectly. You can see my oven here: http://howtospecialist.com/outdoor/how-to-build-an-outdoor-pizza-oven/
Just wanted to update you. I have the base and walls done. I’ve learned that I have zero skills with bricks and mortar, but managed to get it done. I start putting the arch or dome together this weekend. I measured out the arch so that the bricks are tight on the inside. I think it will work out. Once its done, I’ll upload photo’s and comments. This plan is working out really well. Removes a lot of the guess work, which is good.
Thanks
You’re welcome. I’m glad to hear the progress you made.
Sorry, one more question. For the chimney, do I use regular bricks with regular mortar, or fire bricks with refractory mortar? These bricks are exposed to the weather, not sure how rugged fire bricks are. I’m almost done now, I can taste the pizza 🙂
No need to use the firebricks. I would use regular bricks and regular mortar.
Recommendations for where to get the fire brick and heat resistant mortar. Always wanted to do this and now that we have land, it’s a very high priority. Thanks
Where can I find the fire bricks? They seem to be very expensive and would make this project unaffordable.
Ok, finished building the oven! Took me 6 months. Wrapped in thick layer of insulation (expensive as hell) over entire oven, minus the front part. Then wrapped it all in sheet metal. Cured the mortar for a couple of weeks, low heat slowly up to high heat. Wasn’t sure how to build a chimney as its all new to me. So I completely messed that up. I put a cap on it which restricted too much air. So removed the cap, but managed to completely destroy the chimney in so doing. So had to rebuild the chimney from scratch.
The plan if used as a rough guide is excellent. You need to do some thinking about the dome height and how to join it to the lower entrance arch. If I can do it, anyone can.
The pizza’s are fantastic, just need to learn to make better dough.
I will upload all my photo’s onto this site so hopefully others can learn from my many many mistakes.
Yessir, pretty neat oven.
Thanks for all your guidance.
Wonderful story! You’re welcome and I am super happy that you managed to get the job done. You can share the pics here: http://myoutdoorplans.com/contact/
Is there any way to apply the insulating layer you referred to without having the insulation visible and above the brick? Also, do you have any guess as to how much more heat efficiency is gained with the insulation? Thanks. I plan to build this on a platform of a patio I am starting this weekend.
No, I don’t think there is another way to get the job done. Probably at least 50% more efficiency.
Jack, I tried to upload some photos of the finished project. But I’m afraid it kinda died and I don’t think it worked. Can you check and see if its there? I don’t see it.
Tks
I haven’t got anything. Try uploading one or two images at a time, using the form. I have an upload limit set, so if your images are large, it won’t work.
Hey, quick question.
I finish my oven about 4 months ago. Have used it about 20 times now, getting really good now at pizza making. But I can’t help but notice 2 things. When its really cold, as in right now, the bricks shrink? Also, I’m seeing some pretty healthy looking cracks on the walls of the oven. Not just on the grout lines, but the actual bricks have cracked? How is that possible. I thought these bricks are supposed to be able to handle the heat? I can’t tell if its cracked on the ceiling or not as I can’t see.
Any ideas on whether I need to be concerned, or is this normal?
Tks
I don’t think the bricks shrink. Regarding the second part of your concern, I can say that my oven has some bricks cracked, but I have built it more than 5 years ago. It seems unlikely that quality bricks would crack after only 4 months. If the bricks come in direct contact with the weather elements, there are exposed to cracking when you heat it up. If you build a roof, the oven would be better protected.
The oven has a good layer of insulation and then sheet metal over that. So the weather has not contact with the brick, except from the entrance.
Re. shrinkage. I don’t know of any other reason for the new gaps between the floor bricks. They must have shrunk. Its not like I bought the cheapest fire bricks. They were the only ones available, and weren’t exactly cheap. I’ll keep using the oven until it falls down… I guess. But will stop using it during winter, as I’m not sure the cold / hot temperature changes are good for it. Up in Ontario Canada, it gets pretty cold.
Cracks in fire bricks are not uncommon. My father would purge coat the inside of a restaurant pizza oven once a year until he retired. I would recommend doing the same. Use the same mix recommended for the mortar using fire clay and fine sand. Coat the entire interior with a thin layer of the mortar. To do this constantly spray the fire brick with water previous to apply the mortar. Use a flat trowel to apply. Keep an eye on it through the year and re-apply. When you reapply scrape off any loose mortar first. Hope this helps.
If I insulate the fire bricks with a common thin brick, would I still need to cover the oven to keep it from getting wet ?
You can’t use common thin brick. You need something that is designed for high temperatures.
Hi,
The 3″ fire bricks are twice as expensive as the 2-1/2″ and almost impossible to get here in Boise, Idaho. I’m wondering if it’s possible to use the 2-1/2″ and, if so, how much of a difference would it make?
Also, do you know of anyone who built an oven with your plans where it was built on a trailer or as a mobile oven? We’re looking at options to build a base for the oven that would support it in a trailer. Any help you can give would be greatly appreciated.
Thanks,
Jay
You can use the 2 1/2″ bricks. I don’t know anyone who used my plans for that. If someone reading this can help, please leave a comment 🙂
Great plans and thanks for posting them! I have been toying with the idea of building one of these for a while and I love the detail here!. I’ve got a few questions before I start my project though.
1. Do you cover the top of the concrete blocks/cinder blocks before pouring the countertop, or do you fill them with concrete?
2. Would adding a side counter be as simple as extending the foundation + adding another support and extending the frame?
3. It looks as though you just stacked basic firebricks for the dome, then filled in the spaces with fire-mortar. Would it be more efficient, or would there be some advantage to trimming the bricks so the fit with smaller gaps?
4. Would it be worth doing a layer of ceramic fiber insulation and then facing that with some regular/decorative surface? Would 2-3 layers of ceramic insulation be enough to protect whatever the surface was from high-heat?
5. If I wanted to put a cap on the chimney, how much of an Air-gap should I use?
Thanks!
1. Yes
2. Yes
3. Yes, but I don’t think it’s worth the etra effort. You are going to insulate the dome anyway.
4. Yes. That’s enough. It’s a homemade pizza oven not industrial, don’t have to go crazy with the insulation and such.
5. I cannot answer that.
What are the internal dimensions of this pizza oven. Also I really like the look of the oven when not covered. I live in virginia we do not get much freeze thaw here. Was wondering if I can do away with covering and insulating dome does it truly effect cooking without insulate dome
You can go by without the insulation, but it will certainly be less efficient.
Do you have plans for outdoor gas pizza oven.
Thanks
No plans for that.
Hey – This plan looks great, I’m thinking about doing it in the coming months. Is there a ‘premium plan’ available for it?
Thanks
Dan
Not yet.
I love your easy to follow Pizza oven instructions. In the future can you connect it to a small brick BBQ? Just a simple three sideed and a couple of shelves.