Step by step woodworking project about park bench plans. If you want to enhance the look of your garden with a wooden park bench, you should know there are many designs you could choose from. If you want a quick project at a decent price, you could build a seat bench, by using pine or cedar boards. Nevertheless, you could still keep the expenditures under control and build a nice bench, if you use quality materials (redwood, cedar) and add a simple back support. Irrespective of your choice, make sure the lumber boards are perfectly straight and in a good condition (look for cracks, chips, twists, wanes).
After you design the bench, you have to buy the materials required for the project, from your local diy store. Afterwards, you should prepare the power tools: a drill machinery, a screwdriver, a circular saw, a sander and a router. Check out these garden bench plans, if you want to see another approach. Work with good judgement and with attention, making sure you measure the components several times, before performing the cuts. See all my Premium Plans HERE.
Projects made from these plans
Cut & Shopping Lists
- A – 2 pieces of 2×4 lumber 23” long FRONT LEGS
- B – 2 pieces of 2×6 lumber 38” long – both ends cut at 6.5º BACK LEGS
- C – 2 pieces of 2×4 lumber 26” long SIDE BRACES
- D – 10 pieces of carriage bolts 2” carriage bolts BOLTS
- E – 2 pieces of 2×4 lumber 53” long FRONT AND BACK APRONS
- F – 10 pieces of 2 1/2” galvanized wood screws SCREWS
- G – 11 pieces of 1×4 lumber 53” long SLATS
- H – 40 pieces of galvanized decking screws 1 1/4” long SCREWS
- I – 2 pieces of 1×4 lumber 27” long ARM RESTS
- 3 pieces of 2×4 lumber – 8′
- 1 piece of 2×6 lumber – 8′
- 6 pieces of 1×4 lumber – 10′
- 10 pieces of 2″ carriage bolts
- 50 pieces of 1 1/4″ screws
- 50 pieces of 2 1/2″ screws
- glue, stain
Tools
![]() Hammer, Tape measure, Framing square, Level
Hammer, Tape measure, Framing square, Level
![]() Miter saw, Drill machinery, Screwdriver, Sander
Miter saw, Drill machinery, Screwdriver, Sander
Time
![]() One day
One day
Bench with back support components
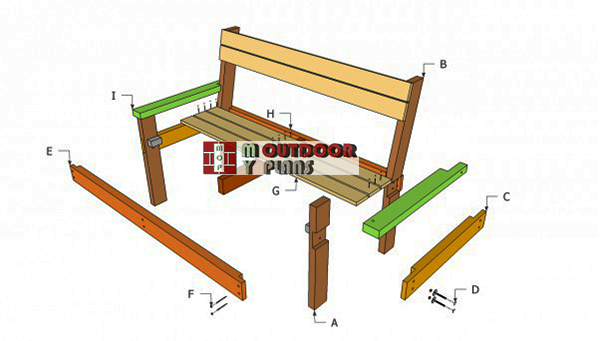
Park-bench-components
Building a park bench with back support is one of those projects that can be done in just one weekend and gives you a great opportunity to learn new carpentry tricks and techniques. If you have the basic woodworking skills and know how to use several power tools, getting the job done by yourself shouldn’t be that hard.
Top Tip: Use lumber designed for outdoor use, such as redwood, cedar pine or pressure-treated. In addition, by applying several coats of wood stain, your bench would look amazing for a long period of time.
Park Bench Plans
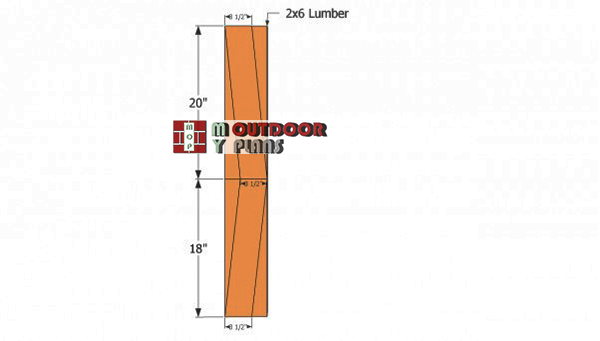
Building-the-back-legs
First of all, you have to cut out the back legs from 2×6 lumber. As you can see in our free plans, you have to mark the cut lines on the wooden boards and cut the components with a circular saw. Work with great care, making sure the blade of the circular saw goes exactly over the cut lines.
Top Tip: Smooth the cut edges of the back legs with medium-grit sandpaper, otherwise they might tear over time.
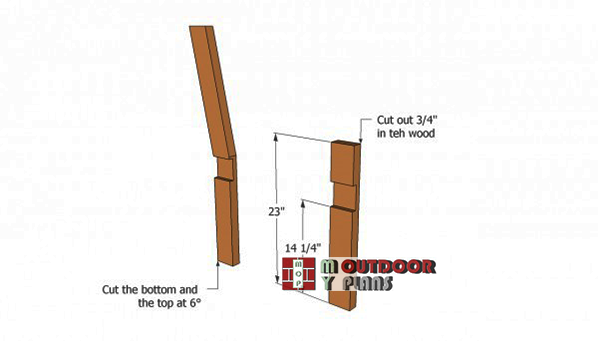
Park-bench-legs-plans
Next, build the front legs from 2×4 lumber. After you have cut all the four legs of the bench, you should notch all the components (3/4”), as in the image. Set the blade of the circular saw at 3/4” and make several parallel straight cuts.
Afterwards, clean the recess with a chisel, making sure the surface is perfectly uniform. Repeat the operation to all the four legs of the bench, proceeding in the same manner described above.

Installing the side aprons
Next, install the side aprons, made from 2×4 lumber.Cut the ends of the aprons to fit perfectly in place, as you can see in the image. Drill several holes trough all the wooden components and insert several 2” carriage bolts.
Top Tip: If you want to enhance the bond of the components, apply a good wood glue, before joining them together. Countersink the head of the screws, in order to obtain a neat look.

Installing-the-front-and-back-bench-aprons
Afterwards, install the front and back aprons, made of 2×4 lumber. Drill several holes in the aprons and drive in 3” screws, to prevent the wood from splitting. Countersink the head of the screws before driving in the galvanized screws.
Top Tip: Before attaching the aprons, you should plumb the sides of the park bench. In addition, reinforce the frame with a middle stretcher. Round the edges of the aprons with router and 1/4” bit.

Installing the seat slats
Place the bench frame on a level surface and make sure the sides are plumb, by using a spirit level. Let the wood glue to dry out properly before installing the slats. In addition, you could lock the joints tightly, with several C-clams, to get the job done. Fit 1×2 cleats for the front slat. In addition, make sure you adjust the size of the front slat to fit into place.
Place the slats equally spaced, by using a piece of wood or a nail between them. Pre-drill holes in the boards, at least 1/2” from the edges, and drive in 2” screws.

Installing the arm rest
One of the last steps of this woodworking project is install the arm rests. Place a spirit level on the components to align them properly, drill several pilot holes and drive in the screws.
Top Tip: As you can see in the image, you have to notch the back end of the arm rests, in order to fit into place properly. Smooth the edges of the wooden components with a sander or with a router and a 1/4” bit. Make a 1 1/2″ deep notch for 4 1/2″.

Park bench plans
The last step of this project is to take care of the finishing touches. Fill the cracks and the holes with wood putty and let the compound dry out for several hours. Sand the wooden components with medium-grit sandpaper and remove the residues with a dry cloth.
Top Tip: In order to protect the wood from water damage and decay, apply several coats of stain, according to manufacturer’s instructions.
This woodworking project is about park bench plans. If you want to see more outdoor plans, check out the rest of our step by step projects and follow the instructions to obtain a professional result. LIKE us on Facebook to be the first that gets our latest updates and submit pictures with your DIY projects.
EXPLORE MORE IDEAS FOR:
 |
 |
 |
 |