This step by step diy project is about outdoor rabbit house plans. I have designed this cheap rabbit hutch out of wood so you can keep your favorite furry pets in a clean and safe environment. The top roof is actually a lid so you have easy access to the house and clean it regularly. In addition, the bottom run is ideal for the rabbits as they can move and stay healthy. I have other rabbit hutch designs you can see HERE.
Generally speaking, there are many designs and sizes you can choose from when building a rabbit hutch, so we strongly advise you to check all the options before starting the actual construction. Always choose professional plans and invest in the best quality lumber you can afford (pine). Use a quality saw to adjust the size of the components at the right dimensions. I have Premium Plans for this project in the SHOP.
Projects made from these plans
Rabbit House Plans
Building-a-bunny-house
Cut & Shopping lists
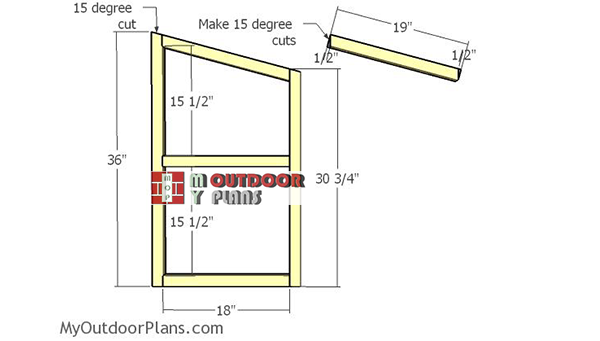
- A – 1 piece of 2×2 lumber – 36” long, 1 piece – 30 3/4″, 2 pieces – 18″, 1 piece – 19″ 2xSIDE
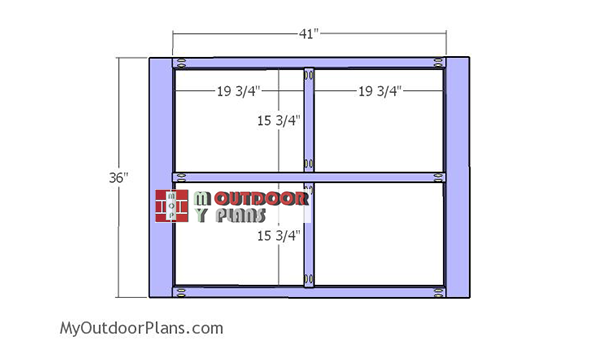
- B – 2 pieces of 2×4 lumber – 36” long, 3 pieces of 2×2 lumber – 41″ long, 2 pieces – 15 3/4″ long FRONT WALL
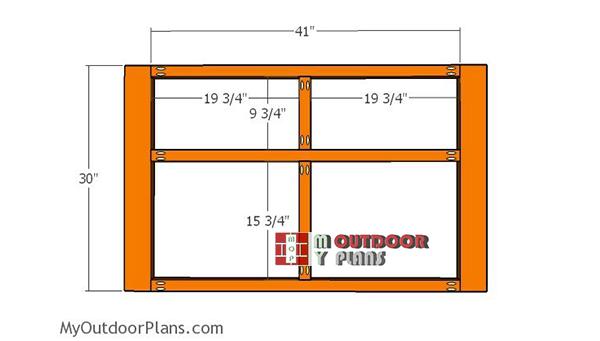
- C – 2 pieces of 2×4 lumber – 30” long, 3 pieces of 2×2 lumber – 41″ long, 1 piece – 15 3/4″ long, 1 piece – 9 3/4″ long BACK WALL
- D – 2 pieces of 2×2 lumber – 21″ long, 2 pieces – 42″ long, 4 pieces – 18″ long, 2 pieces – 20 1/4″ long FLOOR
- E – 1 piece of 3/4″ plywood – 17 1/4″x21″ long PARTITION
- F – 2 pieces of 2×4 lumber – 26″ long, 3 pieces – 41″ long LID
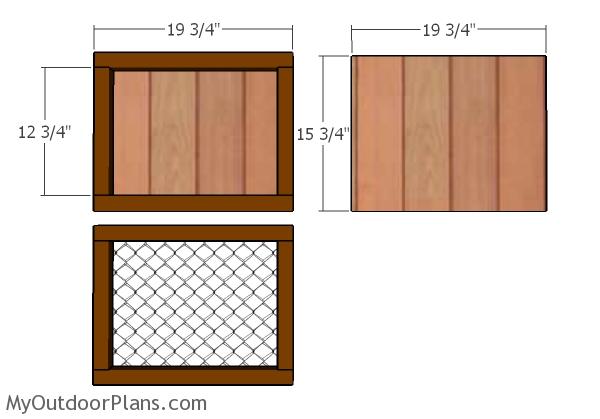
- G – 2 pieces of 2×2 lumber – 12 3/4″ long, 2 pieces – 19 3/4″ long, 1 piece of 1/2″ plywood – 15 3/4″x19 3/4″ long DOOR
- H – 2 pieces of 2×2 lumber – 12 3/4″ long, 2 pieces – 19 3/4″ long DOOR
- I – 2 pieces of 2×2 lumber – 32 3/4″ long, 4 pieces – 5 1/4″ long LADDER
- 5 pieces of 2×2 lumber – 6′
- 7 pieces of 2×2 lumber – 8′
- 2 pieces of 2×4 lumber – 6′
- 2 pieces of 2×4 lumber – 8′
- 1 piece of 1/2″ plywood (siding) – 4’x4′
- 1 piece of 3/4″ plywood – 2’x2′
- 2 1/2″ screws
- 1 1/4″ screws
- hinges, latch
- hardware cloth
Tools
![]() Hammer, Tape measure, Framing square, Level
Hammer, Tape measure, Framing square, Level
![]() Miter saw, Drill machinery, Screwdriver, Sander
Miter saw, Drill machinery, Screwdriver, Sander
![]() Post hole digger, Concrete mixer
Post hole digger, Concrete mixer
Time
![]() One day
One day
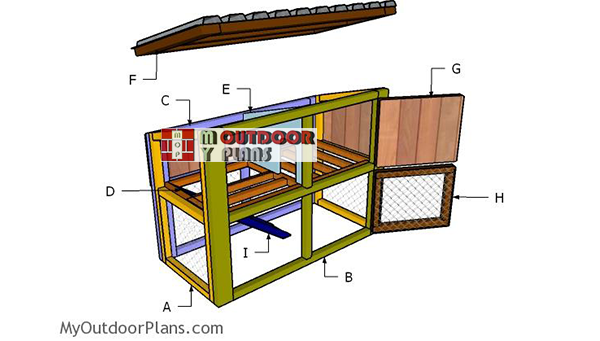
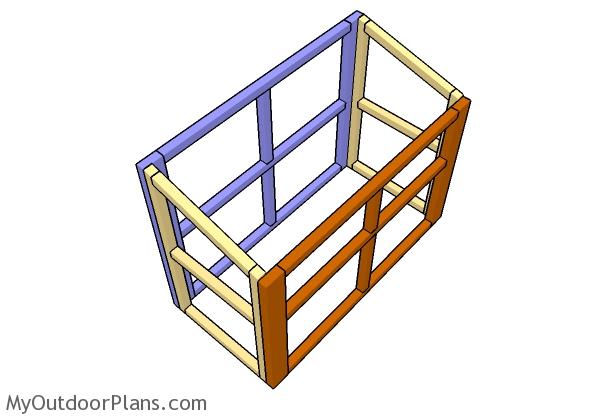
Building a rabbit house
Building-the-side-wall-frames
The first step of the project is to build the sides for the rabbit hutch. Cut the components from 2×2 lumber, using the instructions from the diagrams. Drill pocket holes at both ends of the horizontal components and insert 2 1/2″ screws into the vertical supports. Insert 2 1/2″ pocket screws and add glue to the joints.
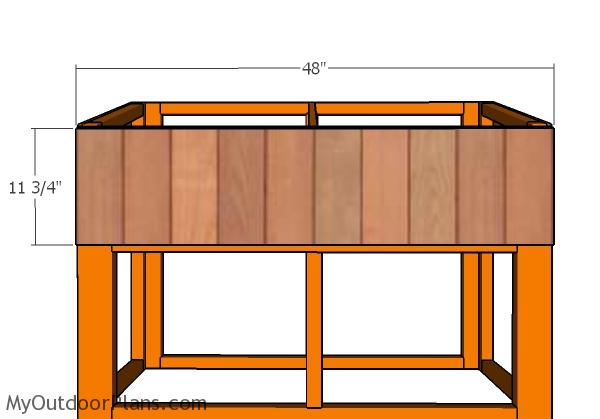
Building-the-front-wall-frame
Build the front wall for the rabbit hutch from 2×4 lumber and 2×2 lumber. Drill pocket holes at both ends of the 2×2 components and lock everything together tightly with 2 1/2″ screws. Add glue to the joints and make sure the corners are right-angled.
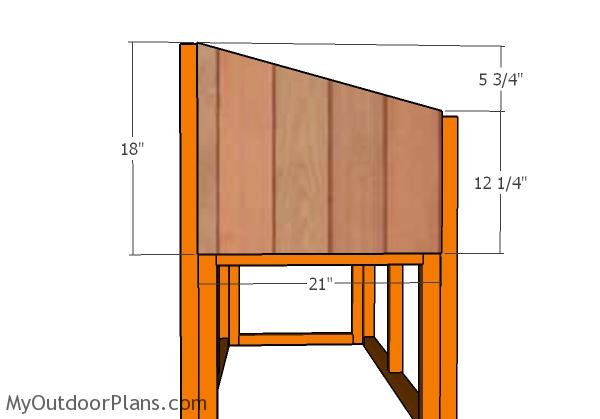
Building-the-back-wall-frame
Build the back wall for the rabbit hutch in the same manner described above. Add glue to the joints, making sure the corners are square.
Assembling-the-rabbit-hutch-frame
The next step of the outdoor bunny hutch project is to assemble the frame. Align the edges flush and then make sure the corners are square. Drill pilot holes and insert 2 1/2″ screws, every 8″.
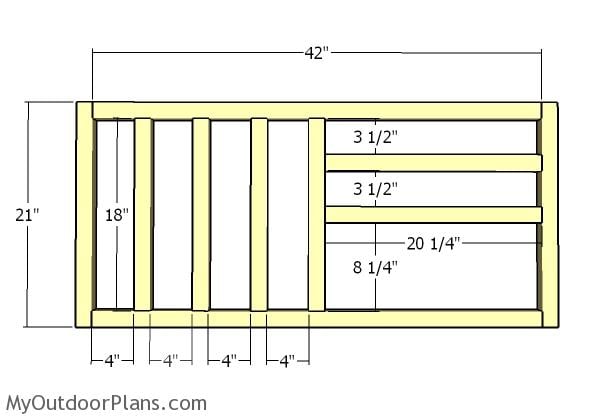
Floor-frame
Assemble the floor for the bunny house, as well. Cut the 2×2 components at the right dimensions and then assemble the floor frame with 2 1/2″ screws. You can drill pilot holes and insert the screws, or you can drill pocket holes and insert the screws.
Fitting-the-floor
Fit the floor frame to the rabbit hutch frame and then secure it into place with 2 1/2″ screws, after drilling pilot holes. Make sure you align the edges flush and leave no gaps between the components. Now it a great time to staple the hardware cloth to the floor, making sure you cut out the area where the ladder will be.
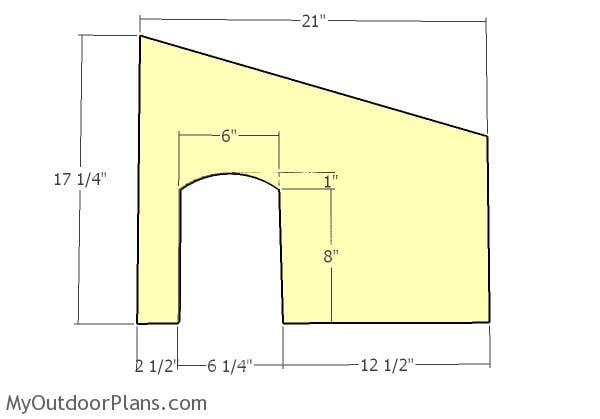
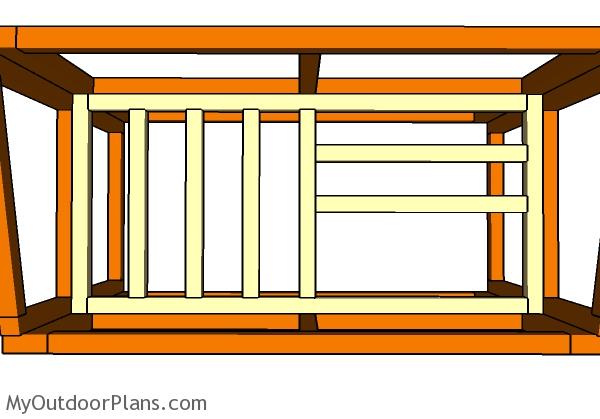
Building-the-partition
Build the partition for the rabbit hutch from 3/4″ plywood. Mark the cut lines for the opening and then cut out the excess with a jigsaw. Smooth the edges with sandpaper and drill pocket holes along the sides of the panel.
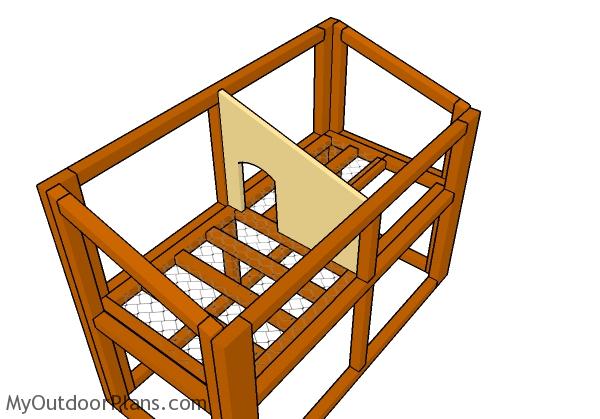
Fitting-the-partition
Fit the panel to the rabbit house and align it properly. Insert 1 1/4″ screws to secure the partition into place.
Attaching-the-back-wall
Attach 1/2″ plywood siding to the back of the rabbit hutch, using 6d nails.
Side-walls
Attach siding panels to the side of the rabbit hutch, as well.
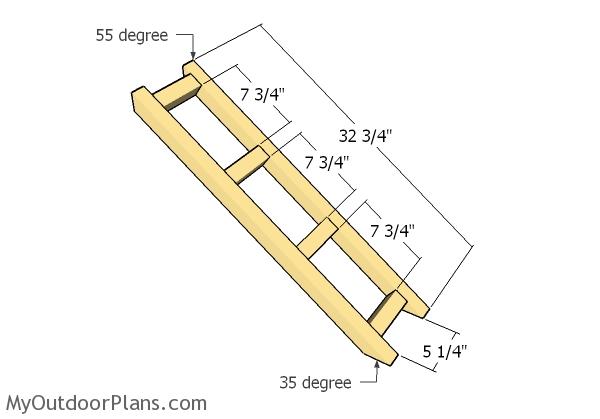
Building-the-ladder
Build the ladder for the rabbit hutch from 2×2 lumber. Cut the components at the angles and dimensions shown in the diagram. Drill pilot holes through the sides and insert 2 1/2″ screws into the steps. Add glue to the joints and leave no gaps between the components.
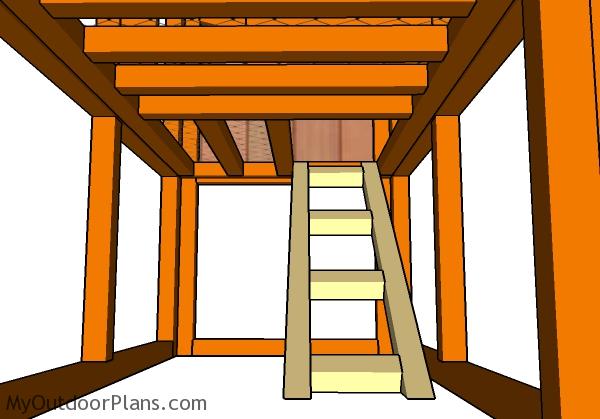
Fitting-the-ladder
Fit the ladder to the rabbit house, drill pilot holes and insert 2 1/2″ screws so you can lock them into place tightly.
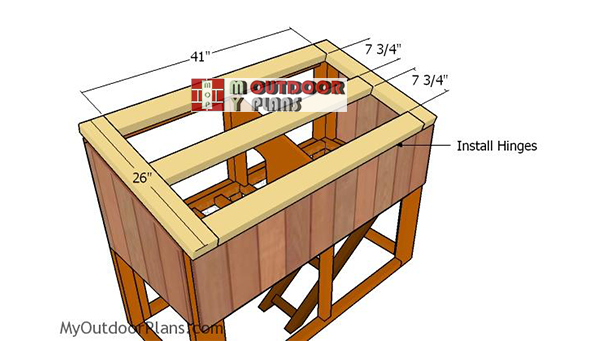
Building-the-top-lid-frame
Build the lid for the rabbit house from 2×4 lumber. After cutting the components at the right dimensions, you need to drill pocket holes at both ends of the 41″ long components. Insert 2 1/2″ screws into the perpendicular components. Add glue to the joints and make sure the corners are square. Use hinges to secure the lid to the bunny house.
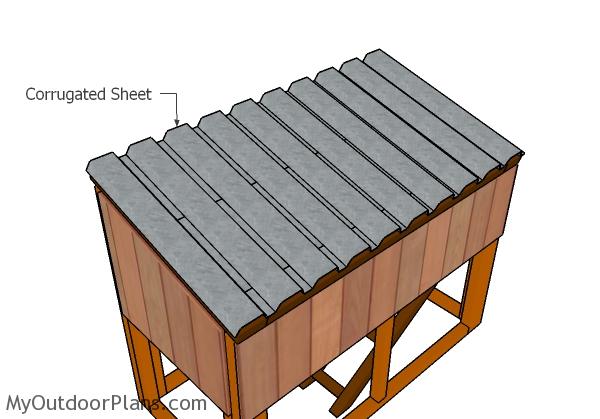
Fitting-the-roofing
Attach corrugated sheets to the lid and secure them into place with screws. I have designed the house with the top lid, so you can have easy access to the inside of the hutch and clean it.
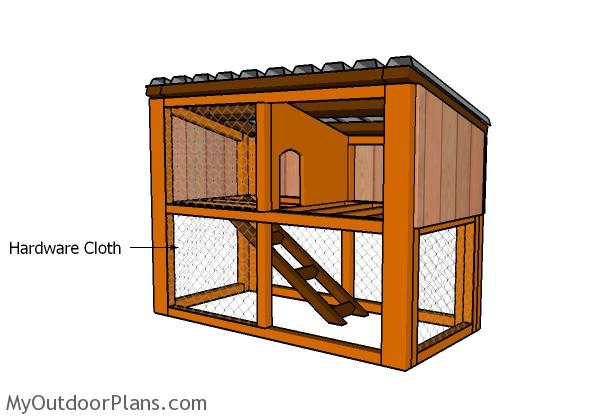
Fitting-the-hardware-cloth
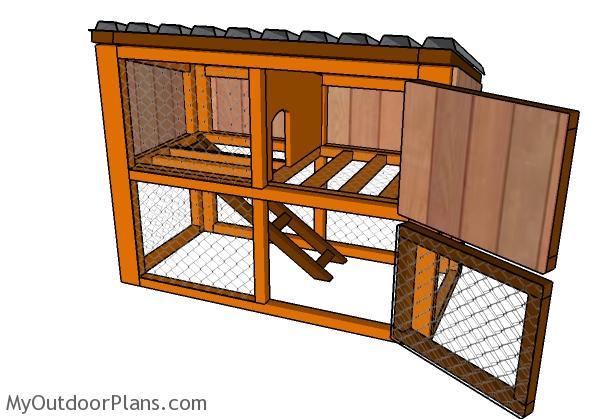
Attach the hardware cloth to the bottom and to the front of the hutch using staples. Make sure you leave the door openings aside.
Building-the-doors
Build the door frames from 2×2 lumber. Drill pocket holes at both ends of the vertical components and insert 2 1/2″ screws into the perpendicular components. Add waterproof glue to the joints for a proper bond. Attach hardware cloth to the bottom door and 1/2″ siding to the top door.

Fitting-the-doors
Fit the doors into the opening and then secure them into place with hinges. In addition, fit small latches so you can lock the doors and keep the bunny safe from the predators.
Bunny-house-plans
Last but not least, you need to take care of the finishing touches. Make sure there are no sharp edges exposed and fill the holes with wood putty. Smooth the surface with 120-220 grit sandpaper and remove the dust with a cloth. Apply a few coats of paint or stain to enhance the look of the components for a neat result.
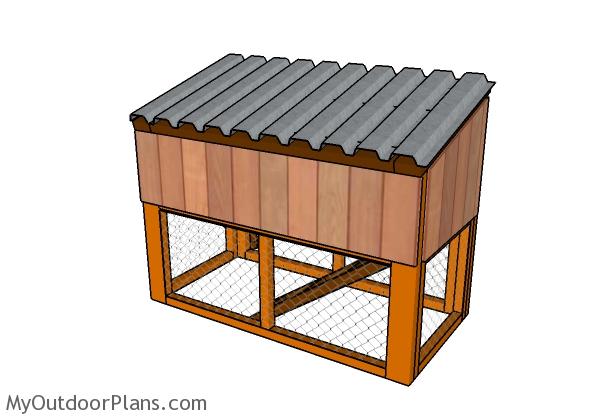
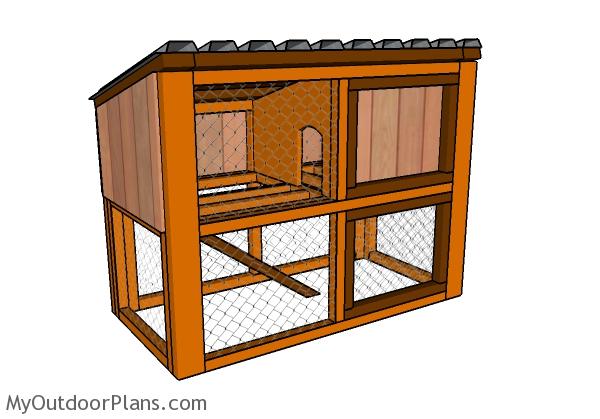
Wooden-rabbit-hutch-plans
The rabbit hutch has a nice appearance from all angles. Make sure the corrugated sheets overhang the house for about 1″ on all sides, so it drains the water properly.
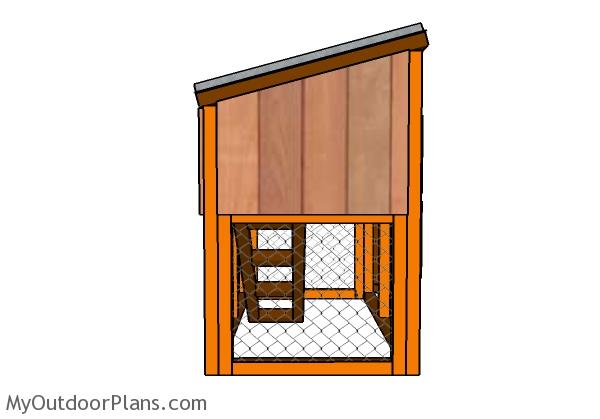
Cheap-rabbit-hutch-plans
This bunny house it is both easy and cheap to build. All the materials are available to all DIY stores and you only need common household tools to get the job done in a professional manner.
Rabbit-house-plans
This bunny house will allow you keep your furry pets in a clean and safe environment. In addition, the pets will have plenty of space to move in the run and stay healthy. I have Premium Plans for this project in the SHOP.
If you want to get PREMIUM PLANS for this project, in a PDF format, please press GET PDF PLANS button bellow. Thank you for the support.

This woodworking project was about outdoor rabbit house plans. If you want to see more outdoor plans, I recommend you to check out the rest of my step by step projects. SHARE my projects and follow us on the social networks to help me keep adding free woodworking plans.
EXPLORE MORE IDEAS FOR:
 |
 |
 |
 |
4 comments
Thanks so much for the Rabbit Hutch plans, my great granddaughter, will be delighted with her birthday present looking forward to building it.
You’re welcome. Let me know how it comes out!
Hello – we just purchased your rabbit hutch plans from Etsy – I’m a little worried that it may be too small for 2 French Lops – adult weight 18 pounds each. Is this hutch intended for 1 or 2 rabbits? and have you ever made this hutch a little larger – I’m thinking more like 24 inches by 48 inches.
Any input is appreciated.
I don’t understand the question. The dimensions for the hutch are listed on etsy: 48″ width x 24″ depth x 39″ height. Therefore, the hutch is already 24″x48″