This step by step diy project is about how to build chicken nesting boxes. After building the chicken coop, you need to get the job done by attaching the nesting boxes to the construction. Although this is a straight-forward process, there are a few things that you should know before starting the construction of the nesting boxes. Invest in high-quality materials and assemble the boxes with great care.
It is essential to use weather-resistant lumber when building the chicken coop, so make sure you select the components with attention. Moreover, take accurate measurements before making the cuts, otherwise the components might not fit together. Adjust the size of the chicken coop according to your needs, but make sure you follow the instructions described in this article. See all my Premium Plans HERE.
Projects made from these plans
How to Build Chicken Nesting Boxes
Building-an-easy-chicken-coop
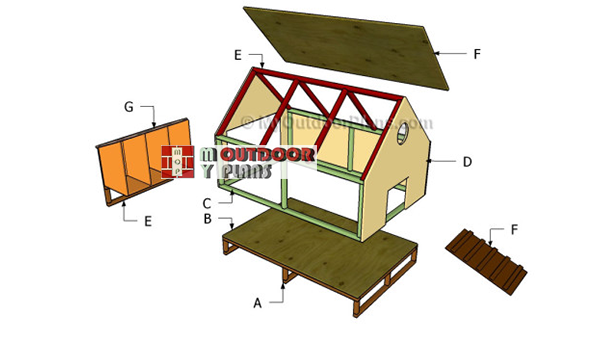
Cut & Shopping Lists
- E – 2 pieces of 2×2 lumber – 36″ long, 3 pieces – 6 3/4″ long LEGS
- F – 1 pieces of 3/4″ plywood – 16″x26″ long, 5 pieces of 1×2 lumber – 16″ long LADDER
- G – 2 pieces of 3/4″ plywood – 16″x24″ long, 2 pieces – 16″x23 1/4″ long SIDES&PARTITIONS
- G – 1 piece of 3/4′ plywood – 16”x34 1/2″ long, 1 piece – 18 1/2″x36″ long, 1 pieces – 36″x17 1/2″ long BOTTOM&TOP
- 2 pieces of 2×2 lumber – 8 ft
- 1 piece of 1×2 lumber – 8 ft
- 1 piece of 3/4″ plywood – 4’x8′
- 2 1/2″ screws
- 1 5/8″ screws
- 1 1/4″ screws
- wood filler
- wood glue
- stain/paint
Tools
![]() Hammer, Tape measure, Framing square, Level
Hammer, Tape measure, Framing square, Level
![]() Miter saw, Drill machinery, Screwdriver, Sander
Miter saw, Drill machinery, Screwdriver, Sander
Time
![]() One day
One day
Related
- Part 1: Easy Chicken Coop Plans
- Part 2: How to Build a Chicken Coop Nest
Building nesting boxes

Building the sides
The first step of the backyard project is to build the sides and the partitions for the nesting boxes. As you can easily notice in the plans, we recommend you to mark the cut lines on the 3/4″ plywood and to get the job done with a circular saw.
Smooth the cut edges with sandpaper and remove the residues with a cleaner, before assembling the nesting boxes. Work with attention and take accurate measurements.

Building the nest box
Next, assemble the frame of the nesting boxes. Drill pocket holes at both ends of the bottom component and insert 1 1/4″ screws into the sides. In addition, we recommend you to drill pocket holes along the bottom edges of the partitions and insert 1 1/4″ screws into the bottom component.

Fitting the face
Continue the project by attaching the face component to the nesting boxes. Cut the component at the right size and attach it to the frame of the nesting boxes with 1 1/4″ screws. Make sure you leave no gaps between the components and add glue to create rigid joints.

Fitting the nest to the chicken coop
Fit the nesting boxes to the opening of the chicken coop and secure it into place by suing 1 1/4″ screws. Plumb the sides of the chicken nest with a spirit level and make sure the top is horizontal. It is essential to create a rigid bond and to leave no gaps between the components.

Fitting the top
Attach the 3/4″ plywood lid to the chicken nesting boxes and secure it to the back wall by using several metal hinges. Work with attention and make sure the lid opens and closes properly.

Fitting the roofing
Cover the lid with tar paper and install asphalt shingles, in order to protect the nesting boxes from decay and water damage.
Top Tip: Align everything with attention and invest in high-quality materials.

Building the legs for the nest
We recommend you to secure them into place by fitting 2×2 legs. Cut the components at the right size and lock them together using 2 1/2″ pocket screws. Drill pocket holes at both ends of the vertical supports and secure them to the horizontal components.
Align the components with great attention and secure the legs to the nesting boxes using 2″ screws. Plumb the legs with a spirit level before fitting them into place.

Building the ladder
One of the last steps of the project is to build the ladder for the chicken coop. Therefore, we recommend you to attach 1×2 slats to the 3/4″ plywood support. Make sure you cut the slats at the right size and secure them to the plywood using 1 1/4″ finishing nails.

Easy chicken coop plans
After building the frame of the chicken coop we recommend you to take care of the finishing touches. Therefore, check if all the components are locked together tightly and aligned properly.
Top Tip: Don’t forget to take a look over the rest of the project, if you want to learn how to build the basic chicken coop. In addition, make sure you read all the instructions with attention before starting the assembly.
This woodworking project was about how to build chicken nesting boxes. If you want to see more outdoor plans, we recommend you to check out the rest of our step by step projects. LIKE us on Facebook to be the first that gets our latest updates and submit pictures with your DIY projects.

EXPLORE MORE IDEAS FOR:
 |
 |
 |
 |
9 comments
Would this coop be suitable for 8 chickens?
Yes, for a light breed and if you grow them in free range. Otherwise, for heavy breed you should take a look over these plans: http://myoutdoorplans.com/animals/4×8-gambrel-chicken-coop-plans/
Why are the sides of the nesting box not equal dimensions?
Because the sides cover the bottom piece, while the partitions go on top of the bottom piece.
How much does the finished product cost?
Can this be done without using pocket screws?
Yes
I am having the hardest time figuring out how to attach the nesting box to the side of the coop. I followed the measurements, but where am I screwing it? I don’t see a safe place to screw it to the main building. I feel like I am missing a step.
Pocket holes through the vertical side panels and screws it into the back wall of the coop.