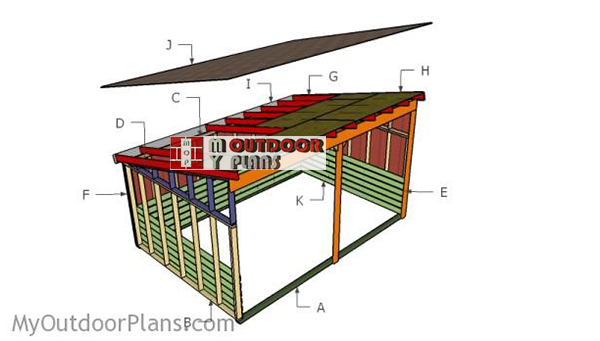
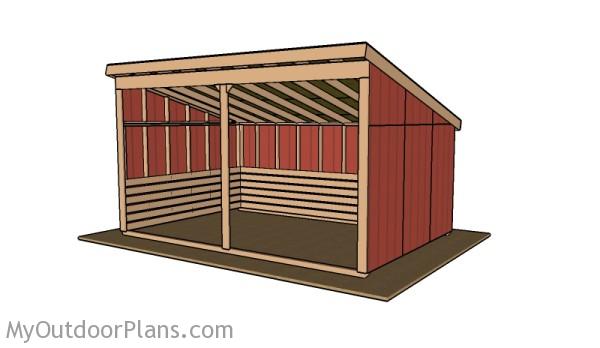
This step by step diy woodworking project is about 12×18 horse shelter plans. The project features instructions for building a a large run-in shed, that can accommodate up to three horses. If you want to build a basic shelter for your horses or for storing other items, take a look over this project, as well as over PART 2 of the article. Make sure you check out the rest of plans to see alternatives and more projects for your garden.
When buying the lumber, you should select the planks with great care, making sure they are straight and without any visible flaws (cracks, knots, twists, decay). Investing in cedar or other weather resistant lumber is a good idea, as it will pay off on the long run. Use a spirit level to plumb and align the components, before inserting the galvanized screws, otherwise the project won’t have a symmetrical look. If you have all the materials and tools required for the project, you could get the job done in about a day. See all my Premium Plans HERE.
Projects made from these plans
It’s that simple to build a run in shed!
Free Run in Shed Plans
Building-a-run-in-shed
Cut & Shopping Lists
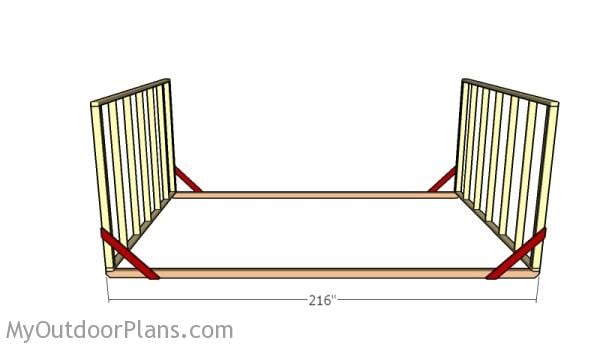
- A – 2 pieces of 4×4 lumber – 216″ long SKIDS
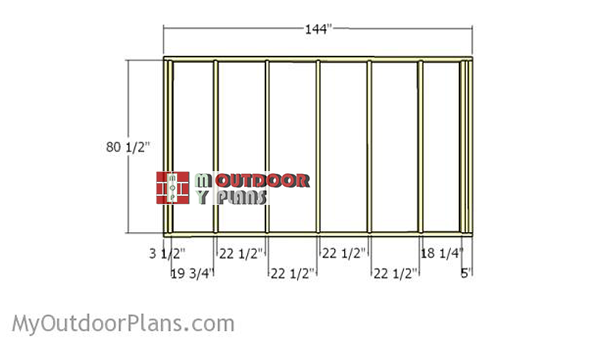
- B – 2 pieces of 2×4 lumber – 144″ long, 10 pieces – 80 1/2″ long 2xSIDE WALL
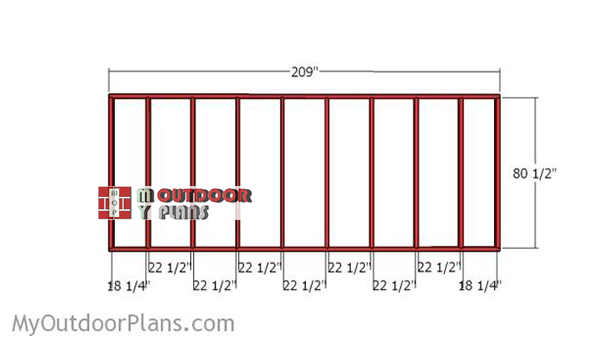
- C – 2 pieces of 2×4 lumber – 161″ long, 10 pieces – 80 1/2 long BACK WALL
- D – 1 piece – 134 3/4″ long, 1 piece – 139″ long, 1 piece – 2 1/2″ long, 1 piece – 8 1/2″ long, 1 piece – 14 3/4″ long, 1 piece – 21″ long, 1 piece – 27″ long, 1 piece – 33″ long 2xTOP SIDE WALL
- E – 1 piece of 2×10 lumber – 216″ long, 3 pieces of 2×6 lumber – 114″ long BEAMS
- F – 4 pieces of T1-11 siding – 48″x84″ long, 1 piece – 24″x84″ long SIDING
- 2 pieces of 4×4 lumber – 18′
- 8 pieces of 2×4 lumber – 12′
- 2 piece of 2×4 lumber – 18′
- 34 pieces of 2×4 lumber – 8′
- 1 piece of 2×10 lumber – 18′
- 3 pieces of 2×6 lumber – 10′
- 500 pieces of 2 1/2″ screws
- 200 pieces of 1 5/8″ screws/brad nails
Tools
![]() Hammer, Tape measure, Framing square, Level
Hammer, Tape measure, Framing square, Level
![]() Miter saw, Drill machinery, Screwdriver, Sander
Miter saw, Drill machinery, Screwdriver, Sander
Time
![]() One day
One day
Building a 12×18 run in shed
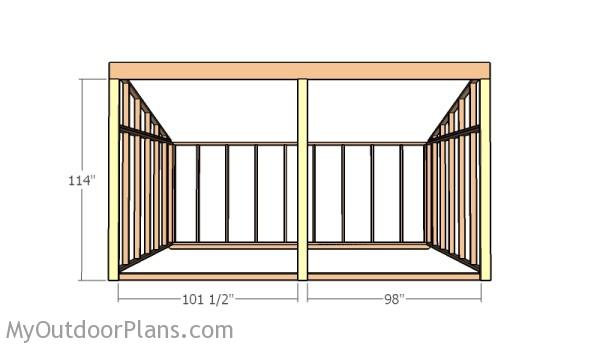
Building-the-side-walls
The first step of the project is to build the side walls for the run in shed. Use 2×4 lumber to build the components. Drill pilot oles through the plates and insert 2 1/2″ screws into the studs. Alternatively, you can use a framing gun. Make sure the edges are aligned and check if the corners are square.
Fitting the side walls
Fit the side walls to the 4×4 skids. Use 2×4 temporary braces to lock the wall frames to the skids. Use 3 1/2″ screws to lock the walls to the skids. Make sure the walls are plumb, by using a spirit level.
Building-the-back-wall-frame
Assemble the back wall, using the same techniques described above. Make sure you space the studs as shown in the plans.
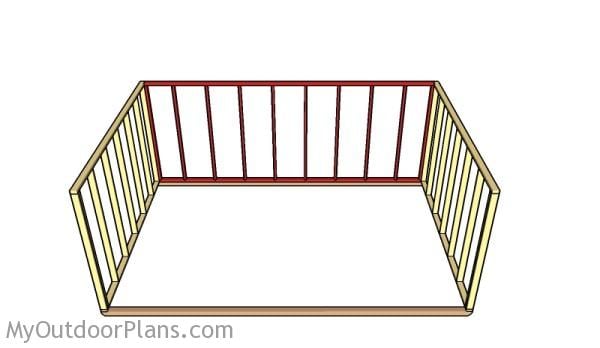
Assembling the frame of the run in shed
Fit the back walls to the structure, as shown in the diagram. Align the edges with attention and make sure the corners are square. Drill pilot holes through the bottom plate and insert 2 1/2″ screws into the skids. In addition, lock the adjacent walls together using 2 1/2″ screws.
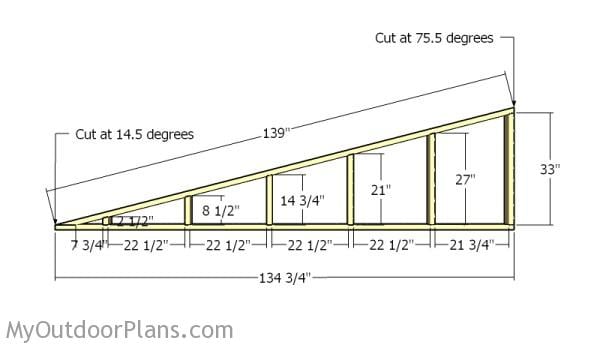
Building the top side walls
Build the top side walls from 2×4 lumber. Cut the components at the right dimensions, following the instructions from the plans. Cut the top of the studs at 75.5 degrees using a miter saw. Drill pilot holes through the plates and insert 2 1/2″ screws into the studs.
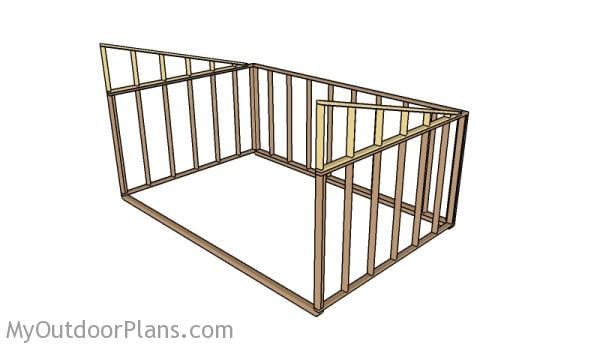
Fitting the top side walls
Fit the top frames to the side walls, as shown in the plans. Align the edges with attention, drill pilot holes through the bottom plate of the lean to frames and insert 2 1/2″ screws into the support walls.
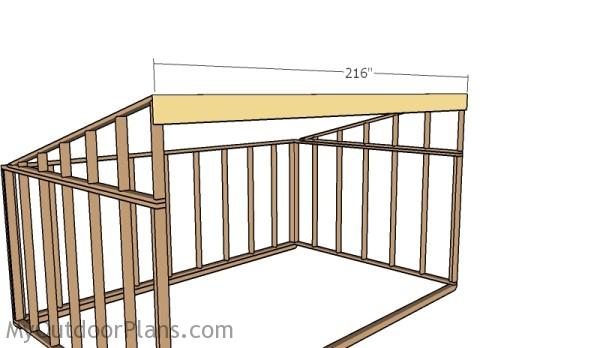
Fitting the top ridge
Next, attach the 2×10 beam to the front of the run in shed. Use a spirit level to check if the beam is perfectly horizontal. Use 3″ lag screws to lock the beam to the top frames.
Fitting the vertical front beams
Next, attach 2×6 beams to the front of the shed, as shown in the diagram. Use a spirit level to plumb the beams. In addition, check if the corners are square for a professional result.

Fitting the middle post braces
Use pieces of 2×6 lumber to lock the middle support into place. Drill pilot holes and insert 3 1/2″ screws to lock the braces into place.
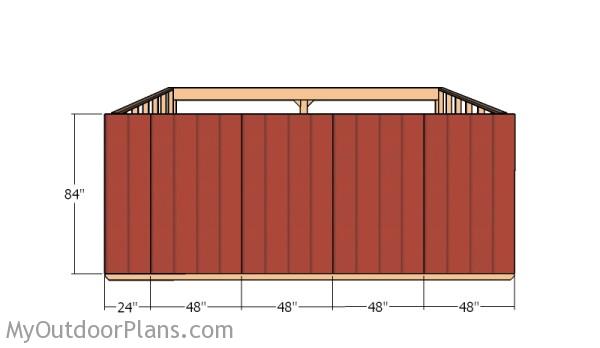
Attaching the back siding panels
Attach T1-11 siding sheets to the back of the run in shed. Use 1 5/8″ screws/nails to lock the sheets to the framing, every 8″ along the studs and plates. Leave no gaps between the sheets.
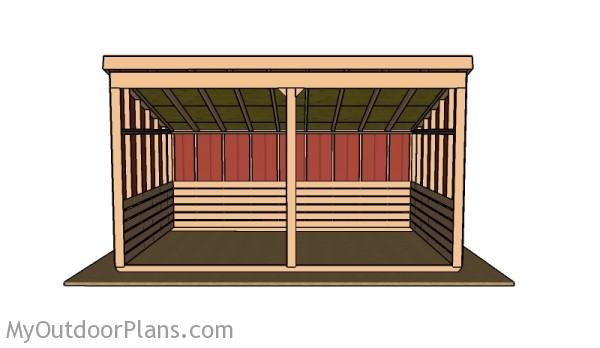
12×18 Run in shed plans
Make sure you check out PART 2 of the project, to learn more about building the roof for the 12×18 shed.
Run in shed plans
Fill the holes with wood putty and let them dry out for a few hours. Smooth the surface with 100-200 grit sandpaper and remove the residues with a damp cloth.
Top Tip: Check out the rest of the project, to learn how to build the roof for the run in shed.
This woodworking project was about 12×18 free run in shelter plans. If you want to see more outdoor plans, check out the rest of our step by step projects and follow the instructions to obtain a professional result.

EXPLORE MORE IDEAS FOR:
 |
 |
 |
 |
35 comments
I love the plans for the 12×18 run in shed. Is there a place to get more detailed plans?
This is as detailed as you can get on MOP.
Thanks Julian! I love the site.
This is really awesome! Can someone tell me what tools I will need? Saws etc???
You need: a circular saw/miter saw, a drill, a nailer (you could use a hammer as well or a screwdriver). Besides that you need the common hand tools: hammer, ruler, spirit level, carpentry square, gloves etc. See what tools I recommend here: http://myoutdoorplans.com/support/
One note: The side walls will sag with no support beneath. I am adding some 4×4 support beneath these walls. I do not plan to move the structure so this will work for me. Another option is to support from beneath until the siding and kick boards are installed. This will firm everything up.
Thank you for the feedback. Looking forwards to seeing your project!
We go to local guy for lumber and get the leftover pine slabs, remove the bark and use them for siding. The slabs I get for free!
Thank you for the tip!
Hi I love these plans! Currently working on this shed. I pulled up your site to see the pictures and they are gone! Are you guys haveing trouble with your site? Please help
If the pics are gone? How can you still comment? Are you using your mobile/tablet or a computer? For me it works.
Do you have recommendations on how to anchor the 12×18′ run-in shed to the ground?
Anchor kit: http://amzn.to/2FOY6A5
I thought i saw plans for a 24″ but I can’t find them.
http://myoutdoorplans.com/shed/12×24-loafing-shed-roof-plans/
Why would you use 4x4s as bottom plates, instead of using 4x4s as corner posts for support in ground with concrete?
HI is there a way to get the full supply list for the entire shed? Walls and roof? Or do i just get everything on the bottom part of the list for each plan A and B?
Yes, the list at the bottom of the plans is what you have to buy.
How many lag screws do I need on either end of the 2×10 beam? Thanks.
At least 3.
Thanks!
What changes would you recommend if i use metal siding?
I’m not an expert when it comes to metal siding, so I can’t help you with that.
What foundation should I build for this plan ?
I can’t figure out how to order plans.
All my plans are free. You can read how to get them here: http://myoutdoorplans.com/faq/
We are building our shed with 4×4 posts cemented in the ground due to high wind area so we are putting 2×6 horizontal on the 4×4 posts…I’m not sure how to space them…guessing 24″??
16″ or 24″ on center
It looks like the height of the 12 x 18 run in shed is about 114” (9.5’). If I want to make it taller would you recommend adding the additional height to the bottom portion (side walls) or when building the top slanted portion of the run in? Or does it matter? I want it about 2’ taller for my Clydesdale.
Thank you
I recommend you to build the side and back walls 2 ft taller. Just cut the studs 2 ft longer. In this way, you don’t change the slope of the roof and you can still follow my plans for the rafters and so on.
I’m not able to print the plans. Is it not allowed? I really like the plan.
Thanks
The print function will be available again in a few days. I had issues with unethical use of my plans. That was very hurtful, since I worked 10 years to make all these plans available for free.
Thank you for your work ! These are great ~!
This shelter is perfect! However, the diagram shows materials labeled A thru K, but the materials list is A thru F. How do I get the true materials list. I’m trying to get the materials list correctly before going to the lumber yard.
K is for the kickboards, which are optional