This step by step diy woodworking project is about dog house plans for large dog. The project features instructions for building a 3×4 dog house using 2×4 lumber and 3/4″ plywood. If you are looking for plans for a sturdy large dog house, chances are you came to the right place. Make sure you take a look over the rest of plans to see alternatives and more projects for your garden.
When buying the lumber, you should select the planks with great care, making sure they are straight and without any visible flaws (cracks, knots, twists, decay). Investing in cedar or other weather resistant lumber is a good idea, as it will pay off on the long run. Use a spirit level to plumb and align the components, before inserting the galvanized screws, otherwise the project won’t have a symmetrical look. If you have all the materials and tools required for the project, you could get the job done in about a day. See all my Premium Plans HERE.
Projects made from these plans
Dog House Plans for Large Dog

Building-a-large-dog-house
Cut & Shopping Lists
- A – 2 pieces of 2×4 lumber – 48″ long, 5 pieces -33″ long JOISTS
- B – 1 piece of 3/4″ plywood – 36″x48″ long FLOOR
- C – 2 pieces of 2×4 lumber – 48″ long, 7 pieces – 27 1/4″ long BACK WALL
- C – 2 pieces of 2×4 lumber – 48″ long, 6 pieces – 36″ long FRONT WALL
- D – 2 pieces of 2×4 lumber – 29″ long, 3 pieces – 27 1/4″ long 2xSIDE WALL
- E – 5 pieces of 2×4 lumber – 38″ long RAFTERS
- F -2 pieces of 3/4″ plywood – 36″x46 1/4″ long, 1 piece – 43 1/4″x48 long, 1 piece – 33 1/2″x48″ long WALLS
- G – 4 pieces of 1×3 lumber – 43 1/4″ long, 1 piece – 46″ long, 4 pieces – 34 1/4″ long, 2 pieces – 33 1/4″ long, 2 pieces of 1×2 lumber – 17″ long, 2 pieces – 24″ long TRIMS
- H – 2 pieces of 3/4″ plywood – 28 3/4″x45 1/4″ long ROOF
- I – 20 sq ft of tar paper, 20 sq ft of asphalt shingles ROOFING
- J – 2 pieces of 1×3 lumber – 46″ long, 2 pieces – 59″ long ROOF TRIMS
- 17 pieces of 2×4 lumber – 8′
- 8 pieces of 1×3 lumber – 8′
- 1 piece of 1×2 lumber – 8′
- 3 pieces of 3/4″ plywood – 4’x8′
- 2 1/2″ screws, 3 1/2″ screws, 1 5/8″ screws
- 4d nails, 16d nails
- wood filler , wood glue, stain/paint
Tools
![]() Hammer, Tape measure, Framing square, Level
Hammer, Tape measure, Framing square, Level
![]() Miter saw, Drill machinery, Screwdriver, Sander
Miter saw, Drill machinery, Screwdriver, Sander
Time
![]() One day
One day
How to build a large dog house
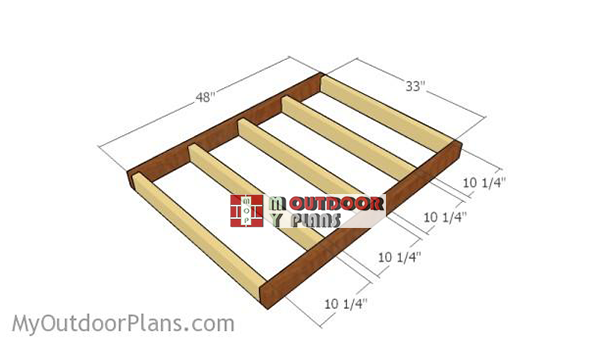
Building-the-floor-frame-dog-house
The first step of the project is to build the floor frame for the large dog house. Cut the joists from 2×3 lumber at the right dimensions. Drill pilot holes through the rim joists and insert 2 1/2″ screws into the perpendicular components. Make sure the corners are square and leave no gaps between the components.
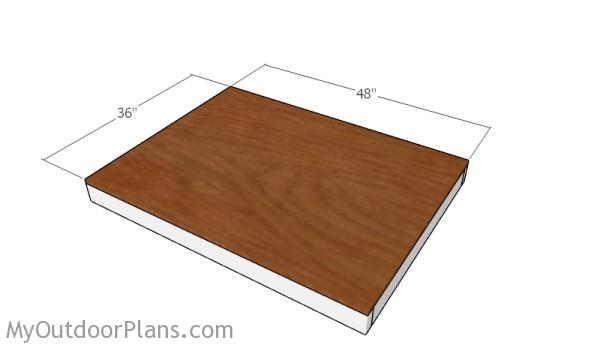
Attaching the floor
Next, attach the 3/4″ plywood floor to the floor. Align the edges with attention and insert 1 5/8″ screws/nails to lock the sheet into place, every 8″ along the joists
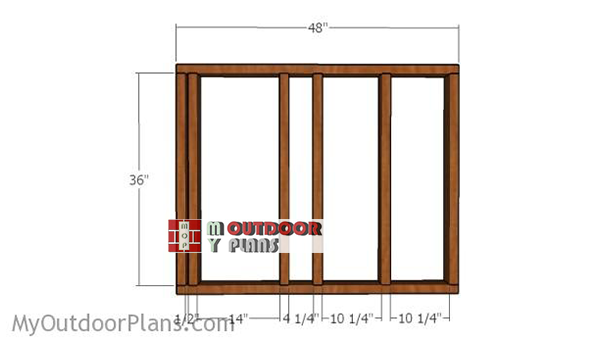
Building-the-front-wall-frame
Continue the project by assembling the front wall for the dog house. Cut the components from 2×4 lumber. Drill pilot holes through the plates and insert 2 1/2″ screws into the studs. Place the studs as shown in the diagram, making sure the corners are square.
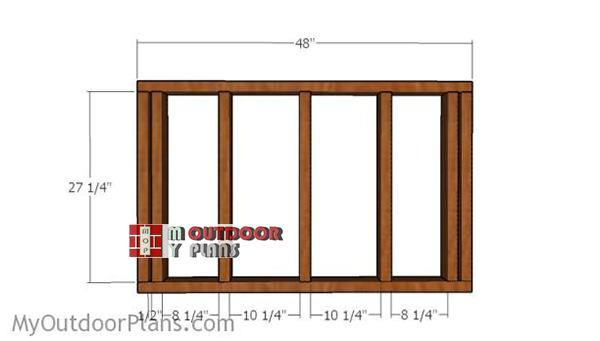
Building-the-back-wall-frame
Build the back wall from 2×4 lumber. Drill pilot holes through the plates and insert 2 1/2″ screws into the studs. Make sure the corners are square and align the edges with attention.
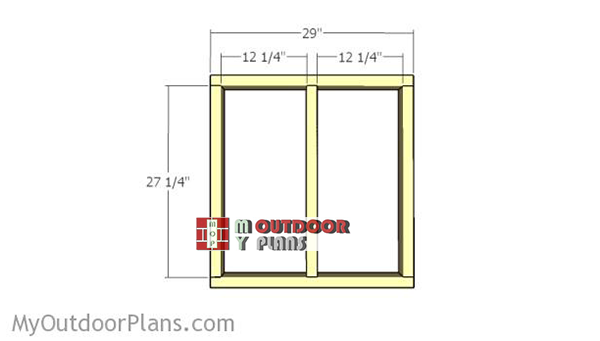
Building-the-side-walls
Next, assemble the side walls. Use the same techniques described above for a professional result.
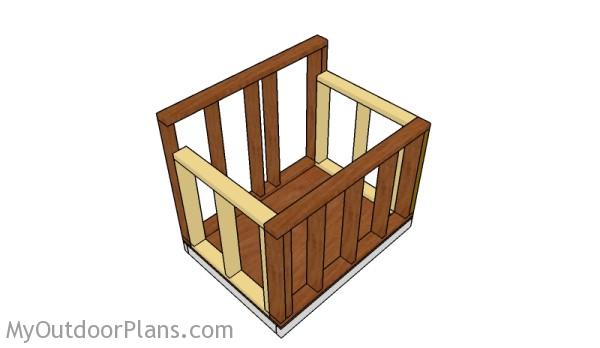
Assembling the dog house frame
Fit the wall frames to the floor of the dog house, making sure you align the bottom plates to the exterior edges. Drill pilot holes through the bottom plates and insert 3 1/2″ screws into the floor of the dog house. In addition, you need to lock the adjacent wall together by inserting 2 1/2″ screws.
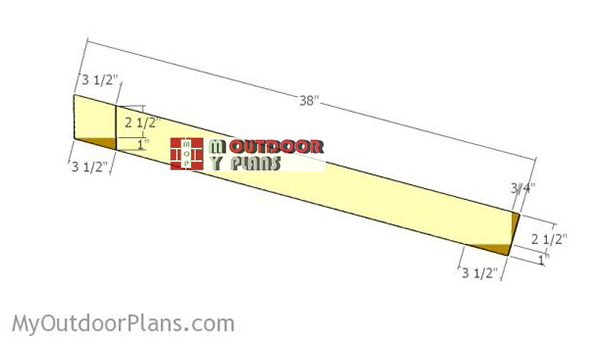
Building-the-rafters-for-the-dog-house
Build the rafters for the dog house from 2×4 lumber. Cut one end of the rafters at 75 degrees. Mark the cut lines on the rafters and make the notches using a saw. Smooth the edges with sandpaper.
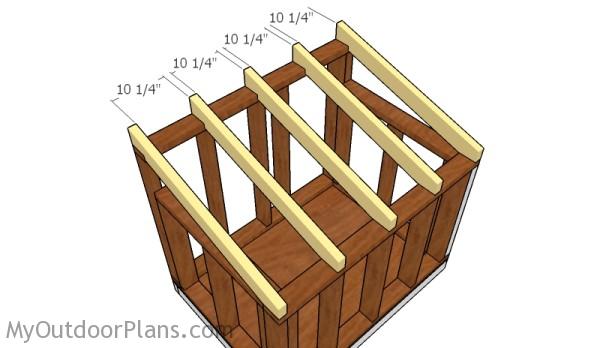
Fitting the rafters
Fit the rafters to the top of the dog house, as shown in the diagram. Place the rafters equally-spaced and lock them to the plates with 3 1/2″ screws. Drill pilot holes to prevent the wood from splitting.
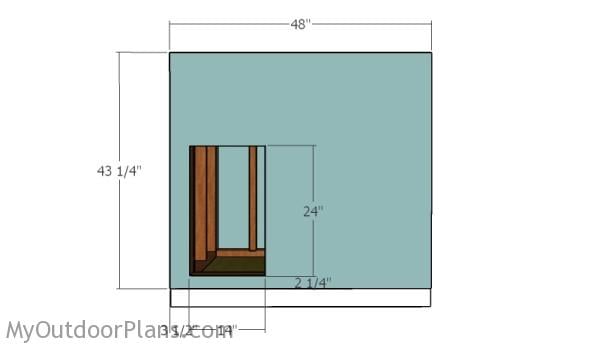
Front wall
Build the exterior walls from 3/4″ plywood. Mark the cut lines and adjust the size of the plywood sheet. Drill a starting holes and use a jigsaw to make the door opening. Make sure you smooth the cut edges, as your dog could easily cut. Use 1 5/8″ nails to secure the sheet to the studs.

Fitting the back wall
Attach the back panel to the structure of the dog house.
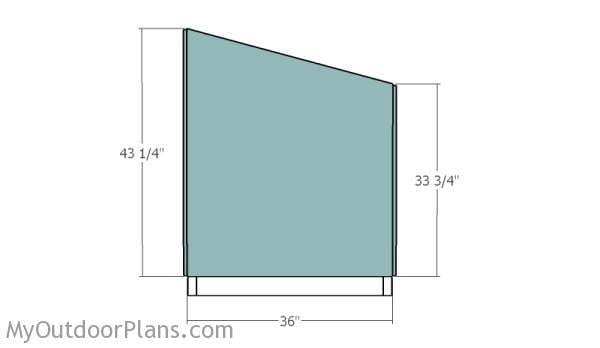
Side walls
Build the side walls from 3/4″ plywood. Cut the panels at the right dimensions and shape before attaching them to the side walls. Use 1 5/8″ nails to lock the sheets into place.
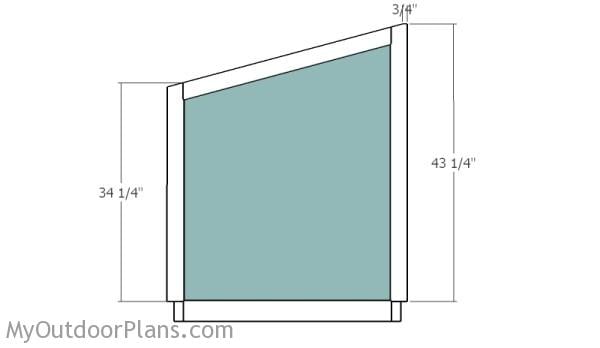
Side trims
If you want to enhance the look of the large dog house, we recommend you to fit 1×3 trims. Cut the top of the vertical trims at 75 degrees. Use 1 5/8″ nails to secure the trims into place.
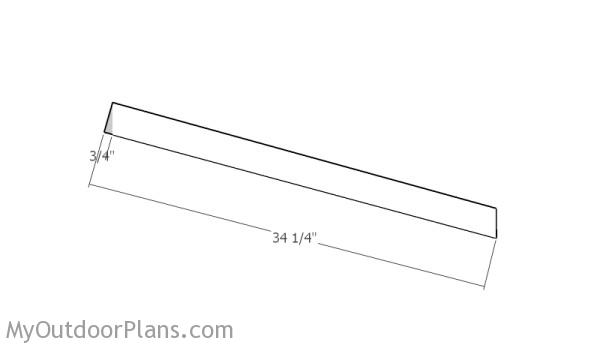
Side trims – top
Cut both ends of the top trims at 75 degrees. Fit them into place and lock them to the walls with 1 5/8″ nails.
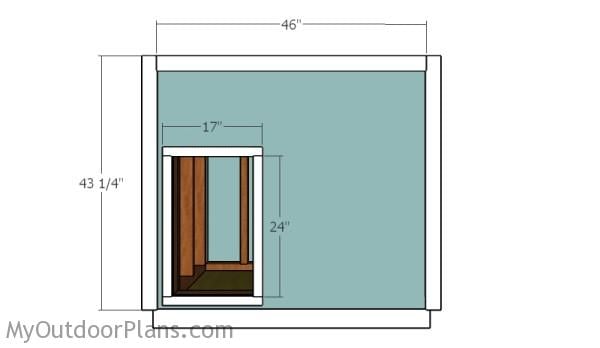
Fitting the front trims
Next, attach the 1×3 trims to the front of the dog house. Moreover, you should attach 1×2 trims around the door opening.
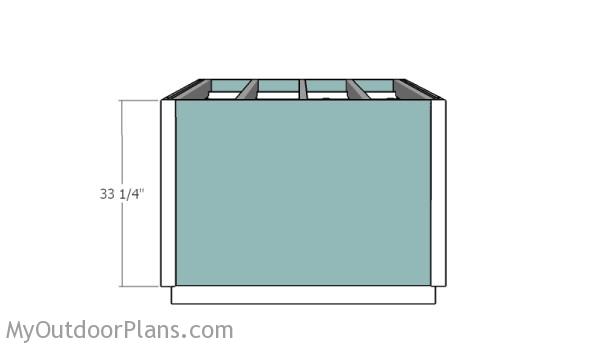
Back Trims
Fit the trims to the back of the dog house to get the job done in a professional manner.
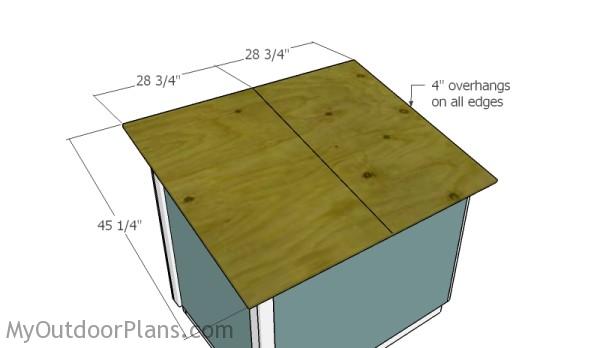
Fitting the roofing sheets
Cut the roofing sheets from 3/4″ plywood. You can use a single 57 1/2″ sheet of plywood, but if you have scraps from previous projects you can use two pieces. Center the sheets to the roof frame, making sure they overhang 4″ on all sides. Use 1 5/8″ screws to lock the sheets into place and leave no gaps between them.
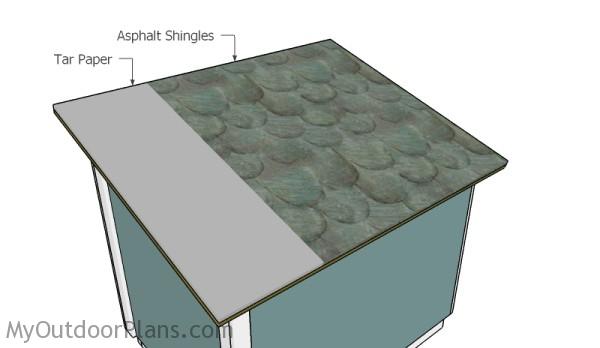
Fitting the roofing
Cover the roofing sheets with tar paper and then install asphalt shingles, starting from the bottom up to the top.

Roof Trims
Attach 1×3 decorative trims to the front and to the back of the roof. Use 1 5/8″ nails to lock the trims into place.
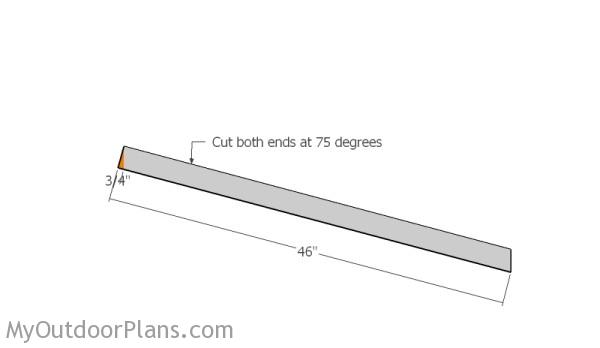
Building the side roof trims
Build the side trims for the roof from 1×3 lumber. Cut both ends at 75 degrees. Fit the trims to the sides of the roof and lock them into place with 1 5/8″ screws.
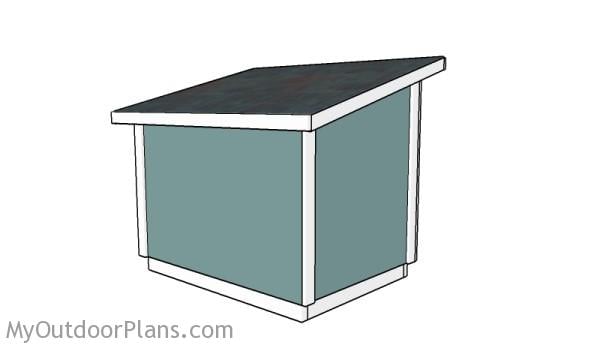
DIY Large Dog House
Apply a few coats of paint to the exterior walls and to the trims, in order to add character to the project. In addition, the paint will protect the wood from moisture. Remember that you should adjust the size of the dog house and of the opening to suit your needs.
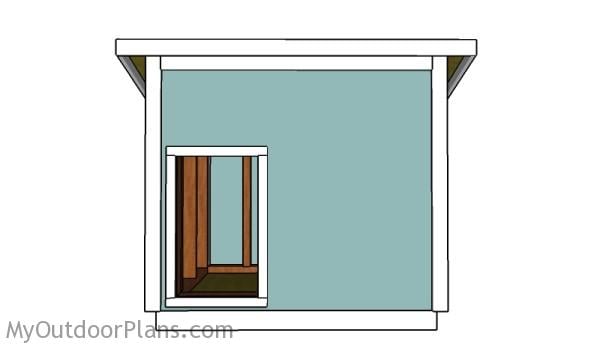
How to build a large dog house
This dog house should be sturdy enough to last for many. many years. Check if there are protruding screws or sharp edges before moving your pet to its new home.
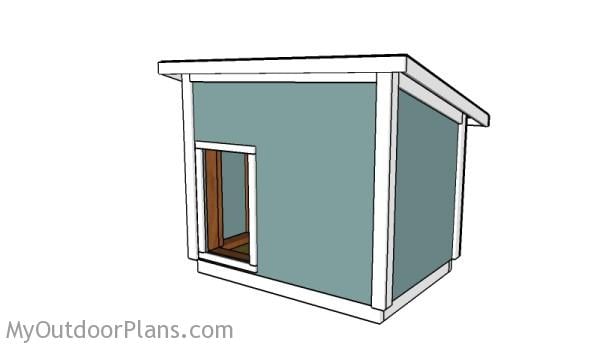
Dog house plans for large dog
This large dog house is a nice project for a weekend. If you care about your pet, building this project is the greatest gift you can offer. You can even install insulation to the walls, if you live in a cold area.
Top Tip: Check out the rest of the projects, if you want to see lots of outdoor projects. See insulated dog house plans so you save time and money.
This woodworking project was about dog house plans for a large dog. If you want to see more outdoor plans, check out the rest of our step by step projects and follow the instructions to obtain a professional result.
EXPLORE MORE IDEAS FOR:
 |
 |
 |
 |

13 comments
Hello, I would really love to build this dog house for my Bernese Mountain dog. Is there a way to get the materials for less money ? It is very expensive since I am still a student.
Thank you very much !!
You could use recycled materials. There is an outrageous amount of good materials people throw away each day, like from demolitions or renovations.
How can I get plans that I can print for this dog house? Thank you
Please read the Faqs: http://myoutdoorplans.com/faq/
Love the design. My question is how can you hinge the roof in order to clean the house? Thanks.
Yes, you can do that in several ways. The easiest is to attach the plywood roof to the rafters with hinges.
This looks great! Been trying to find something like this to build for my Bernese mountain dog.
Thanks for stopping by. Looking forward to seeing your dog house. Good luck!
I’ve started!! really enjoying building it.
That’s great. Let me know how it comes out.
I would love to try this but I am needing a bigger size dog house and I am terrified of trying to calculate the measurements my self. My mom has 5 outdoor dogs and they all sleep together, I would love to replace the makeshift shack they have now. Very detailed plans, great job.
Building this right now. Are you sure about the rafters angle and cut measurements? Very possible I’m doing it wrong, but I’m seriously wondering if 75 degrees is accurate.
Set the miter at 15 degrees. 75 degrees is what the rafter end will be after the cut