This step by step diy project is about plans for raised garden beds. If you want to start a small garden in your backyard in a fashionable manner, you should pay attention to this article. Building a garden bed is not enough to ensure the plants are proper climate during the cold night, so you should also install light hoop frames and put polyethylene film. Work with attention, after reading all the instructions and tips.
First, you need to remove the weeds and lay out the garden bed, using string and batter boards. Next, you need to dig in the ground about 3-5”. You can improve the drainage of the soil by putting a 2” thick layer of gravel. Fill the bed with soil and cover the surface with landscaping fabric, making sure the materials also extends to the walls of the wooden structure. We strongly recommend you to use weather-resistant lumber, such as pine, cedar or redwood. See all my Premium Plans HERE.
Projects made from these plans
Plans for Raised Garden Beds
Building-a-raised-garden-bed
Cut & Shopping Lists
- A – 4 pieces of 2×8 lumber – 48” long, 4 pieces – 45″ long SLATS
- B – 12 pieces of 2×4 lumber – 14 1/2” long POSTS
- C – 4 pieces of 2×4 lumber – 51” long TRIMS
- 4 pieces of 2×8 lumber – 8 ft
- 4 pieces of 2×4 lumber – 8 ft
- 2 1/2″ screws
- 1 5/8″ screws
- 1 1/4″ screws
- wood filler
- wood glue
- stain/paint
Tools
![]() Hammer, Tape measure, Framing square
Hammer, Tape measure, Framing square
![]() Miter saw, Drill machinery, Screwdriver, Sander
Miter saw, Drill machinery, Screwdriver, Sander
Time
![]() One weekend
One weekend
Related
Building a 4×4 raised garden bed
Building-the-frame-of-the-garden-bed
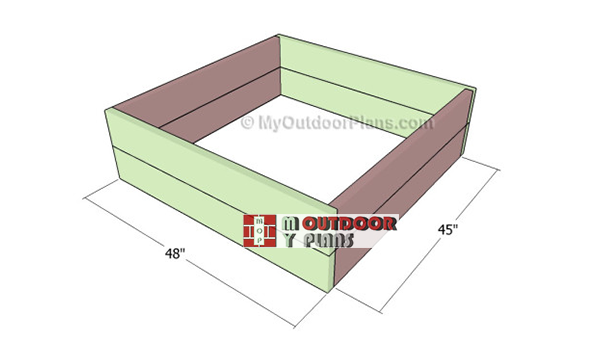
The first step of the woodworking project is to build the frame of the raised garden beds. As you can easily notice in the image, we recommend you to cut the components out of 2×8 lumber.
Take accurate measurements and use a proper circular saw to get the job done. Smooth the cut edges with sandpaper. Drill pocket holes at both ends of the short slats and secure them to the perpendicular components.
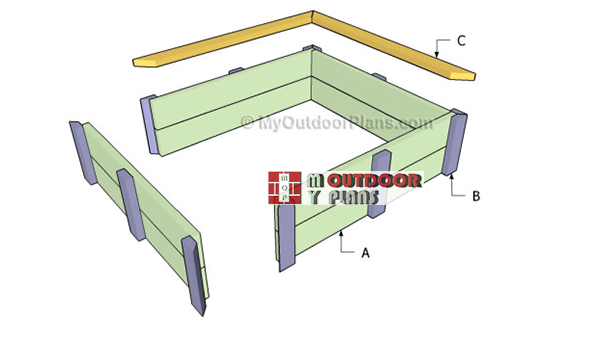
Attaching-the-exterior-supports
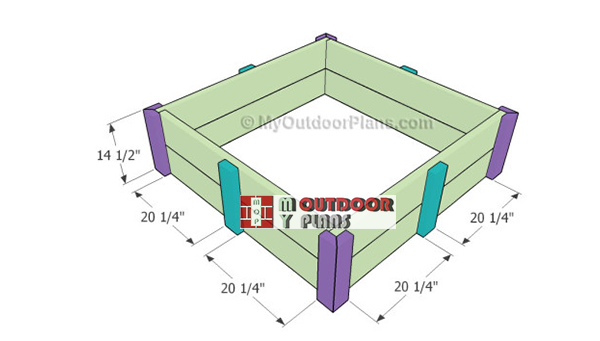
The next step of the woodworking project is to attach the 2×4 slats to the exterior of the frame, as described in the diagram. In order to get the job done in a professional manner, we recommend you to cut one edge of the slats place on the corners at 45 degrees. In this manner, they will join together in a professional manner.
Align the posts with great attention and secure them to the slats by using 2 1/2″ screws. Add glue to the joints in order to get a professional result.

Fitting the corners supports
If you want to enhance the rigidity of the structure, we strongly recommend you to fit the supports to the corners of the raised garden bed. Cut the supports out of 1×4 lumber, as described in the plans. Drill pilot holes and insert 1 1/4″ screws through the supports into the frame of the garden bed.

Attaching the trims
One of the last steps of the woodworking project is to fit the 2×4 trims to the top edges of the raised garden bed. Cut both ends of the trims at the right size and secure them into place by using 2 1/2″ screws. Round the exposed edges of the trims in order to add character to the garden bed.

Plans for raised garden beds
Last but not least, you should take care of the finishing touches. Therefore, make sure the corners are square and the structure is rigid. You could cover the raised bed with polyethylene film, to raise the air and soil temperature.
Top Tip: If you want to save yourself from work, you should install a simple drip-irrigation system. The drip emitters will deliver water to the plants roots constantly, so you just have to wait until the first harvest.
This woodworking project was about plans for raised garden beds. If you want to see more outdoor plans, check out the rest of our step by step projects and follow the instructions to obtain a professional result.
EXPLORE MORE IDEAS FOR:
 |
 |
 |
 |
2 comments
Thank you for the plans.
My wife and I are getting older and it is harder for us to bend down.
This make it easier for the few vegetables and herbs we raise.
Thank you for stopping by. Don’t forget to send a few images if you manage to complete the projects. Good luck!