This step by step diy woodworking project is about video game console shelf plans. I have designed this project with the help of our DIY friend, Bren. He built this video game console storage unit all by himself and I think it’s a fabulous project, so I had to make some matching plans. All your “thank yous” should go to Bren for this project. See his step by step build HERE. Take a look over the rest of my woodworking plans, if you want to get more building inspiration.
When buying the lumber, you should select the planks with great care, making sure they are straight and without any visible flaws (cracks, knots, twists, decay). Investing in cedar or other weather resistant lumber is a good idea, as it will pay off on the long run. Use a spirit level to plumb and align the components, before inserting the galvanized screws, otherwise the project won’t have a symmetrical look. If you have all the materials and tools required for the project, you could get the job done in about a day. See all my Premium Plans HERE.
Projects made from these plans
Video Game Console Shelf Plans
Building a video game console cabinet
Cut & Shopping Lists
- A – 2 pieces of 1×12 lumber – 42″ long SIDES
- B – 5 pieces of 1×12 lumber – 72″ long SHELVES
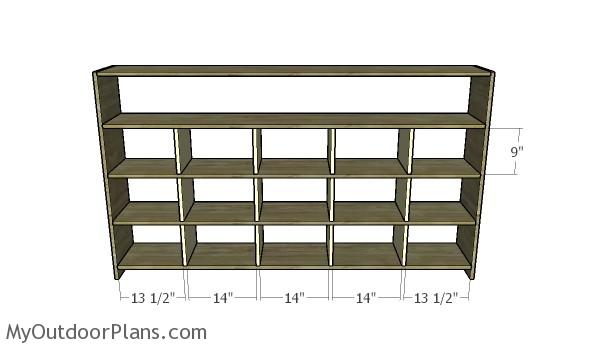
- C – 14 pieces of 1×2 lumber – 9″ long PARTITIONS
- D – 2 pieces of 1×2 lumber – 42″ long, 5 pieces – 70 1/2″ long, 2 pieces – 7 1/2″ long, 12 pieces – 8 1/4″ long TRIMS
- E – 1 piece of 1/4″ plywood – 39 3/4″x73 1/2″ long BACK
- 9 pieces of 1×12 lumber – 6′
- 2 pieces of 1×2 lumber – 6′
- 9 pieces of 1/4″ plywood – 4’x8′
- 50 pieces of 1 1/4″ screws
- 300 pieces of 2″ brad nails
- 50 pieces of 1″ brad nails
- wood glue, mineral oil
Tools
![]() Hammer, Tape measure, Framing square, Level
Hammer, Tape measure, Framing square, Level
![]() Miter saw, Drill machinery, Screwdriver, Sander
Miter saw, Drill machinery, Screwdriver, Sander
Related
![]() One day
One day
Time
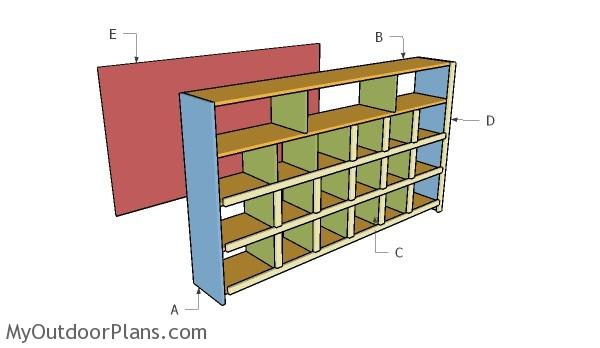
How to build a video game console cabinet – Video game console storage
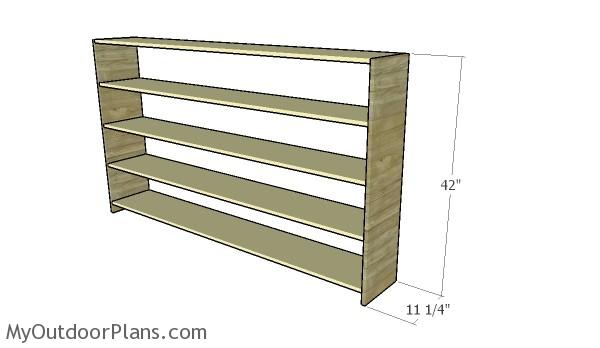
Building the sides
The first step of the project is to build the frame for the cabinet. You can use 1×12 lumber, 1×12 panels or 3/4″ plywood. Using plywood would require a lot of cuts, so you would probably be better off using the 1×12 slats. Cut the sides at 42″ using a saw and smooth the edges with sandpaper.
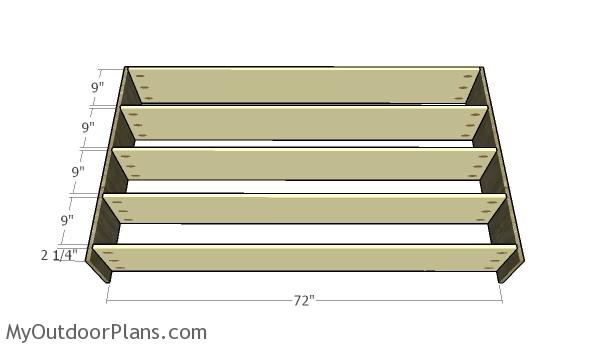
Fitting the shelves
Use 6′ long slats or panels for the shelves. Drill pocket holes at both ends of the components and attach them to the sides, as shown in the diagram. Make sure the edges are flush and check if the corners are square. Add glue to the joints and insert 1 1/4″ screws.
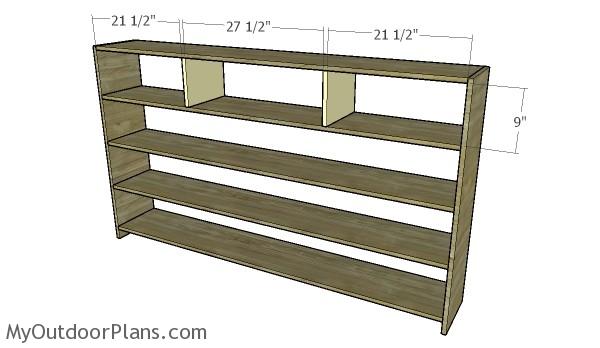
Fitting the top partitions
Cut partitions for the video game console storage unit. Set a stop block for the miter saw, so that you get consistent results for all the partitions. Fit the top partitions into place and make sure the corners are square. Drill 2″ brad nails from top and bottom into the components.
Remember that you can adjust the distance between the dividers, so it suits your needs.
Fitting the partitions
Next, you need to attach the rest of the partitions to the storage cabinet, as shown in the diagram. You can adjust the distance between the dividers, as well. Fit the dividers to the bottom shelf, at first. Use 2″ brad nails from top and bottom and add glue to secure them into place, making sure the corners are square.
Next, fit the dividers to the next shelf, inserting 2″ nails only from the top. Continue the process with the next shelf, using the same techniques described above. Don’t worry that the dividers are locked in nails only at one end, as when attaching the front trims, everything will be more rigid.
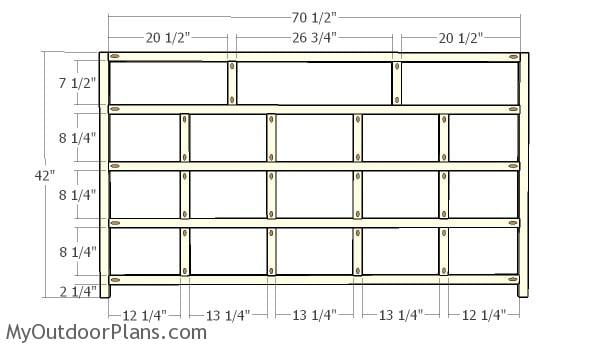
Building the front trims grid
Use 1×2 lumber for the front trims. Cut the components at the right dimensions, as shown in the diagram. Drill pocket holes, align the components and lock them together with 1 1/4″ screws. Make sure the edges are aligned and check if the corners are square. Add glue to the joints for a professional result.
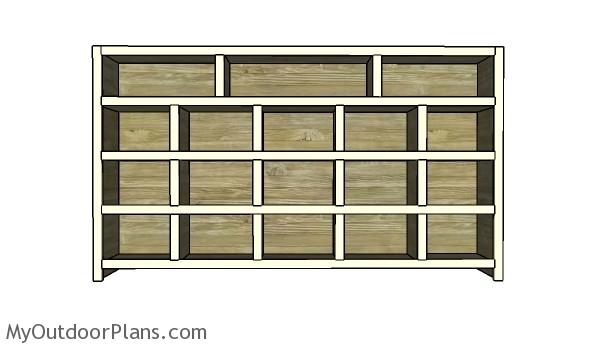
Attaching the front trim grid
Attach the trims to the front of the storage cabinet and make sure the outside edges are flush with the frame of the unit. Add glue to the joints and use 2″ brad nails to lock everything tightly. Leave no gaps between the trims and the storage cabinet, for a professional result.
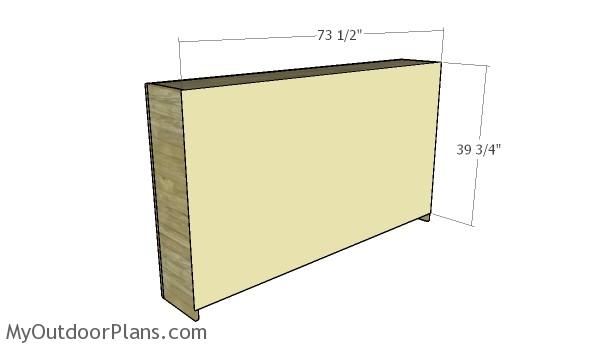
Attaching the back
Cut a piece of 1/4″ plywood and attach it to the back of the unit. Align the edges with attention and use 1″ brad nails to secure it to the frame of the video game console shelf.
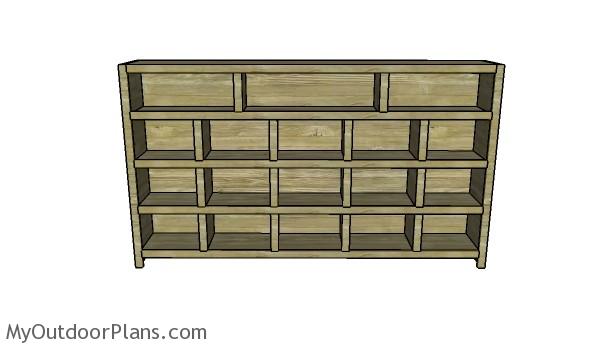
Video game console shelf plans
Work with attention and smooth the edges with sandpaper so you even out the edges and the surface. Fill the holes with wood putty and leave it do dry out for a few hours. Smooth the surface with fine-grit sandpaper before applying the coats of stain or paint.

Video game console cabinet plans
Once again, I want to thank Bren from coming with this idea. He built this project and it looks so great that I had to make some place, based on his work, so you can also make your own version. You can see his full project with lots of useful instructions and tips HERE.
This woodworking project was about video console storage cabinet free. If you want to see more outdoor plans, check out the rest of our step by step projects and follow the instructions to obtain a professional result.
EXPLORE MORE IDEAS FOR:
 |
 |
 |
 |
2 comments
I don’t understand how the top shelf suddenly got shorter over time. It should still be evenly spaced at about 9″. Weird math or something my guy.
Oh, and you could probably cut down from 9 boards to 8 if you were careful with your cuts, and used the scrap from the sides to make 6 partition boards in addition to the 8 you’d get from the one board, plus the 5 shelf boards makes 8 total boards rather than 9.