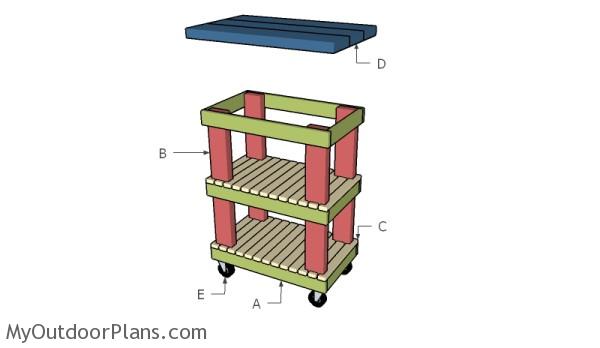
This step by step diy woodworking project is about butcher block table plans. I have designed this project with the help of our DIY friend, Claude. After he showed me his awesome butcher block table, I knew that I have to make some plans so that you can build one, as well. It is a basic project that features storage shelves and caster wheels, so that you can move it easily. Take a look over the rest of our woodworking plans, if you want to get more building inspiration.
When buying the lumber, you should select the planks with great care, making sure they are straight and without any visible flaws (cracks, knots, twists, decay). Investing in cedar or other weather resistant lumber is a good idea, as it will pay off on the long run. Use a spirit level to plumb and align the components, before inserting the galvanized screws, otherwise the project won’t have a symmetrical look. If you have all the materials and tools required for the project, you could get the job done in about a day. See all my Premium Plans HERE.
Projects made from these plans
Butcher Block Table Plans
Building a butcher block table
Cut & Shopping Lists
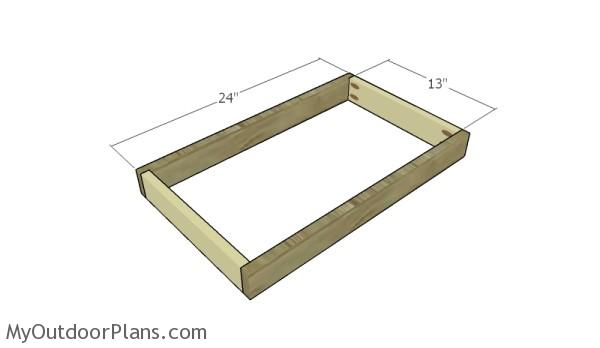
- A – 2 pieces of 1×3 lumber – 24″ long, 2 pieces – 13″ long 3xFRAME
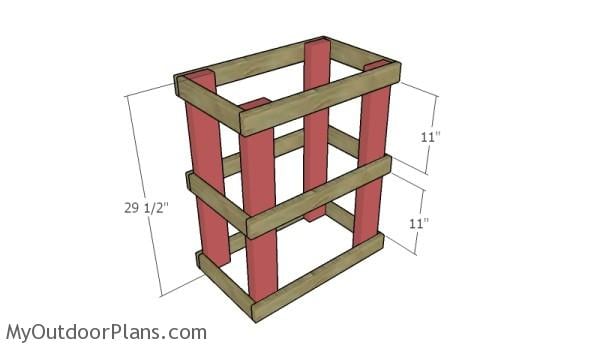
- B – 4 pieces of 2×4 lumber – 29 1/2″ long LEGS
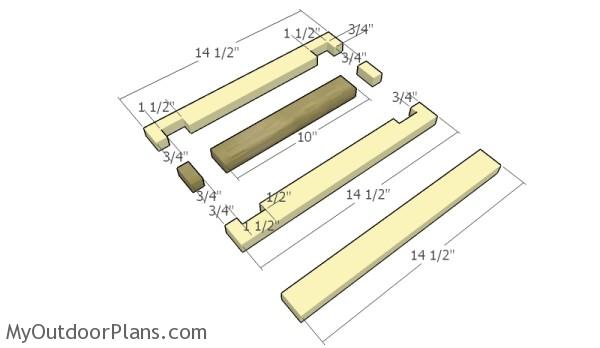
- C – 13 pieces of 1×2 lumber – 14 1/2″ long 2xSHELF
- D – 3 pieces of 2×6 lumber – 26″ long TABLETOP
- 3 pieces of 1×3 lumber – 8′
- 2 pieces of 2×4 lumber – 6′
- 5 pieces of 1×2 lumber – 8′
- 1 piece of 2×6 lumber – 8′
- 200 pieces of 1 1/4″ screws
- 200 pieces of 2″ brad nails
- 4 pieces of 3″ caster wheels
- wood glue, mineral oil
Tools
![]() Hammer, Tape measure, Framing square, Level
Hammer, Tape measure, Framing square, Level
![]() Miter saw, Drill machinery, Screwdriver, Sander
Miter saw, Drill machinery, Screwdriver, Sander
Time
![]() One day
One day
Related
Building a small butcher block island
Building the frames
The first step of the project is to build the frames for the shelves. As you can easily notice in the diagram, you need to use 1×3 slats. Cut the components at the right dimensions and drill pocket holes at both ends of the 13″ components. Use 1 1/4″ screws and glue to lock the slats together. Make sure the corners are square before inserting the screws and check if the edges are flush.
Don’t forget that you should adjust the size of the butcher block table to suit your needs and to match the height of the countertop. It is so easy to adjust the plans, so you should really take this opportunity and use it to your favor.
Assembling the butcher block table
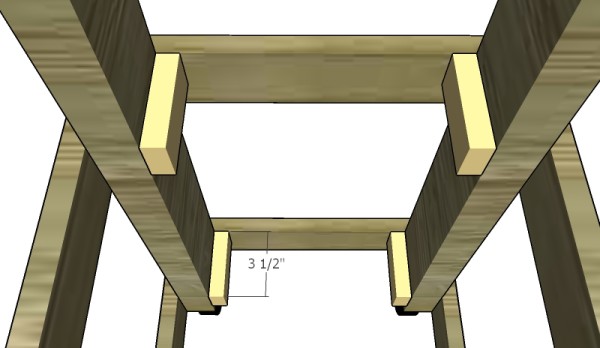
Use 2×4 lumber for the legs. Attach the legs to the frames and use 2″ brad nails to lock them into place. Insert the nails through the frames into the legs, after making sure the corners are right-angled.
Making the cuts to the shelf slats
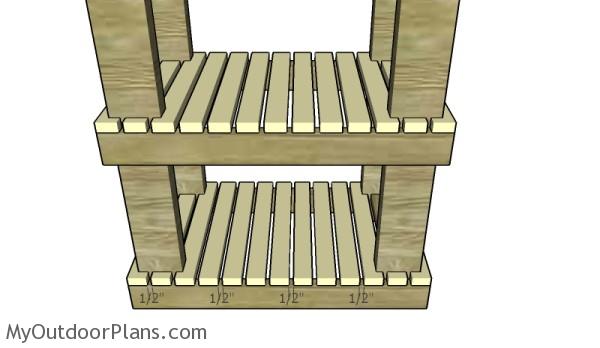
You need to make some notches to the 1×2 slats that go around the legs of the butcher block. Mark the cut lines and use a saw to make the notches. Use a chisel to remove the excess and smooth the recess with a damp cloth.
Attaching the cleats
Attach 1×2 cleats to the legs of the kitchen island, as shown in the diagram. Use 1 1/4″ screws or 2″ brad nails to get the job done in a professional manner. Add glue to the joints, as well.
Attaching the shelf slats
Fit the 1×2 slats to the shelves and lock them into place with 2″ brad nails. Use at least 2 nails for each joint to add strength to the joints. Make sure you place the slats equally spaced for a professional result. Smooth the exposed edges with sandpaper and remove the excess with a damp cloth.

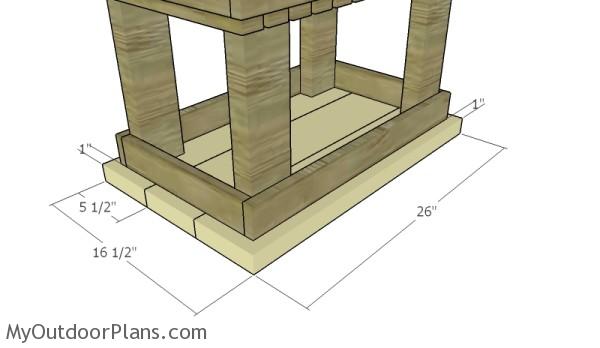
Building the tabletop
One of the last steps of the project is to build the tabletop for the small kitchen island. Therefore, cut 3 pieces of 2×6 lumber at 26″. Drill pocket holes, as shown in the diagram and insert 2 1/2″ screws to lock them together tightly. In addition, add glue to the joints and clamp them together tightly, after making sure the edges are flush one with another.
Attaching the tabletop
Drill pocket holes along the interior faces of the top frame of the butcher block table. Next, lay the tabletop on a level surface and center the frame of the table. Insert 1 1/4″ screws through the frame into the tabletop until there are no gaps between the components.
Attaching the caster wheels
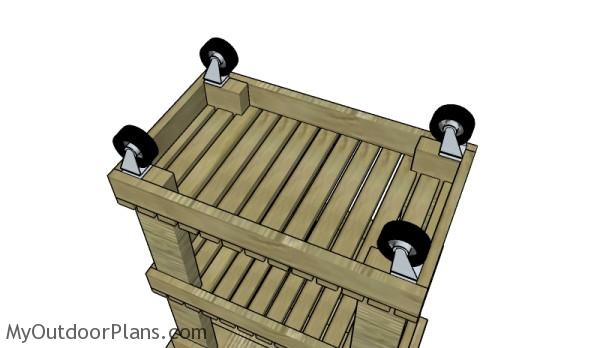
Attach 3″ caster wheels to the bottom of the butcher block table. Align the casters with attention and use screws to get the job done in a professional manner.
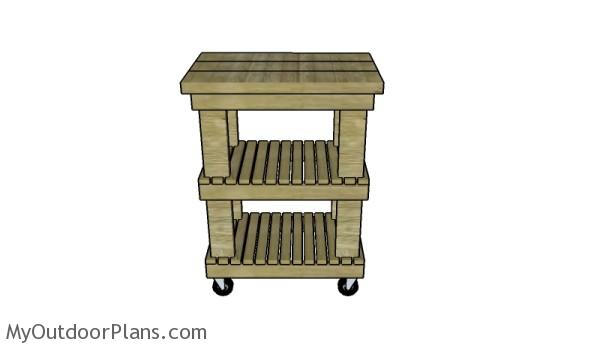
Building a butcher block table plans
Smooth the surfaces thoroughly with 120-220 grit sandpaper and remove the residues with a damp cloth. Last but not least, apply a few coats of mineral oil or other type of food safe wood finish. Make sure you reapply the finish periodically, as it tends to wear on the long run.
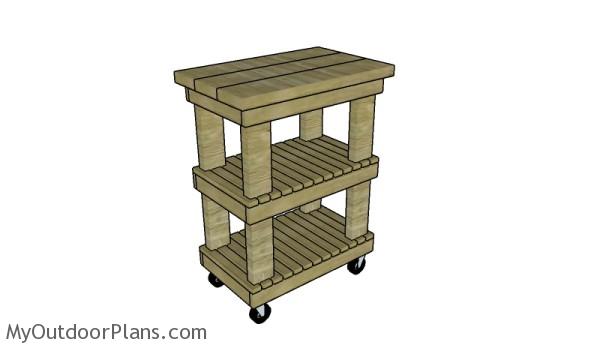
Butcher block table plans
Once again, thank you Claude for inspiring me with your project and for helping me designing it. This is a quick woodworking project that makes a good choice for your home or outdoor kitchen.
This woodworking project was about butcher block table free. If you want to see more outdoor plans, check out the rest of our step by step projects and follow the instructions to obtain a professional result.
EXPLORE MORE IDEAS FOR:
 |
 |
 |
 |
4 comments
Can you forward more measurements regarding the runners
on the kid’s rocker. There are some measurements if added
would make it easier to mark the runner.
Ok… I will update the project today. If you have more questions, please comment on that specific project.
Love these plans, I have managed to build me several inexpensive projects and they have made our lives easier at home.
Great to hear that. If you have the time, I would love to see your creations!