This step by step woodworking article is about small greenhouse plans. If you want to adopt a healthy lifestyle, you should consider building a mini greenhouse in your backyard, taking into account the construction doesn’t require a high investment or a significant amount of expertise in the field. If you are familiar with the sheds construction, you can get the job done in just a weekend and start growing your own vegetables.
Read the local building codes, before starting the construction, as to comply with the legal requirements. In addition, choose a proper location for the greenhouse, as it has to be exposed to the sun light at least 8 hours a day. Buy quality materials for the project, otherwise you won’t be able to get the job done properly and the construction won’t be durable. Protect the lumber against rot with appropriate products. See all my Premium Plans HERE.
Projects made from these plans
Cut & Shopping Lists
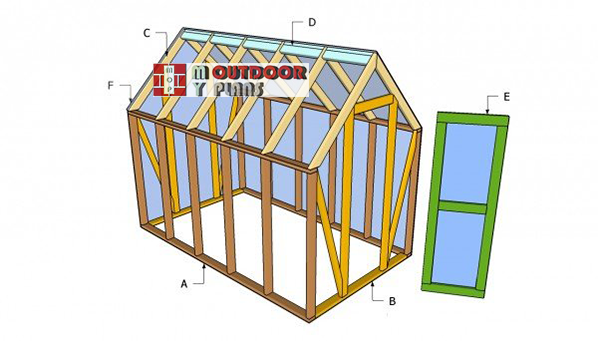
- A – 12 pieces of 2×4 lumber 60”, 4 pieces of 2×4 lumber 120” SIDE FRAMES
- B – 2 pieces of 2×4 lumber – 80”, 1 piece of 2×4 lumber 65”, 2 pieces of 2×4 lumber 63 3/4” FRONT END
- B – 2 pieces of 2×4 lumber – 80”, 1 piece of 2×4 lumber 65”, 2 pieces of 2×4 lumber 63 3/4” BACK END
- C – 12 pieces of 2×4 lumber – 51” long, cut at 45º at both ends RAFTERS
- D – 10 pieces of 2×4 lumber 22 1/2” BLOCKINGS
- E – 2 pieces of 2×4 – 69 1/2”, 2 pieces of 2×4 – 24 1/2”, 1 pieces of 2×4 – 17 1/2” DOOR
- F – 400 sq ft of polyethylene foil FOIL
Tools
![]() Hammer, Tape measure, Framing square
Hammer, Tape measure, Framing square
![]() Miter saw, Drill machinery, Screwdriver, Sander
Miter saw, Drill machinery, Screwdriver, Sander
Time
![]() One weekend
One weekend
Mini greenhouse plans
Mini-greenhouse-plans
Building a small greenhouse is a straight forward project, if you use the right plans for your needs and quality materials. As you can see in the plans, building a wooden greenhouse is similar to making a shed, so if you are familiar to these constructions, you can get the job done in just a weekend.
Top Tip: You can adjust the size of the greenhouse to your needs, but still use the tips and carpentry techniques described in this project. Secure the wooden frame into place with a couple of 2×4 stakes.
Small greenhouse plans
side-wall-plans
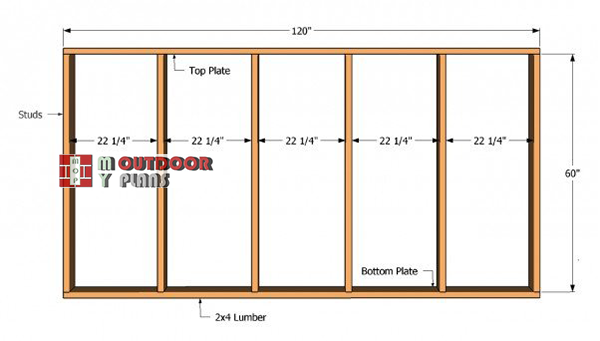
The first step of the project is to build the side wall, as in the image. In order to get the job done in a professional manner, we recommend you to build the plates and the studs from 2×4 lumber. Drill pilot holes trough the plates and insert the 3” screws into the studs.
Work on a level surface if you want to obtain a professional result. Make sure the corners are right angled, using a carpentry square.
Installing-the-rafters—greenhouse
Place the both sides on the selected location, plumb them with a spirit level and secure them temporarily with several braces. In addition, measure the diagonals of the greenhouse, to check if the corners are square.
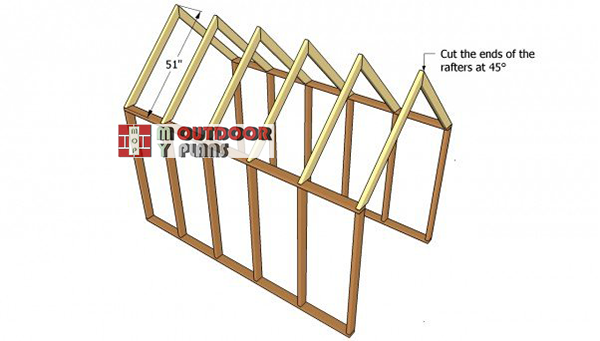
Build the rafters from 2×4 lumber, cutting them at 45º at both ends, with a miter saw. Assemble the trusses on the ground, before locking them to the top plates with 3” screws. Drill pilot holes to prevent the wood from splitting.

Fitting the filler slats
Afterwards, fit wooden blockings between the trusses, as you should notice in the plans. Place the 2×4 slats between the trusses, after plumbing them with a spirit level. Work with great care and attention, if you want to build a professional greenhouse.
Drill pilot holes at both ends of the blockings and insert 3” wood screws. Countersink the head of the screws, otherwise they might tear the foil.
Back-wall-plans
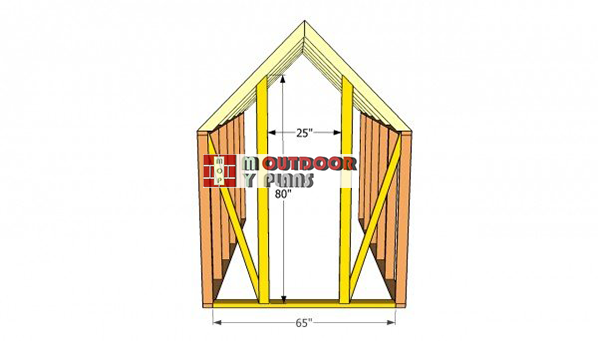
Continue the diy project by installing the back end of the greenhouse. In order to provide extra-support to the construction, you should fit several 2×4 studs and to lock them into place tightly.
In addition, install two braces, as in the image in order to secure the frames together properly. Cut the ends of the braces at 17º and lock them into place with 3” screws. Drill pilot holes in the components, to prevent the wood from splitting.

Front face plans
Build the front face of the greenhouse in the same manner as the back end and secure it into place with 3” screws. In addition, install the header of the door, using our free plans. Use a spirit level to plumb the studs, before fitting them into place and locking them with screws.
If you want to leave a wider door opening, you should place the studs accordingly. Remember that the wider the opening, the shorter the door.

Greenhouse door plans
Build a simple door for the small greenhouse, as to save time and money. Therefore, use 2×4 slats to build the frame of the door, locking them together with 3” screws, after drilling pilot holes. As you can notice in the door has to be 1/2” narrower than the opening, otherwise it won’t open properly.
Top Tip: Fit the door into place and attach the three hinges. In addition, install a latch to get the job done like a pro.

Small greenhouse plans
Last but not least, you have to rake care of the finishing touches. Therefore, you have to check if everything is aligned and secured properly into place. Afterwards, make sure all the screws are countersunk, otherwise they might tear the polyethylene foil.
Top Tip: Stretch the foil over the frame and secure it into place with 1×2 slats and 2” screws. Apply several coats of stain, to protect the wood from rot.
This article was about small greenhouse plans. If you want to see more plans for your garden, we recommend you to check out the rest of our step by step projects.
EXPLORE MORE IDEAS FOR:
 |
 |
 |
 |
2 comments
Any chance you have plans for a 6×12 walk-in chicken run…..about 6.5′ tall with a flat roof? Figured it was worth asking…..I am currently using your duck house plans and will send a pic when its done.
No, sorry