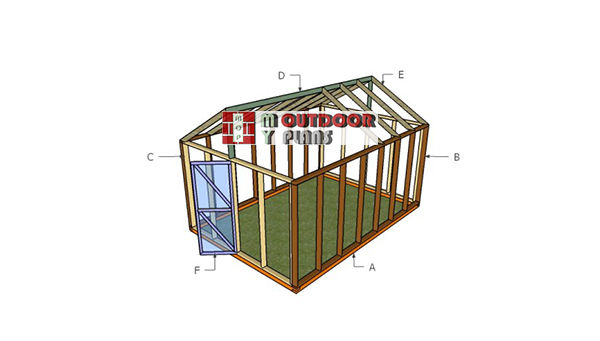
This step by step diy woodworking project is about diy greenhouse plans. The project features instructions for building a free-standing 10×14 greenhouse. This small greenhouse made from pressure-treated lumber is ideal for any backyard, if you want to grow your own vegetables. Make sure you take a look over the rest of plans to see alternatives and more projects for your garden.
When buying the lumber, you should select the planks with great care, making sure they are straight and without any visible flaws (cracks, knots, twists, decay). Investing in cedar or other weather resistant lumber is a good idea, as it will pay off on the long run. Use a spirit level to plumb and align the components, before inserting the galvanized screws, otherwise the project won’t have a symmetrical look. If you have all the materials and tools required for the project, you could get the job done in about a day. See all my Premium Plans HERE.
Projects made from these plans
DIY Greenhouse Plans
Building-a-greenhouse
Cut & Shopping Lists
- A – 2 pieces of 4×4 lumber – 120″ long, 2 pieces – 168″ long BASE
- B – 2 pieces of 2×4 lumber – 168″ long, 8 pieces – 72″ long 2xSIDE WALL
- C – 2 pieces of 2×4 lumber – 113″ long, 5 pieces – 72″ long 2xFRONT WALL
- D – 2 pieces of 2×4 lumber – 30 3/4″ long, 1 piece – 168″ long RIDGE
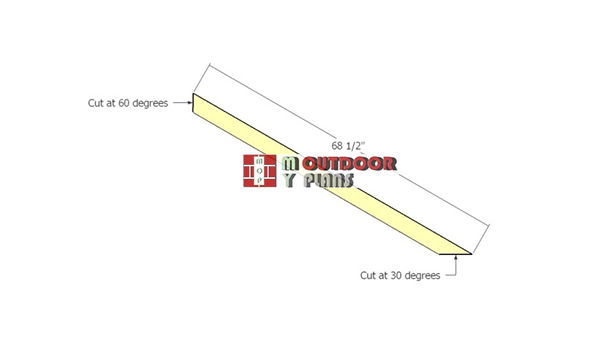
- E – 16 pieces of 2×4 lumber – 68 1/2″ long RAFTERS
- F – 2 pieces of 2×2 lumber – 69″ long, 2 pieces – 26 1/2″ long, 1 piece – 23 1/4″ long, 2 pieces – 41″ long DOOR
- 2 pieces of 4×4 lumber – 14′
- 2 pieces of 4×4 lumber – 10′
- 44 pieces of 2×4 lumber – 6′
- 5 pieces of 2×4 lumber – 14′
- 4 pieces of 2×4 lumber – 10′
- 5 pieces of 2×2 lumber – 6′
- 1 1/4″ screws
- 1 5/8″ screws
- 2 1/2″ screws
- filler, stain
- glue
- film
Tools
![]() Hammer, Tape measure, Framing square, Level
Hammer, Tape measure, Framing square, Level
![]() Miter saw, Drill machinery, Screwdriver, Sander
Miter saw, Drill machinery, Screwdriver, Sander
Time
![]() One day
One day
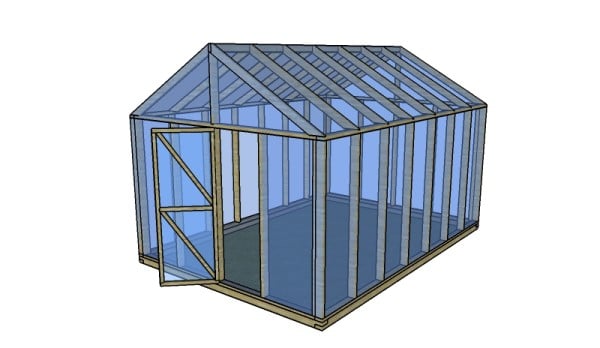
Building a free-standing wooden greenhouse
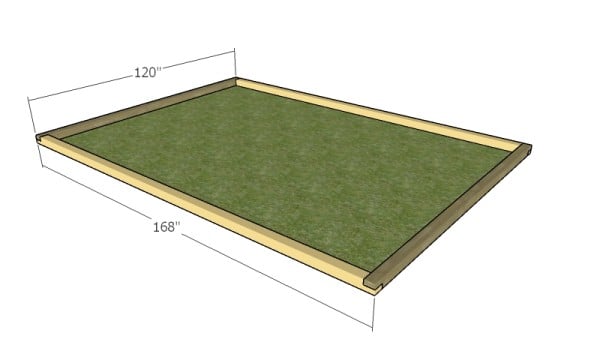
Building the base
The first step of the project is to build the base for the greenhouse. Use 4×4 lumber for the components. Select the right location for your greenhouse, making sure it gets at least 8 hours of light every day.
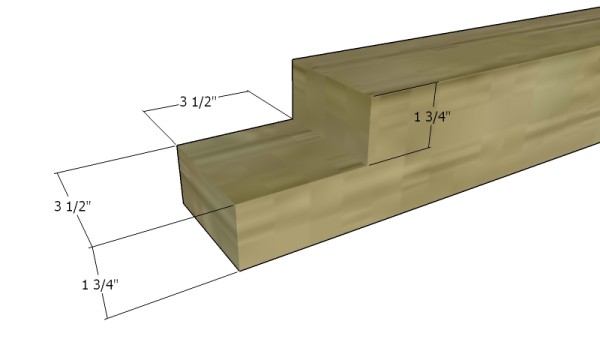
Cutting the ends of the base beams
Make notches to the ends of the beams, as shown in the diagram. Make parallel cuts and remove the excess material with a chisel. Drill pilot holes and lock the beams together using 3 1/2″ screws.
Make sure the corners are right-angled using a carpentry square. Measure the diagonals and make adjustments until they are square.
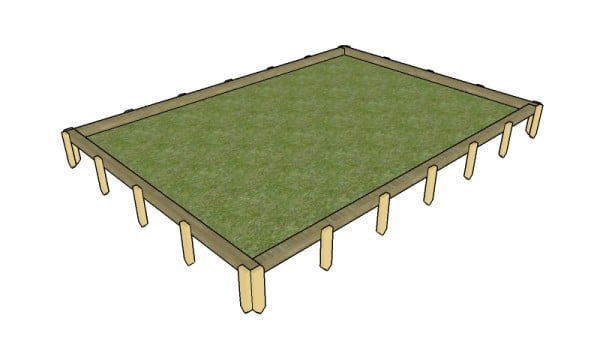
Installing the stakes
Remove the vegetation layer and make sure the surface is perfectly level. Use 2×4 stakes to anchor the base to the ground, as shown in the plans. Use 2 1/2″ screws to secure the stakes to the base.
Building-the-side-walls
Build the side walls from 2×4 lumber. Drill pilot holes through the plates and insert 2 1/2″ screws into the studs. Place the studs equally-spaced and make sure the corners are square.
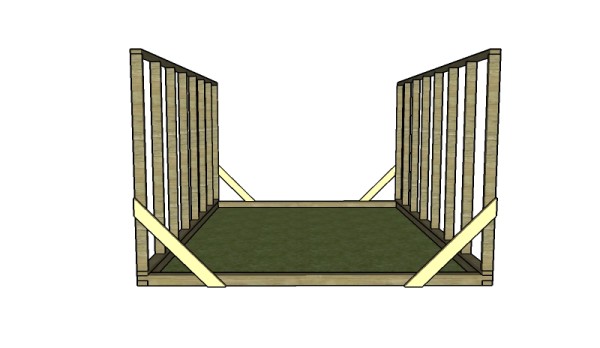
Fitting the side walls
Fit the side walls to the base of the greenhouse. Plumb the walls with a spirit level and secure them to the base by inserting 2 1/2″ screws through the bottom plates. Use 2×4 braces to lock the side walls temporarily.
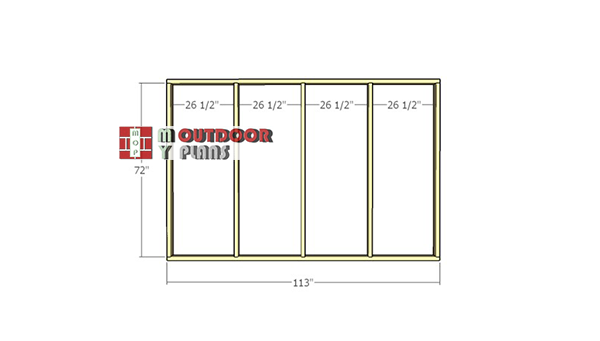
Building-the-front-wall-frame
Build the front and the back walls from 2×4 lumber. Drill pilot holes through the plates and insert 2 1/2″ screws into the studs. Check if the corners are square and leave no gaps between the components.
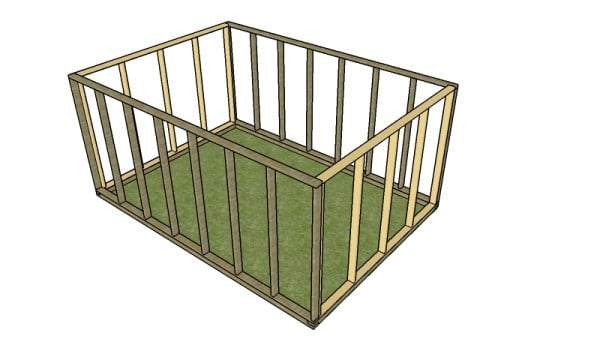
Assembling the frame of the greenhouse
Fit the front and back walls to the frame of the greenhouse, as shown in the diagram. Use 2 1/2″ screws to secure the walls to the base. In addition, lock the adjacent walls together by using 2 1/2″ screws. Make sure the corners are right angled before inserting the screws.
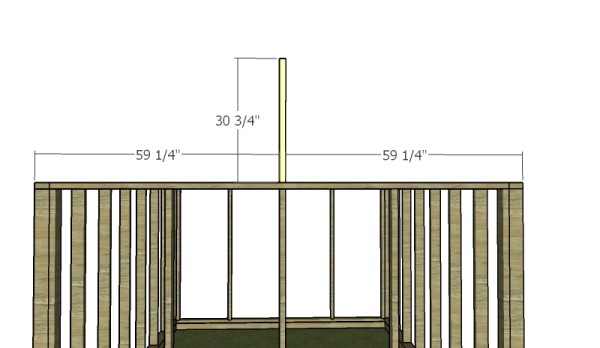
Fitting the supports for the top ridge
Fit the 2×4 supports for the top ridge. Plumb the supports with a spirit level. Toe-nail the supports to the top plate with 2 1/2″ screws.
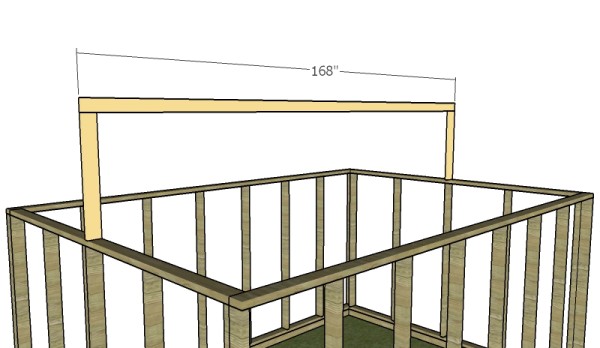
Fit the top ridge
Fit the top ridge to the supports, as shown in the diagram. Make sure the corners are square and align the edges with attention. Toe-nail the top ridge to the supports with 2 1/2″ screws.
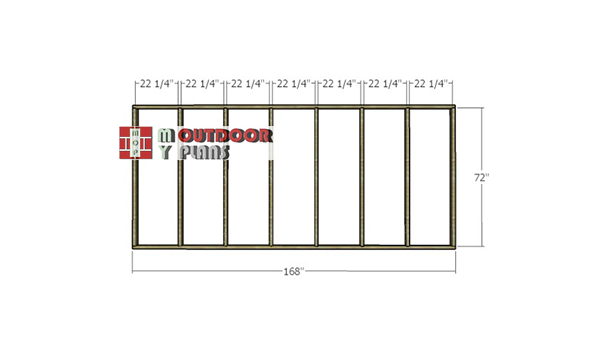
Rafters-for-gable-greenhouse
Build the rafters from 2×4 lumber. Make the cuts at both ends of the rafters, as shown in the plans.
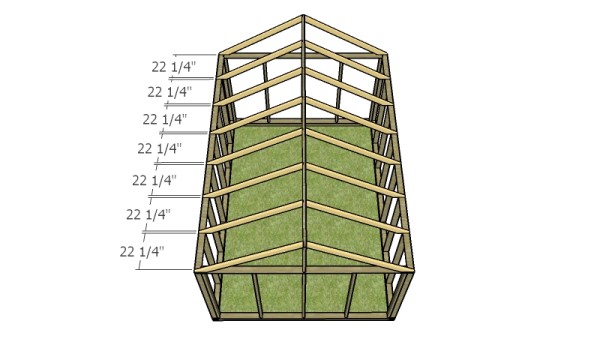
Fitting the rafters
Fit the rafters to the top of the greenhouse. Place the rafters equally-spaced, leaving 22 1/4″ between the them. Use 2 1/2″ screws to secure the rafters to the top plates and to the top ridge.
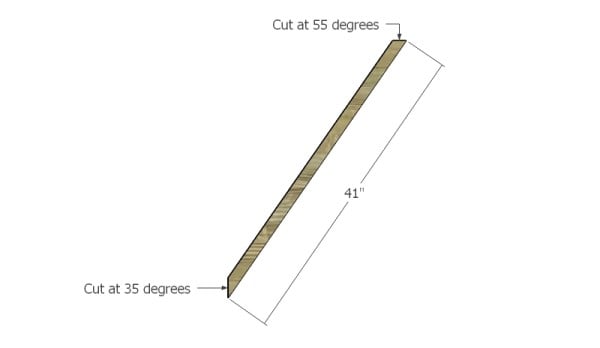
Building the braces
Build the diagonal braces for the door of the greenhouse. Make cuts at both ends of the 2×2 slats, as shown in the diagram.
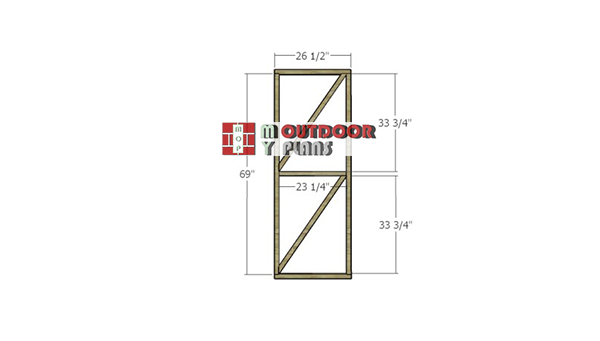
Building-the-greenhouse-door
Assemble the frame of the door using the information from the diagram. Drill pilot holes through the top and bottom components and insert 2 1/2″ screws into the vertical studs. Fit the middle components with 2 1/2″ screws. In addition, secure the diagonal braces with 2 1/2″ screws.
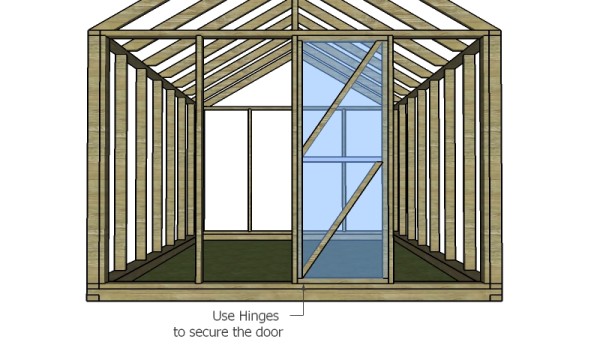
Fit the door
Fit the door to the opening, as shown in the diagram. Use several hinges to secure the door to the frame of the greenhouse. In addition, use a latch to lock the door into place.
DIY Greenhouse Plans
Last but not least, you should take care of the finishing touches, as to be able to continue the process with the rest of the steps. Use translucent polyethylene film or polycarbonate sheets to cover the greenhouse.
Top Tip: Check out the rest of the garden projects for more inspiration for your backyard.
This woodworking project was about diy greenhouse plans. If you want to see more outdoor plans, check out the rest of our step by step projects and follow the instructions to obtain a professional result.
EXPLORE MORE IDEAS FOR:
 |
 |
 |
 |
2 comments
Question: How does one download these plans
Answer: read the faqs: https://myoutdoorplans.com/faq/