This free woodworking project is about outdoor table plans. Building a table doesn’t have to be a complex or an expensive job, if you choose the plans and the design of the table with good judgement. In addition, you have to buy quality lumber, designed for outdoor use, such as redwood, cedar, pine or pressure treated, if you want to make a durable table with a pleasant appearance. Apart for these considerations, you should also take into account that you need to use common household tools: a drill machinery with drill bits, a miter saw, a router and basic carpentry tools.
You could make the joints in several ways, according to your needs and available tools. On one hand, a professional way to make the joints would be to drill pocket holes with a special jig and to insert the appropriate screws. In this manner, the wood joint would be rigid and you don’t need to conceal them by filling the hole with wood putty. On the other hand, a straight-forward technique would be to drill holes trough the components, to countersink the holes and to insert the screws. This techniques requires to fill the holes with putty and to smooth the surface with sandpaper, in order to obtain a comparable result with the pocket-hole method.
Projects made from these plans
Cut & Shopping lists
- A – 4 pieces of 4×4 lumber 30” long WOODEN LEGS
- B – 2 pieces of 2×6 lumber 26 1/2” long CROSSPIECES
- C – 8 pieces of 4 1/2” wood screws WOOD SCREWS
- D – 1 pieces of 2×4 lumber 45” long STRETCHER
- E – 2 pieces of 2×4 lumber 50” long SIDE APRONS
- F – 50 pieces of 3” galvanized wood screws SCREWS
- G– 2 pieces of 2×4 lumber 41 1/2 TOP APRONS
- H – 7 pieces of 2×4 lumber 61” long SLATS
- I – 2 pieces of 2×2 lumber 64” long, 2 pieces of 2×2 lumber 44 1/2” long TRIMS
Tools
![]() Hammer, Tape measure, Framing square, Level
Hammer, Tape measure, Framing square, Level
![]() Miter saw, Drill machinery, Screwdriver, Sander
Miter saw, Drill machinery, Screwdriver, Sander
Time
![]() One day
One day
Outdoor Dining Table Plans Free
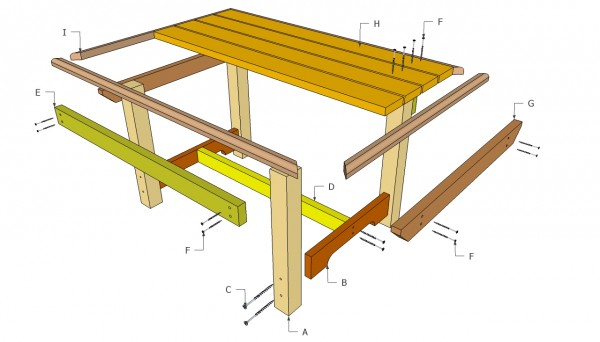
Outdoor table plans free
Building an outdoor table is a fun project and a perfect opportunity to learn new carpentry skills or to impress your family or friends. In addition, if you choose the right plans for your needs and buy quality materials, you could save a significant amount of money by getting the job done by yourself. The wooden components should fit perfectly one with another, the legs should be plumb and the top of the table has to be level.
Top Tip: As compared to other woodworking projects, building a dinning table is pretty much a straight-forward job, but you still have to pay attention to details and work with good judgement. Use a router to round the edges of the 2×2 trims, otherwise you might easily injure yourself.
Outdoor Table Plans
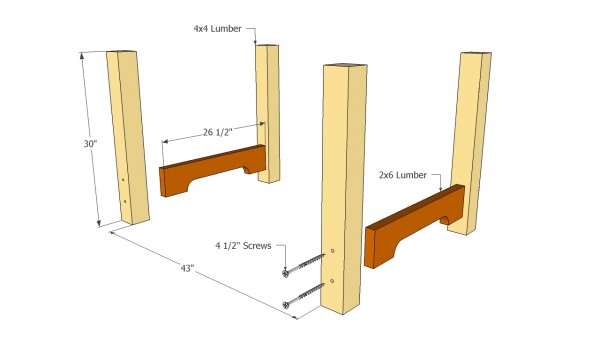
Outdoor table legs plans
First of all, you have to build the legs of the outdoor table from 4×4 lumber. In order to obtain accurate cuts, we recommend you to use a miter saw with a sharp blade. In addition, build the crosspieces from 2×6 lumber and use a jigsaw to give them an exquisite appearance (optional).
Top Tip: Smooth the cut edges with a sand block and drill pilot holes before inserting the screws, to prevent the wood from splitting.
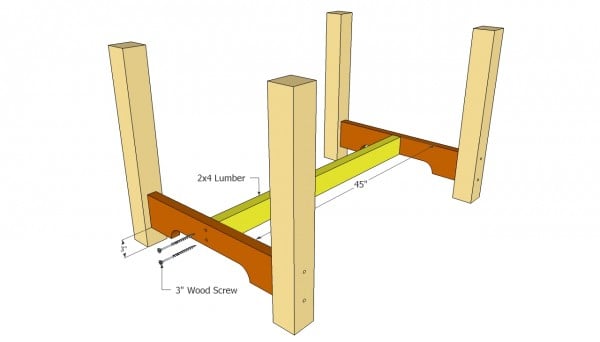
Installing the table stretcher
Next, you have to joint the two sides of the table (the front and the back components), by installing the stretcher. Therefore, use 2×4 lumber and adjust it size according to your needs (in our case 45”).
There are many ways in which you can set the stretcher into place, such as using a pocket hole jig or drilling pilot holes and inserting the screws trough the crosspieces. Irrespective of the choice, countersink the head of the screws, for as neat appearance.
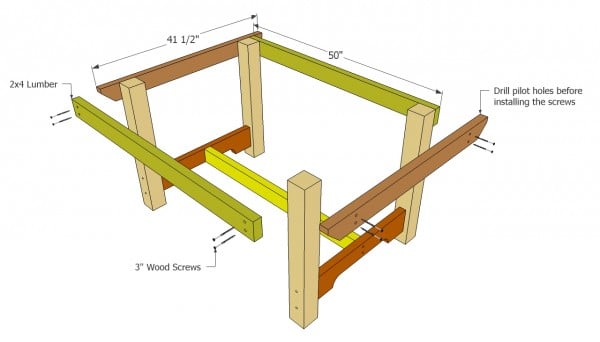
Table aprons plans
Continue the woodworking project by installing the wooden aprons to the legs of the outdoor table as in the free plans. Pre-drill holes, otherwise the wood might split. This step is utterly important, therefore ask someone to hold the components into place while inserting the 3” screws.
Plumb the legs before attaching the aprons and check the corners for squareness. Ensure the top of the table describes a level surface.
Attaching the top of the table
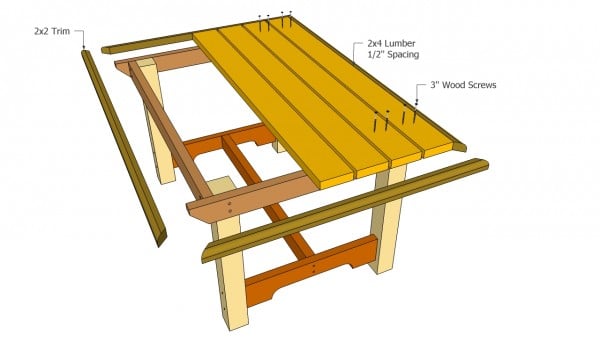
Once the frame of the table is ready, install the 2×6 slats into place and secure them with 3” screws. Make sure the slats are equally spaced and aligned at both ends, by placing a nail or a wood piece between them. Next, attach the trims to the edges of the table, by using finishing nails.
Top Tip: Don’t forget to countersink the head of the screws, otherwise it would be impossible to conceal them, by filling the holes with wood putty.
Outdoor table plans
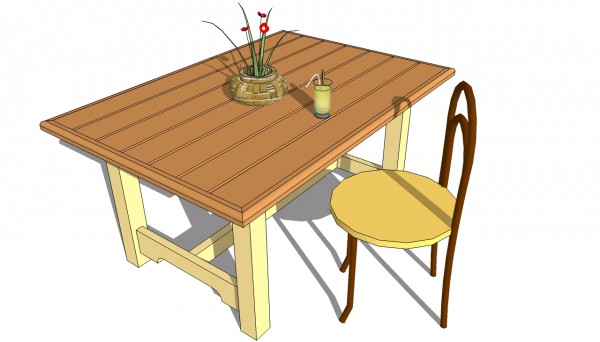
Last but not least, apply wood filler in the screw holes and leave it for several hours to harden (read the manufacturer’s instructions). Next, smooth the wooden surface with average-grit sandpaper and remove the residues with a dry cloth.
Top Tip: Apply several coats of paint or varnish, to protect the table from wood decay or water damage. Use a respiratory mask while applying the varnish in a well-ventilated area.
This woodworking project is about free outdoor table plans. If you want to see more outdoor plans, check out the rest of our step by step projects and follow the instructions to obtain a professional result.
EXPLORE MORE IDEAS FOR:
 |
 |
 |
 |

1 comment
got any more patterns